If you’re a product maker, you’re more than likely familiar with Product Hunt. The community-based platform is the go-to place for makers looking to share their creations with a community of like-minded people. In fact, our own no-code web app platform Bubble got a big boost after we launched on Product Hunt back in 2015. Product Hunt has also featured this very How to Build series to its audience of creators and builders.
Now, imitation is truly the sincerest form of flattery. In this post, we will walk through the process of building your own version of Product Hunt using Bubble, without writing a single line code.
Whether you’re looking to build a dedicated community platform, or you’re just interested in utilizing some of the core features from Product Hunt, this guide will share how to start building the underlying logic for your MVP.
The steps to build Product Hunt with no code include:
Get Started
Before you start, you’ll need to first register your free Bubble account. Then you can follow along as we build our product together.
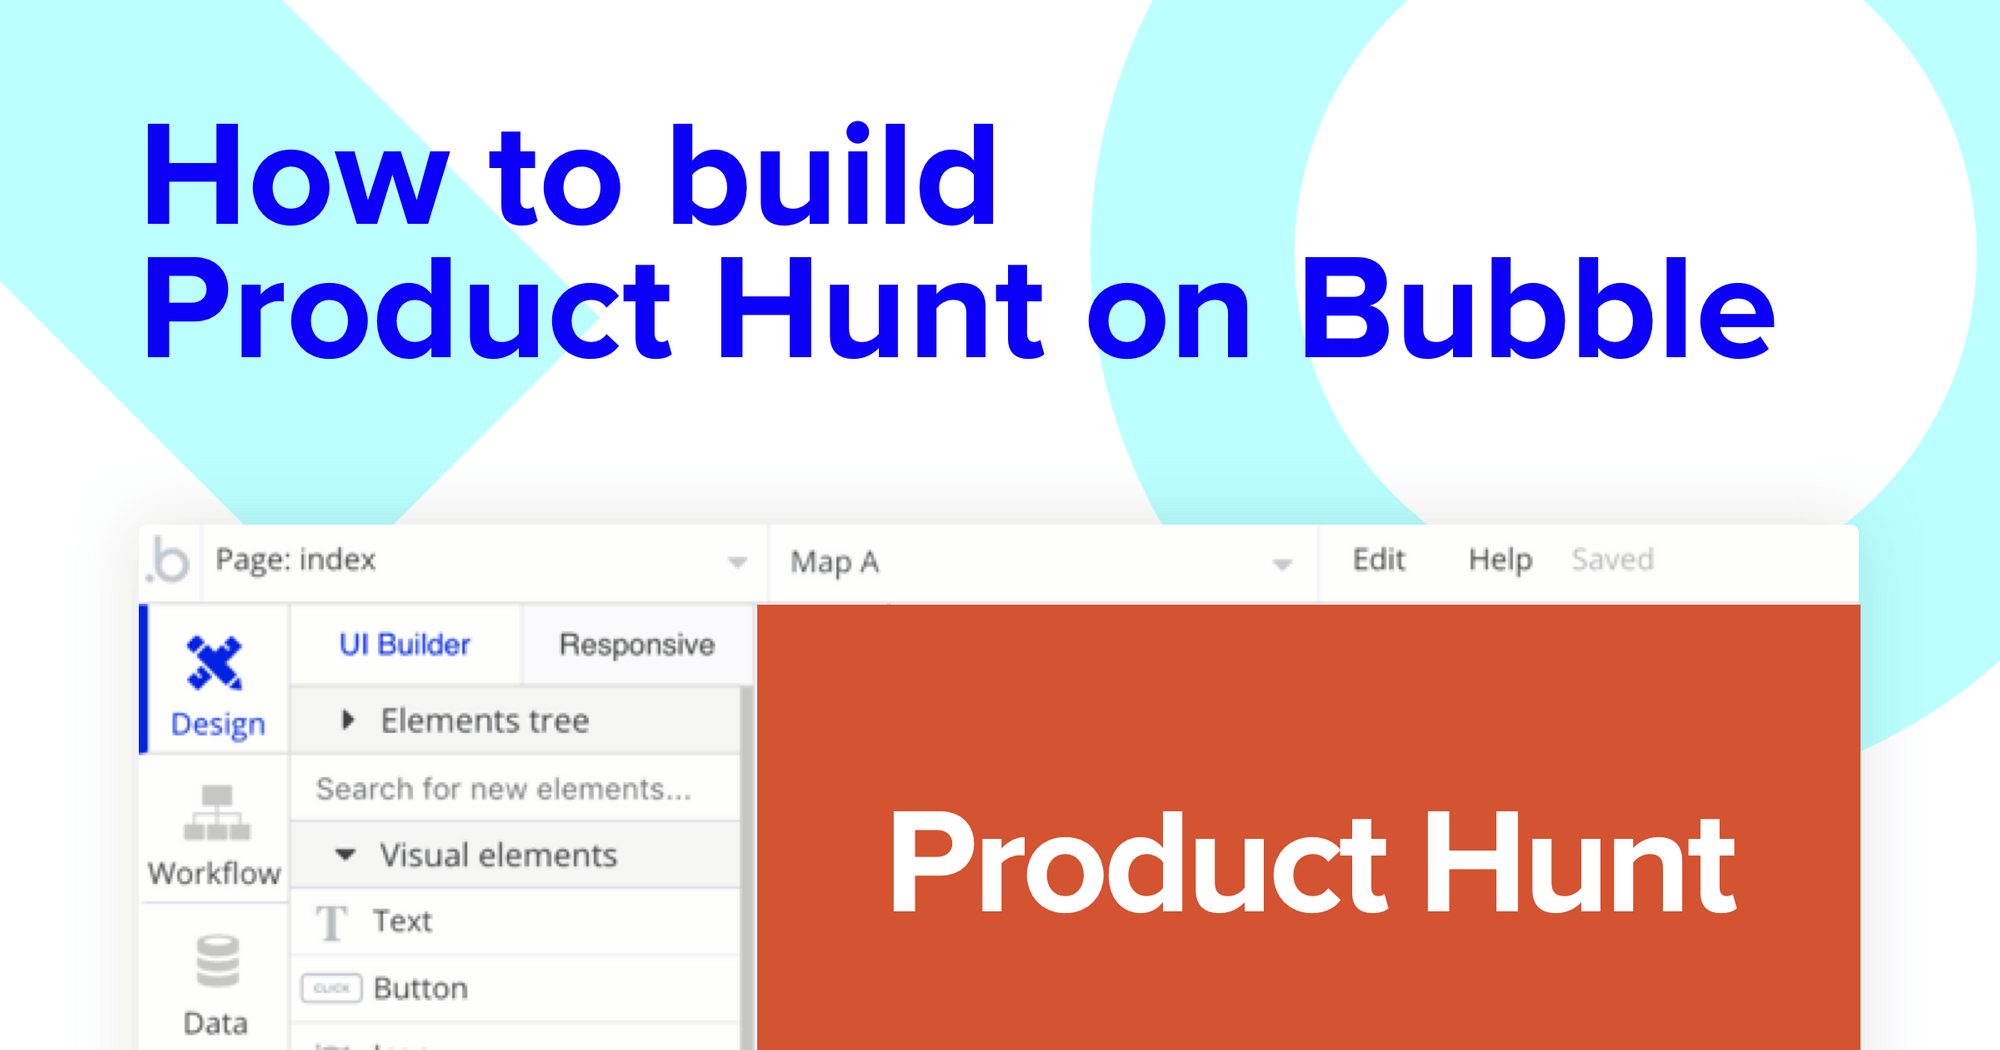
Register your account on Bubble
We also recommend completing our introductory lessons, which will guide you through the step-by-step process of the most common Bubble features. This will help you get a running start when building your Product Hunt clone.
It’ll also be beneficial if you understand how to create and edit user accounts, which we cover in our other How To Build Guides.
When kickstarting your project, you can choose to begin by wireframing your product design, or building the necessary fields within your database.
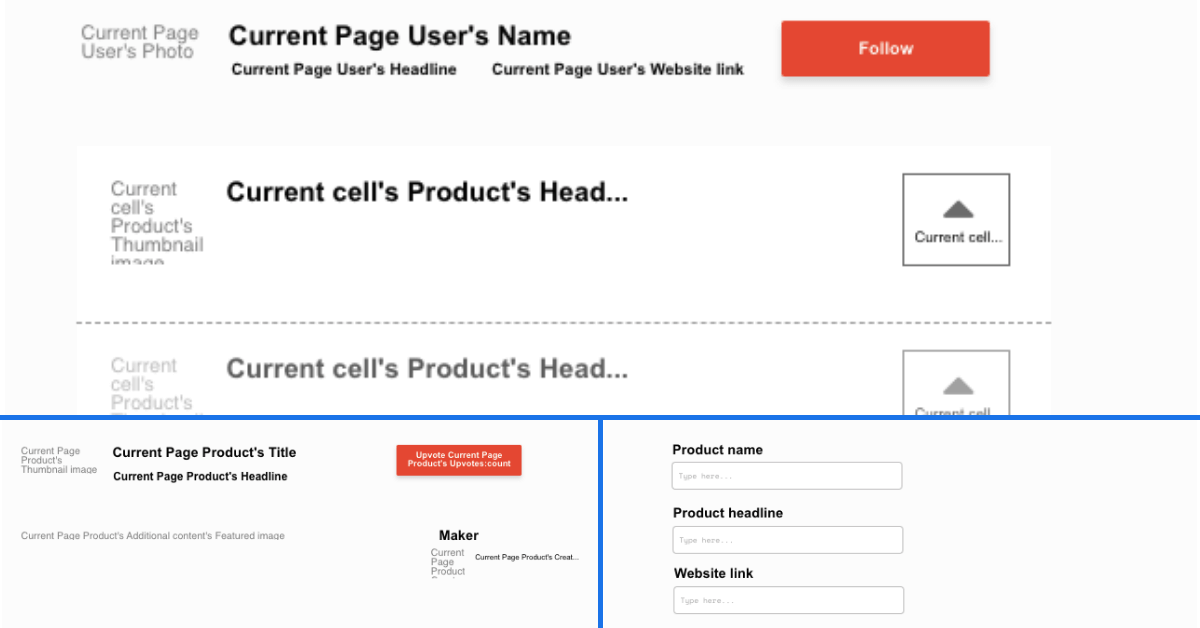
In this case, we’ll start by using Bubble’s visual design tool to shape the user-interface of our platform. If you’re replicating a version of Product Hunt, some of the core pages you’ll want to include are:
- Upload page - A portal where users can post their products
- Home page - Displaying a list of all the products that have launched
- Product page - A page to host each individual product
- User profile - A page to host each users profile
A major feature within Bubble is the ability to send data between pages. This allows you to create one generic version of a page, then dynamically display the relevant content from your database when it’s required.
In the case of your Product Hunt clone, you’ll only need to create one page to host your individual products. We can then write the necessary logic to display only the relevant product on each page when it’s needed (we’ll cover this in more detail soon).
Configuring your database
Once you’ve mapped out the display of your product, you can focus on creating the necessary data fields to power your application. We’ll rely on these fields to connect the workflows behind your product.
Bubble’s pre-built database makes it easy to create different data types with unique fields. When creating a database, we recommend splitting larger items into separate data types to enhance the speed of your application.
For example, we’ll create two separate data types for each new product. One data type will include the basic details of a product (including the name, maker, and headline), while the other data type will include larger content files like the full product description and featured image.
By creating these as separate data fields, it allows us to only load the necessary information when it’s needed, reducing how much content the Bubble editor will need to render.
When building Product Hunt as an MVP, we’ll need to create the following data types & fields:
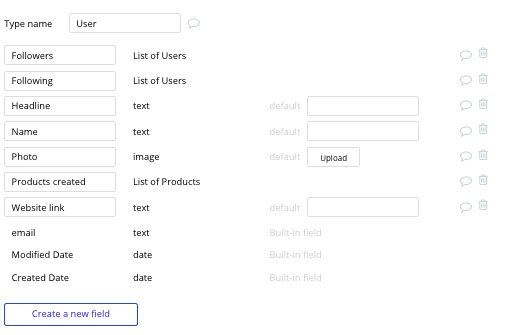
Data type: User
Fields:
- Headline
- Name
- Photo
- Products created - List of products. Note: Creating a field as a list based on a separate data type allows you to seamlessly integrate all of its relevant data fields without having to create additional fields
- Website link
- Followers - List of users
- Following - List of users
Data type: Product
Fields:
- Title
- Headline
- Website link
- Upvotes - List of users
- Thumbnail image
- Additional content - Product content

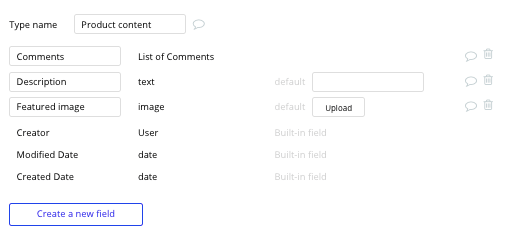
Data type: Product content
Fields:
- Description
- Featured image
- Comments - List of comments
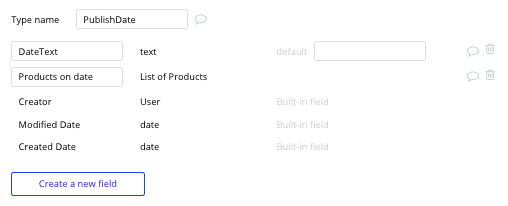
Data type: Publish date
Fields:
- Date (formatted as text)
- Products launched on date - List of products
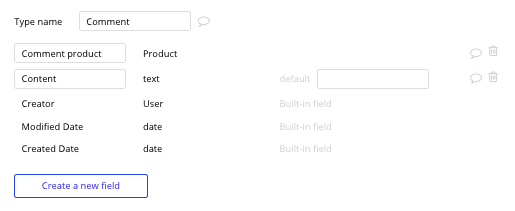
Data type: Comment
Fields:
- Content
- Comment product - Product
Building workflows
Now that you’ve structured both the design and database of your application, it’s time to start stitching everything together and making your app functional.
In Bubble, the main way to do this is with workflows. Each workflow happens when an event occurs (e.g. a user clicks on a button), and then runs a series of “actions” in response (e.g. “sign the user up”, “make a change to the database”, etc.)
Posting a new product
The first core feature we’ll build is a function for users to post their product to the community of makers.
On the submit page of our application, you can start creating this process by using a combination of input fields, including; free-text fields, multiline inputs, and image uploaders.
Once a user has added the relevant details within each input, they’ll click the post button to create a new entry in your database. This button click will be the necessary action to trigger your workflow.
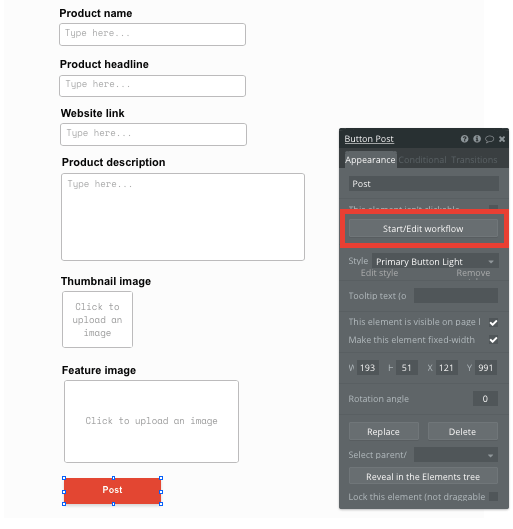
Using the workflow editor, you can select to create a new thing within your database. In this instance, we’ll be creating a new product.
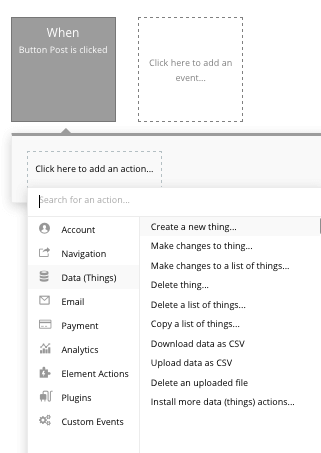
We’ll then need to start adding the relevant fields within our database. Map each input field you’d like to create against its corresponding data field.
We’ll first start by creating the product content type, then we’ll link this to the product itself.

Next, we’ll add an additional step to this workflow, creating another thing - only this time we’ll create the product itself.
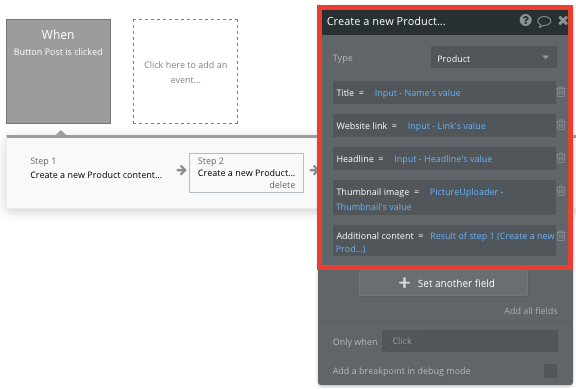
By linking the initial product content we created with this product, it’s possible to seamlessly integrate this data across our platform.
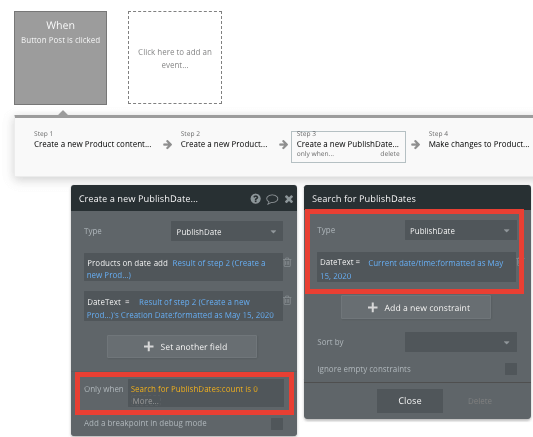
After creating a product, we’ll then need to define what date it belongs to. This will allow us to display each product alongside a list of others that share the same launch date.
As our dates are a separate data type in our application, we’ll need to add another step to our workflow that creates a new entry.
Note: When building this step, we’ll need to first add a condition that only creates a new date if the date doesn’t already exist within our database. Without this condition, it would create a new date each time a product is created. Instead, we’ll only want to create one unique date, then add any new products to this current date depending on the time.
By adding an ‘only when’ condition to this step, we’ll perform a search within our database for published dates where the date (formatted as text - May 15, 2020), equals the current date, also formatted as (May 15, 2020). If the count of this date (as text) is 0, it will create a new date.
In layman's terms - if the date already exists, it won’t create another entry within your database.
Next, we’ll need to structure the content of a new date in the event that a new entry is created.
We’ll start by adding the actual date itself - again, formatted as text (May 15, 2020).
We’ll also add the new product we’ve created into the list of this date’s products.
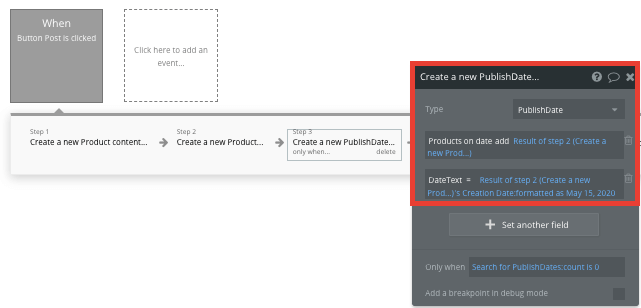
After creating the new date, we’ll need to add one more step to this workflow - updating the launch date field for our new product.
For this step, we’ll need to make changes to a thing.

When adding the date, we’ll add the current date/time, formatted as 12 May, 2020.

Displaying products in a feed by their launch date
Once users have submitted products to the platform, we’ll need to display these on our home page.
One of the key features to Product Hunt is the format in which products are aggregated into daily lists.
To build this feature, we’ll need to utilize a repeating group element. Repeating groups integrate with your database to display and update a list of dynamic content.
As we’ll be displaying both a list of dynamic dates, as well as a list of dynamic products, we’ll be using two repeating groups stacked within each other.
We’ll first need to add a repeating group that displays a list of the published dates recorded in our database.
After adding your first repeating group, start by configuring the type of content as publish date, then perform a search for all publish dates within your database.
Note: For the sake of this guide, this repeating group is formatted in red.
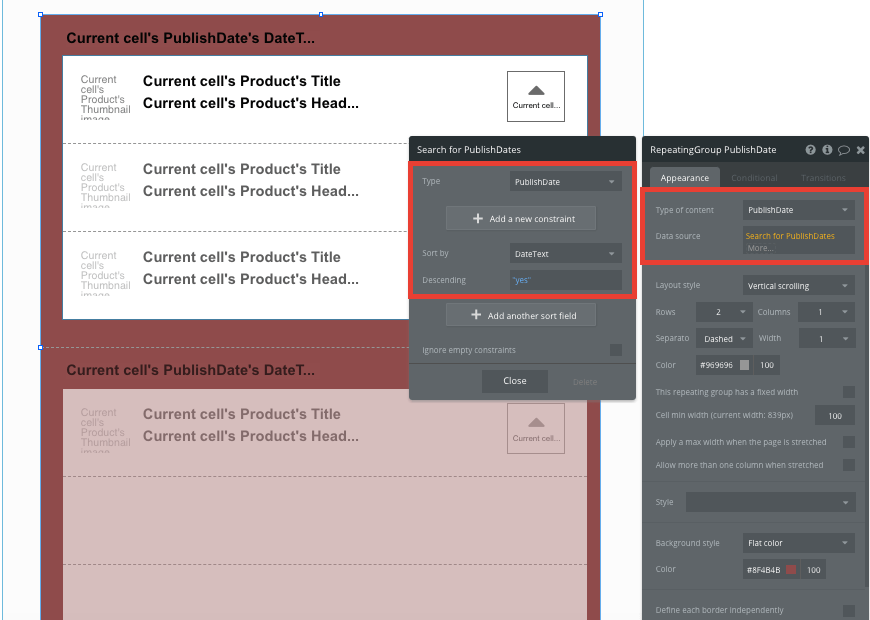
Within this repeating group, we’ll now add another - displaying the list of all the products listed under each publish date.
The type of content for this repeating group will be a product. The data source will then need to search for all the products where their product launch date is equal to our parent repeatings groups publish date.
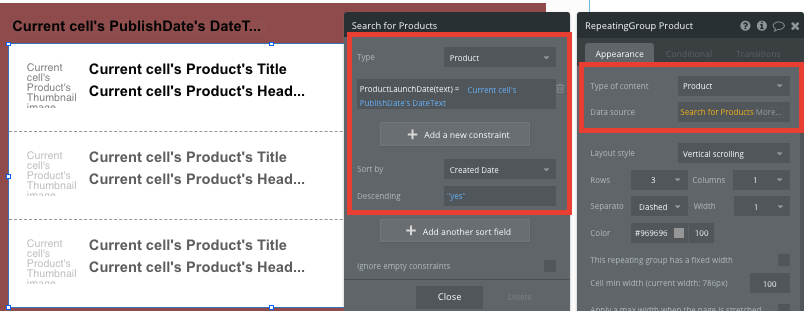
This will now segment every product into the date it was published.
Sending data between pages
Within a repeating group, it’s also possible to create events from each individual column.
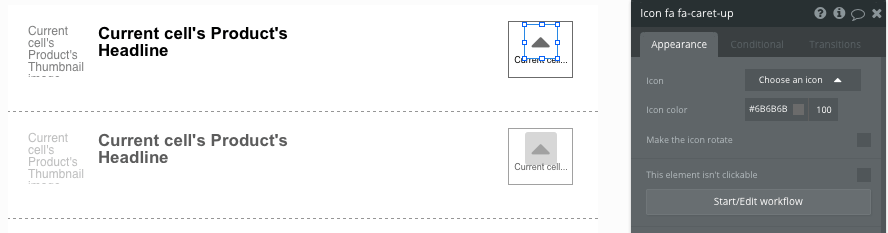
This feature will become useful when building navigation features across your platform. As each product card on our homepage only displays an overview of each product (including its name, headline, and thumbnail image), we’ll need to display the full product details for each unique item on a separate page.
This additional content will need to be hosted on your individual product page.
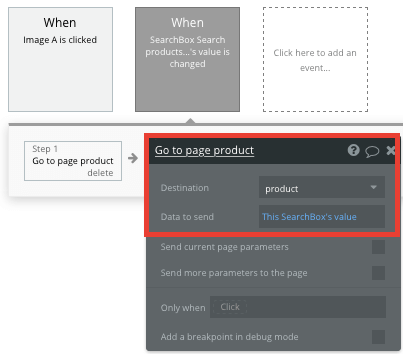
To power this event, start by creating a workflow that redirects a user to your product page when the products image is clicked.
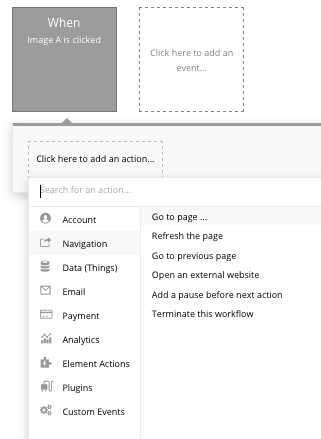
When creating this workflow, use a navigation event to send a user to another page. From here, select the destination page type to be the product page.
You’ll then need to send additional data to this page so the Bubble editor knows which specific product to display. The data you’ll need to display is that of the current cell’s product.
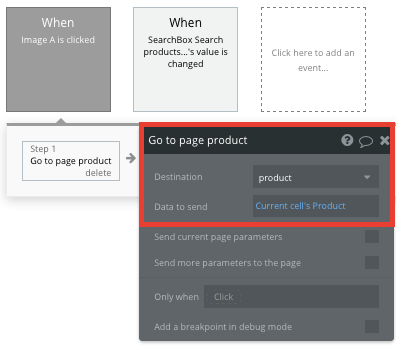
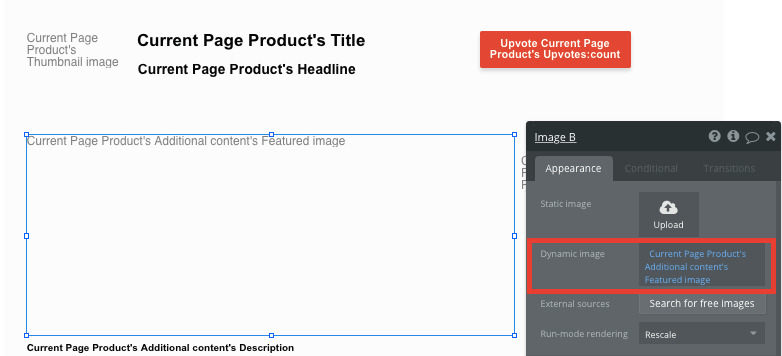
Display dynamic content on a products page
When a user is directed to a specific product page, you can easily pull this event data from your workflow and display the relevant content. We can also display the additional product content we’ve linked to this particular product.
Before we create this workflow, you’ll first need to ensure that the page type matches the data property that you’ve sent through your workflow event. In this case, you’ll need to set the product page to a product property.
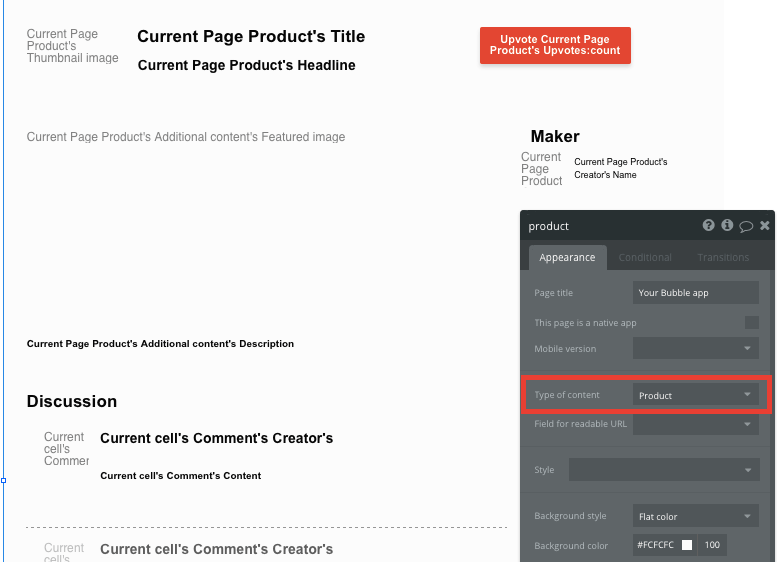
You can now start adding dynamic content into your page elements, displaying the information from the product or its additional content that’s been sent in your workflow.
Building a search function
An alternative way to discover new products can be through a search function on our home page.
Get started by adding a search bar element that integrates with a list of all the current products in your database.
By selecting the search bars content type to be a ‘product’, and your data source as a list of all products, it will index all existing entries.
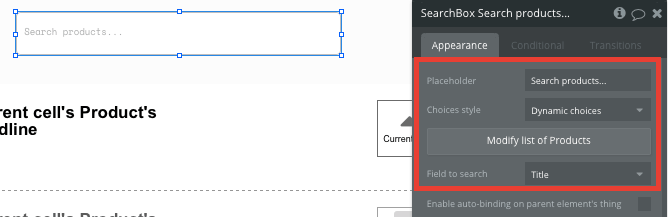
To send a user to the relevant product page, navigate to your workflow editor, then create a new event that is triggered when the value of an element is changed.
You’ll then create a navigation event, setting the destination page as a product, and sending the data source of the search box's current value.
Upvoting a product
Upvoting a product is an essential feature that drives community engagement on Product Hunt.
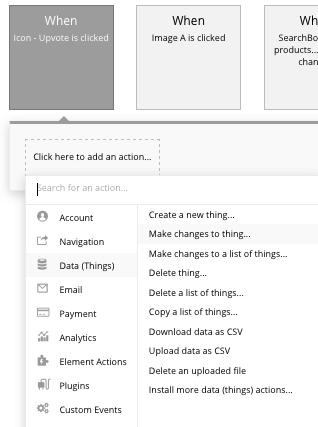
When building this feature, you can get started by utilizing our icon elements to create an upvote button.
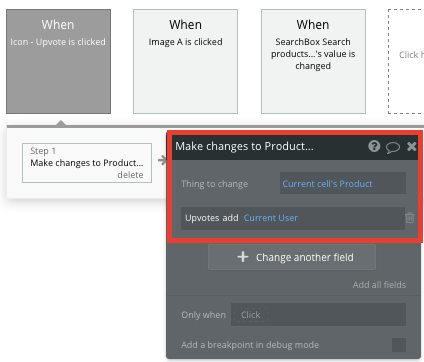
When the like icon is clicked, you’ll create a new workflow that makes changes to something.
Within our database, upvotes for each product are measured by a list of users. This allows us to add the user to this data field, increasing the total amount of all users who have contributed an upvote.
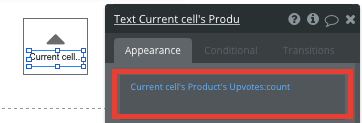
If you’d like to then display the number of upvotes a product has, you can then add a dynamic text element to display the total user count.
Commenting on a product
On our individual product page, we can add an additional repeating group and text input field, allowing users to send and display new comments.
When configuring this repeating group, start by setting the data type as comments. Next, our data source will search for all the comments where the comment product is the current pages product.
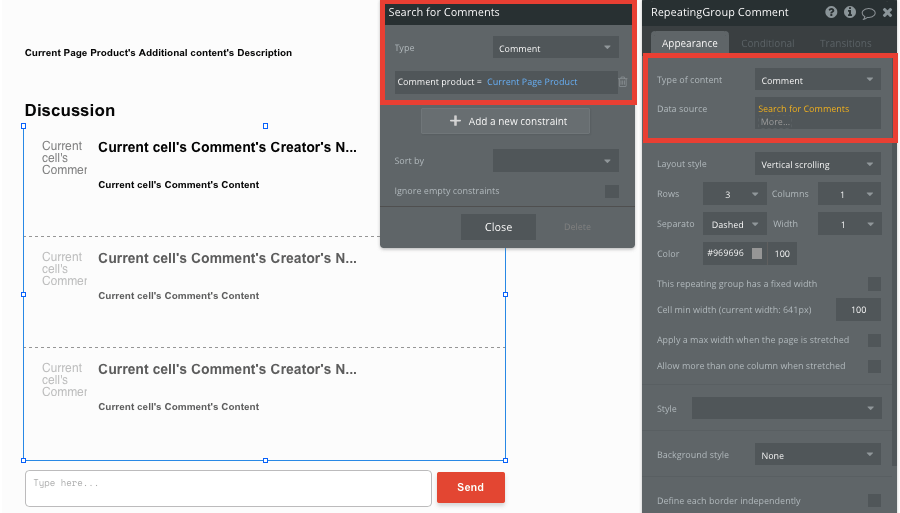
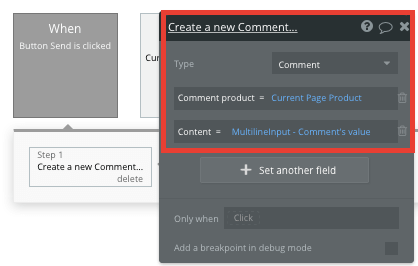
When creating a new comment, we’ll use a simple text input field and a button. When the send button is clicked, this will trigger a new workflow - creating a new thing.
The thing we’ll want to create is a new comment. Once again, you’ll also need to match the on-page element with the necessary comment data field.
Whenever a new comment is created, the repeating group on this page will automatically update with the new content.
Displaying user profiles
Displaying individual profile pages is an essential feature for any community-based platform. Across Product Hunt, user profiles allow you to learn more about individual makers. You can even see a list of the products each maker has previously upvoted.
By creating a separate user profile page, we can start dynamically displaying the necessary data for each user within the community.
Start by configuring this page type to be a user.
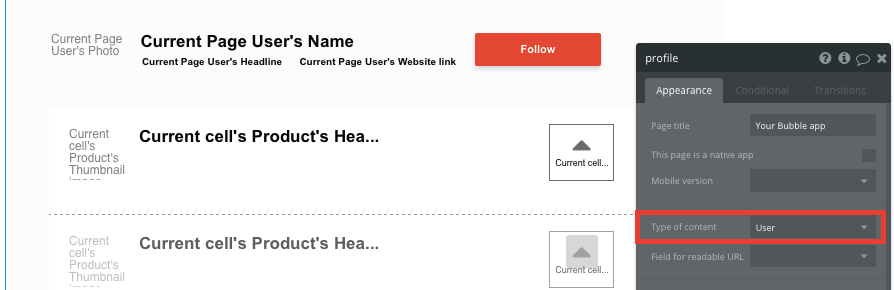
Next, add the dynamic elements to the page that you’d like to display for each user.

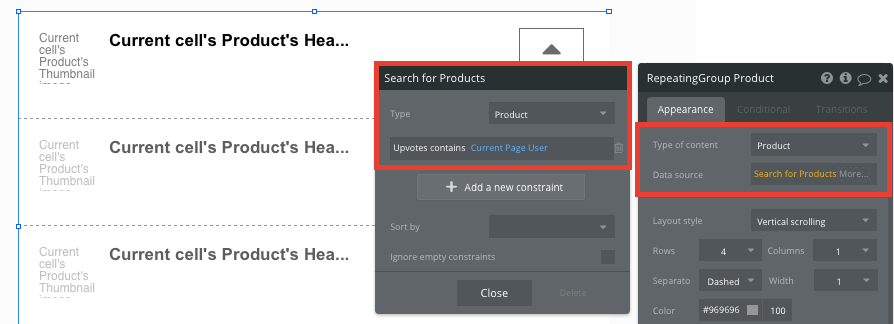
Finally, we’ll add a repeating group to this page, allowing us to showcase a list of the products a user has upvoted.
To save time, you can copy the repeating group element from your home page and simply update the data source.
The data source of this repeating group will need to search for all products where the upvotes contain the current page users.
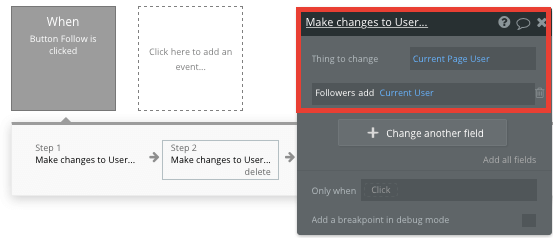
Following a user
The final core feature we’ll create for our MVP is the ability to follow another user on the platform.
On the user profile page, we’ll add a follow button. When this button is clicked, we’ll create a new workflow that makes changes to a thing.

The thing we’ll want to change is the current user, adding the current page user to their list of following users.
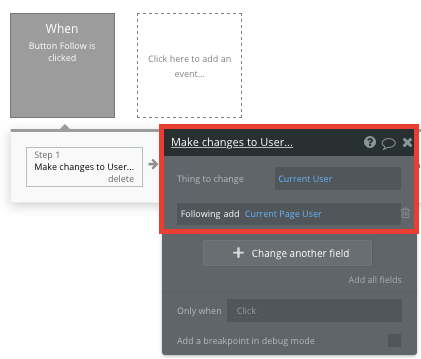
Next, we’ll also need to update the current page users list of followers by adding the current user.
Additional features
Now that you’re familiar with creating custom data fields and displaying dynamic content, you can start getting creative with the experiences you build within your product. Additional you can:
- Add support for product collections
- Add multiple makers to a product
- Create notifications when products are launched
Launch
Hiring a developer or dev team to build this application would cost thousands, if not tens-of-thousands of dollars. As you launch and grow in users, our paid plans allow you to host the product on your own custom domain, starting from as low as $25 per month. Some templates and plugins may cost more, but you can build all the functionality of Product Hunt without any additional costs.
Templates
If you don’t want to build your Product Hunt clone from scratch, you can purchase one of the templates made by our community members. Some similar templates include:
- UpHunt like Product Hunt by Rapid Dev
- Uplisty by Rapid Dev
- Community Like Product Hunt by Nalfe
Start Building
Bubble can help you build a Product Hunt clone or any other product you choose! It’s never been easier to build something incredible without having to code.
Ready to join the no-code movement? Register your free account here and get started today.
If you’d like additional help when building your product, our thriving community forum is a great place to source actionable advice and resources. It’s not only a great place to search through our existing Bubble examples, but any maker is encouraged to ask questions to help them on their journey.