Discord is an industry-leading chat application that’s all about helping community join together via open dialogue, whether that be through its instant messaging, live streaming, or video chat capabilities. (With hundreds of millions of monthly users, Discord is anything but a redux of AIM or Skype.) While you might not react with much surprise to learn it’s a platform used mostly by gamers, don’t worry — you can video chat with people all over the world regardless of whether you’ve ever adventured in Minecraft. Meeting new people on your iOS or Android device so you can start building friendships on Discord is as easy as “add friend.”
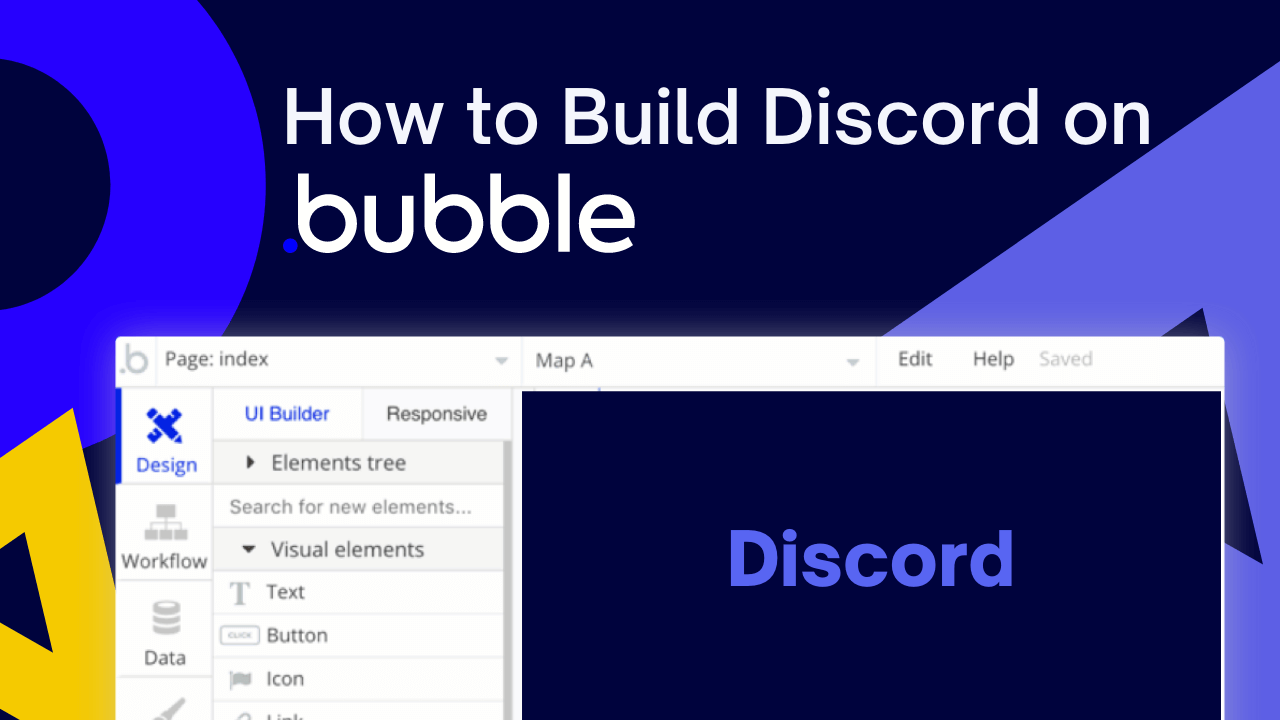
Learn how to build a community chat app with Bubble's visual web editor. In this post, we’ll walk you through the step-by-step process of building a Discord clone with Bubble. Whether you’re looking to build a chat app or you’re just interested in utilizing some of Discord’s core features, this guide will show you how to start building the underlying workflows for the Discord clone you want to create regardless of your web development experience.
The steps to building a Discord clone with no-code include:
Get Started
Ready to build your Discord clone with this tutorial? Before you start, you’ll need to first create a free Bubble account. Click the button below to get started, then you can follow along as we build our product together.
If you’re new to Bubble, follow along on our introductory videos to get familiar with the basics. This will help you get a running start when building a Discord clone with all the functionality of the original.
When kickstarting your project, you can choose to begin by wireframing your product design, or building the necessary fields within your database. In this case, we’ll start by using Bubble’s visual design tool to shape the user interface of our platform.
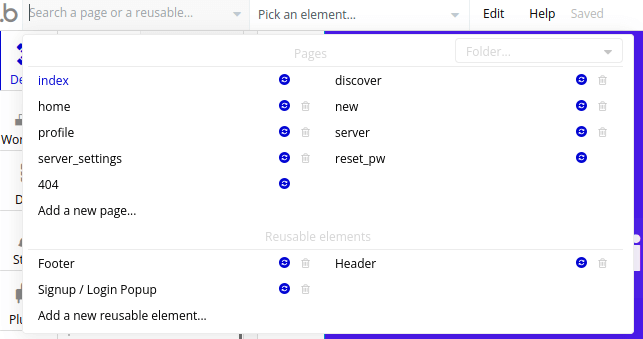
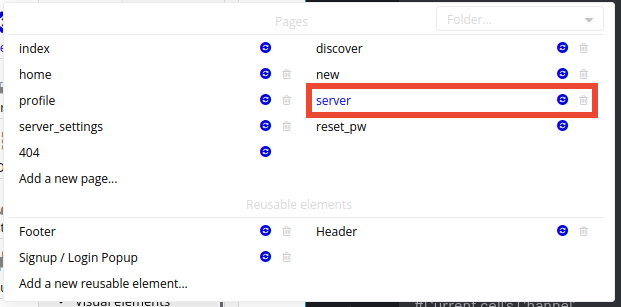
If you’re replicating a version of Discord, you’ll need to build the following pages:
- A home page (“home”) – the first page the user will see after logging in, with a friends list and a friend chat window.
- A profile settings page (“profile”) – to update the user’s profile information.
- A server page (“server”) – to display channels, navigate between each of them, with a chat window to type.
- A server settings page (“server_settings”) – to update the information of servers you own.
- A new server page (“new”) – to create a brand new server.
- A discover page (“discover”) – to explore and join public servers.
Once you create these pages, your page dropdown should look like this:
A major feature within Bubble is the ability to send data between pages. This allows you to create one generic version of a page, then dynamically display the relevant content from your database when it’s required.
In the case of your Discord clone, you’ll only need to create one page for each activity. Then we’ll add unique conditions to display only the relevant content for each of them when it’s needed (we’ll cover this in more detail soon).
Configure your database
Once you’ve wireframed these pages, you can focus on creating the necessary data types and fields to power your application. We’ll rely on these data types to connect the workflows behind your product.
Bubble’s pre-built database makes it easy to create different data types with unique fields. When building Discord as an MVP, we’ll need to create the following data types and fields.
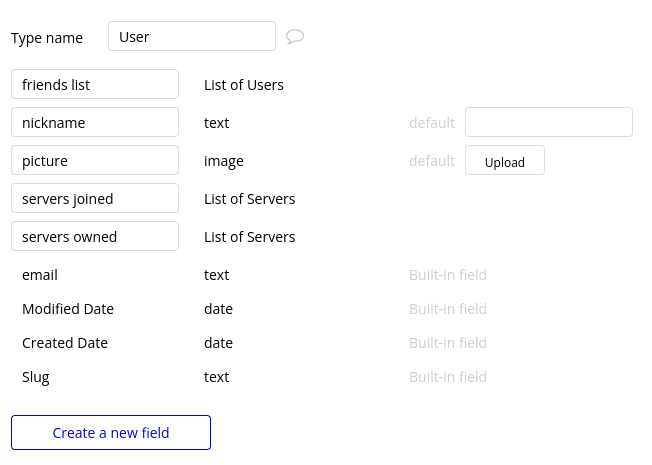
Data type: User
Fields:
- nickname (type: text)
- picture (type: image)
- friends list (type: User. Tick “this field is a list.” Doing so will allow you to add multiple users to this field.)
- servers joined (type: Server. Tick “this field is a list.” Doing so will allow you to add multiple servers to this field.)
- servers owned (type: Server. Tick “this field is a list.” Doing so will allow you to add multiple servers to this field.)
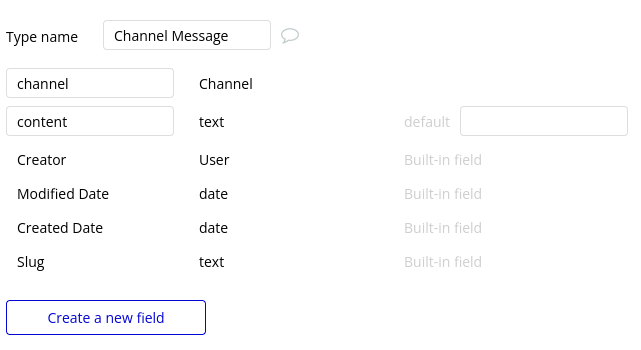
Data type: Channel Message
Fields:
- content (type: text)
- channel (type: Channel)
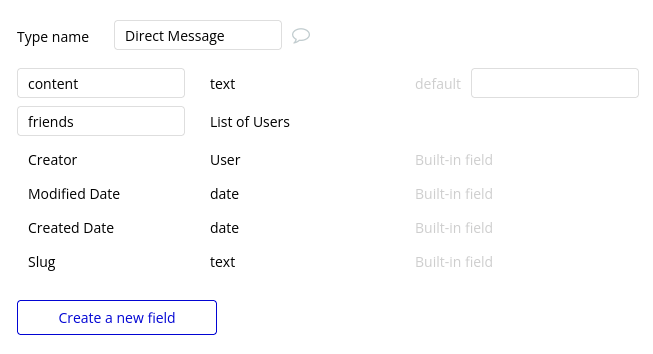
Data type: Direct Message
Fields:
- content (type: text)
- friends (type: User. Tick “this field is a list.” Doing so will allow you to add multiple users to this field.)
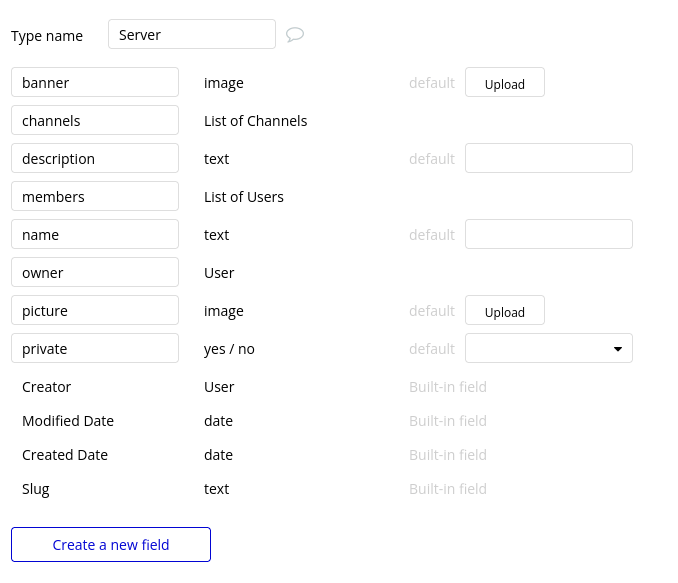
Data type: Server
Fields:
- name (type: text)
- description (type: text)
- picture (type: image)
- banner (type: image)
- private (type: yes/no)
- owner (type: User)
- members (type: User. Tick “this field is a list.” Doing so will allow you to add multiple users to this field.)
- channels (type: Channel. Tick “this field is a list.” Doing so will allow you to add multiple channels to this field.)
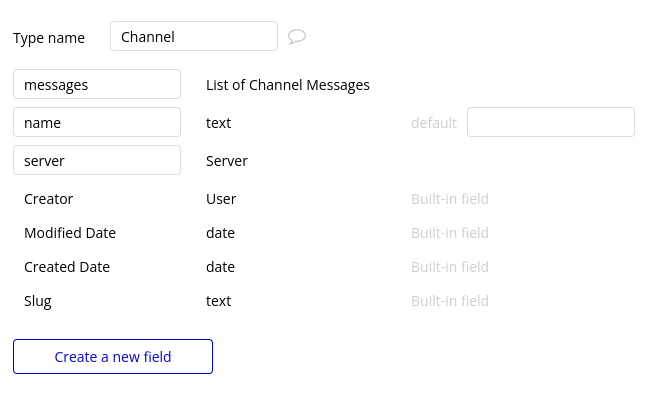
Data type: Channel
- name (type: text)
- messages (type: Channel Message. Tick “this field is a list.” Doing so will allow you to add multiple channel messages to this field.)
- server (type: Server)
Prepare your pages
Now that we have all the data types and all the pages we’ll need, we can prepare some pages to hold certain types of data. This will make the process of sending information from page to page much easier once we start building workflows.
Navigate to your “server” page.
Right-click the page background and select “Edit.”
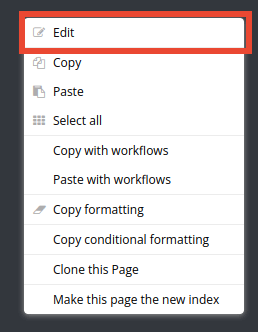
Then, click on the dropdown “Type of content” and choose “Server.”
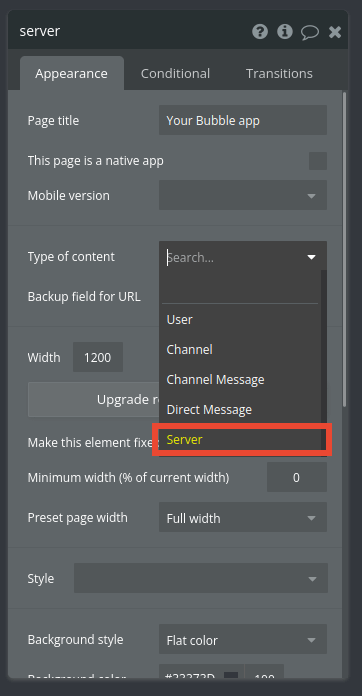
Repeat the same steps for the “server_settings” page. Edit the “server_settings” page to also have “Server” as the content type.
Now that you’ve structured both the design and database of your application, it’s time to start stitching everything together, making your app functional.
In Bubble, the main way to create functionality in your app is with workflows. Each workflow happens when an event occurs (e.g. a user clicks on a button), and then runs a series of “actions” in response (e.g. “sign the user up,” “make a change to the database,” etc.)
Create a top-level menu
For this Discord clone, we’re going to create a menu to let the user move between each page within our app. The menu needs to be visible at least on the following pages:
- home
- server
- discover
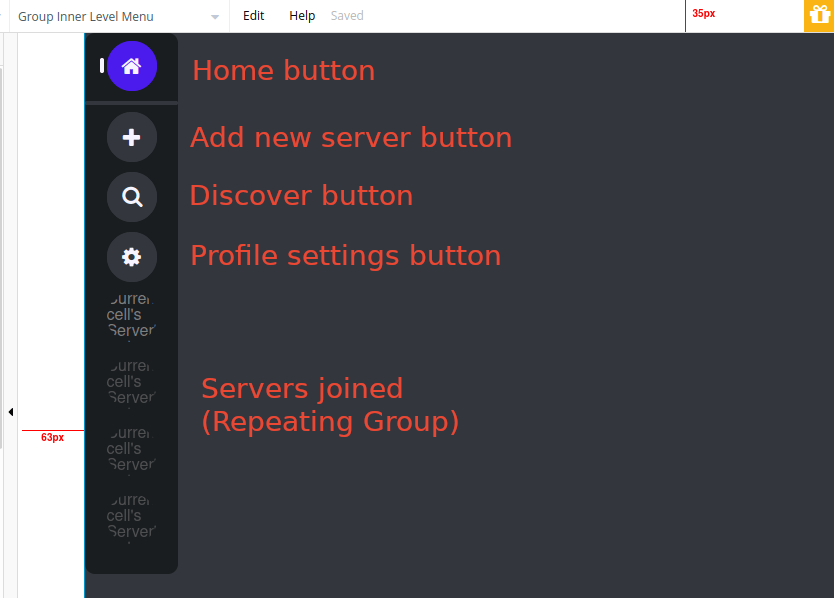
Navigate to the home page, create a new group and add the following buttons to it:
- a home button,
- an add new server button,
- a discover button,
- a profile settings button,
- and a repeating group to display shortcut links to the servers the current user has joined so far, so they can navigate to that server easily.
Bubble’s repeating group feature allows you to create dynamic displays of user data. In this tutorial, we are using to display servers the user has joined.
Here’s an example design:
Let’s set the workflows to make this menu functional, starting with the “Home” button. Follow these steps:
1) Right-click the button element and select “Start/Edit workflow.”
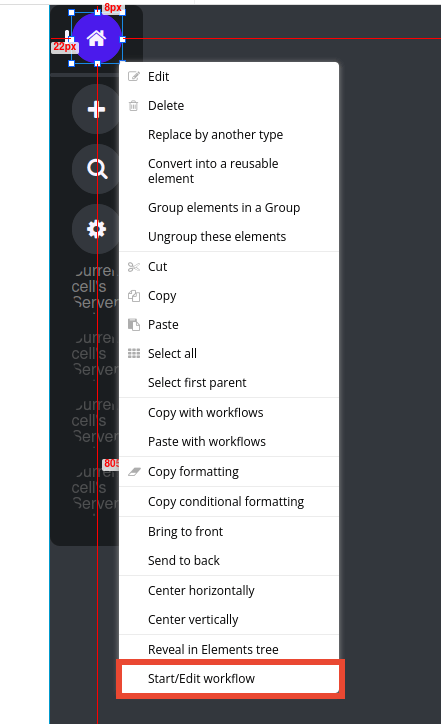
2) Now that we’re on the workflow tab, click to add a new action. In “Navigation,” select “Go to page.”
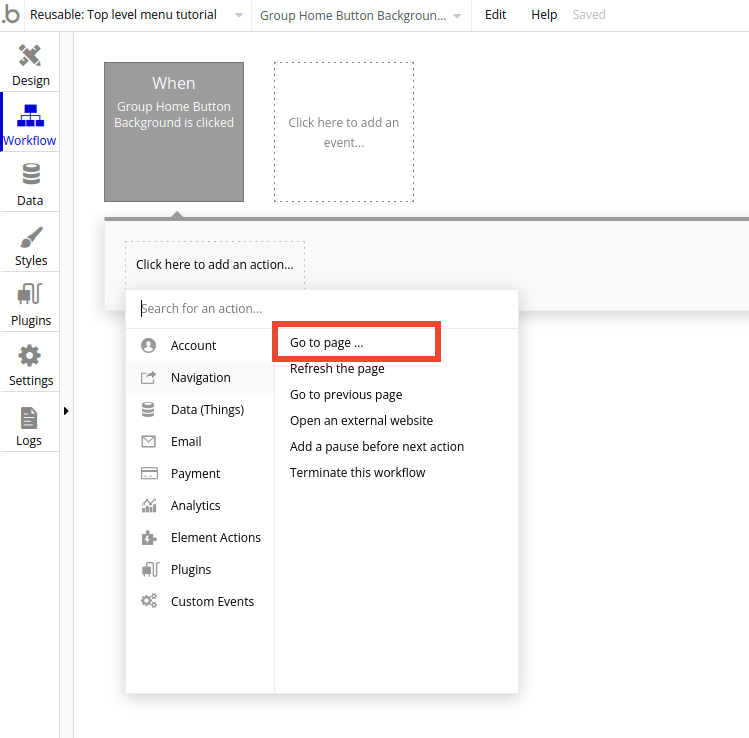
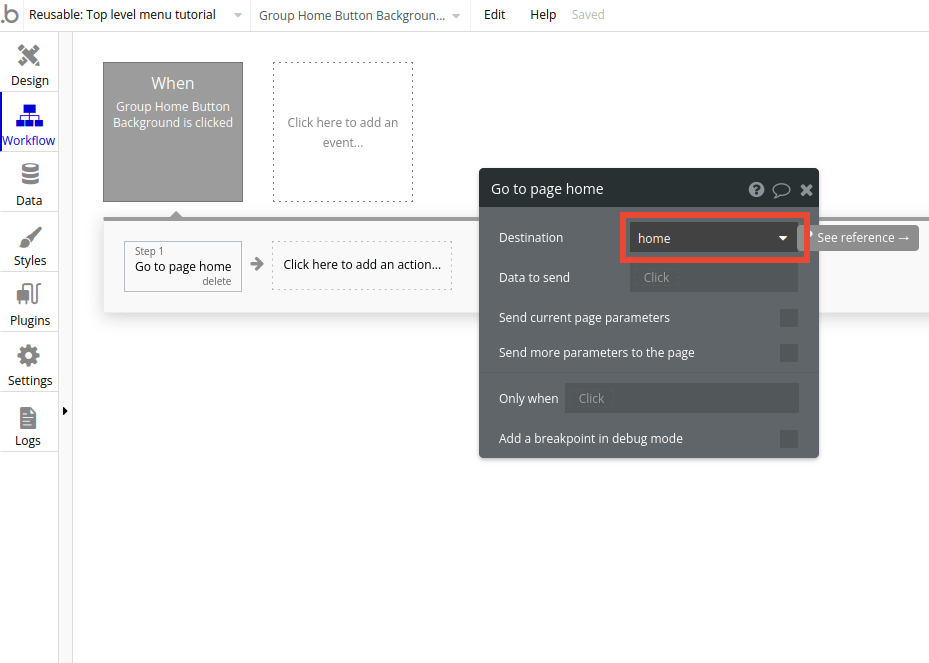
3) For the Home button, choose “home” as the destination.
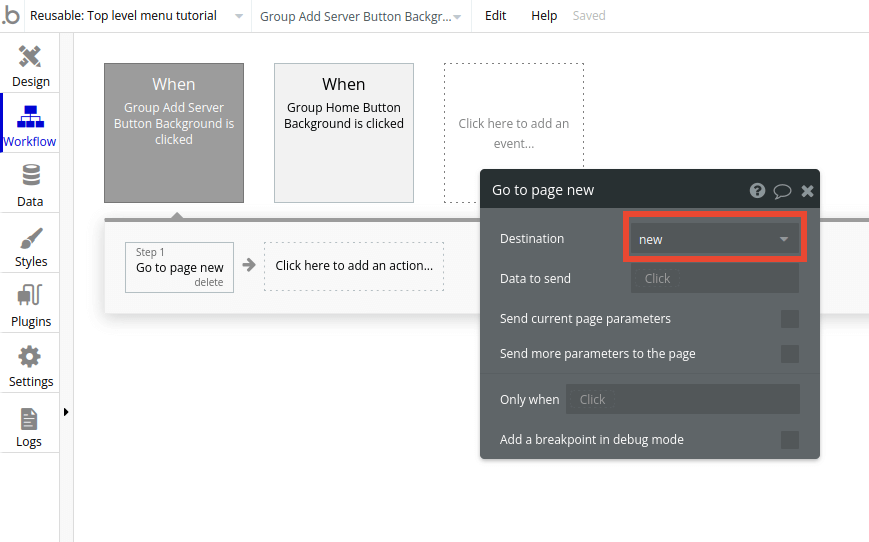
Repeat the process for the “add new server” button:
- Right click and select Start/Edit Workflow
- Select “Click here to add a new action”; in Navigation, add “go to page,”
- but this time, select the destination as the “new” page.
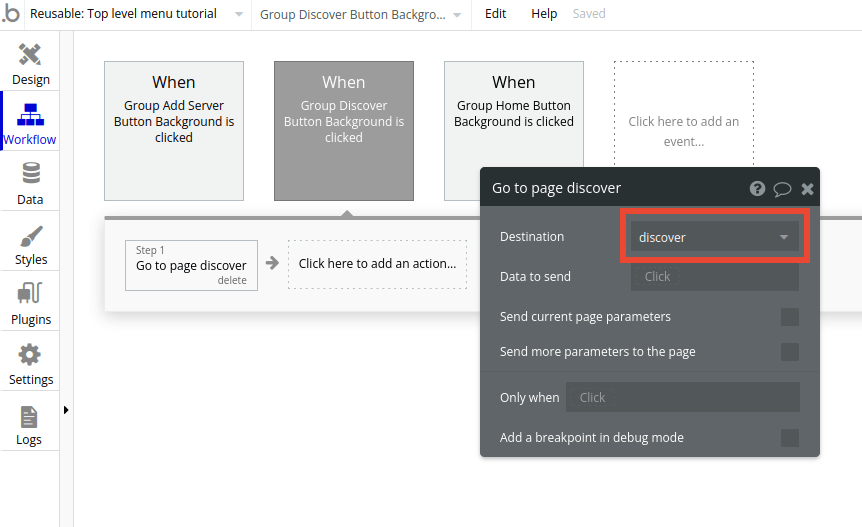
Repeat steps 1–3 to do the same for the “discover” button, with the final destination as the “discover” page.
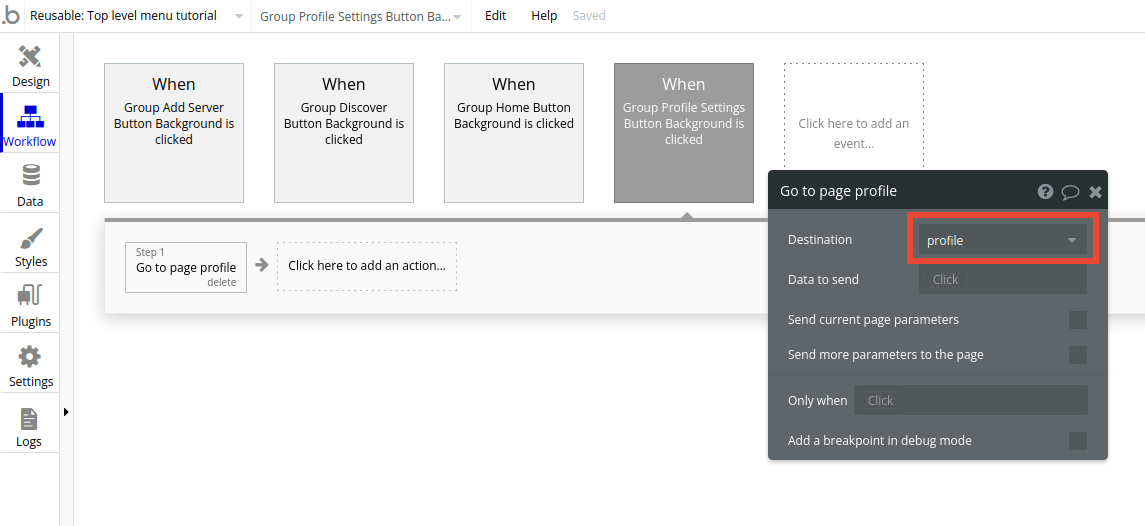
The “profile settings” button workflow (repeat steps 1–3) should take the user to the “profile” page.
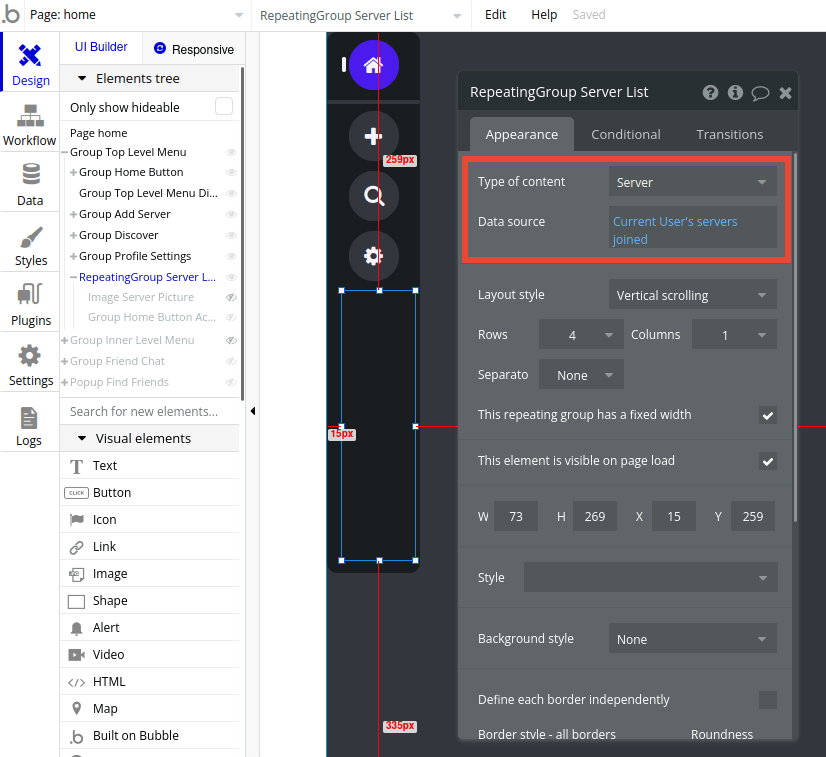
Finally, for the repeating group of the user’s servers, change the type of content to “Server” and the data source to “Current User’s servers joined.”
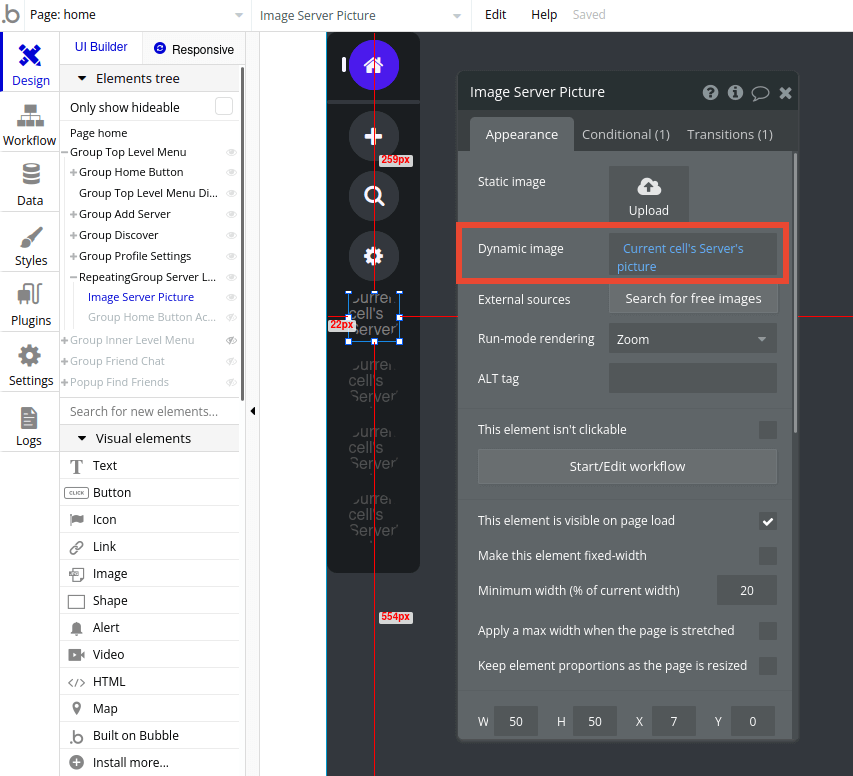
Add an image to the first row in the repeating group, and set it to display the “Current cell’s Server’s picture.”
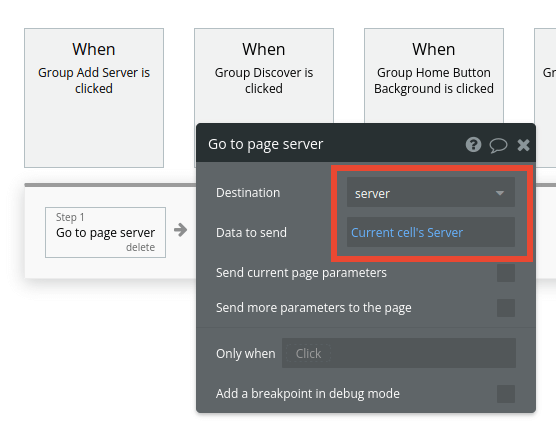
Now, let’s start a workflow when the user clicks the server image. We want to send the user to the appropriate server page. Fill the “Data to send” field with the “Current cell’s Server.”
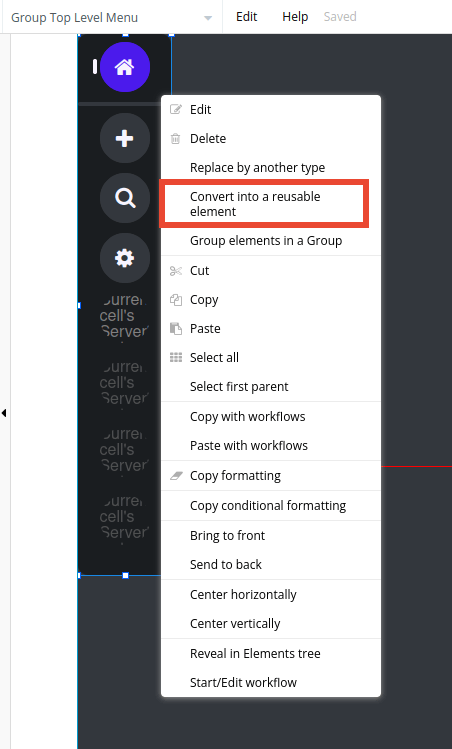
Once you’re done, right-click the group containing all the menu elements, and select “Convert into a reusable element.” This will enable you to use this menu on other pages within your app without having to completely remake it.
Name the element. Once you do, you’ll be taken to the reusable element’s individual page.
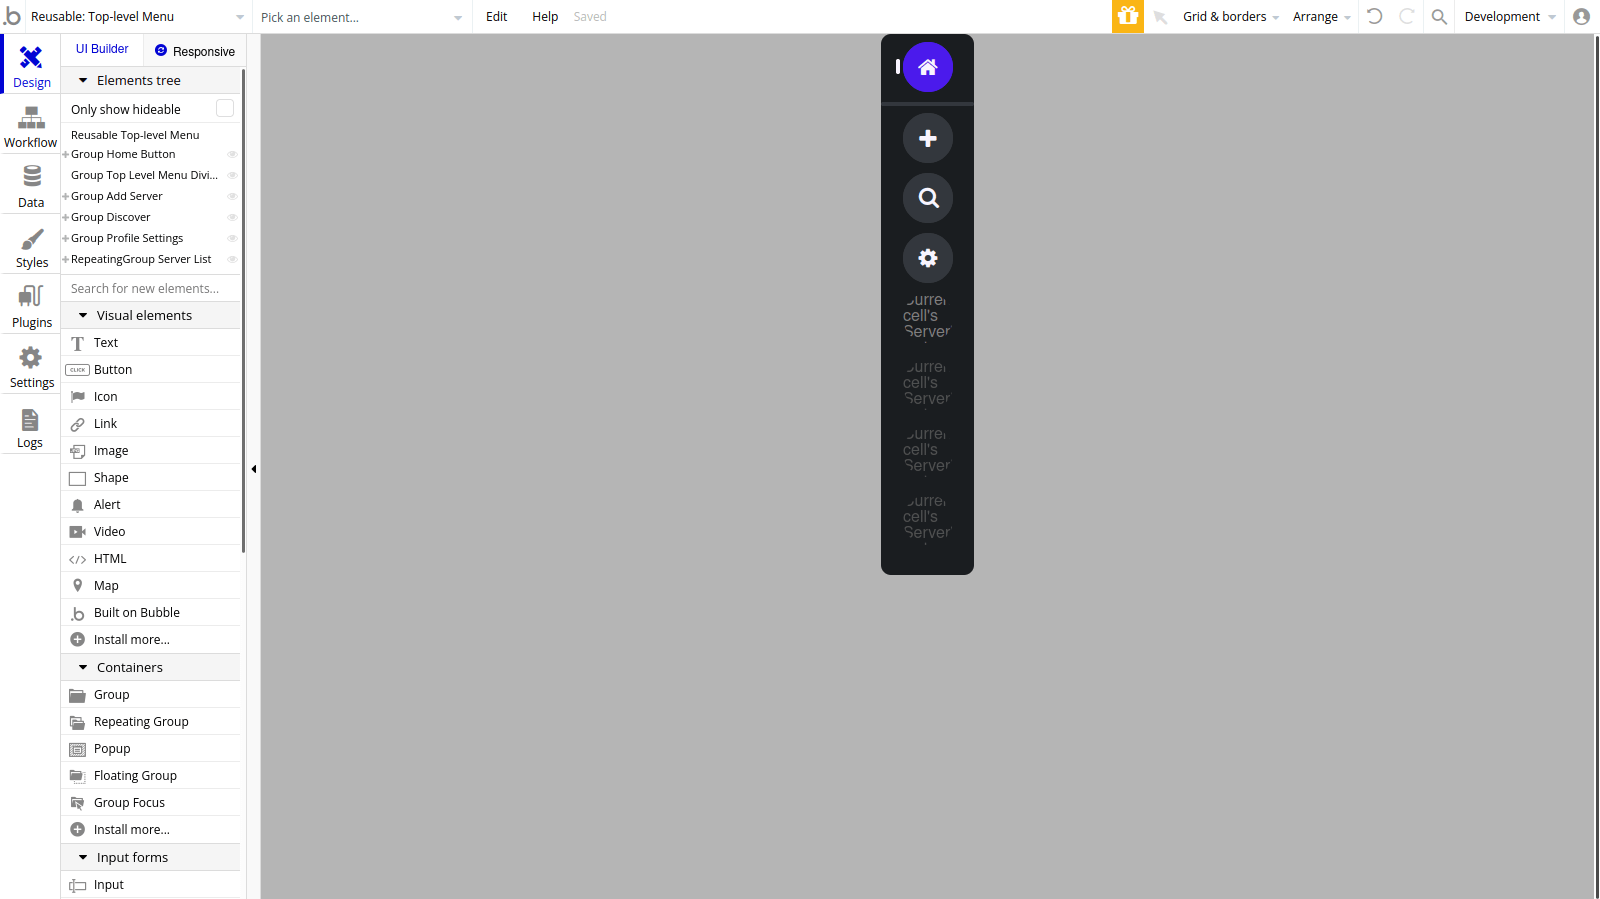
You can access all your reusable elements the same way you access your app's individual pages from the top-left dropdown in the Bubble editor. If you ever need to make changes to this menu element, you can do so on this editor page, and the changes will propagate to all other pages where this reusable element is shown.
Update your profile details
In the initial Bubble training lessons, you learned how to create new user accounts. Now, we’ll create a profile settings page, where users can update their data and preferences.
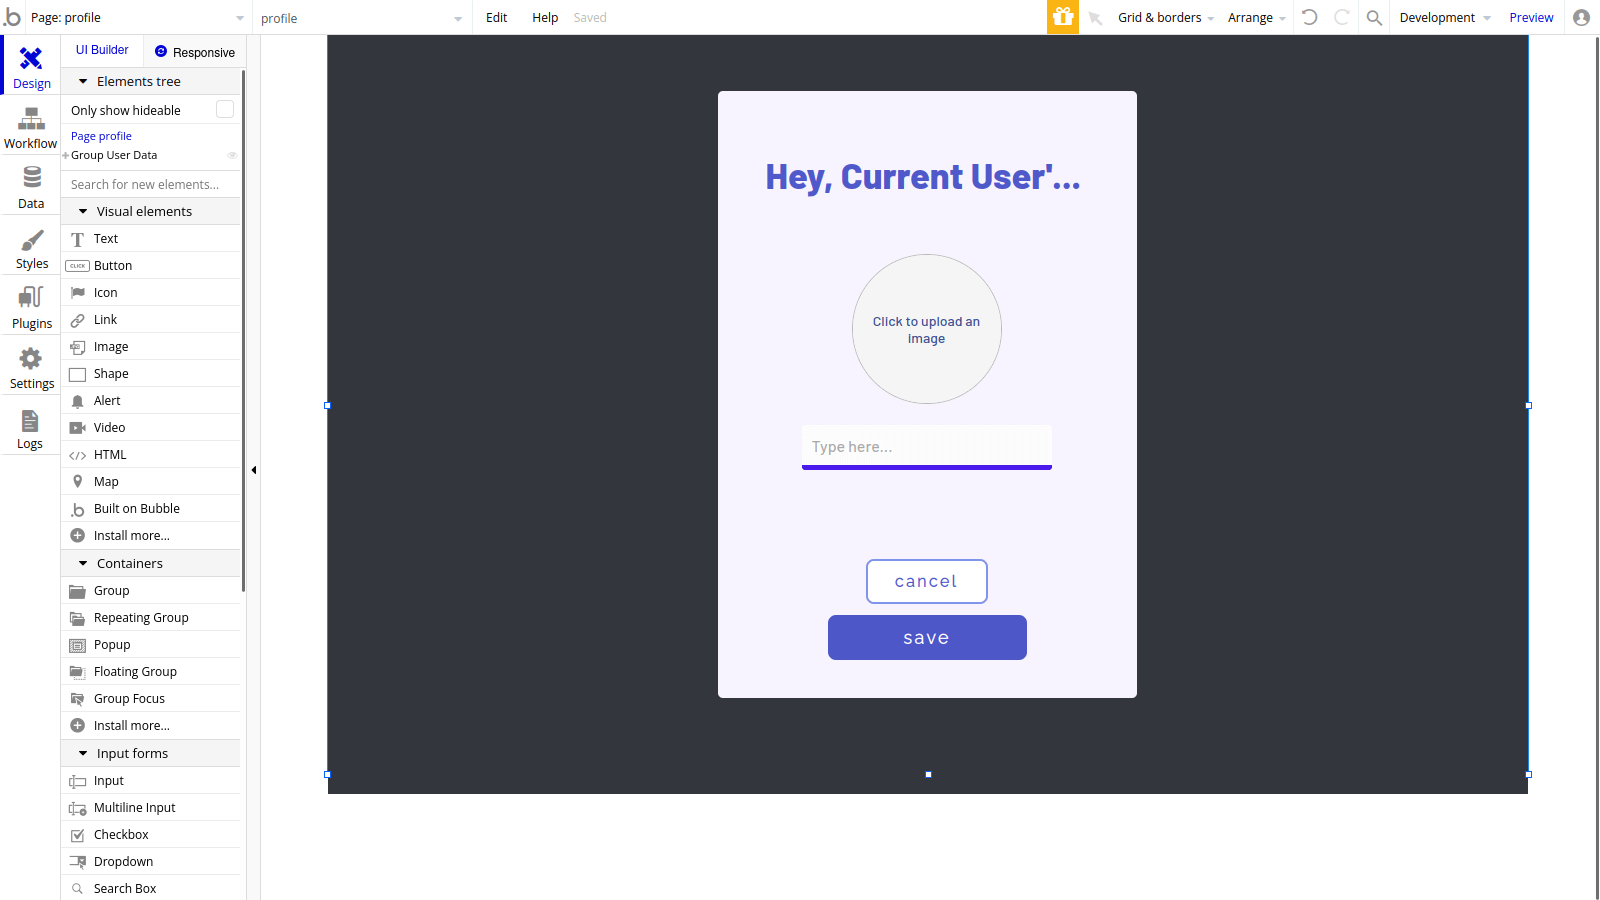
After adding all the input fields — in our case, a picture uploader and a text input field — we can start building the workflows to make changes to the current user.
Right-click the save button and choose “Start/Edit workflow.”
Click to add an action. Within “Account,” select “Make changes to current user.”

The next step is to send the user back to the home page. Click to add another action, but this time choose “Navigation,” followed by “Go to page,” and then set “home” as the destination.

One last thing: If the user doesn’t want to keep any changes made, we need to set a workflow for the cancel button.
Let’s create that workflow on this page. Add a new event by clicking “Click here to add an event.” Within “Elements,” choose “An element is clicked.”
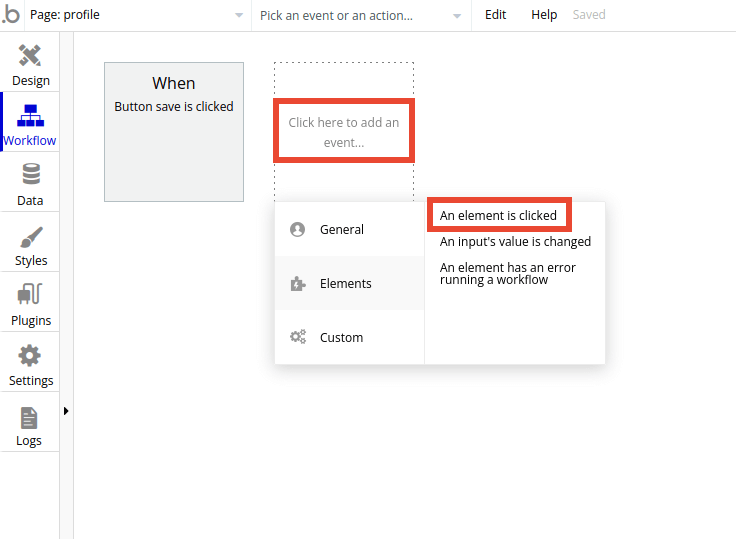
Choose the “cancel” button from the dropdown menu.
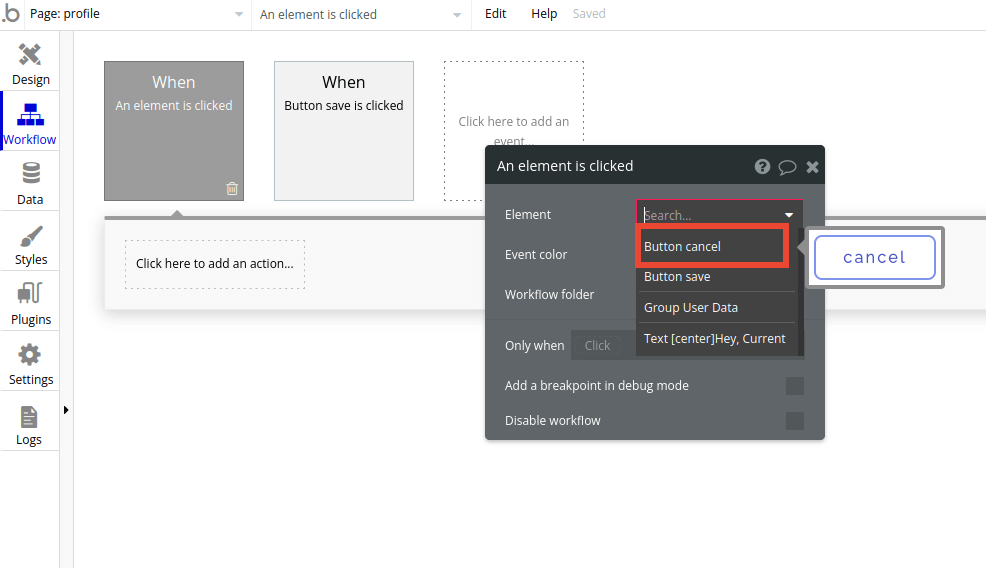
As we did with the last step in the save button, choose “Navigation,” “Go to page,” and select the home page.
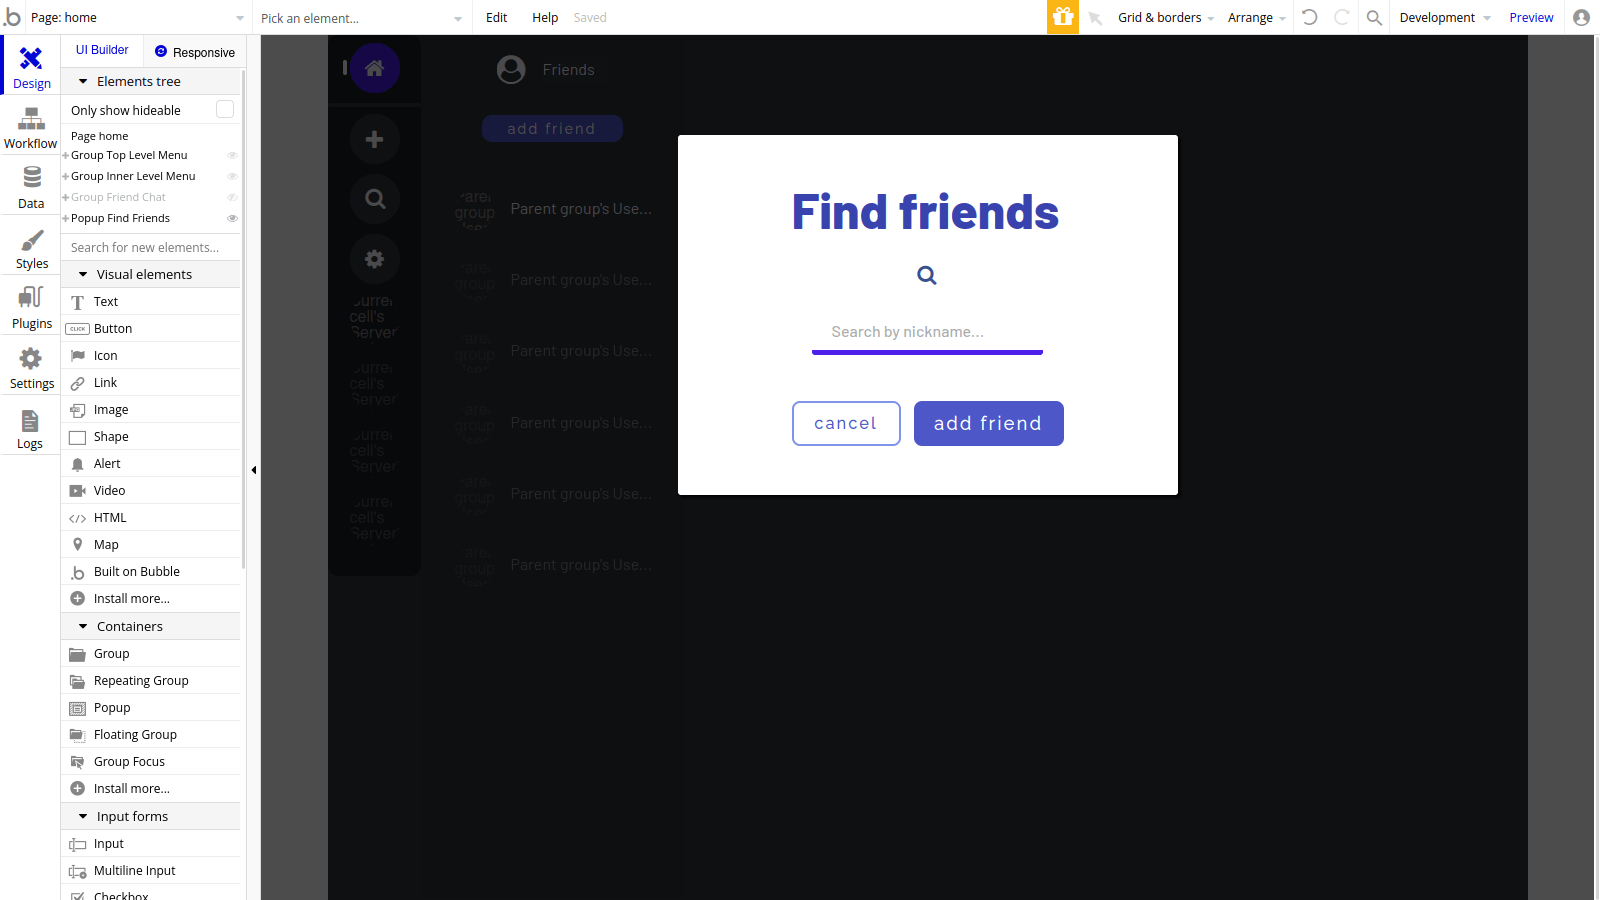
Add friends (with a popup)
An empty friends list would make anyone react with disappointment, and a friends list is useless if you can’t add new buddies. Let’s build the functionality in our chat app to make that happen.
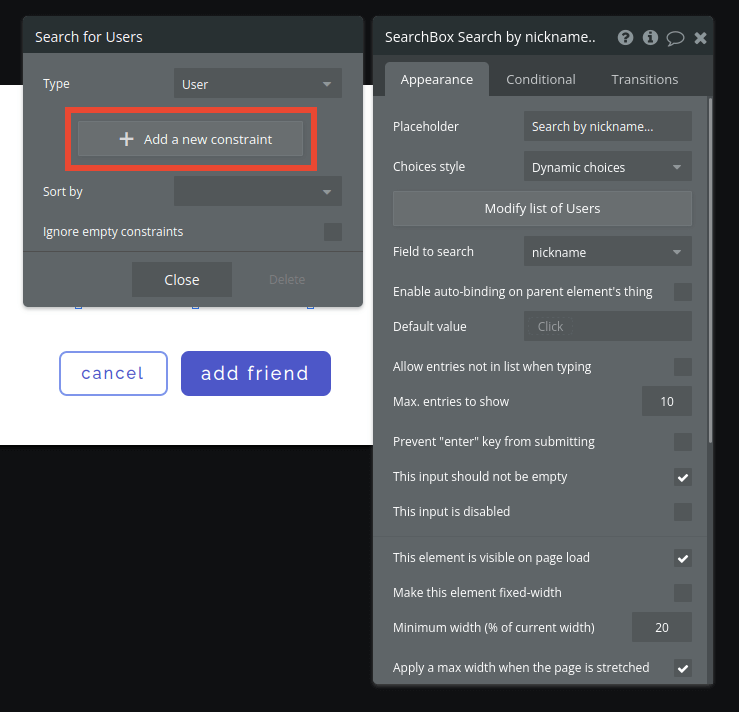
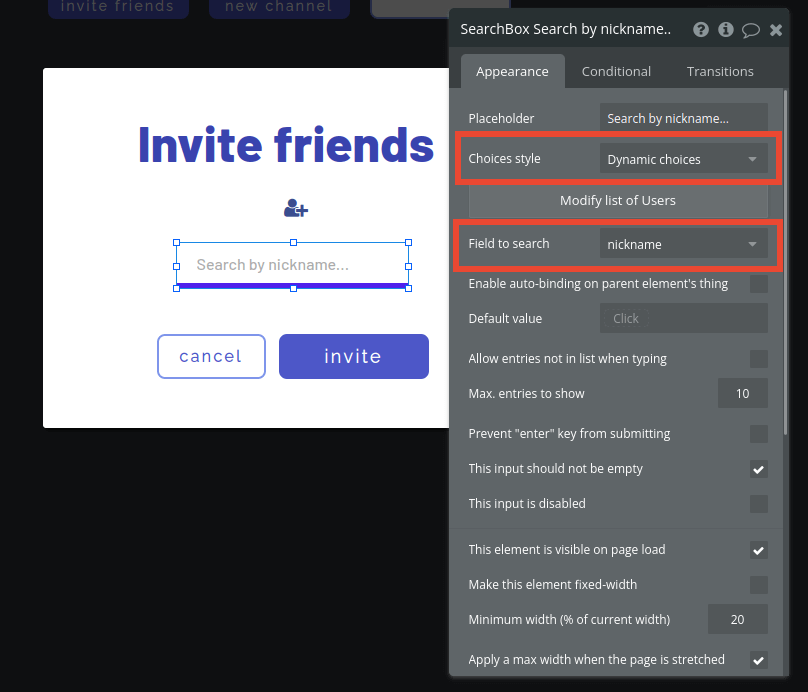
Create a new popup on your home page, and fill it with a Search Box element, a cancel button, and an add friend button.
We’ll configure the search box to search for other registered users by their nickname. Choose “Dynamic Choices,” and set the “field to search” to “nickname.”
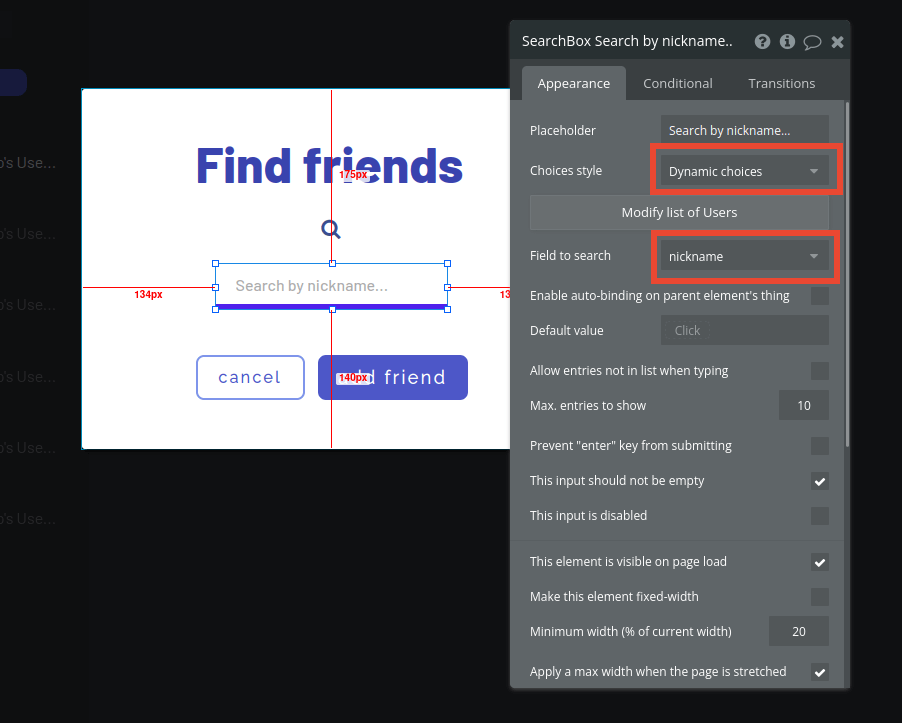
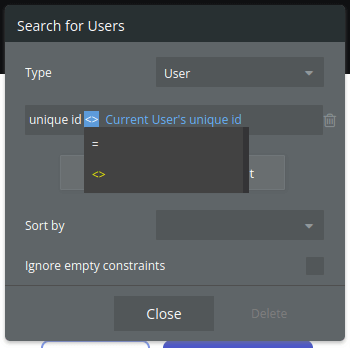
There’s a catch: We shouldn’t let users add themselves to their own friends list. Click on “Modify list of Users.”
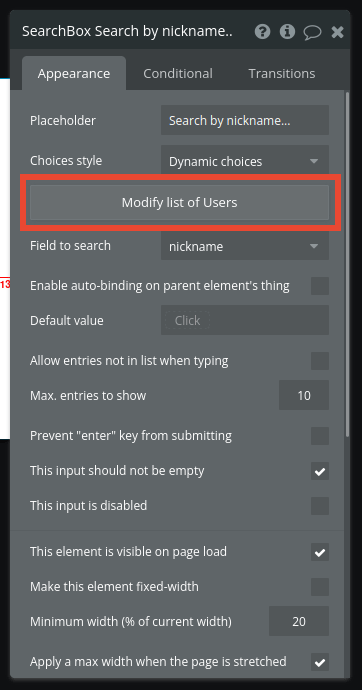
Add a new constraint.
Set it to only show users that don’t have the current user’s own unique ID. You can click the default “=” sign to change it to “<>” (does not equal).
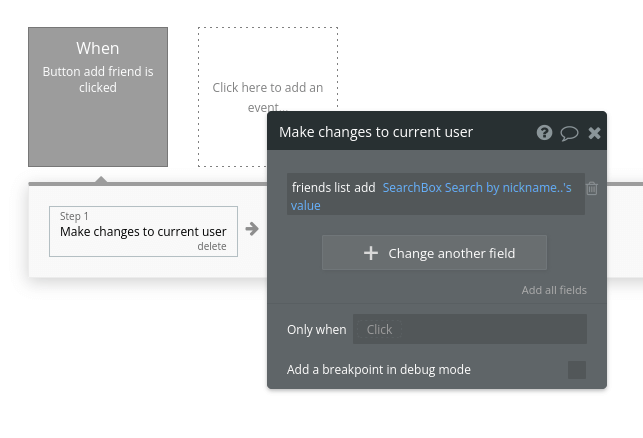
Now that the search box is ready, it’s time to set up the workflow for the “add friend” button in the popup. Right-click the button and hit “Start/Edit workflow.”
Click to add a new action. In “Account,” choose “Make changes to Current User.” Set it to add the search box’s value to “friends list.”
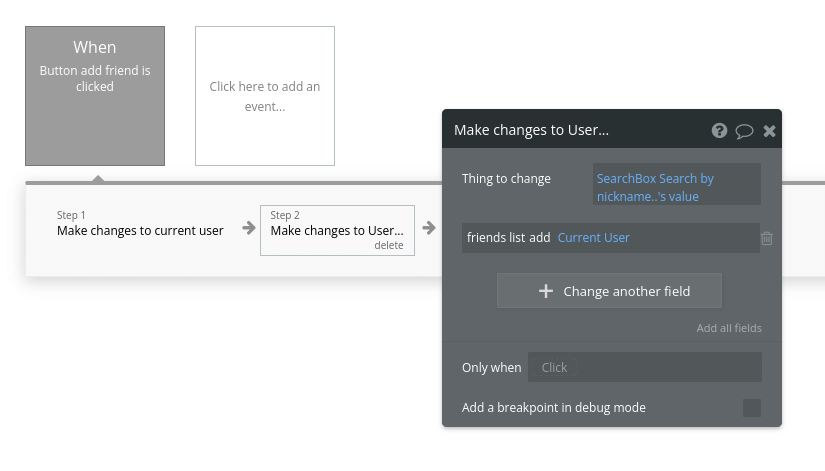
Then, add a new action in “Data (Things)” > “Make changes to a thing” > target the user in the search box, and add the current user to that user’s friends list. Now, both users have each other on their respective lists.
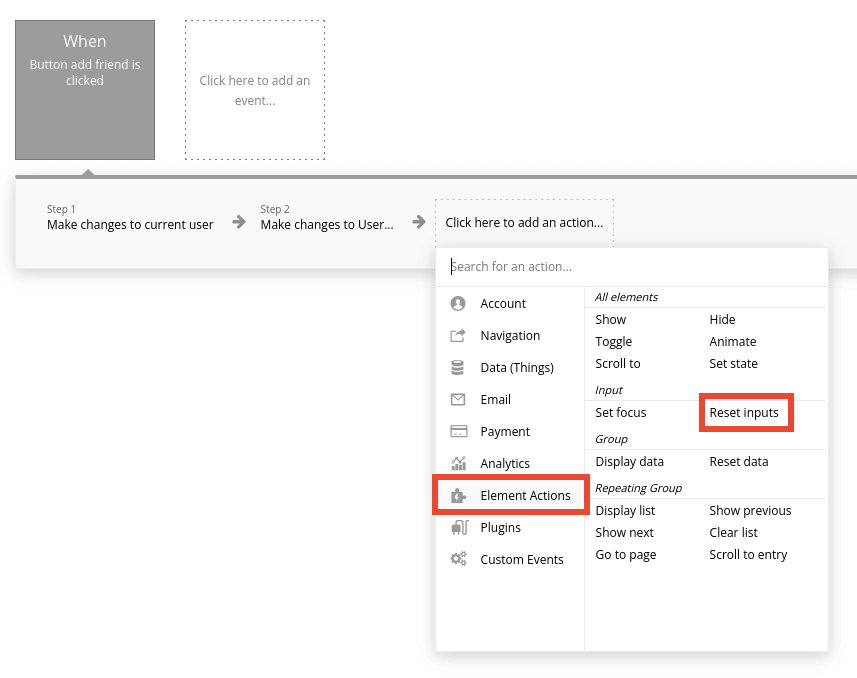
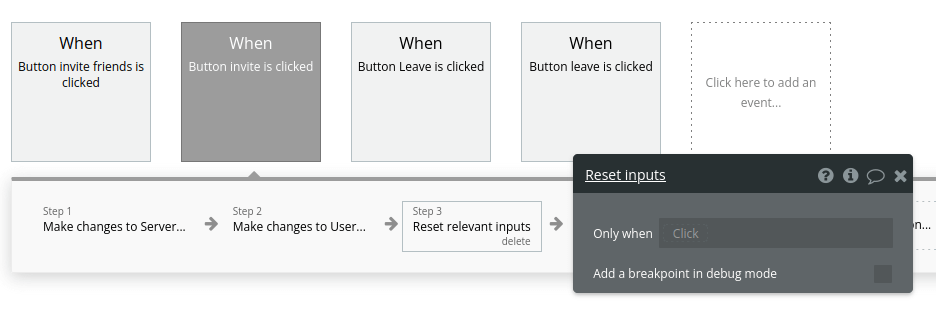
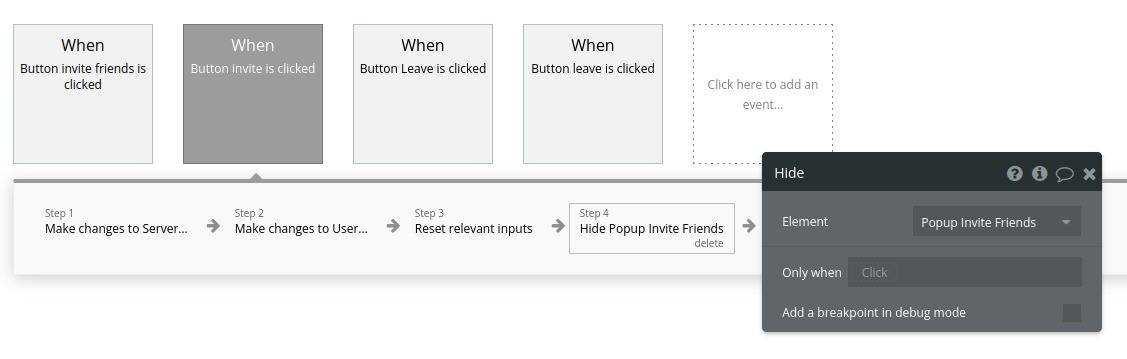
Add a “Reset relevant inputs” to clear the search box (“Element Actions” > “Reset inputs”).
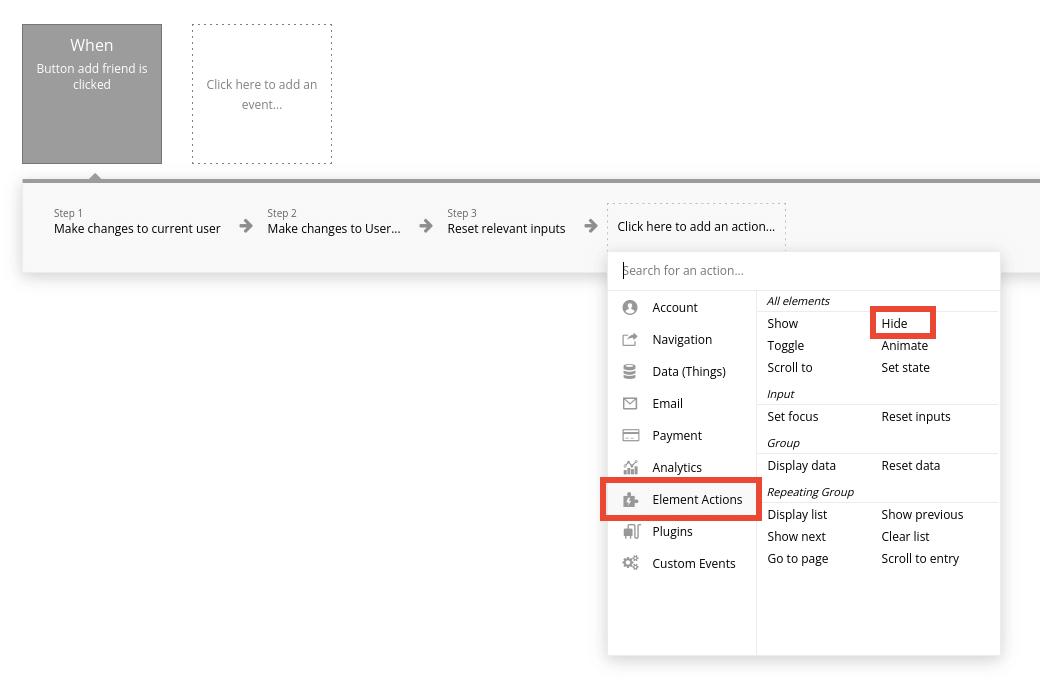
And “Hide Popup Find Friends.”
To complete the functionality of the popup, remember to set a workflow for the cancel button to hide the popup without doing anything else.
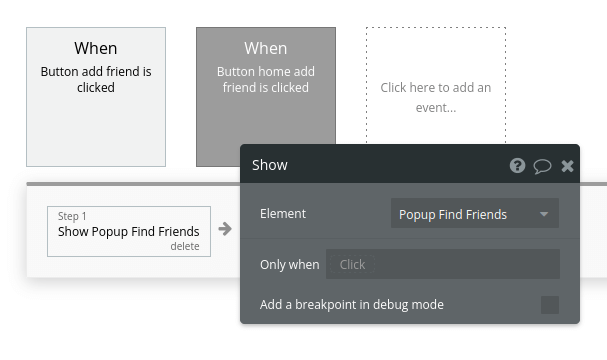
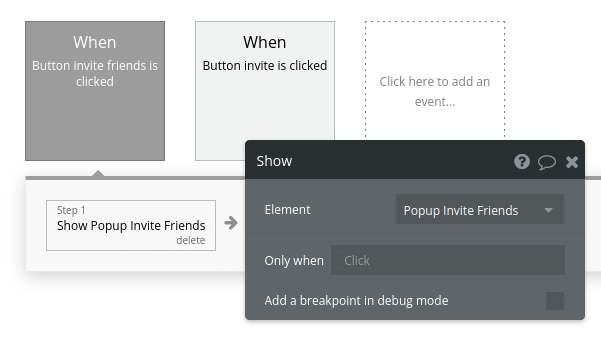
The last thing we need to do is to place a button on the home interface to open this popup. Once that’s done, start a workflow for that button, and set it to show the popup you just created (“Element Actions” > “Show”).
Chat with friends
Before we begin building the functionality to support chat, we need to create a chat window.
Our chat window will have:
- a header showing who we’re chatting with
- a repeating group to show the messages
- an input field
- a send direct message button
- a remove friend icon (that we’ll configure later)
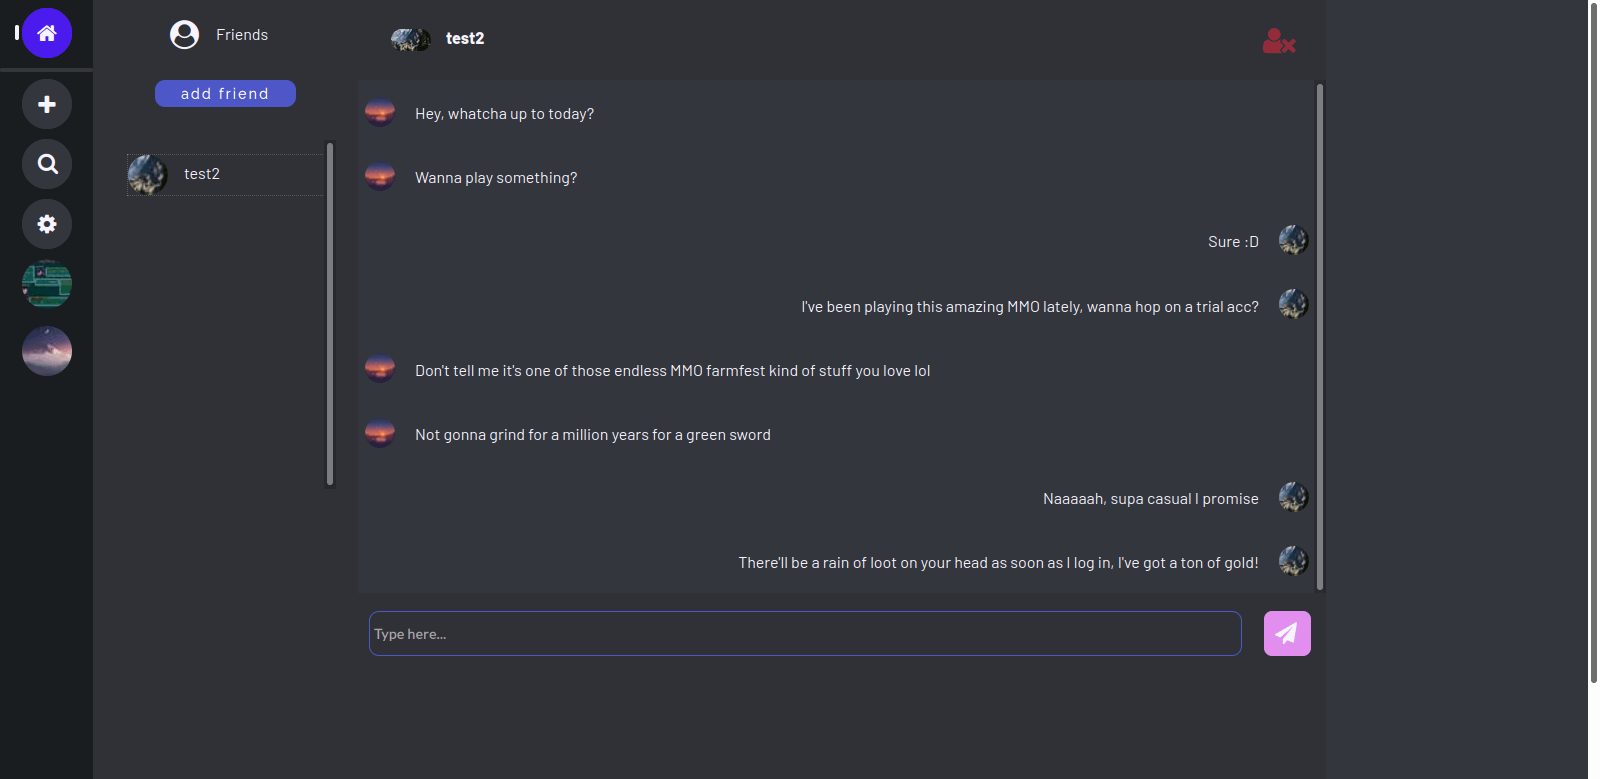
Here’s an example design:

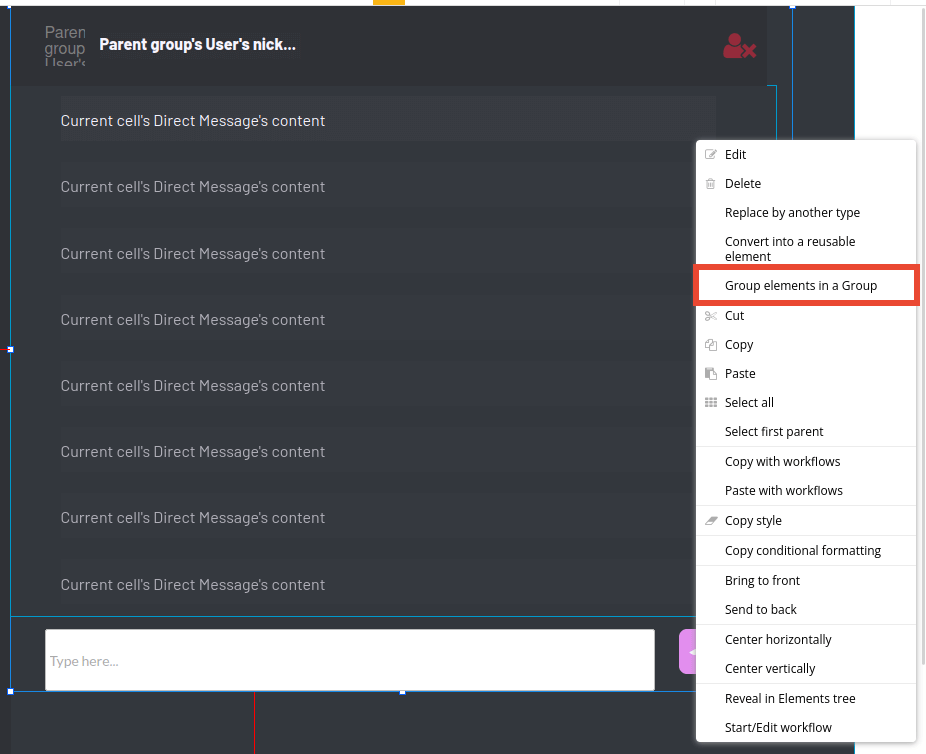
To simplify the process of creating workflows later, select and group all of these elements together and name it “Group Friend Chat.”
Set the group’s type of content to be “User,” but leave the data source empty for now. Also, untick “This element is visible on page load.”
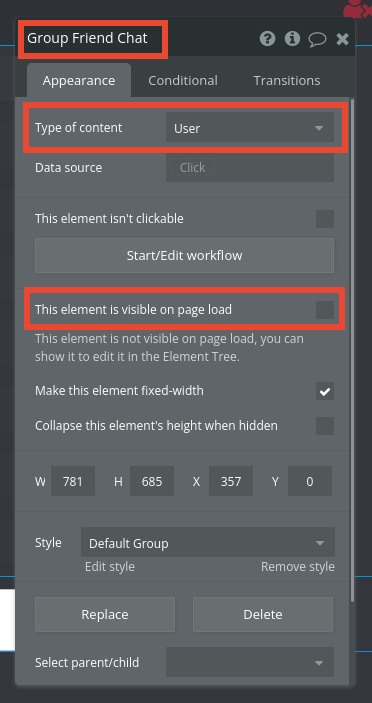
Within our Group Friend Chat, set the Repeating Group’s type of content to Direct Messages. Set the Data source to search for Direct Messages, with the following constraints:
- “friends contains Current User”
- “friends contains Parent group’s User”
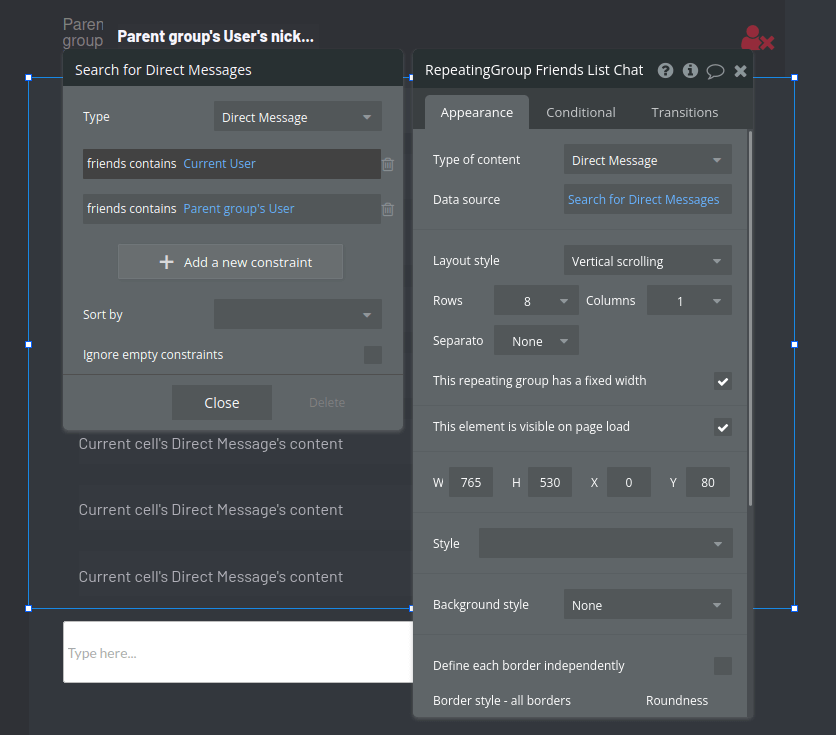
Our chat window is now ready. Let’s set up the workflows to send messages. Right-click the “send message” button within the Friend Chat group and start a workflow.
Within “Data (Things),” select “Create a new thing” and fill the fields as shown.
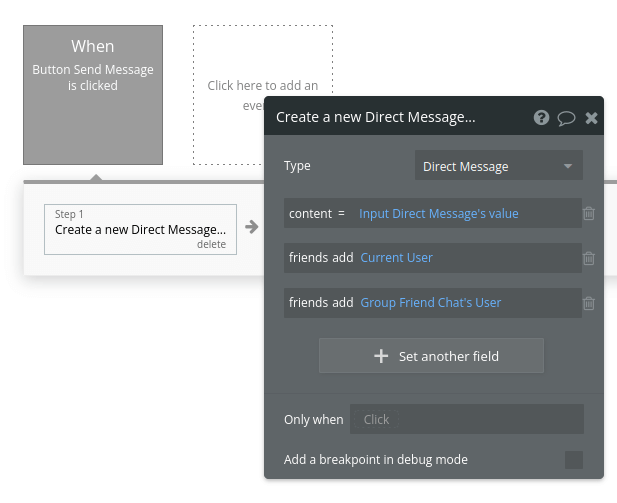
Add a “reset relevant inputs” (“Element Actions” > “Reset inputs”) after creating a new message, so the user won’t have to manually erase everything to enter the next one.
Choose who to chat with
Now that we have a chat window and the workflows to send messages, we need a way to select who we want to chat with.
Set up a Repeating Group to display the user’s friends list.
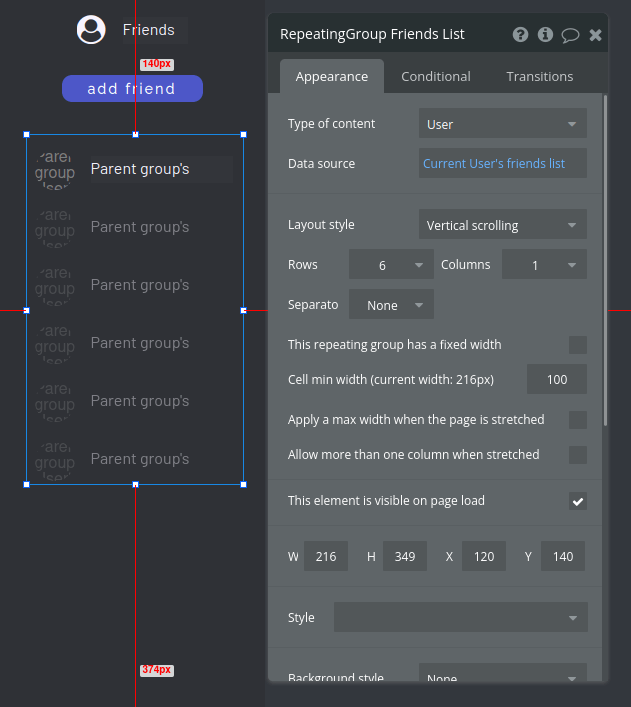
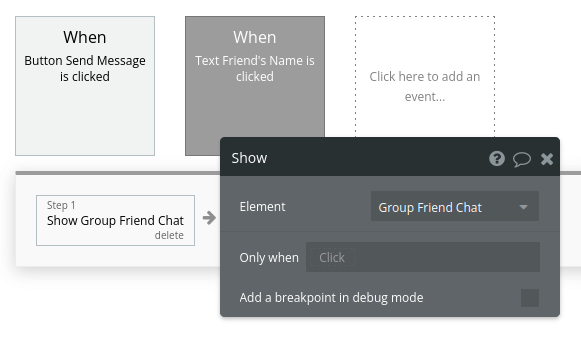
In the Repeating Group displaying your friends list, right-click the Text field displaying the friend’s name and create a new workflow.
In the first step, set the Group Friend Chat to show by hovering “Element Actions” > “Show.”
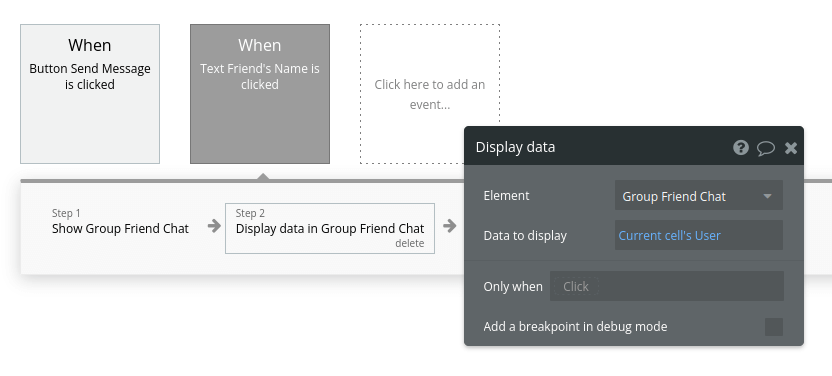
Then, we need to display the data of the friend we clicked on in our chat window. Do so by hovering “Element Actions” again and selecting “Display data” under the Group section.
In the “Element” field, choose the “Group Friend Chat,” and set the “Data to display” to “Current cell’s User.”
Remove friends
Some friendships last forever. Others don’t. To accommodate all possibilities, let’s add a way to remove friends from the friends list so there’s no need to react with frustration later on.
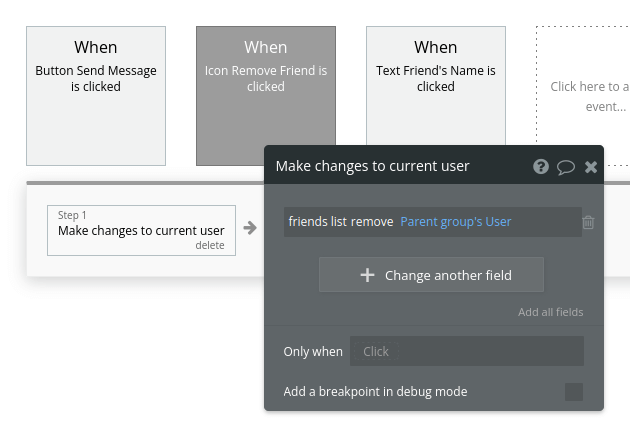
Within the Group Friend Chat, right-click the remove friend icon and start a new workflow.
Add a new action. Hover over “Account” and choose “Make changes to current user.” Remove the Parent Group’s User from the friends list.
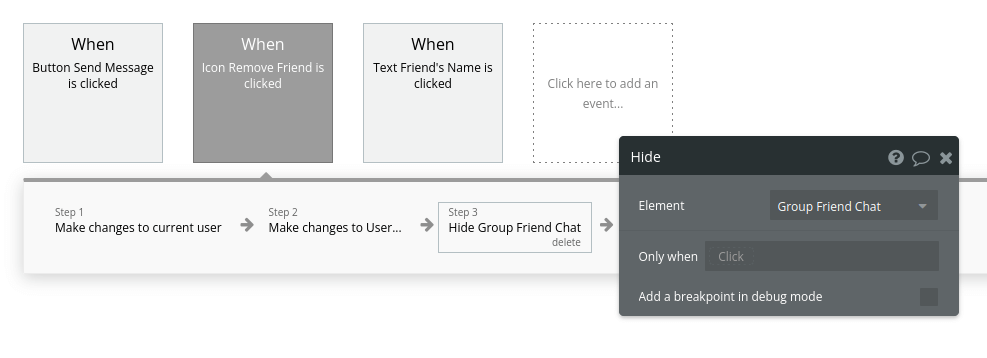
Then, add a new action: On “Data (Things),” choose “Make changes to a thing.” Remove the current user from the other user’s friends list.

Since the chat between these friends was showing, let’s hide the chat window as a way to show that the action was carried out successfully. Add a new action: “Element Actions” > “Hide an element” and choose the Friend Chat group.
All features related to friends are now implemented. Let’s move on to creating servers and channels.
Create servers
One of Discord’s core features is creating a server for you and your friends to chat in. We’re going to build that functionality now.
Navigate to the “new” page, where we’ll set everything up to let users create their own servers.
Here’s an example design:
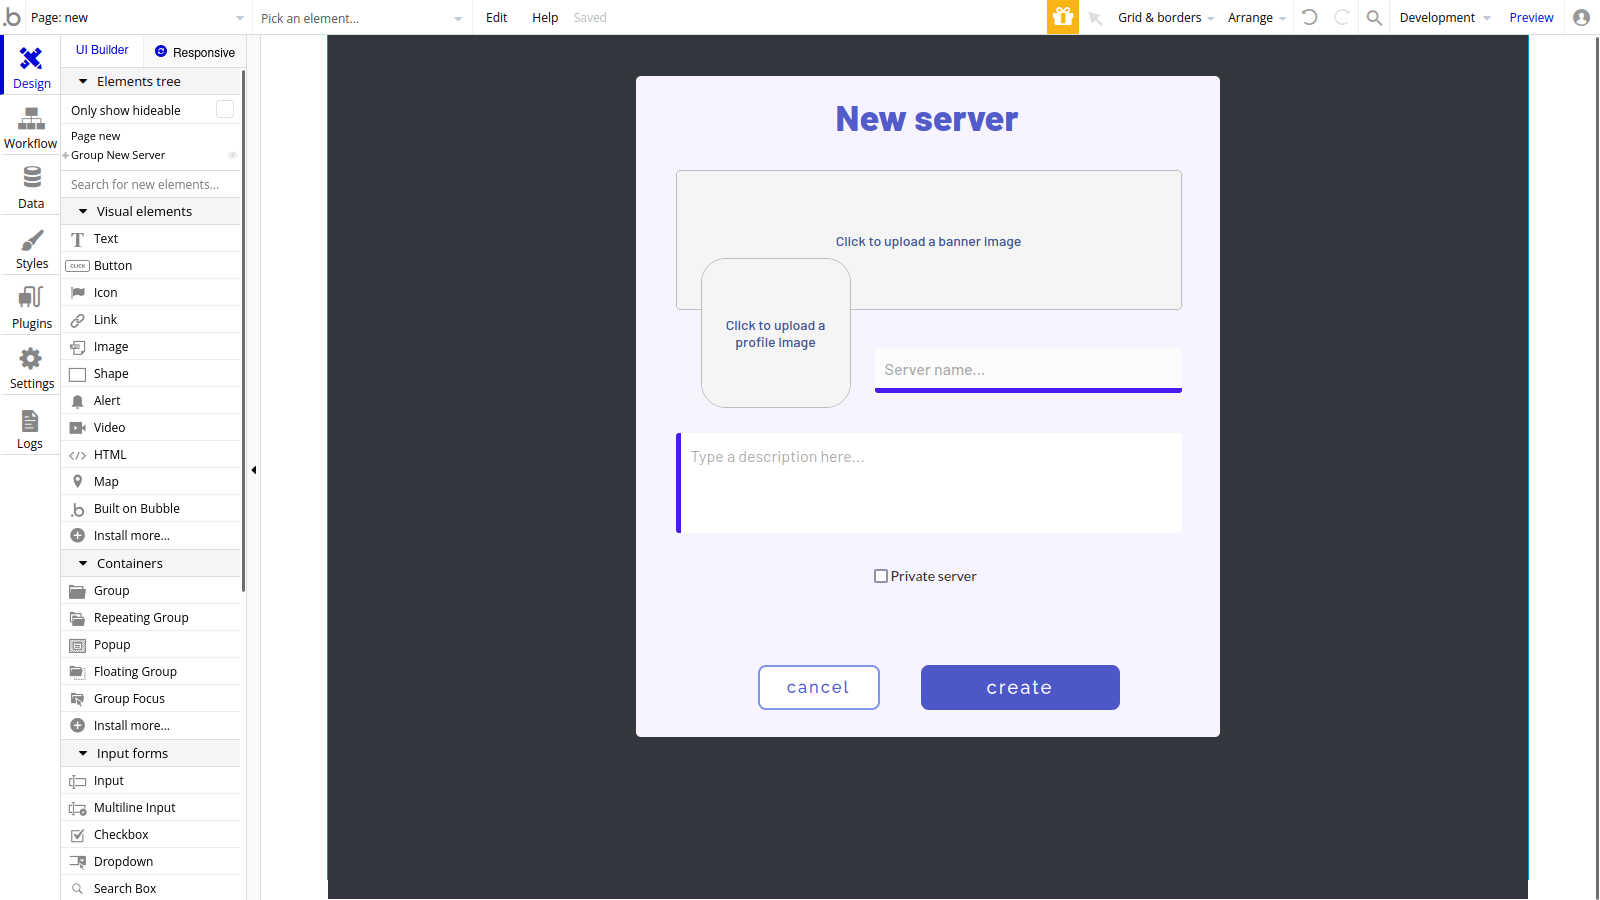
Once you have all the input fields in place, start a new workflow for the “create” button.
Create a new action. On “Data (Things),” select “Create new thing.”
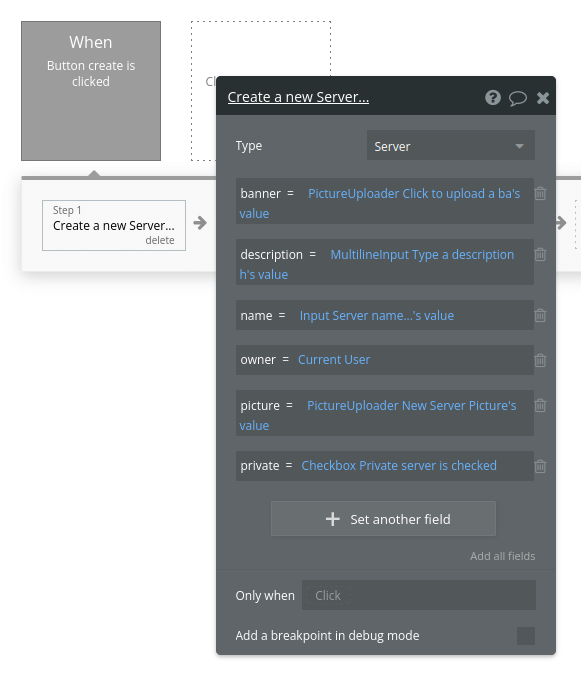
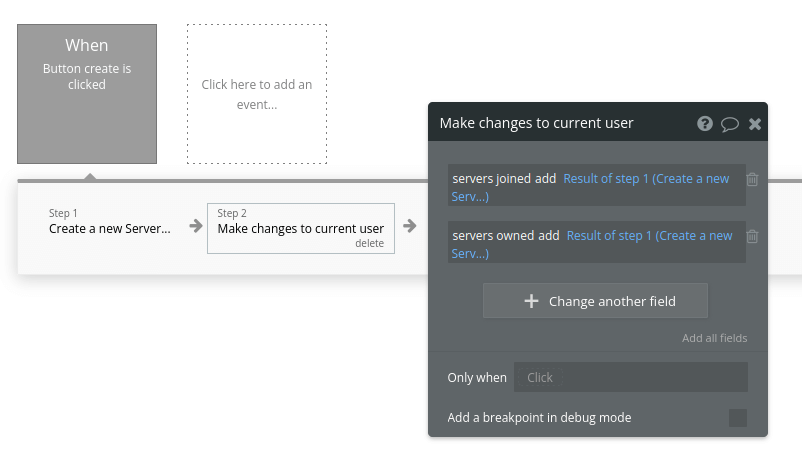
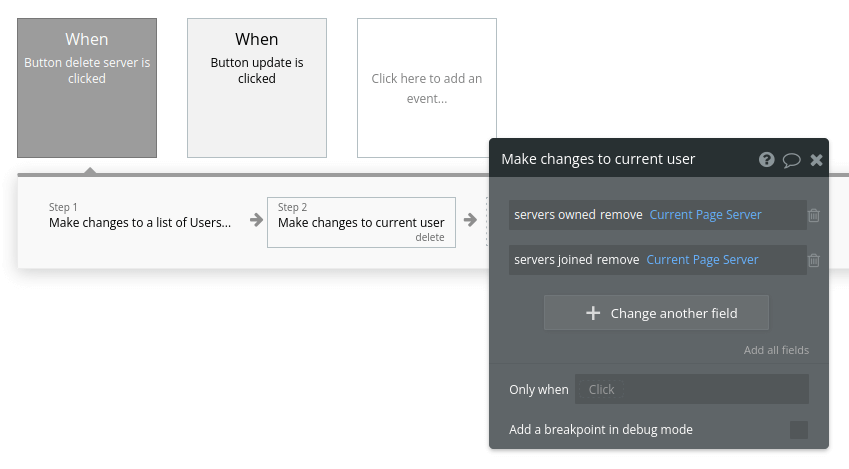
We need to register this new server to its owner, and we want to add it to the servers joined list of the current user. Under “Account,” choose “Make changes to current user,” and add the “Result of step 1” to both the “servers joined” and “servers owned” fields.
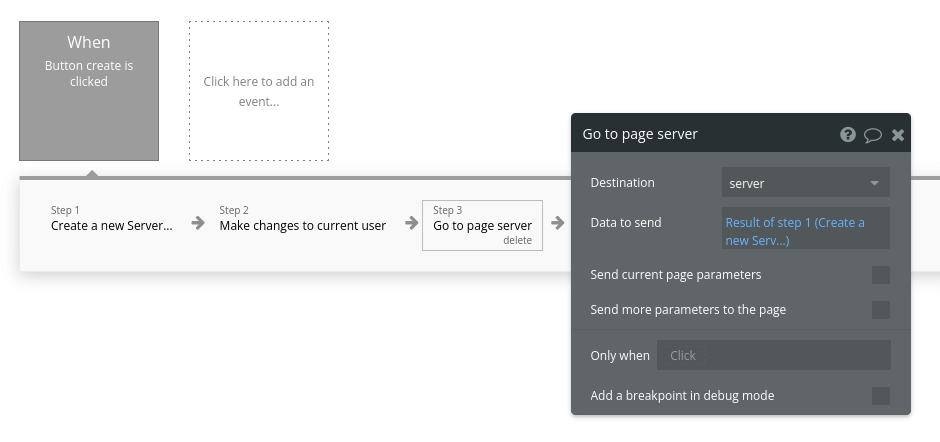
After this is done, we’ll send the user to the server page. Add another action: In “Navigation,” choose “Go to page,” and remember to fill the “Data to send” with the “Result of step 1.”
Invite friends to your server
If your friends don’t know you have a new server (or if your server is private), you need to invite them over.
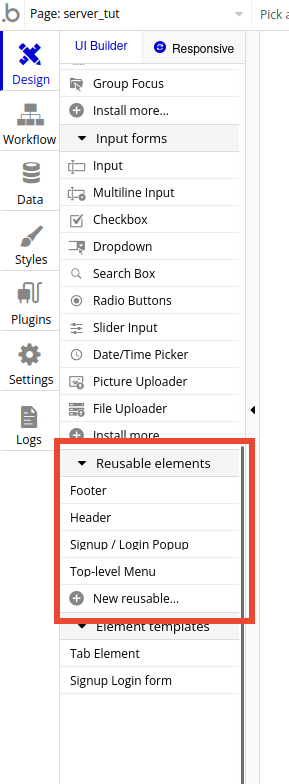
Navigate to your server page. Remember to put your reusable menu in place. In the Design tab, scroll down the UI Builder list. You’ll find the menu you created under the “Reusable elements” section.
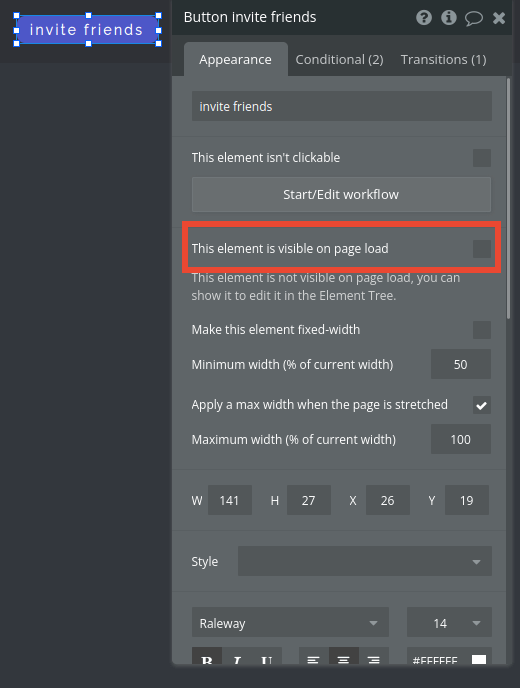
Place a new button on this page to invite friends. Let’s set it so that only the owner can invite their friends over. Edit the button, and untick “This element is visible on page load.”
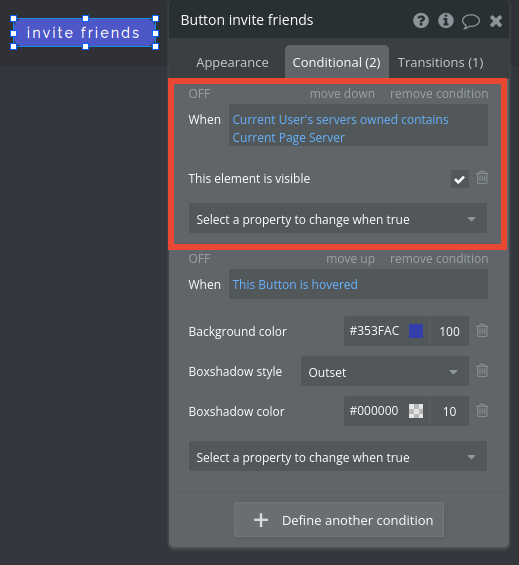
Click on the “Conditional” tab. Define a new condition. When the current user has the current server on their “servers owned” list, set this button to be visible.
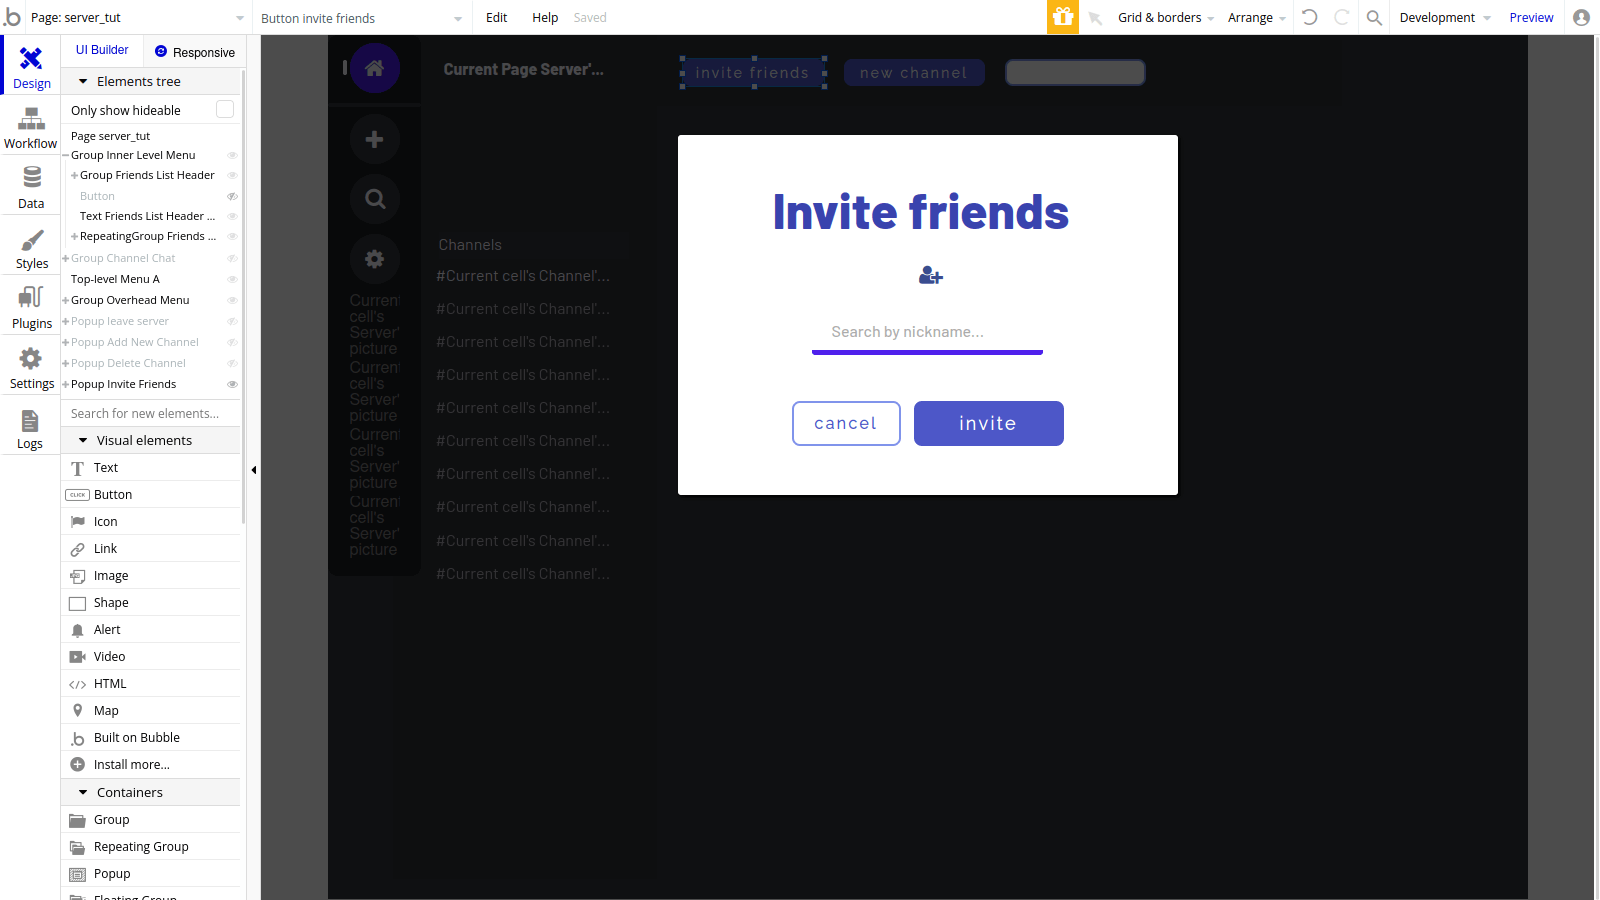
We’ll be using a popup to search for and invite friends. Add a new popup to the page. Remember the one we created for adding new friends to the friends list? This one will have similar functionality.
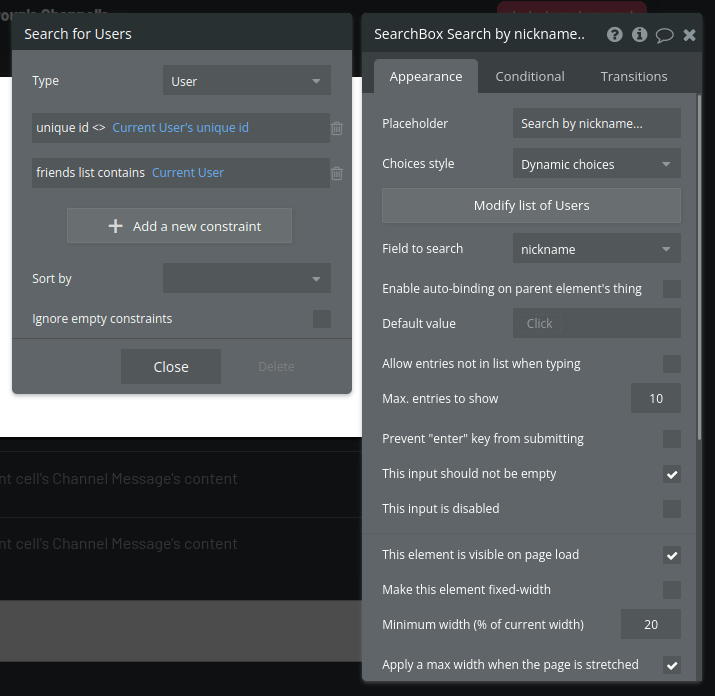
Add a “Search Box” element to the popup and set it to display dynamic choices, and the field to search to “nickname.”
We also want to keep this search box from displaying yourself. And this time, we also want this search to only display users already on your friends list. Click “Modify list of Users” and add the appropriate constraints. The search will only show:
- users that don’t have the current user’s unique ID
- users that are part of the current user’s friends list
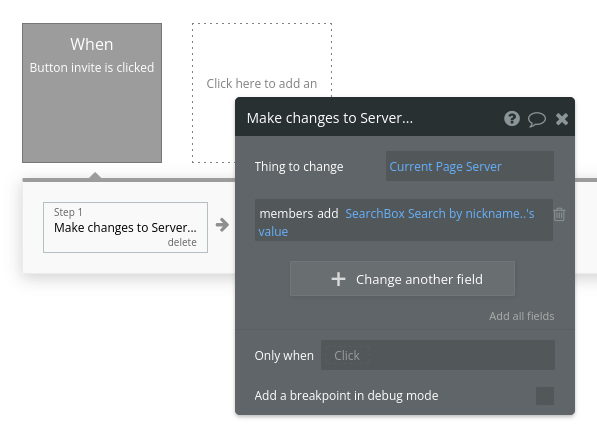
Start a workflow for the invite button. Under “Data (Things),” select “Make changes to a thing,” and add the Search Box’s value to the members list.
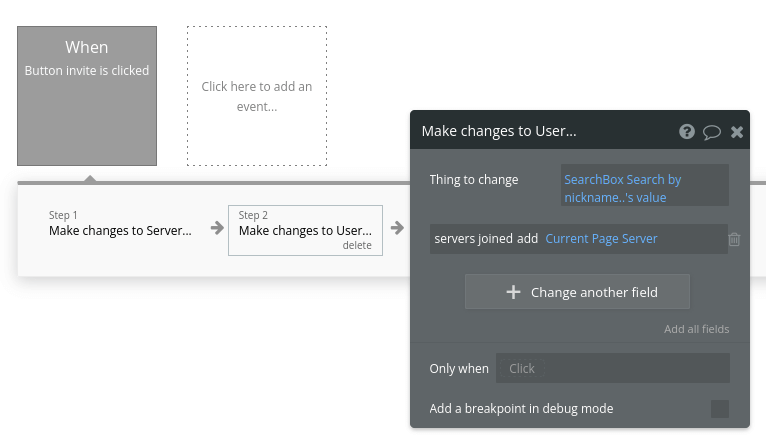
We also need to add this server to the list of joined servers of the invitee (“Data (Things)” > “Make changes to a thing”).
Reset the relevant inputs, clearing the Search Box.
Now that the friend has been added, hide the popup.
Last step: Add a button to display this popup on your “server” page. Then, set up the workflow as you see below.
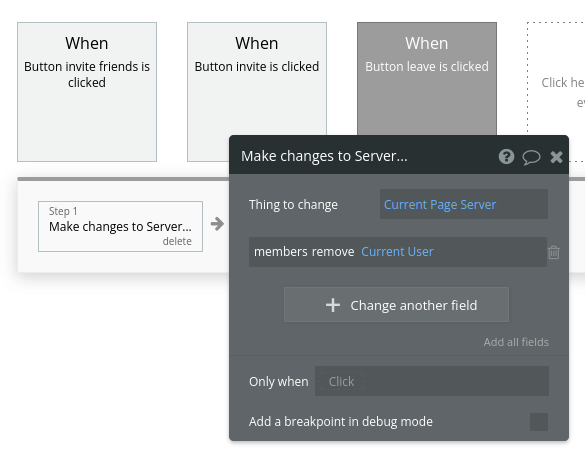
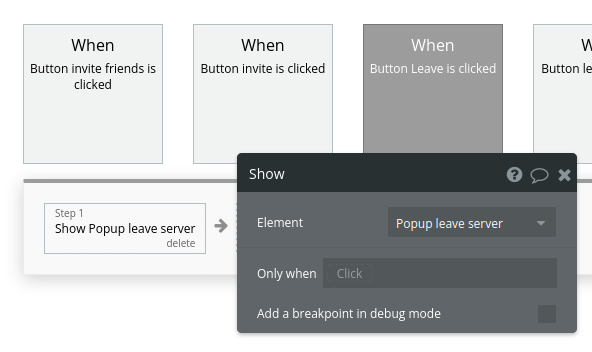
Allow users to leave the server
Create a confirmation popup element.
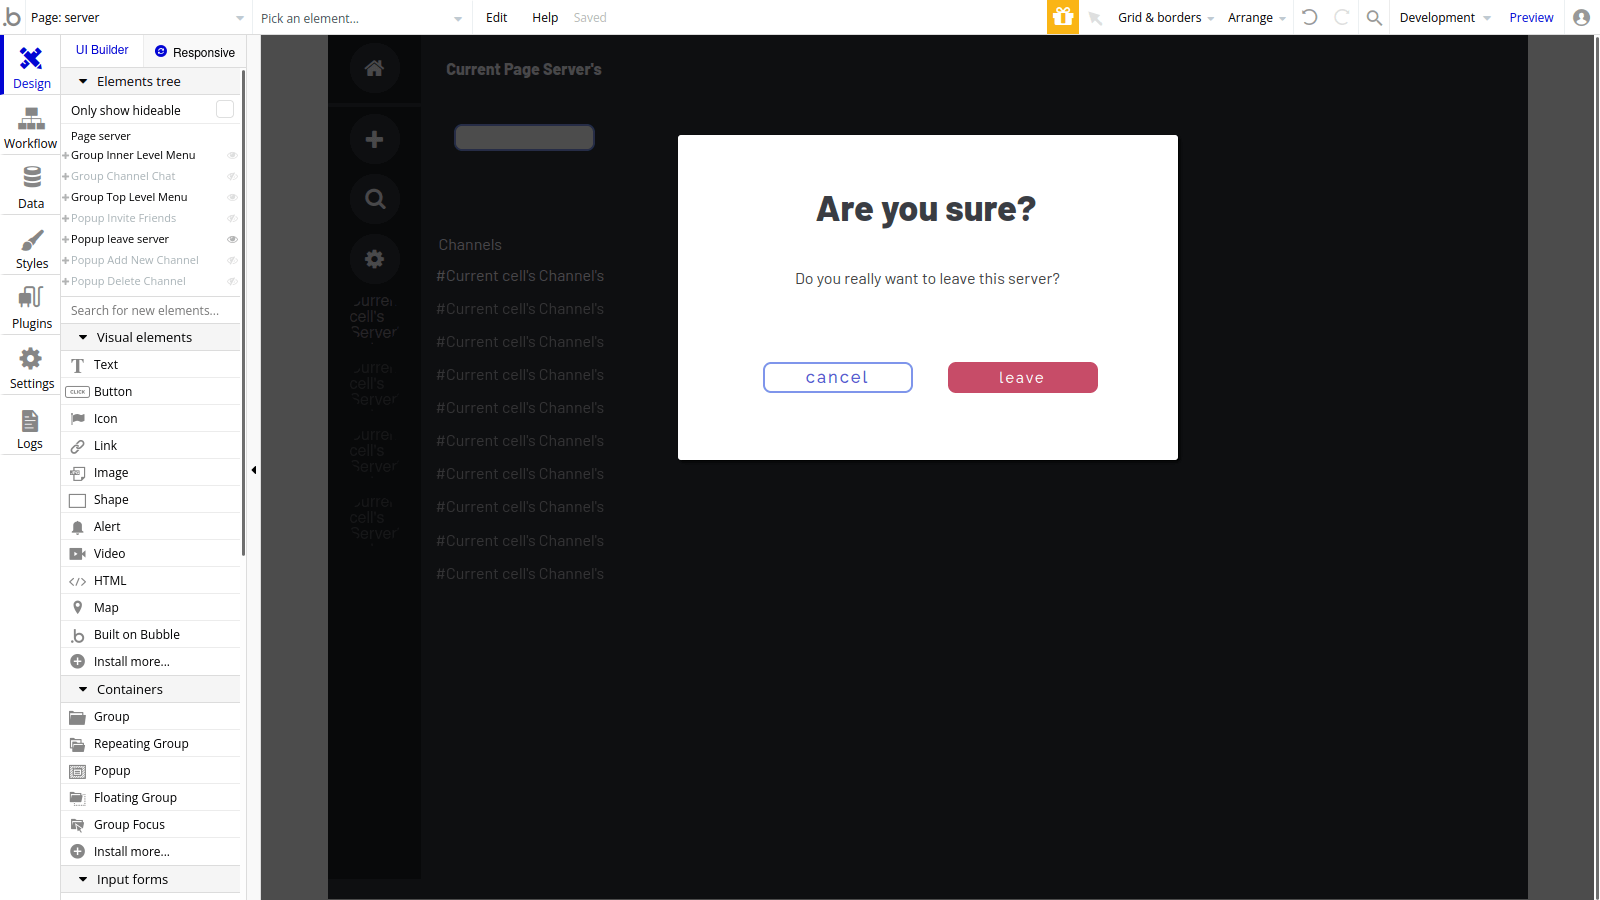
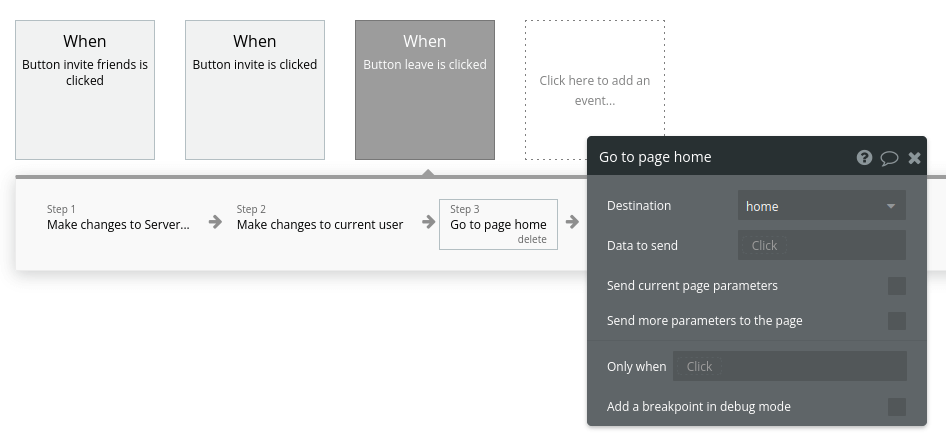
Start a workflow for the popup leave button. Make changes to the “Current Page Server,” removing the Current User from the list.
Next, remove the server from the Current User’s “servers joined” list.
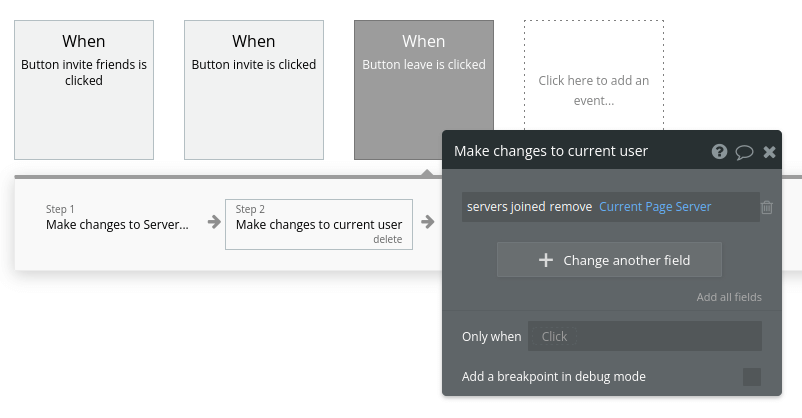
After this is done, send the user back to the home page.
Before we move on, add a button to open this popup to the server page and set it to show (“Element Actions” > “Show”).
Update server settings
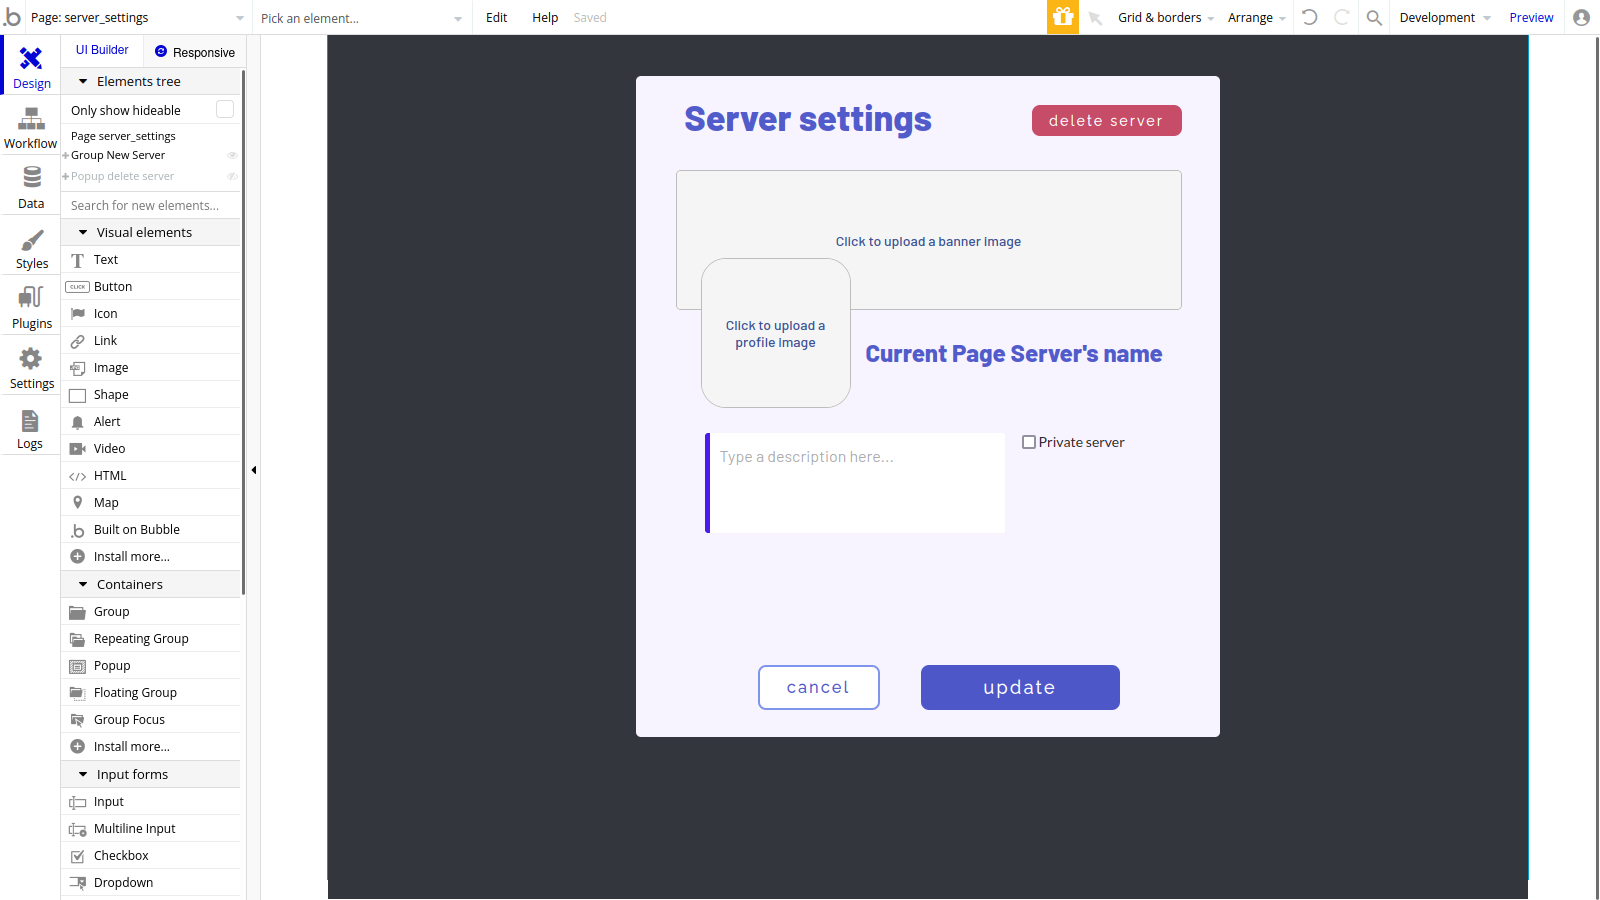
Your community changes over time, and so should your server information. Navigate to your “server_settings” page.
Add the appropriate input fields, picture uploaders, and buttons, and remember to have them display the server data.
Here’s an example design:
Now, it’s time to set everything up. Start a new workflow for the “update” button. In “Data (Things)”, hit “Make changes to a thing.” Match the data fields to the Input elements on the page.
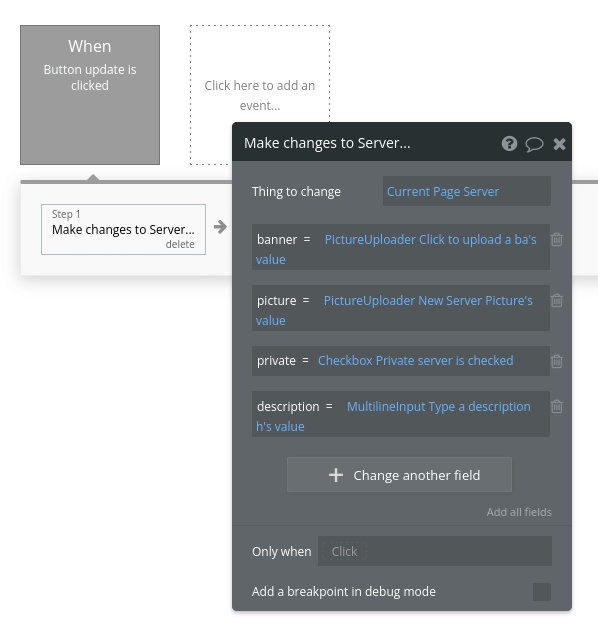
As for the second step, send the user back to the “server” page. To ensure all data moves according to plan, remember to set the data to send to be the “Current Page Server.”

The user can also delete the server from this page. Let’s add a popup to ask for confirmation as a safety measure.
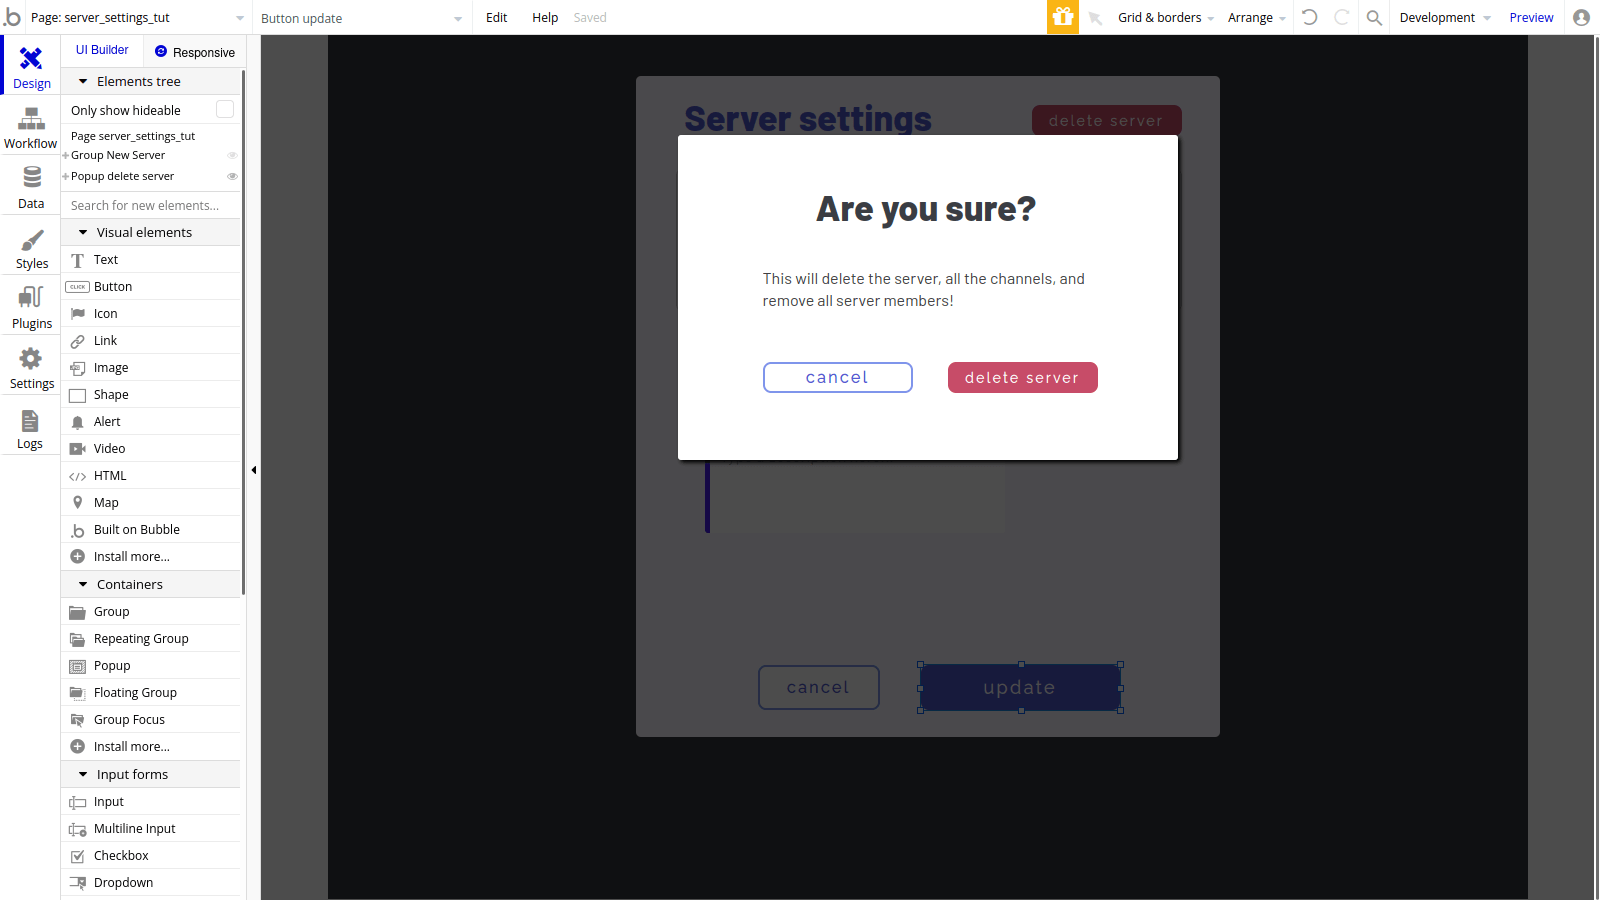
Now, start a workflow for the “delete server” button. This workflow is longer, as we’ll be:
Removing the server from the “servers joined” list of each of the members. From “Data (Things)”, select “Make changes to a list of things”...
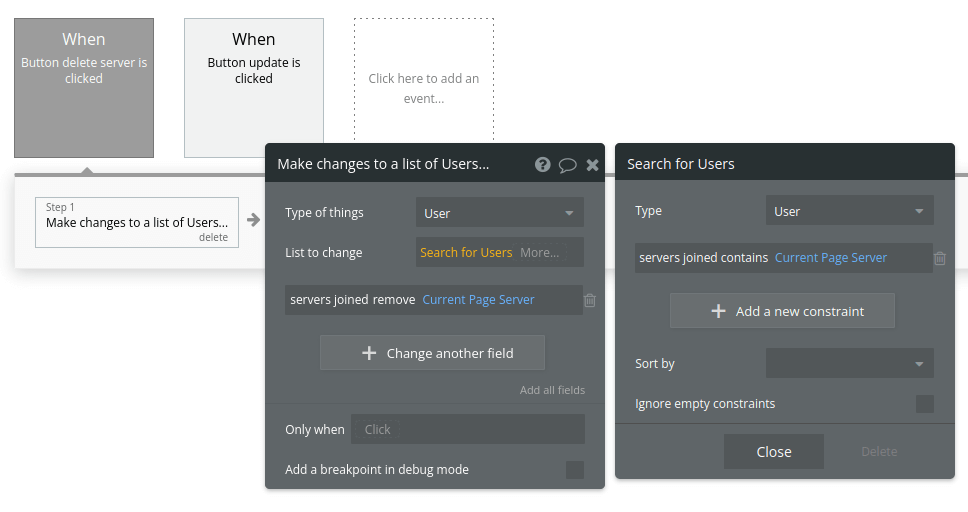
Removing the server from the “servers owned” and “servers joined” of the Current User (“Account” > “Make changes to the current user”)...
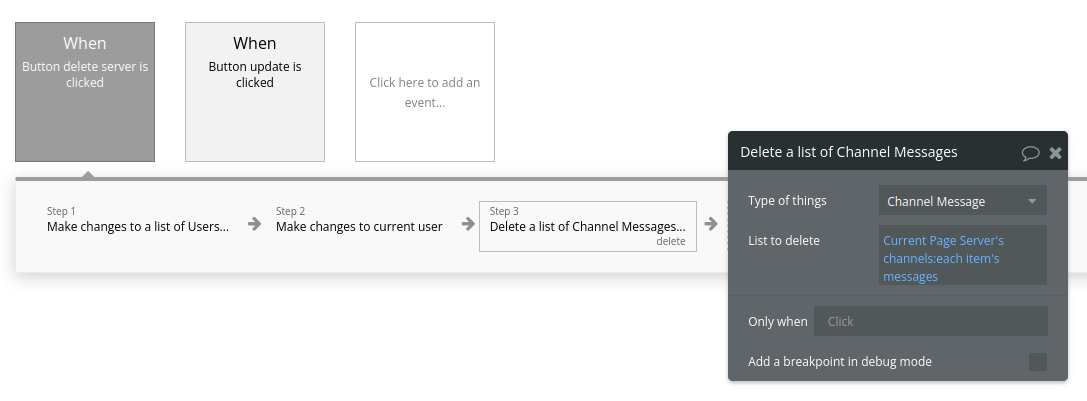
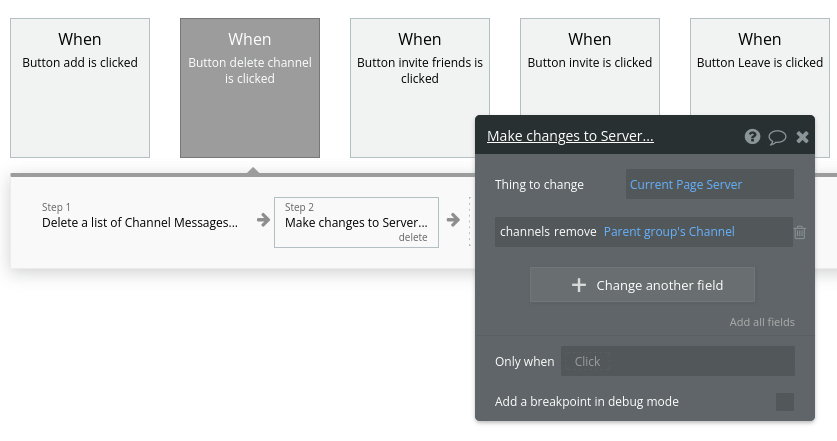
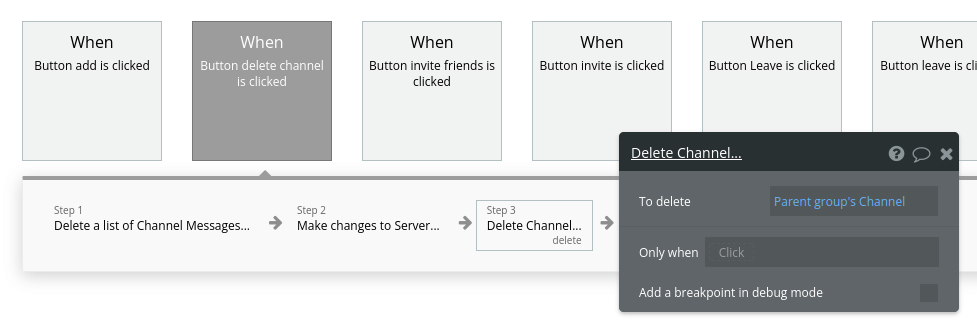
Deleting all the channel messages on this server (“Data (Things)” > “Delete a list of things”)...
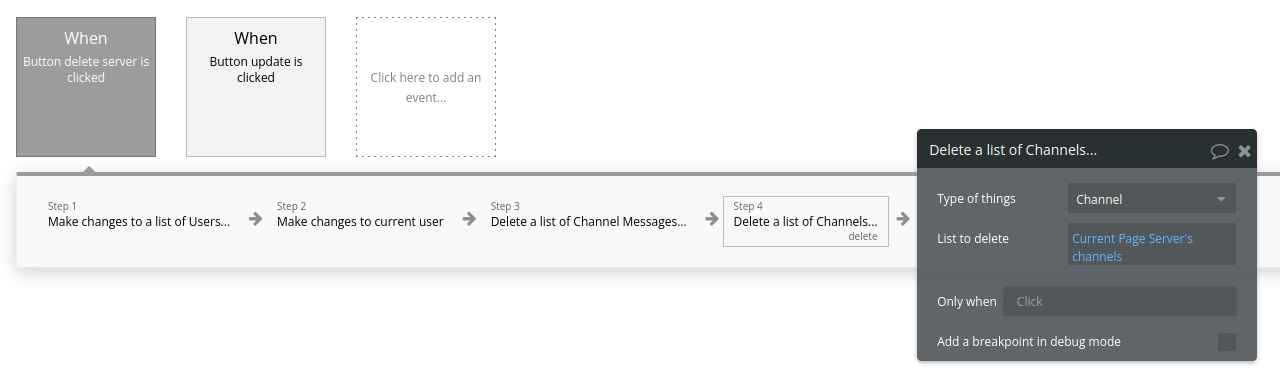
Deleting all the server channels…
And finally deleting the server (“Data (Things)” > “Delete a thing”).
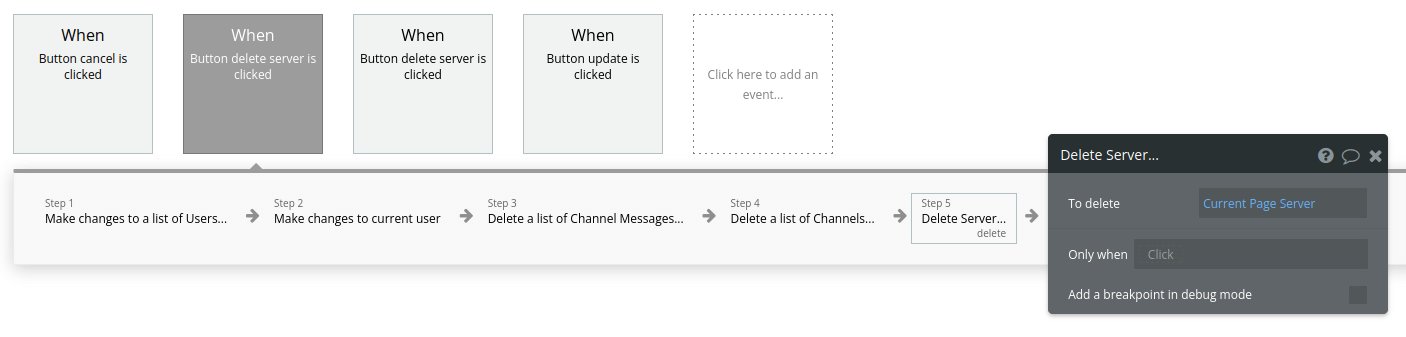
Once that’s done, let’s send the user back to the “home” page. Add a new action, “Navigation” and “Go to page.”
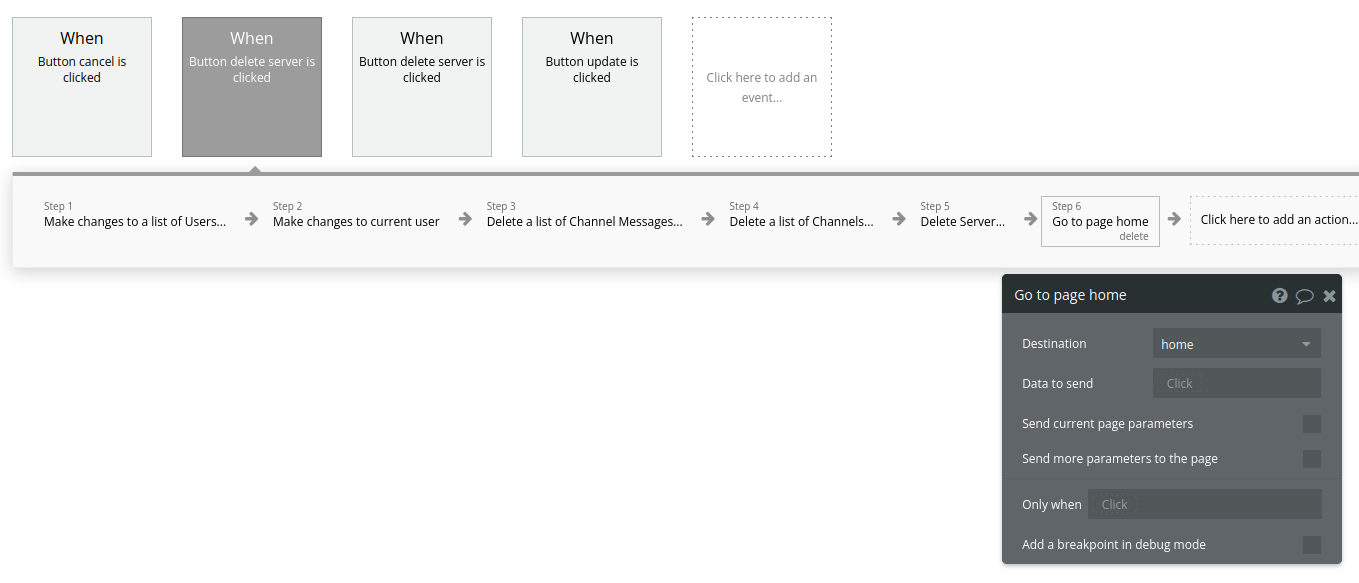
The functionality to delete the server is now ready.
Remember to add the workflow to show this confirmation popup before moving on (right-click the appropriate button in your “server_settings” page, start a workflow, “Element Actions” > “Show”).
Create server channels
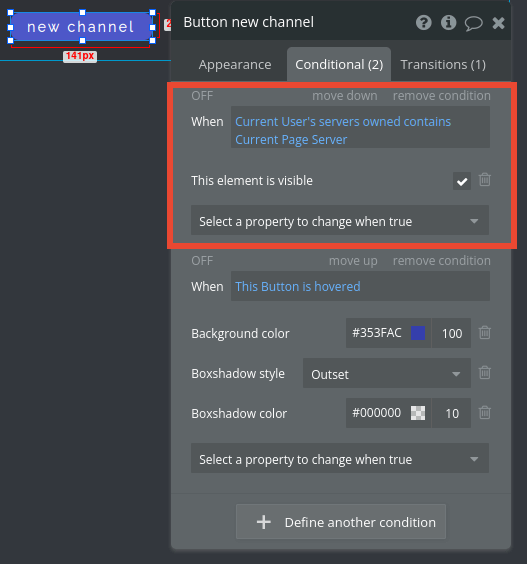
New channels can only be created and deleted by the server owner. Let’s add a button to the server page that will only show if the current user is the owner.
Create the “new channel” button. Untick “This element is visible on page load.”
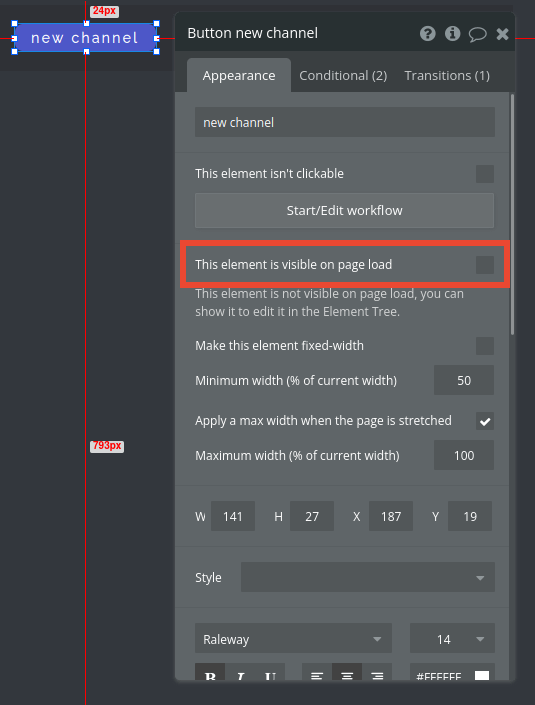
Click the “Conditional” tab and define a new condition, where the button is only visible when the current user has the server on their “servers owned” list.
Let’s set up a new popup to enter the channel name and then create it.
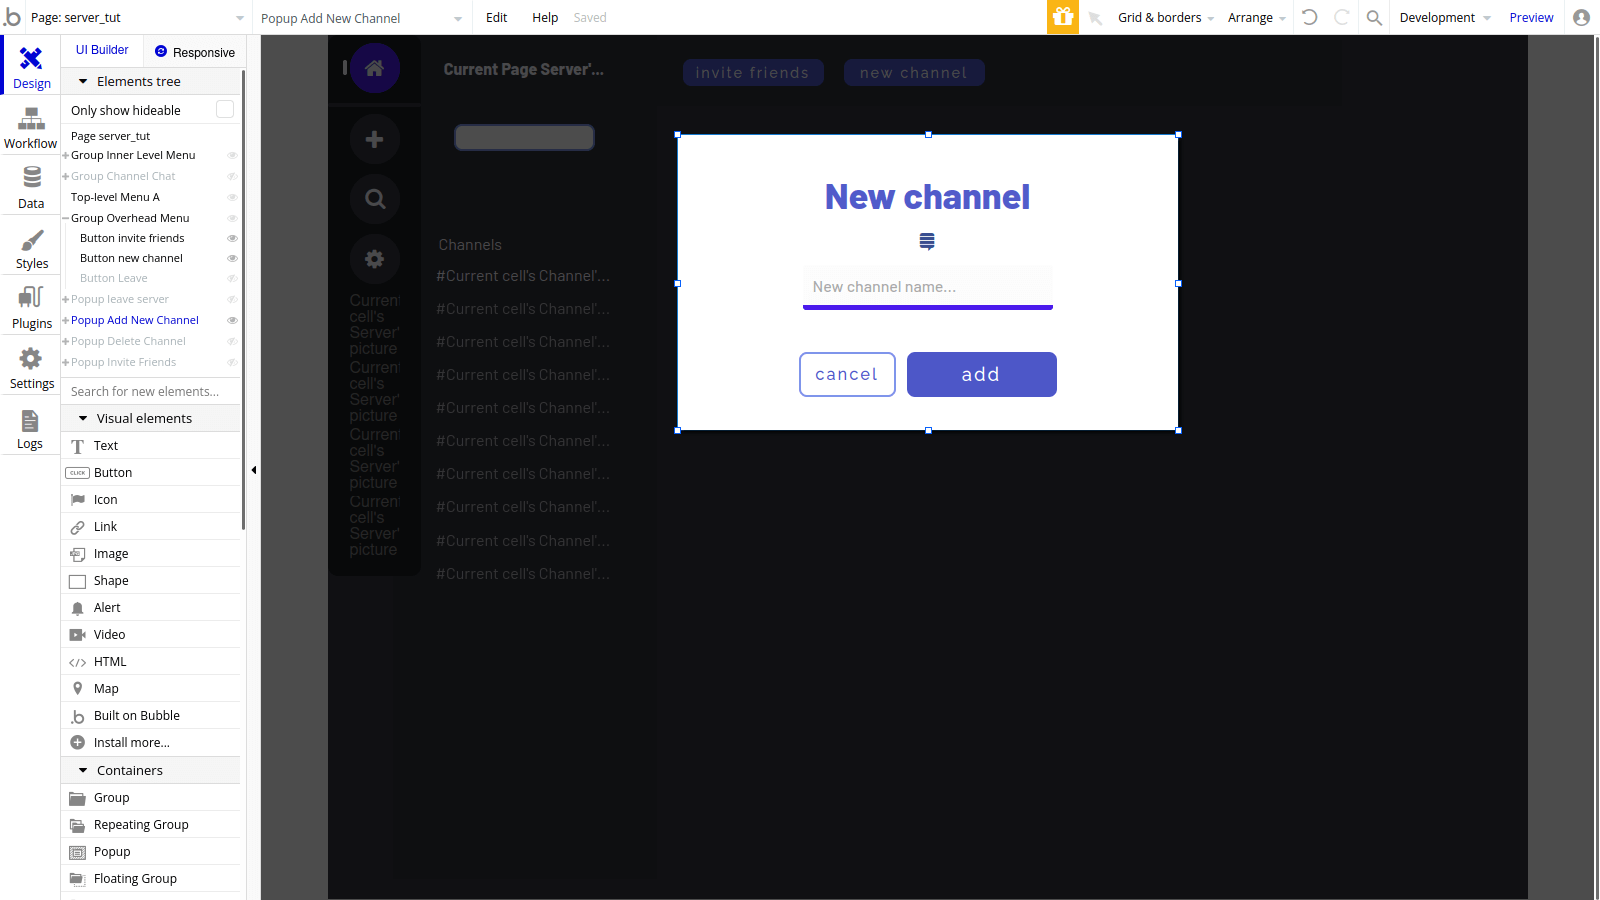
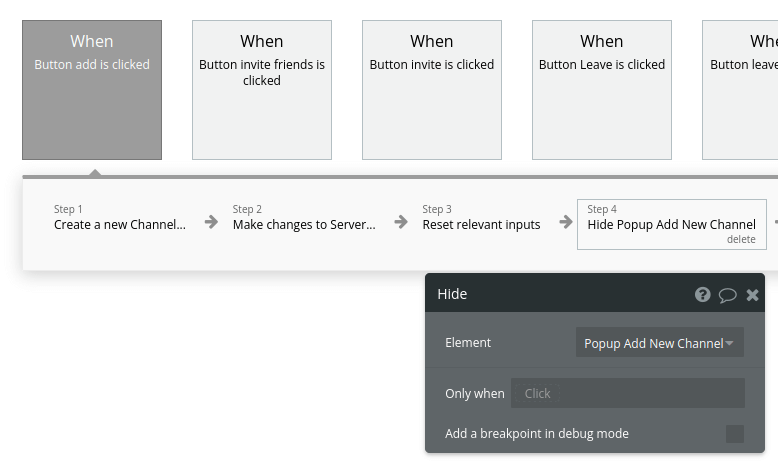
Start a workflow for the “add” button on the popup. Add a new action to create a new channel (“Data (Things)” > “Create a thing”).

Make changes to the Server to add the new channel to it (“Data (Things)” > “Make changes to a thing”).
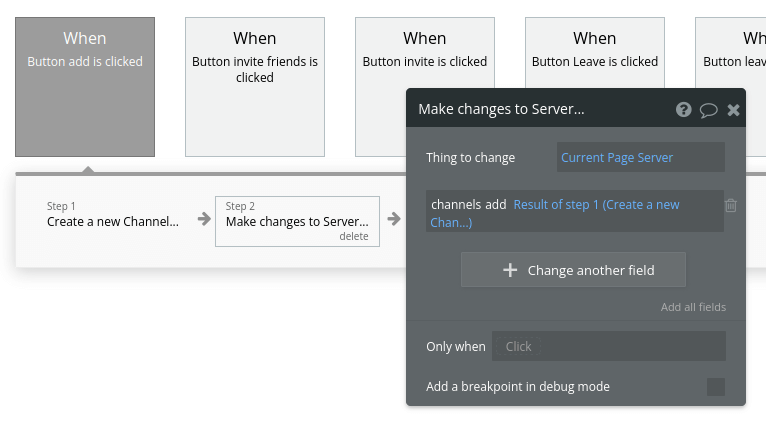
Time to reset the relevant inputs and hide the popup.
Don’t forget to set a workflow to show this popup. Right-click the “new channel” button we created before and set it to show the popup (“Element Actions” > “Show”).
Chat in server channels
Remember how we configured the friend chat window on the “home” page? The process will be similar here, except we’ll be working with Channel Messages this time.
Create a group to contain:
- a header, showing the name of the channel,
- a repeating group to show the channel messages,
- an input field,
- a send channel message button,
- and a delete channel button (we’ll configure it later).
Here’s an example design:
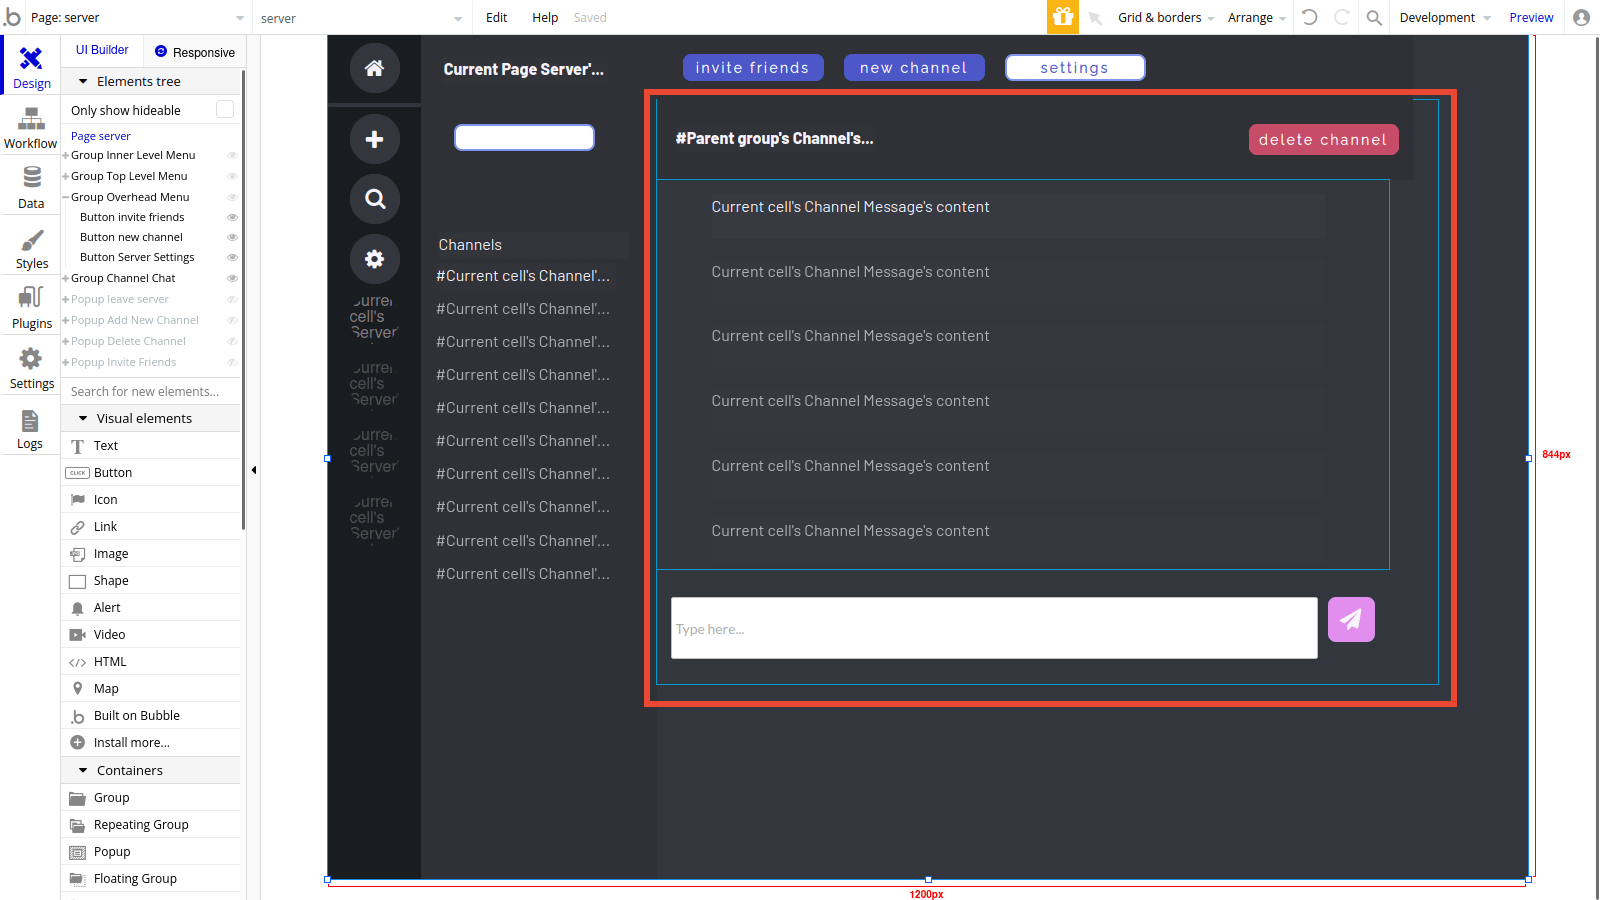
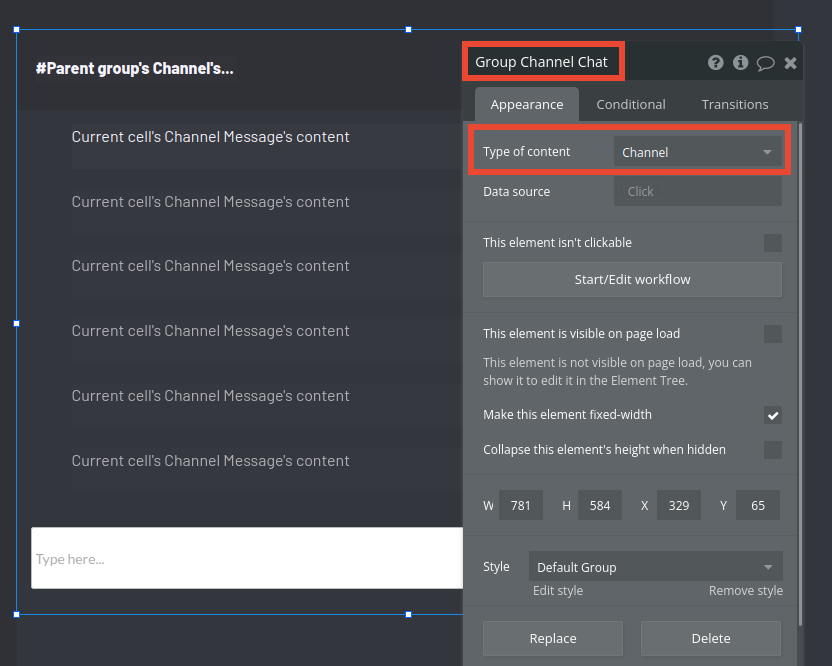
To simplify the process of creating workflows later, select and group all of these elements together and name it “Group Channel Chat.” Then, set its content type to be “Channel,” and leave the data source empty.
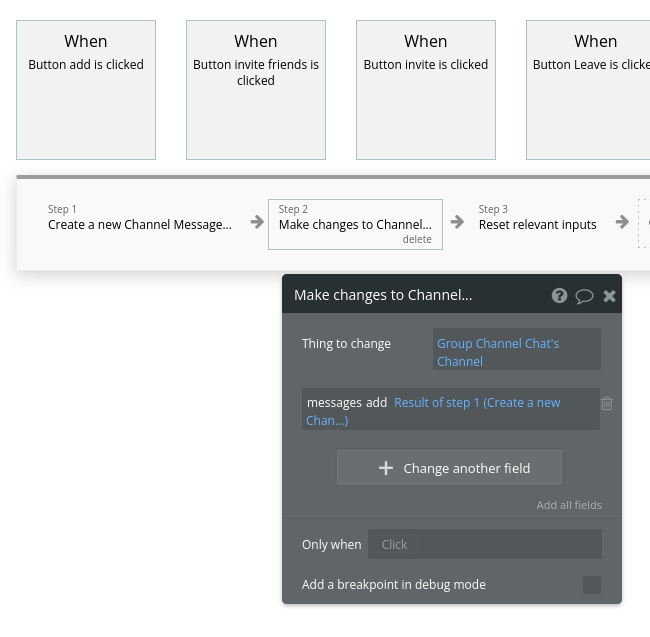
Once that’s done, start a workflow for the “send message” button. Set it to create a new Channel Message (“Data (Things)” > “Create new thing”).
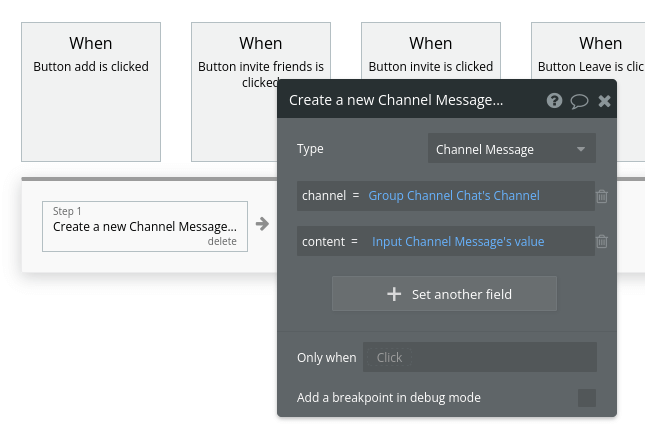
Time to add this channel message to the channel we’re chatting in (“Data (Things)” > “Make changes to a thing”). Don’t forget to reset the relevant inputs at the end.
Delete server channels
In the Group Channel Chat, add a new button to delete the channel. Set it to be visible only to the server owner by unticking “This element is visible on page load.” Set the condition to only show the button when the current user has the server on their “servers owned” list.

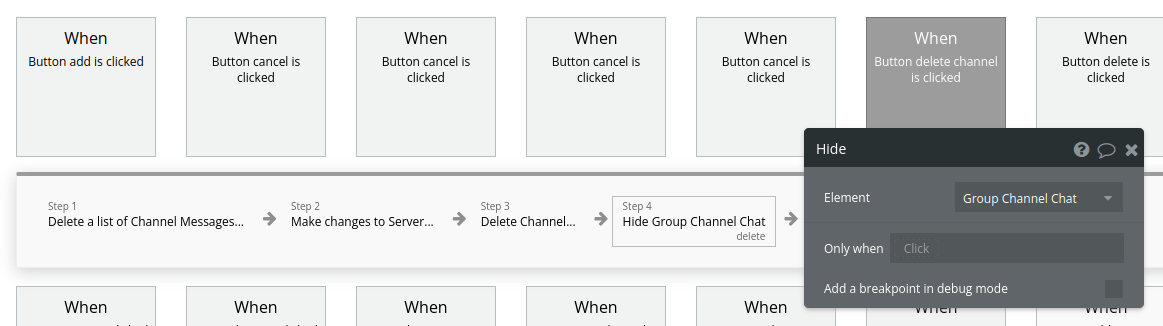
Start a workflow for this button, and delete a list of the messages within this channel (“Data (Things)” > “Delete a list of things”). On the “List to delete,” do a search for channel messages that belong to this channel.

Next, remove the channel from the server (“Data (Things)” > “Make changes to a thing”).
Time to delete the channel (“Data (Things)” > “Delete a thing”).
To show that the action was carried out successfully, let’s hide the Group Channel Chat.
Browse and joining public servers
Let’s work on our “discover” page to show all the available public servers, so users can find, join and chat within them.
Navigate to the “discover” page and add the reusable menu.
Next, add a Repeating Group to display the available servers. Remember to only display the ones that aren’t private.
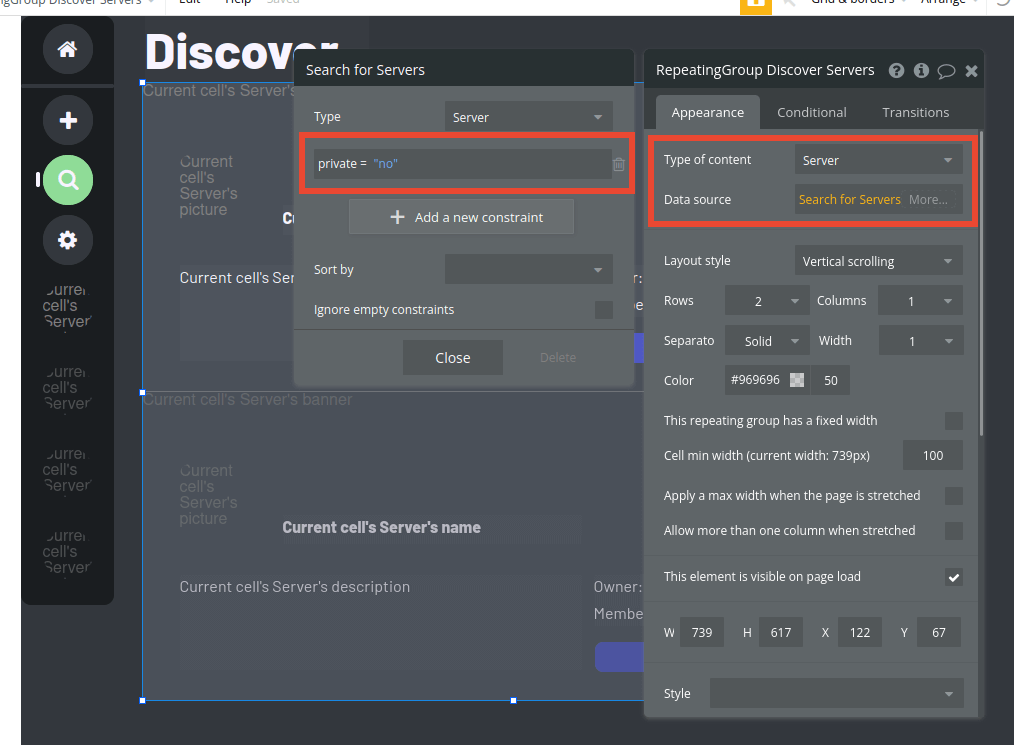
Style the Repeating Group rows to show the banner image wide at the back, the server profile picture on the top, along with the name, description, owner, and member count. To top it off, add a “join” button.
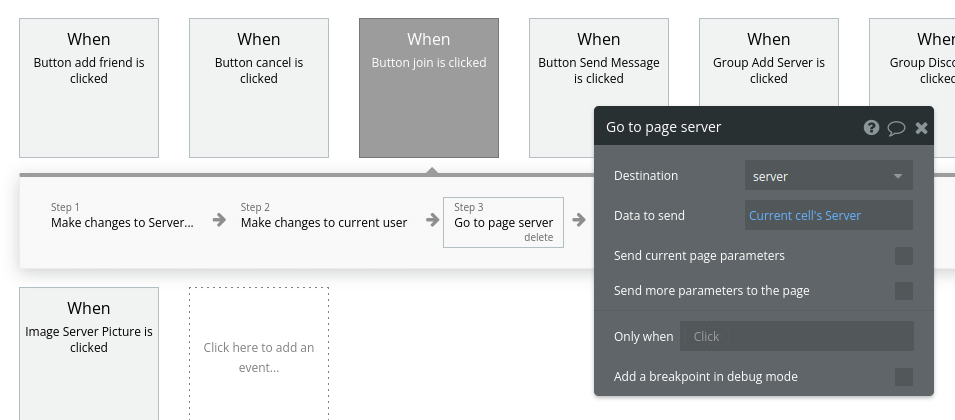
Start a workflow for the “join” button. Add the Current User as one of the server’s members (“Data (Things)” > “Make changes to a thing”).
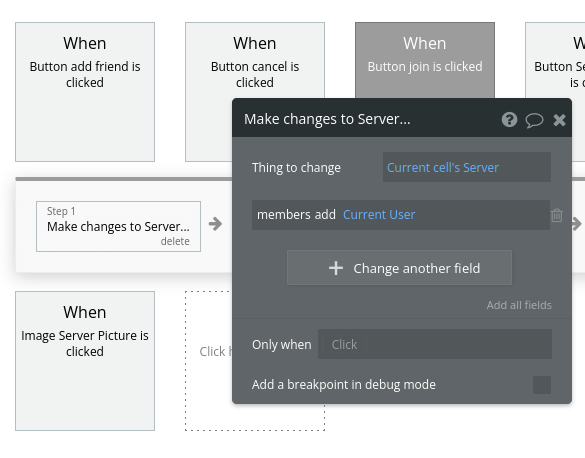
Now, add the Server to the “servers joined” field of the Current User (“Data (Things)” > “Make changes to a thing”).
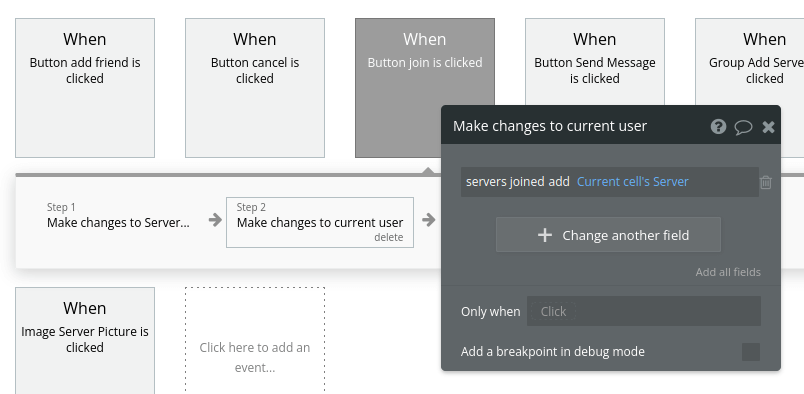
Finally, send the user to the “server” page (“Navigation,” “Go to page”), along with the “Current cell’s Server” data.
Add additional features
Once you’re familiar with creating custom data fields and displaying dynamic content, you can start getting creative with the experiences you build. Additionally, you can:
- Add video call functionality to the app by exploring the Bubble plugins section so users can video chat with ease,
- Create a notification system so users can keep track of new messages,
- Add rich-text support to the chat,
- And much more!
Add privacy and security
Now that you have the basics of your app, don't forget to set some privacy rules, conditions, and authentications to keep your data secure—starting with roles in the “Privacy” section of your data tab. You can also check if you're unintentionally exposing any data with an API checker.
Launch your Discord clone
Hiring a developer or dev team to build this app would cost thousands, if not tens of thousands of dollars. And come launch day, if users react positively to your app, keeping up as usership grows in real-time can be a struggle. Paid plans allow you to host the app on your own custom domain, and the pricing starts at as low as $29 per month. Some templates and plugins may cost more, but you can build all the functionality of a Discord clone without any additional costs.
Start building
Bubble can help you build a Discord clone or any other product you choose! It’s never been easier to build something that will make others react with awe—all without having to code.
Ready to join the no-code movement with zero prerequisites? Register your free Bubble account and get started today. If you’d like additional help when building your product, join our thriving community forum open to all Bubble users. It’s a fantastic place to source actionable, step-by-step advice and resources. Any maker is encouraged to ask questions within the community to help empower their no-code journey.