In this article, we’ll walk you through the step-by-step process of building a budgeting app like Mint, YNAB, or PocketGuard with Bubble's visual programming platform. Whether you’re looking to build a personal finance app or you’re just interested in utilizing some of Mint’s core features, this guide will share how to start building the underlying workflows for your product.
The steps to building a Mint clone with no-code include:
- Building a dashboard page to keep track of account balance, bills, and budget
- Setting a budget with a monthly limit
- Changing the account balance, adding and subtracting funds to the user’s account
- Adding bills and expenses, labeling each by category
Note: This beginner minimum viable product (MVP) tutorial will NOT show how to draw real financial data from any user’s financial accounts. If you’d like to integrate this feature in your app, you can do so by integrating your Bubble app with Plaid. Search for Plaid in the Bubble’s plugins page.
Table of Contents:
Get Started
Before you start, you’ll need to first register your free Bubble account. Click the button below to get started, then you can follow along as we build our product together.
New to Bubble? Follow along on our introductory videos to get familiar with the basics of Bubble. This will help you get a running start when building a budgeting app.
When kickstarting your project, you can choose to begin by wireframing your product design, or building the necessary fields within your database. In this case, we’ll start by using Bubble’s visual design tool to shape the user interface of our platform.
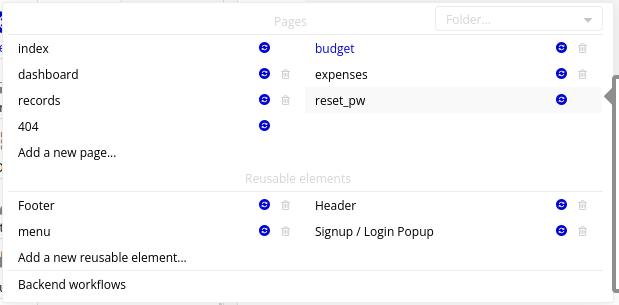
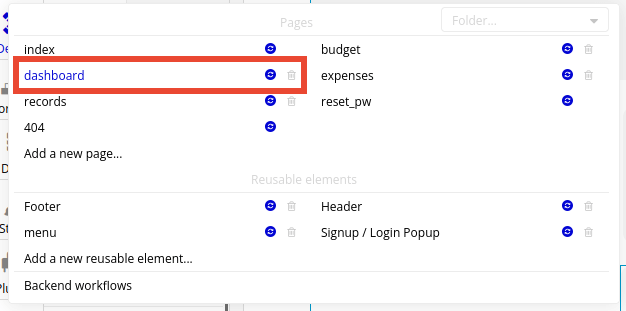
If you’re replicating an app like Mint, you’ll need to build the following pages:
- A dashboard page (“dashboard”) - this page will show the user’s financial health at a glance, with general budgeting goals and account balance.
- A budget page (“budget”) - here, the user can see if they’re on track by seeing the limits, spending and categories.
- An expenses page (“expenses”) - showing a list of expenses, filterable by category.
- A records page (“records”) - where the user can add new income and new expenses to the app.
Once you create these pages, your page dropdown should look like this:
A major feature within Bubble is the ability to send data between pages. This allows you to create one generic version of a page, then dynamically display the relevant content from your database when it’s required.
In the case of your Mint clone, you’ll only need to create one page for each activity. We can then add unique conditions to display only the relevant content of each of them when it’s needed (we’ll cover this in more detail soon).
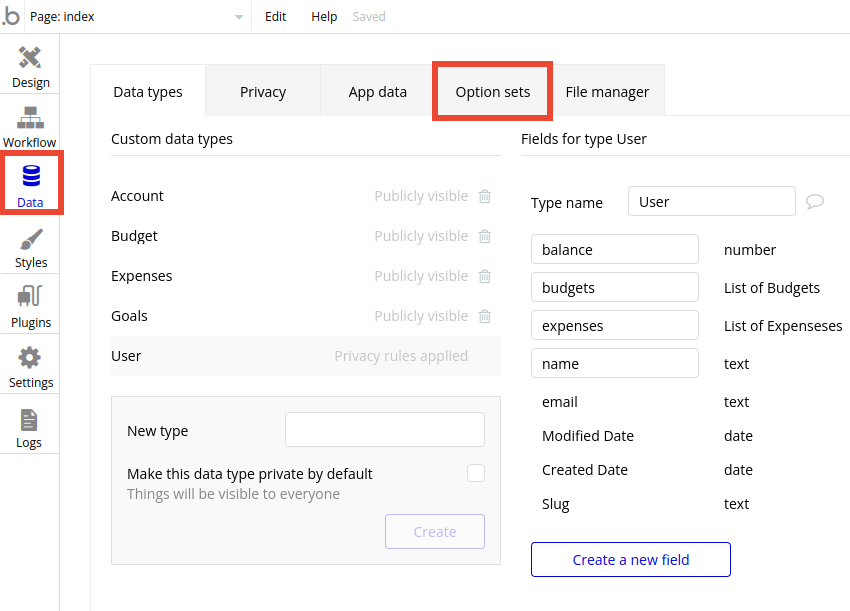
Configuring your database for Mint
Once you’ve wireframed these pages, you can focus on creating the necessary data fields to power your application. We’ll rely on these fields to connect the workflows behind your product.
Bubble’s pre-built database makes it easy to create different data types with unique fields. When building Mint as an MVP, we’ll need to create the following data types, fields, and option sets.
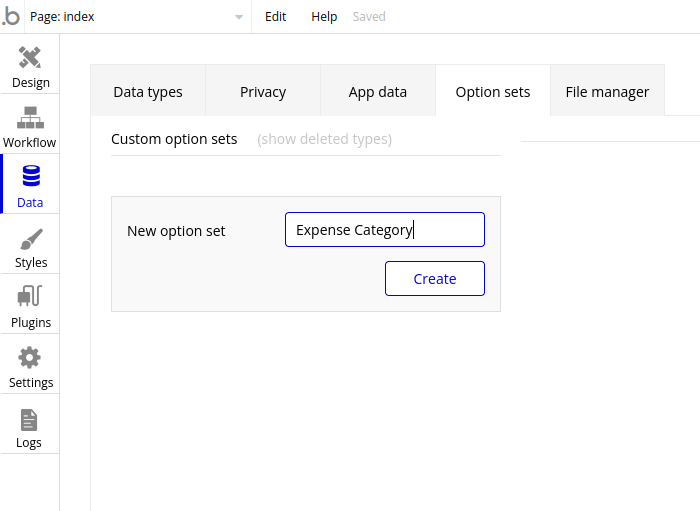
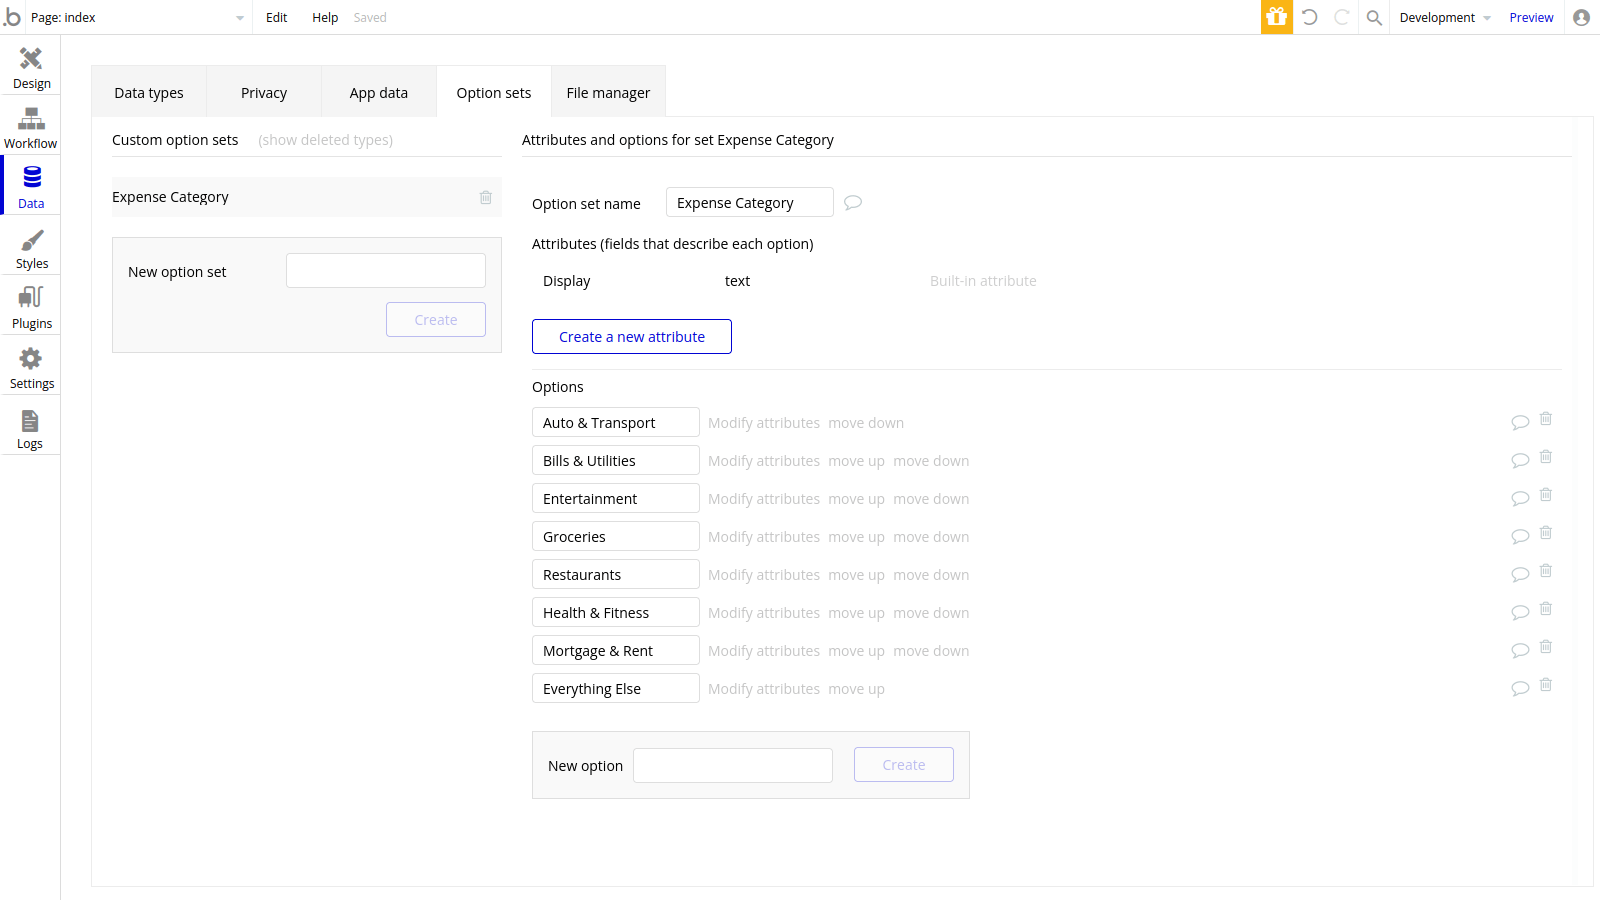
Create an Option set: Expense Category
Bubble's option set feature allows you to create a preset list of options in different parts of your app without having to retype each into every page, dropdown menu, or data type.
On Bubble’s Data tab, click on Option sets.
Enter “Expense Category” into the input box, and click create.
Now, we’re going to enter the spending categories for our budgets. Type “Auto & Transport” in the “New option” input as our first category, and click “Create.”
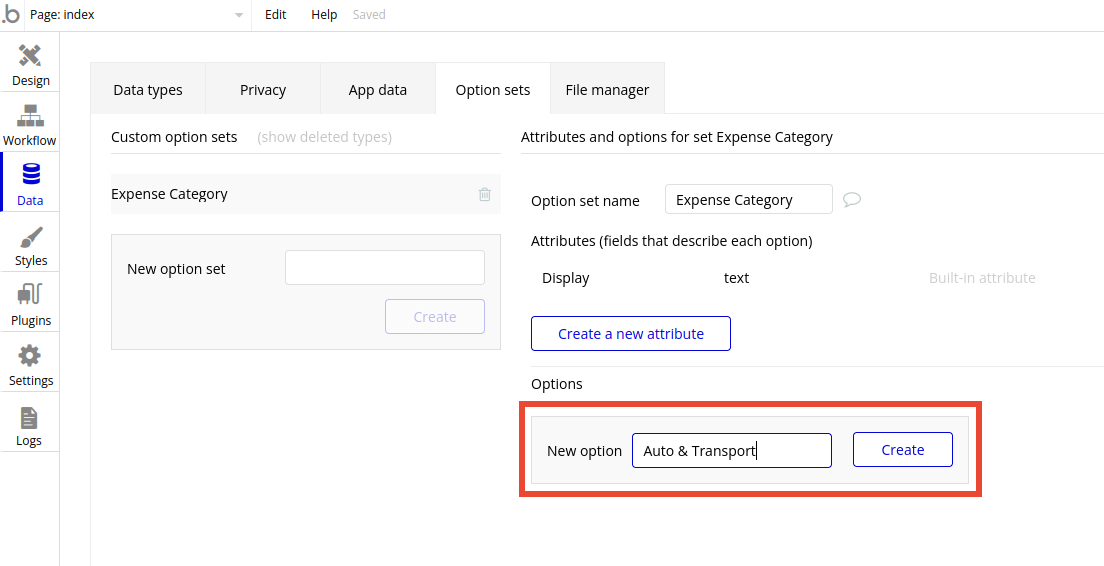
Repeat the process for the following examples of spending categories (you can choose to add more or change these):
- Bills & Utilities
- Entertainment
- Groceries
- Restaurants
- Health & Fitness
- Mortgage & Rent
- Everything Else
Once you’re done, your option sets section should look like this:
Now, click back to the “Data types” section and add the following data types:
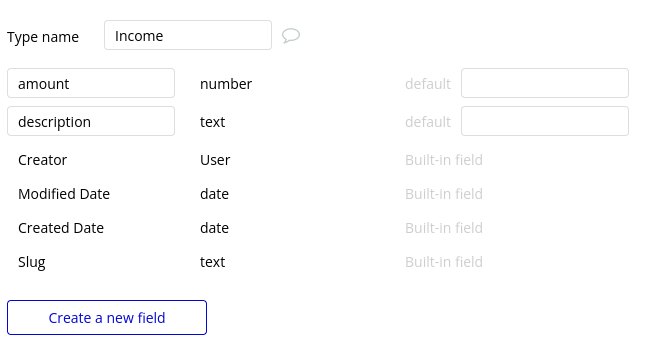
Data type: Income
Fields:
- amount (type: number)
- description (type: text)
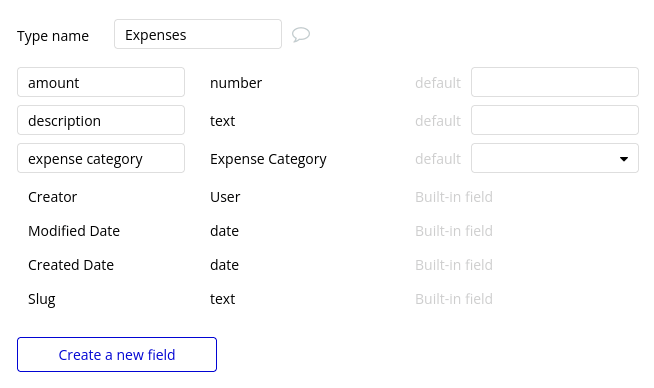
Data type: Expenses
Fields:
- amount (type: number)
- description (type: text)
- expense category (type: Expense Category. This is the option set we just created. We’ll use it to label each of the expenses.)
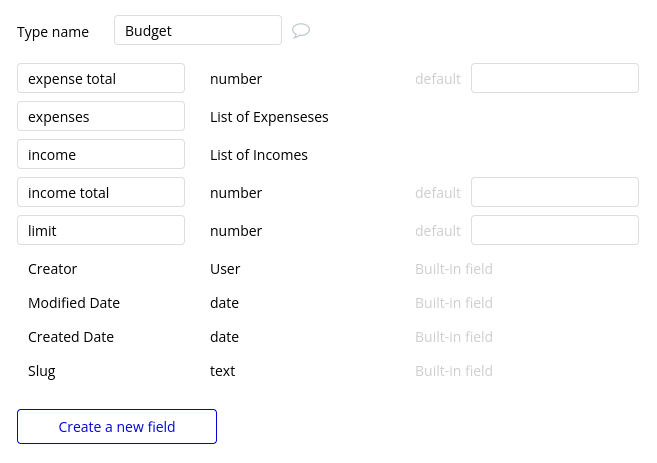
Data type: Budget
Fields:
- expense total (type: number)
- expenses (type: Expenses. Tick “this field is a list.” Doing so will allow you to add multiple expenses to this field.)
- income (type: Income. Tick “this field is a list.” Doing so will allow you to add multiple income records to this field.)
- income total (type: number)
- limit (type: number)
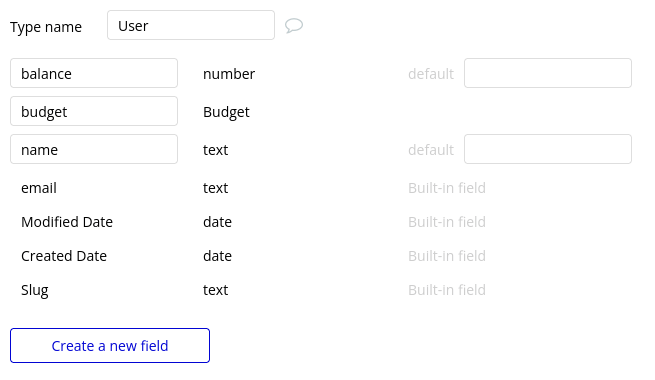
Data type: User
Fields:
- balance (type: number)
- budget (type: Budget)
- name (type: text)
Building workflows
Now that you’ve structured both the design and database of your application, it’s time to start stitching everything together, making your app functional.
In Bubble, the main way to create functionality in your app is with workflows. Each workflow happens when an event occurs (e.g. a user clicks on a button) and then runs a series of “actions” in response (e.g. “sign the user up,” “make a change to the database,” etc.)
Creating a menu
Let’s start by creating a menu to let our users navigate between the dashboard, expenses, and budget pages.
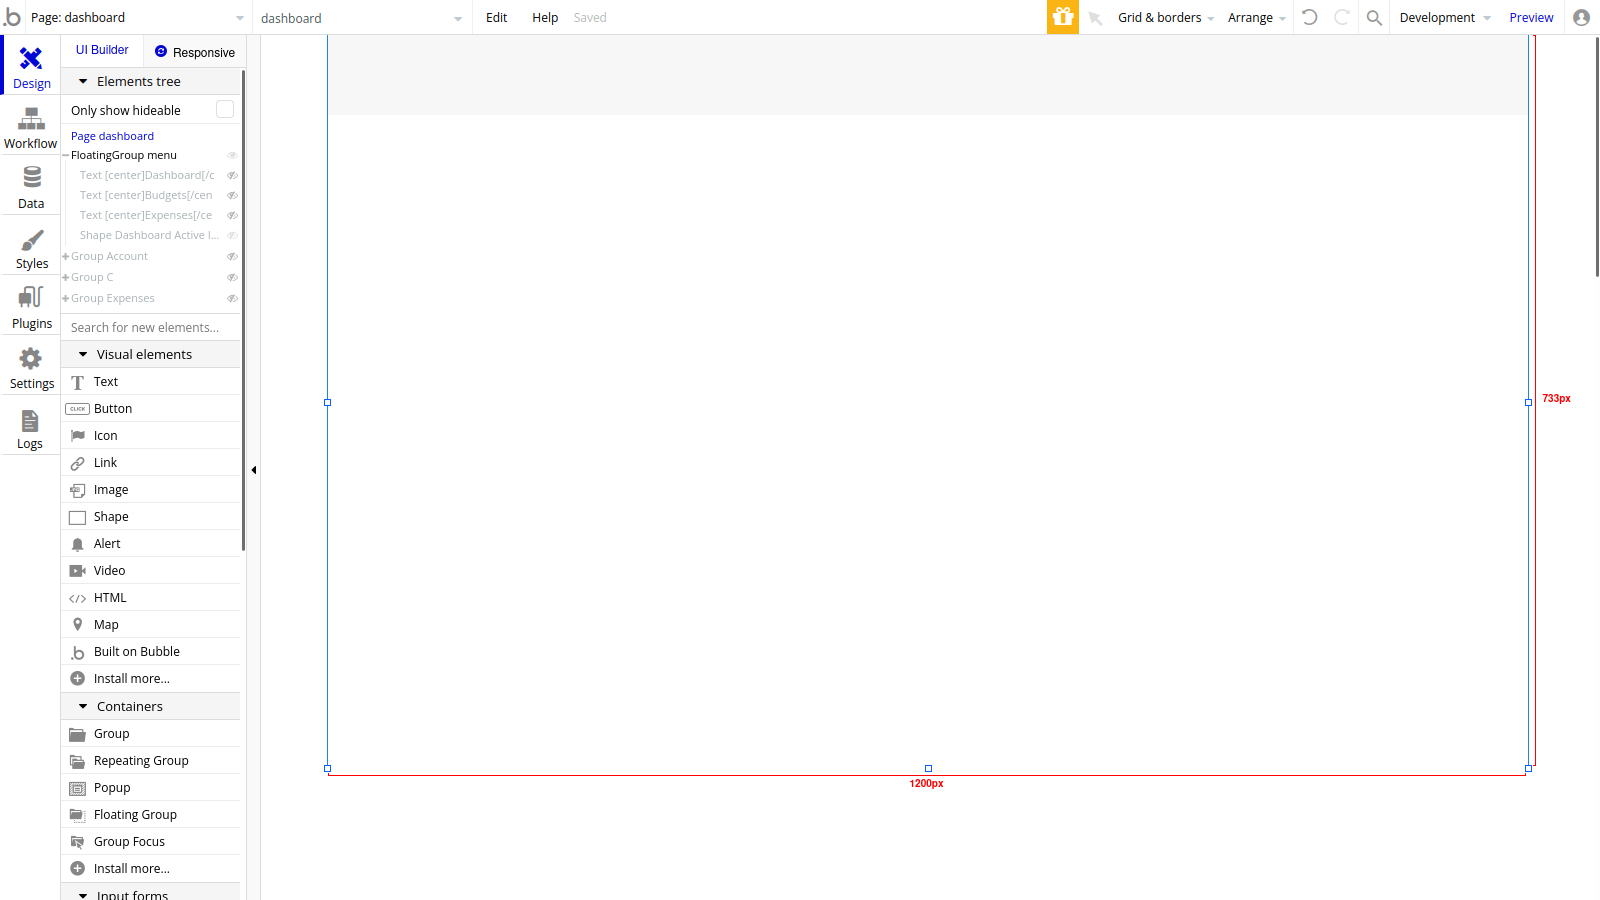
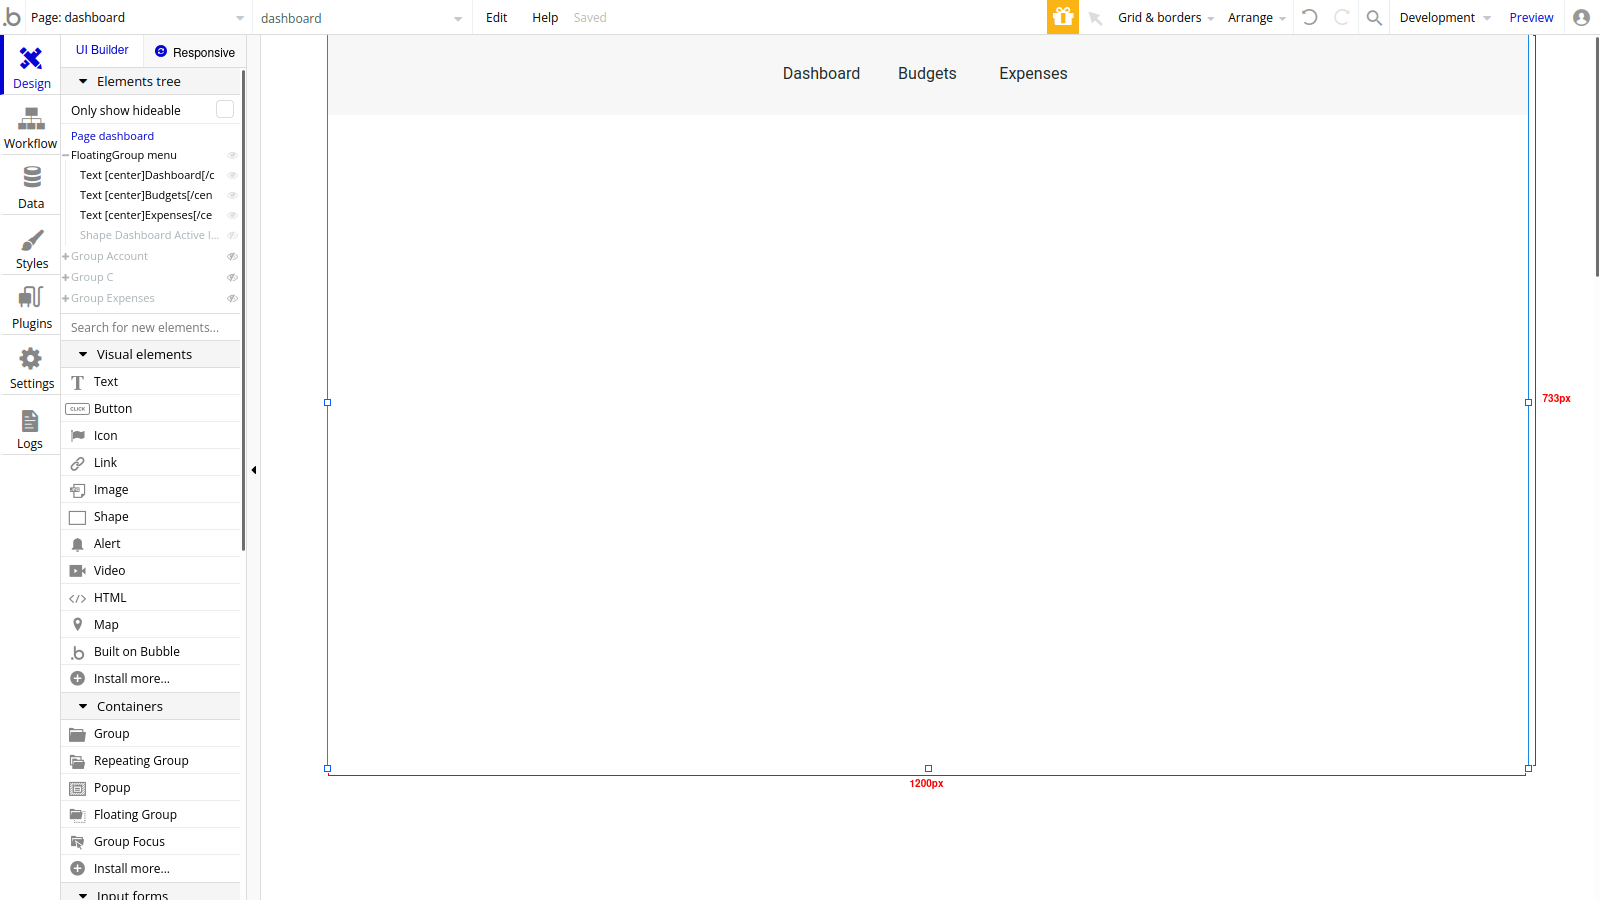
Navigate to the dashboard page we created earlier.
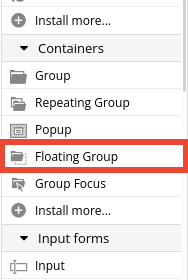
In the UI builder list, look under containers and place a floating group on the page. This kind of group always stays locked to a part of the viewport, and other elements will scroll underneath it.
Place the floating group at the top of the dashboard page, stretching to each of the sides of the page, and give it a background color.
Now, add 3 text elements to the floating group, each containing the names of our pages:
- Dashboard
- Budgets
- Expenses
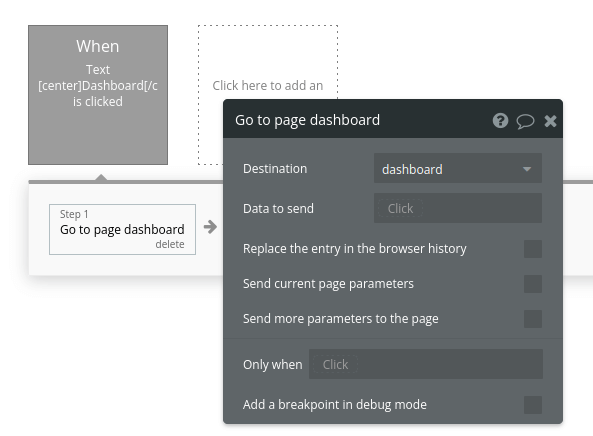
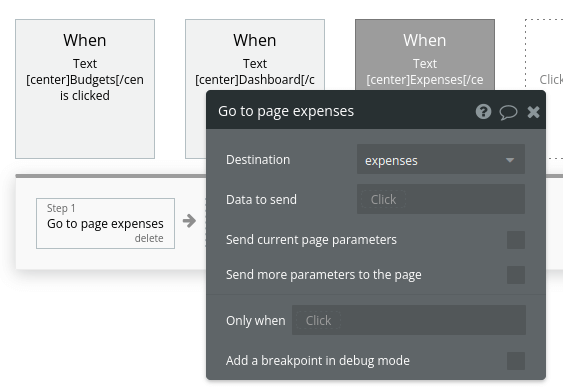
Now, let’s start the workflows to allow the user to navigate to each page. Right-click the Dashboard text element and hit “Start/Edit workflow.”
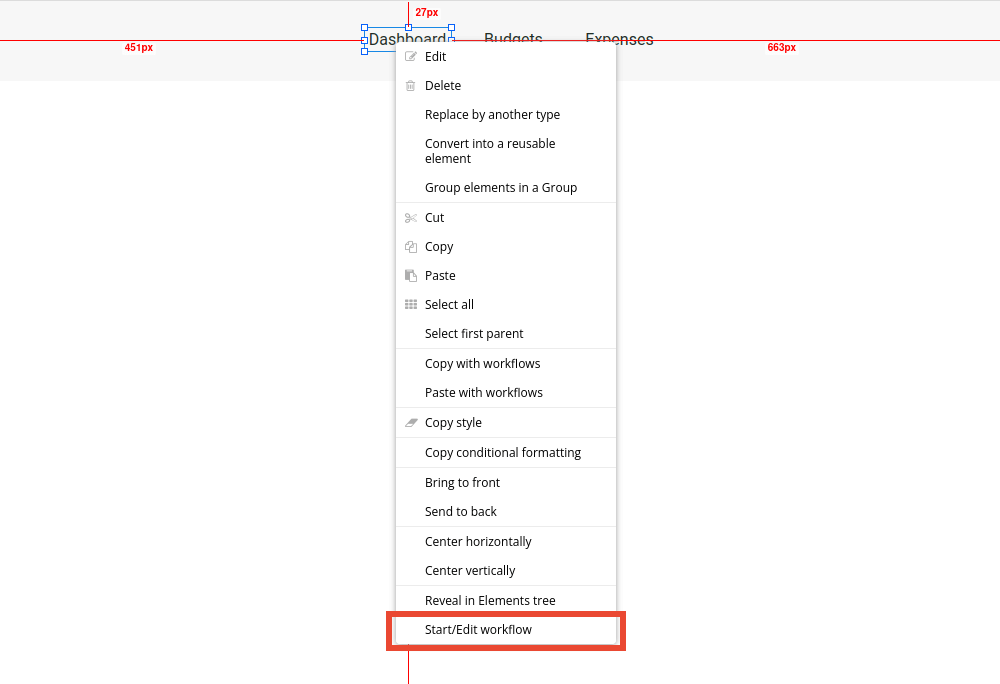
Click to add an action. Select “Navigation” > “Go to page…” and choose the dashboard page as the target.
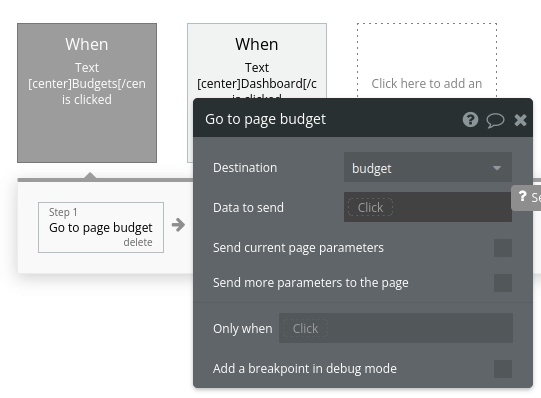
Repeat the process for the other two elements. Right-click the Budgets text element, start a workflow, add an action, choose “Navigation” > “Go to page…” and set the budget page as the target.
Right-click the Expenses text element, start a workflow, add an action, choose “Navigation” > “Go to page…” and set the expenses page as the target.
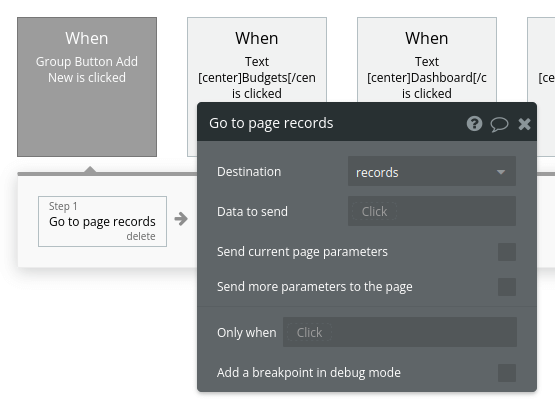
Before we move on, let’s add a button to allow the user to go to the records page, where they can add new income and expenses as needed. Place this button on the right side of the element.

Right-click the button and start a new workflow. Select “Navigation” > “Go to page” and set the records page as the target.
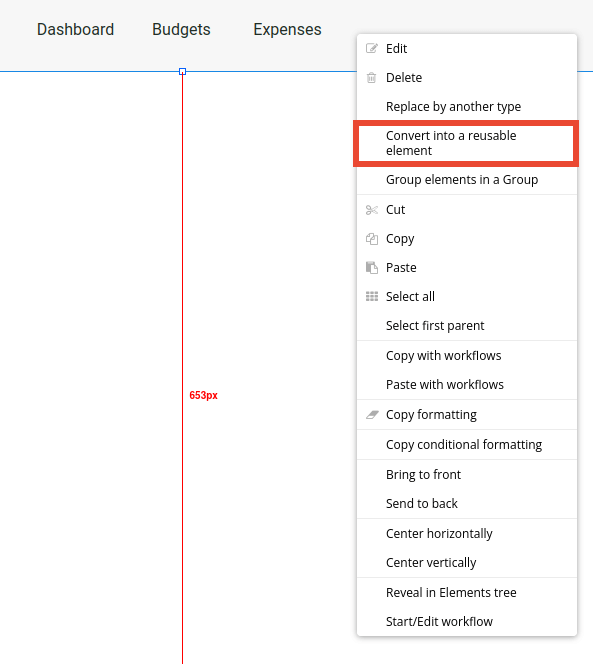
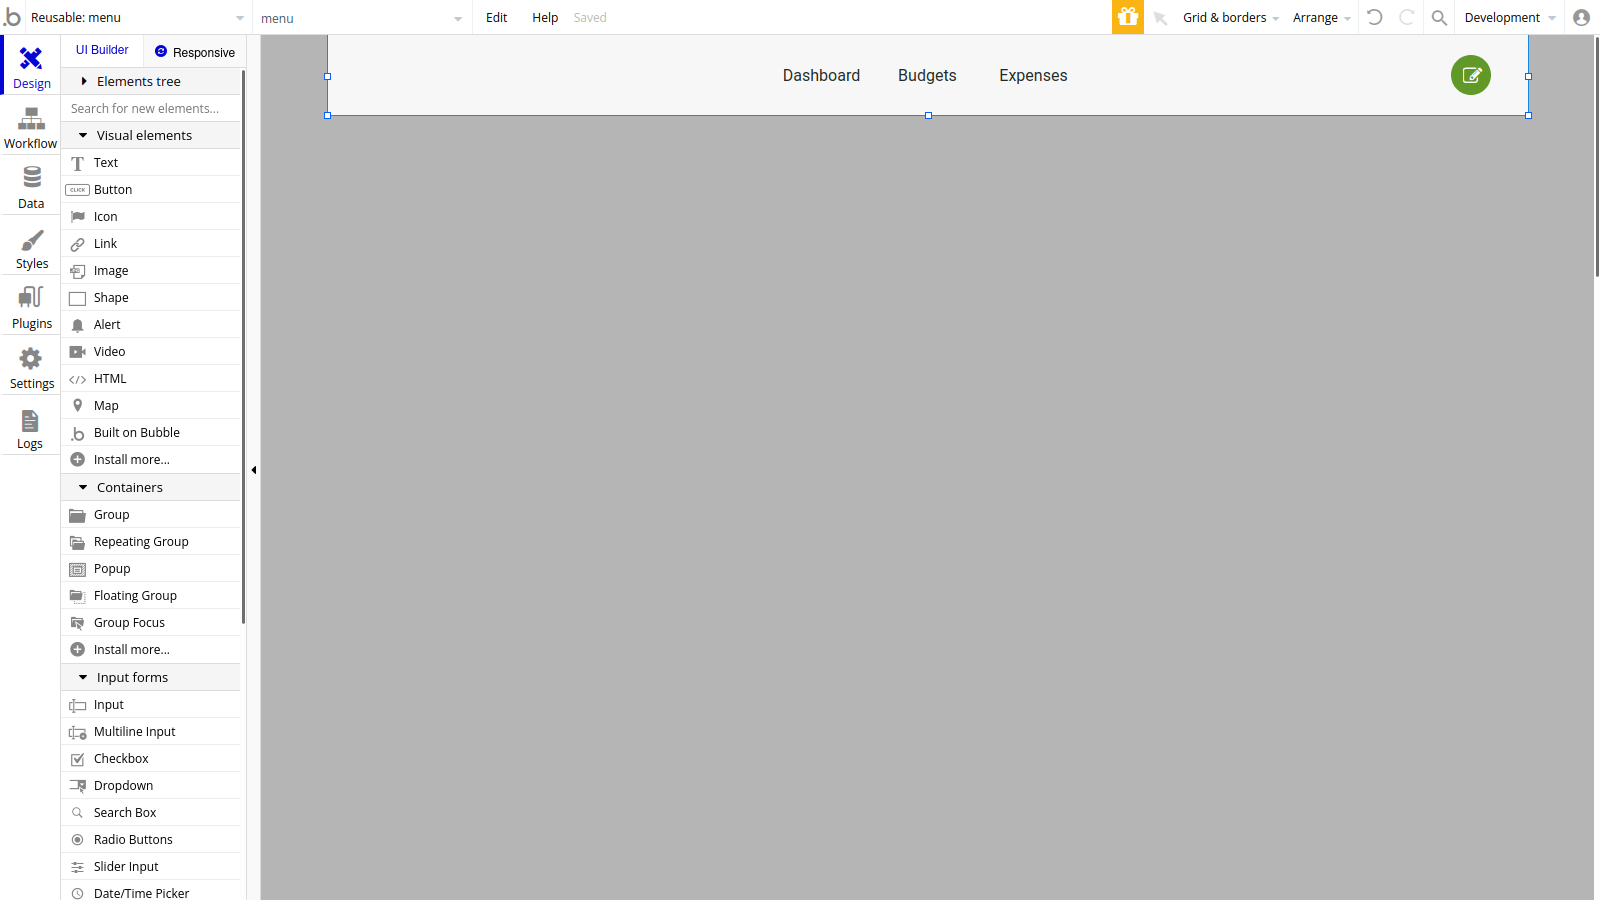
Let’s make this menu a reusable element. Reusable elements can be used in other pages without having to configure everything again. Right-click the floating group’s background, select “Convert into a reusable element,” and name it “menu.”
Once that’s done, you’ll see a new page with the menu we’ve created. We can now reuse it on other pages. If you ever need to make changes to it, you can do so here and it will propagate across your app.
Creating a new budget
To take advantage of the app’s features, the user must create a budget first.
Navigate to the dashboard page. Let’s add a popup that appears once the user lands on this page without having a budget in place. Include a couple of text fields to explain the situation, an input field to set the monthly spending limit, and a button labeled “create.”
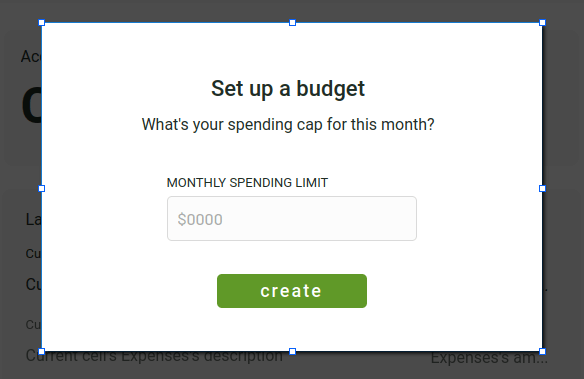
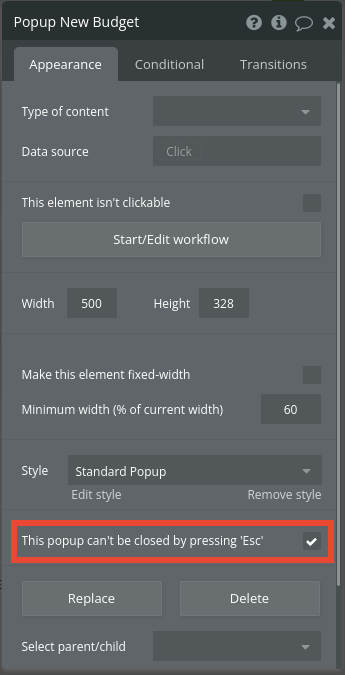
We don’t want the user to close this popup by accident. Right-click the popup’s background and hit “Edit.” Tick “This popup can’t be closed by pressing ‘Esc.’”
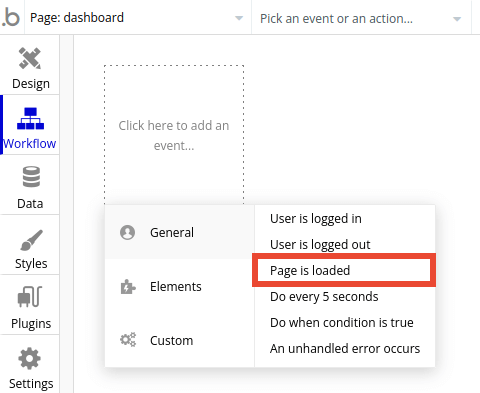
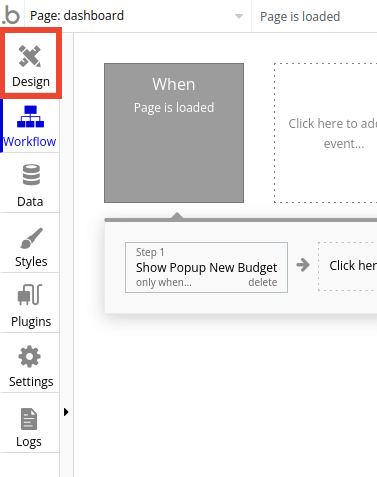
Now, it’s time to display to set up the workflow to display the popup at the right time. Click the workflows tab on the left side of the screen.
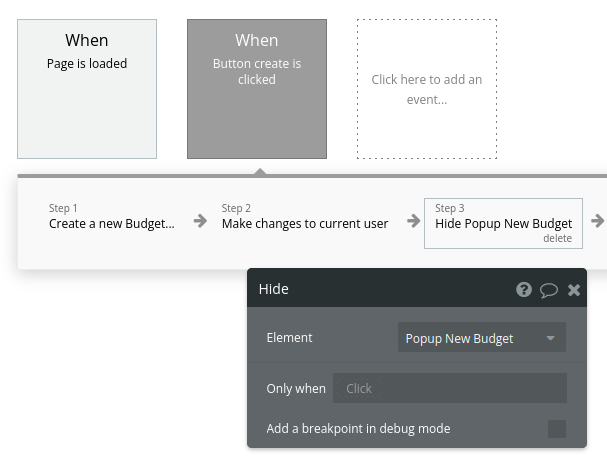
Click on the dotted square to add a new event. Hover over “General,” and click on “Page is loaded.”
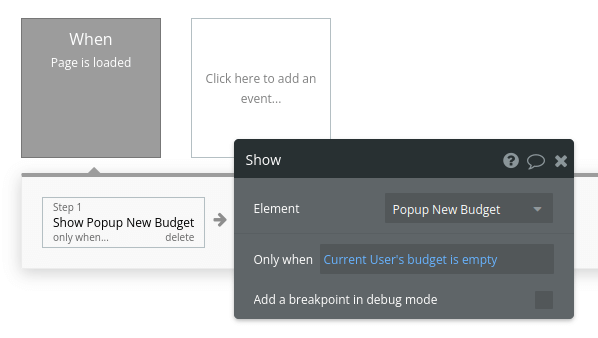
Click to add a new action: “Element Actions” > “Show” and show the popup.
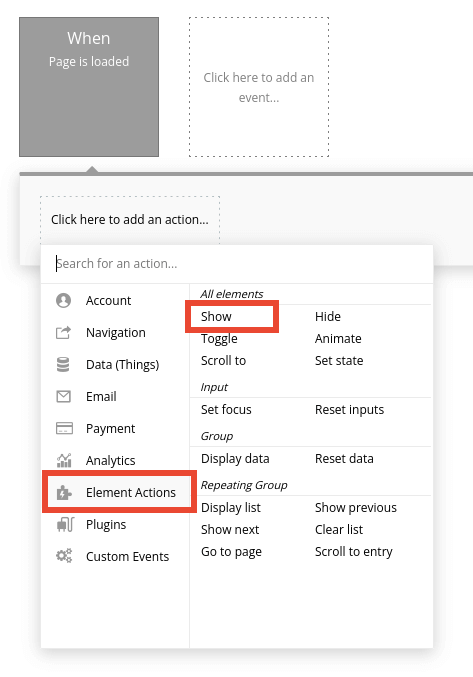
We only want to show this popup when the current user has no budget. On the “Only when” field, enter “Current user” > “ ’s budget” > “is empty”.
Time to set up the create budget button. Go back to the design tab.
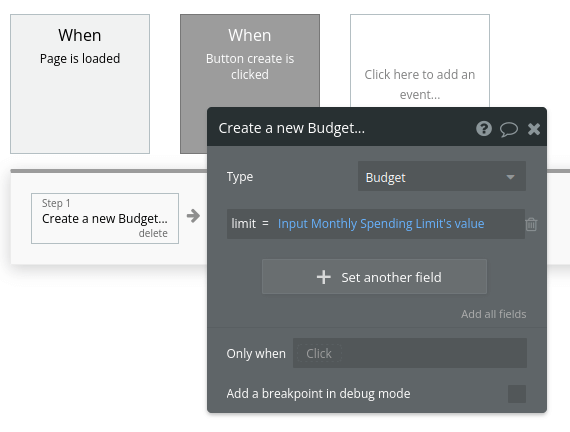
Right-click the create button inside the popup and click “Start/Edit workflow.”
Add a new action: “Data (Things)” > “Create a new thing,” create a new Budget, and set the limit to be the value of the input field.
Next, we’ll add this budget to the current user’s account. Add a new action: “Account” > “Make changes to current user,” and set the budget to equal the result of step 1.
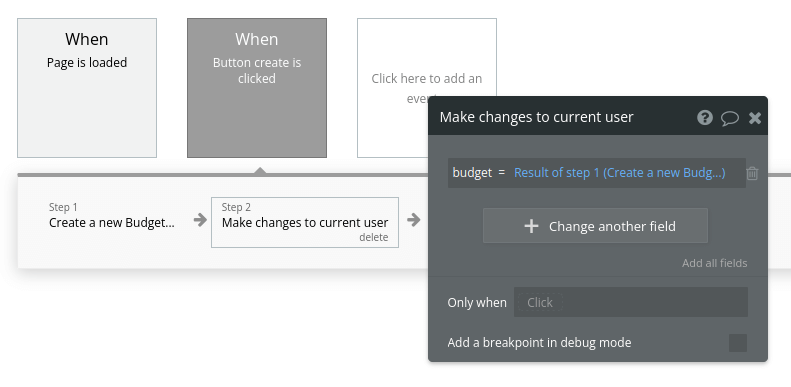
Finally, let’s hide the popup. Add a new action: “Element Actions” > “Hide” and hide the new budget popup.

Setting up the user dashboard
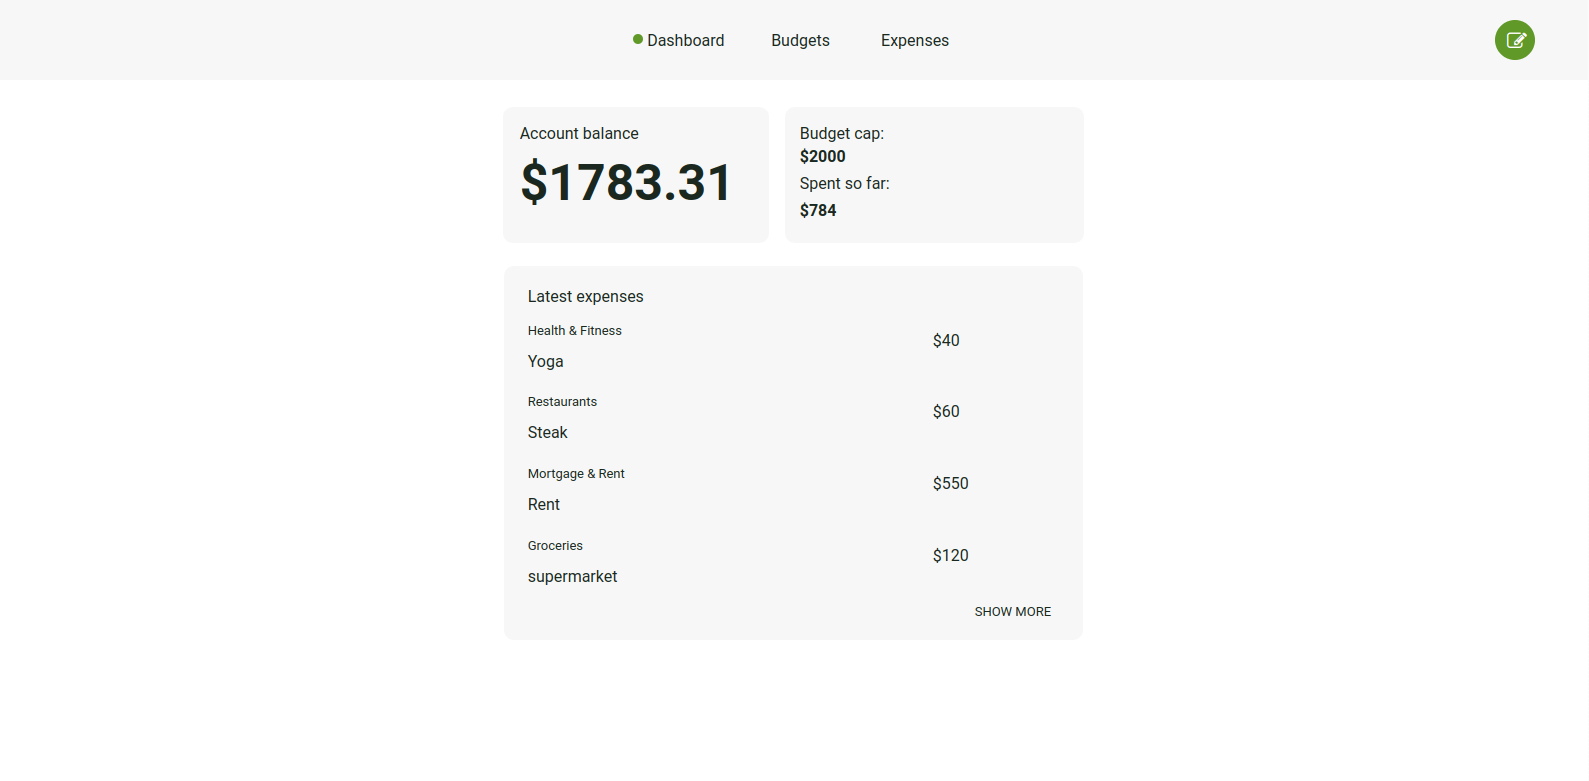
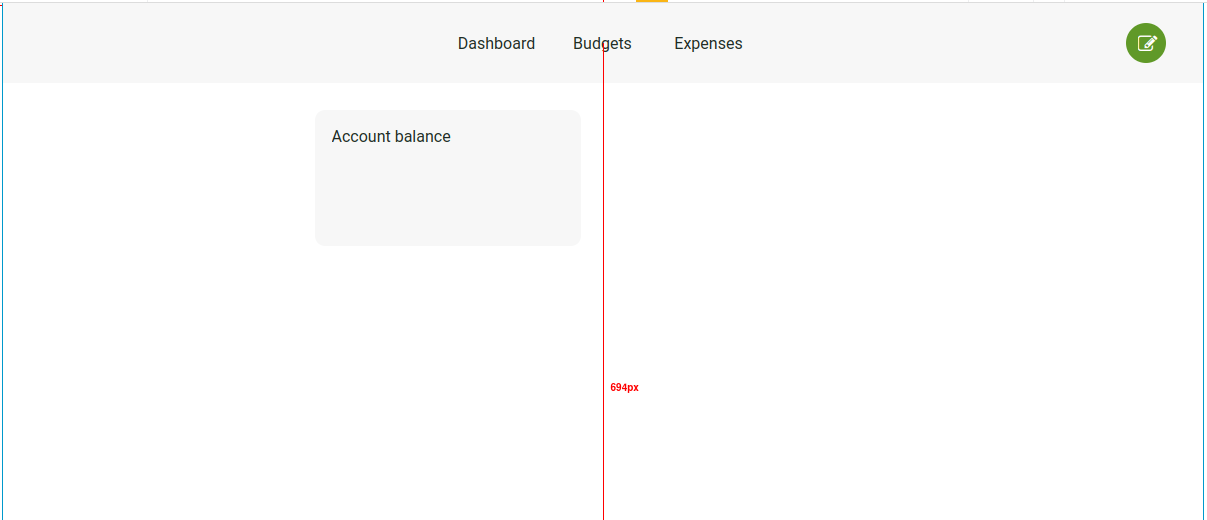
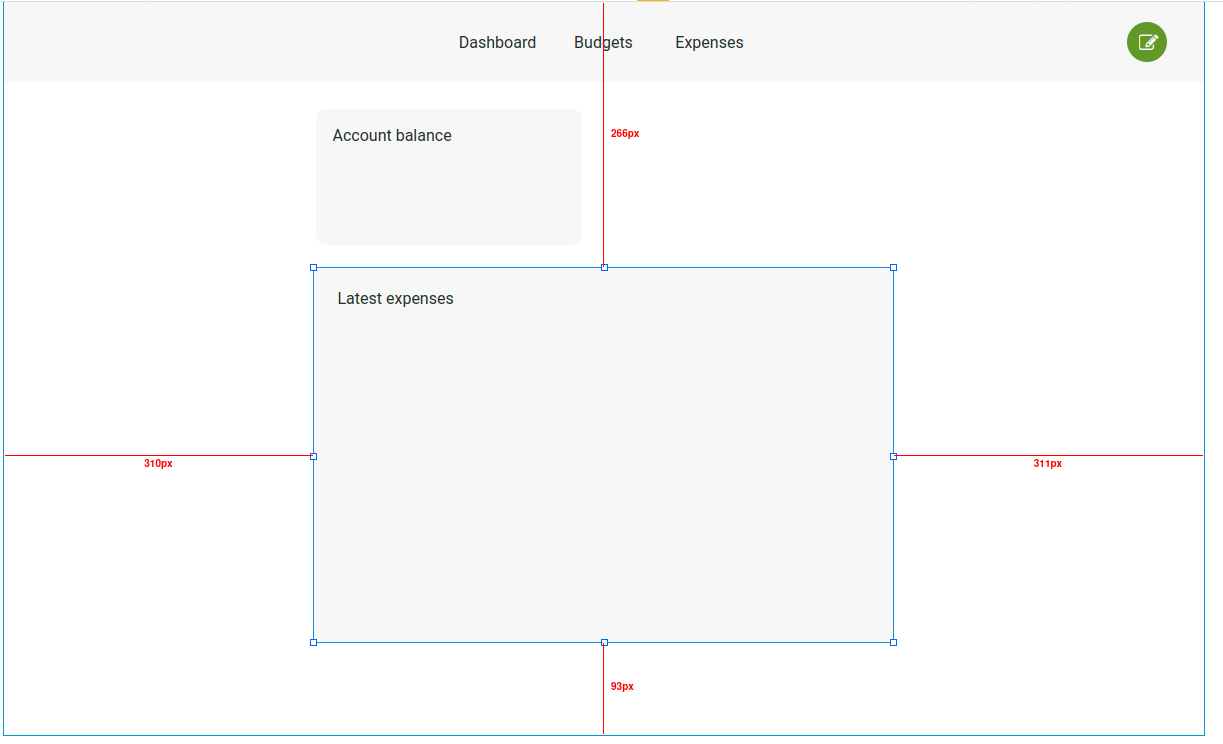
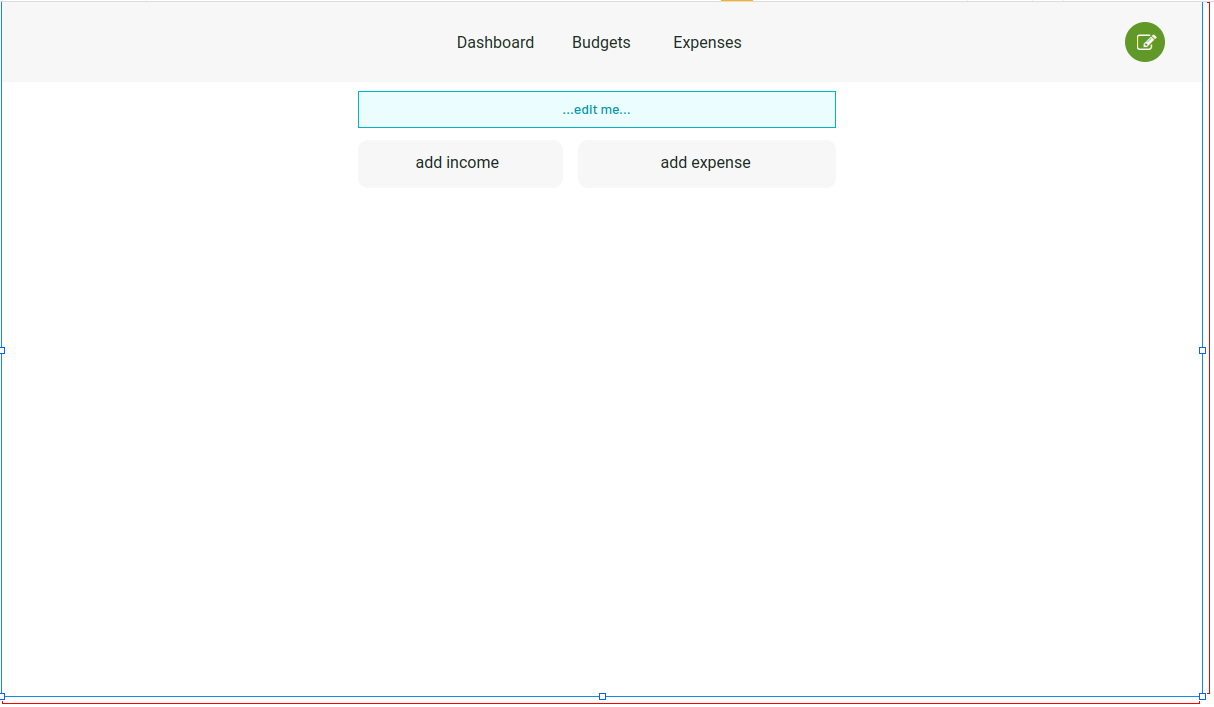
The dashboard page will display the user’s financial health at a glance, displaying the current account balance, basic budget information, and a list of recent expenses.
Navigate to your dashboard page. Here, add a group and include a text element displaying the text “Account balance.”
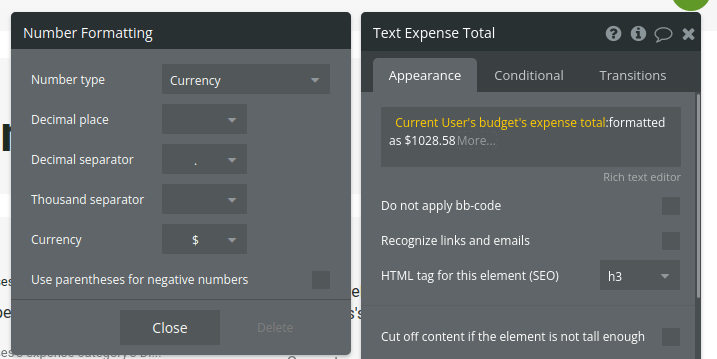
Now, add another text element underneath. We will display the current user’s account balance as a currency.
Edit the text element. Click on the input box and then click on “Insert dynamic data.”
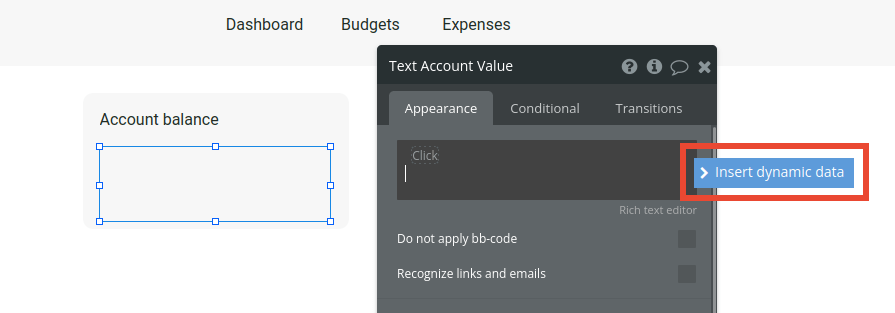
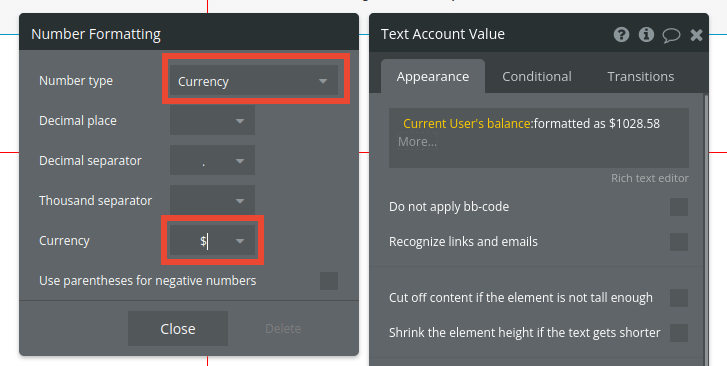
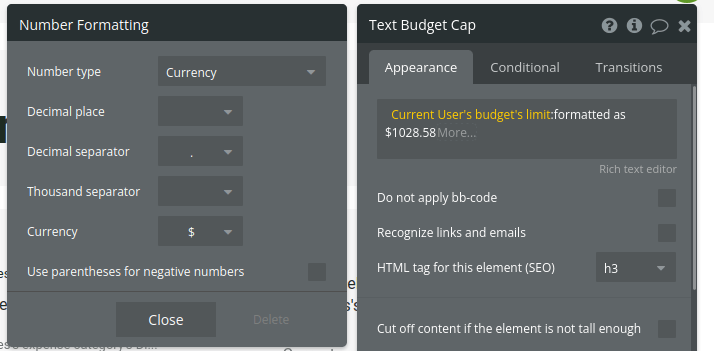
Select “Current user” > “’s balance”. Now, click the small “More” box that appears after the expression.

A dropdown menu will open. Hit “:formatted as…”, set the number to be displayed as a currency, and choose $ as the currency.
The user can now see how much money they have in their account. Now, let's set up a list of the latest expenses we can show directly here on the dashboard.
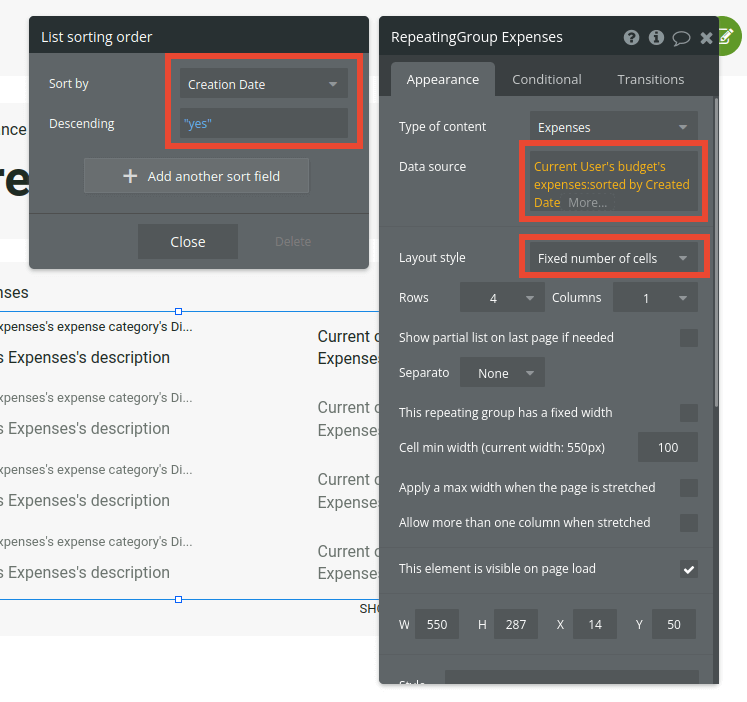
Add a new group to the dashboard page and insert a text element within it with the text “Latest expenses.” Additionally, add a repeating group inside this group.
Set the repeating group’s type of content to “Expenses” and the data source to the “Current user” > “ ‘s budget” > “’s expenses”. Click the small “More” box and add “:sorted by Created Date.” Set the records to be sorted in descending order.
We want to show only the latest 4 expenses. Set the layout style of the repeating group to “Fixed number of cells,” and set it to 4.
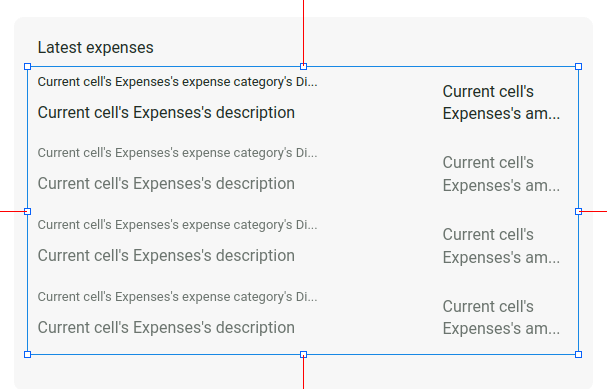
Add text elements to the first row of the repeating group to show:
- The expense’s description
- The expense category
- The expense amount
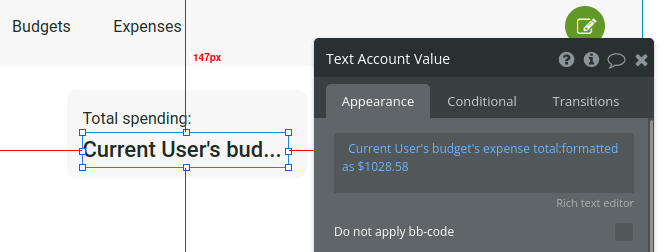
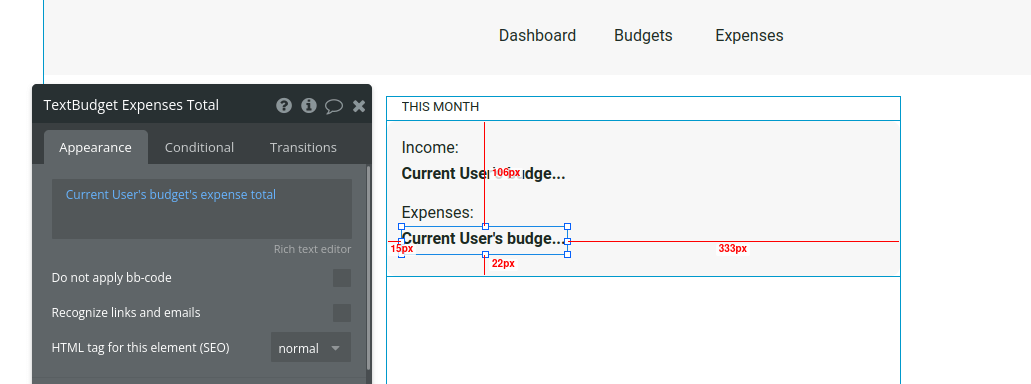
Now that we have a list of recent expenses, let’s show the budget limit and how much was spent so far. To the right of the account balance, place two text fields to show this information.

To show the budget, insert dynamic data into the text field: “Current user” > “’s budget” > “’s limit” > “:formatted as” > “Currency”.
The process to show the amount spent so far is similar. Insert dynamic data: “Current user” > “ ‘s budget” > “ ‘s expense total” > “:formatted as” > “Currency”.
Setting up the expenses page
On the expenses page, the user will be able to see a list of their expenses and filter them by category.
Navigate to the expenses page and place the reusable menu we created earlier.
Next, add a text field to show the total amount spent. Add dynamic data: “Current user” > “’s budget” > “’s expense total” > “:formatted as” > “Currency”.
To the left of this section, add a dropdown menu to filter the expenses. Set the choices style to “Dynamic choices,” the type of choices to “Expense Category,” the choices source to “All Expense Category” and the option caption to “Current option’s Display.”
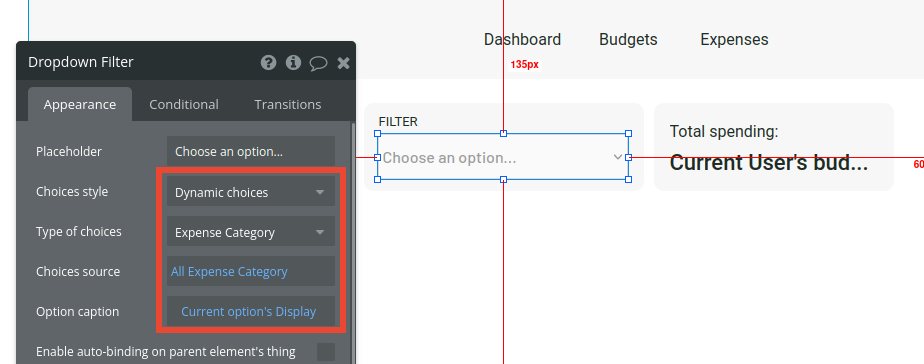
Under both of these elements, add a repeating group. Set the type of content to “Expenses” and the data source to “Current user” > “’s budget” > “’s expenses” > “:filtered.” On the new window that appears to apply the filter, pick “expense category” equals the dropdown’s value. Remember to tick the box labeled “Ignore empty constraints.”
Don’t forget to add the text elements to display the expense category, description, and amount.

Setting up the records page
Navigate to the records page. Don’t forget to place the reusable menu at the top of the page.
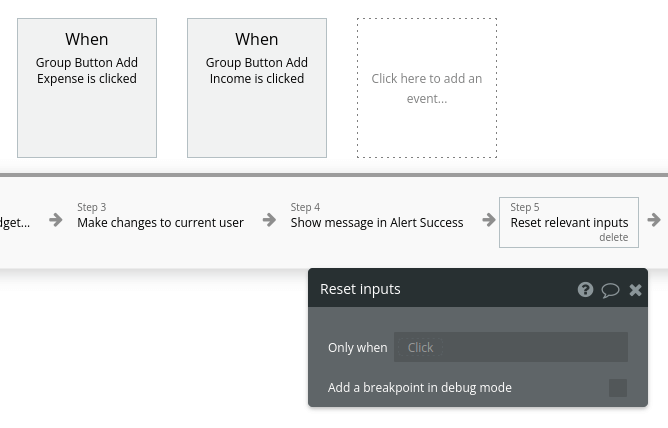
Add an alert element under the menu. We’ll use it to display a message when the user successfully adds a new income or expense entry.
Add 2 buttons, one for adding income and the other to add expenses.
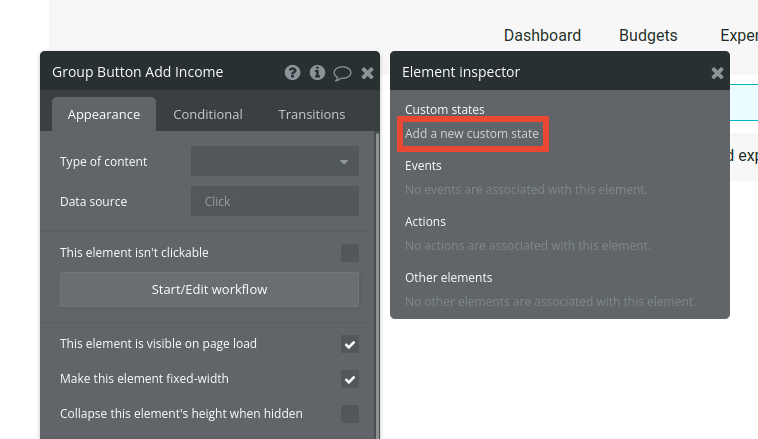
Right-click the “add income” button and edit it. On the edit window, click on the “Element Inspector” icon.

We’ll configure a custom state to show the appropriate window to add income or to add expenses, and have the buttons show whether they’re active or not.
On the element inspector window, click on “Add a new custom state.”
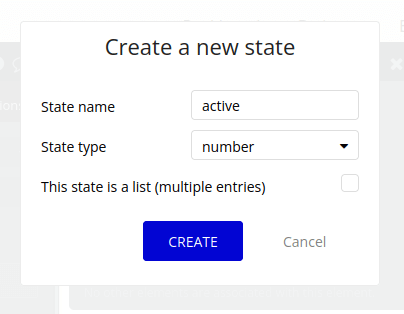
Let’s name our custom state “active,” and set it to be a number.
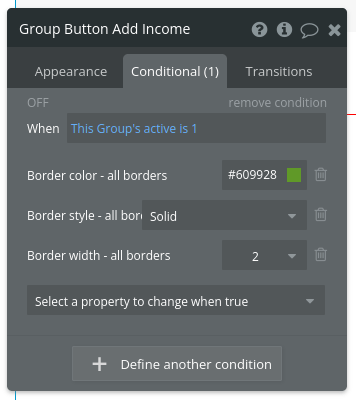
Now that we have our custom state ready, let’s style this button. Click on the conditional tab in the edit window.

Define a new condition. Set it that when “This group” > “’s active” > “is,” then type “1” and hit ENTER on your keyboard.
Then, select the properties to change from the dropdown. Change the border color to #609928, the border style to solid, and the border width to 2.
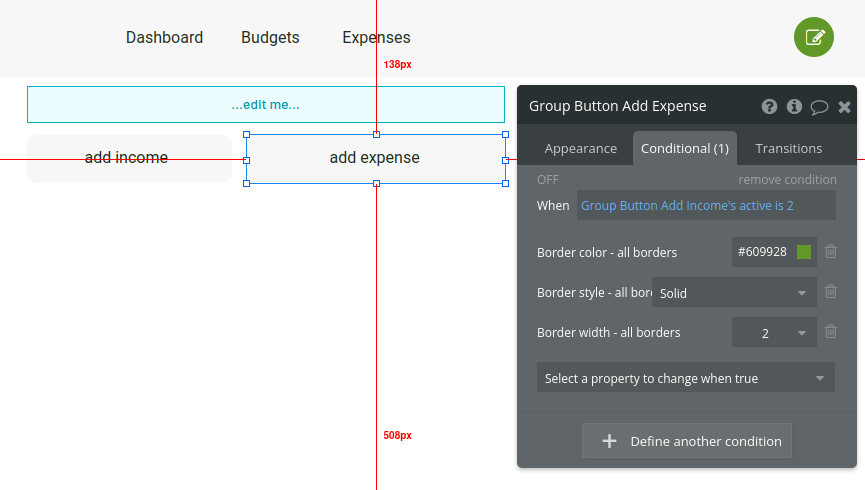
Now, right-click the “add expenses” button, edit it, and click the conditional tab.
Define a new condition. We will pick up the custom state we created on the button to add income (“Group Button Add Income” in this case). Set it that when “Group Button Add Income” > “’s active” > “is” and then type “2”.
Add all the property changes (border color #609928, style solid, and width 2) the same way as before.
Let’s configure the workflows to change the custom state, allowing us to change which button is showing as active.
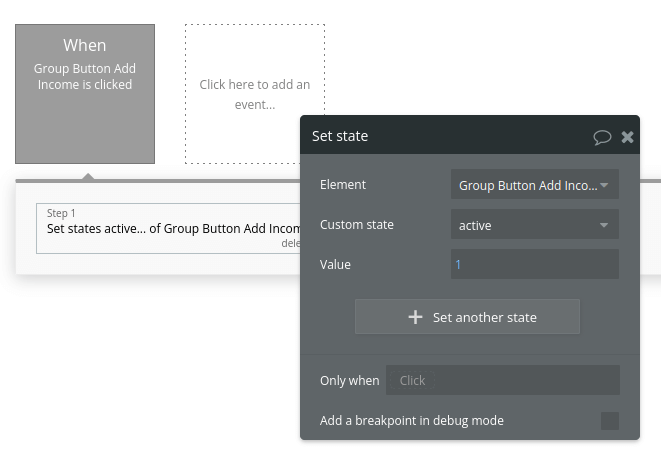
Right-click the add income button and click “Start/Edit workflow.”
Add a new action. Choose “Element Actions” > “Set state.” Target the “Group Button Add Income,” the state “active,” and set the value to “1”.
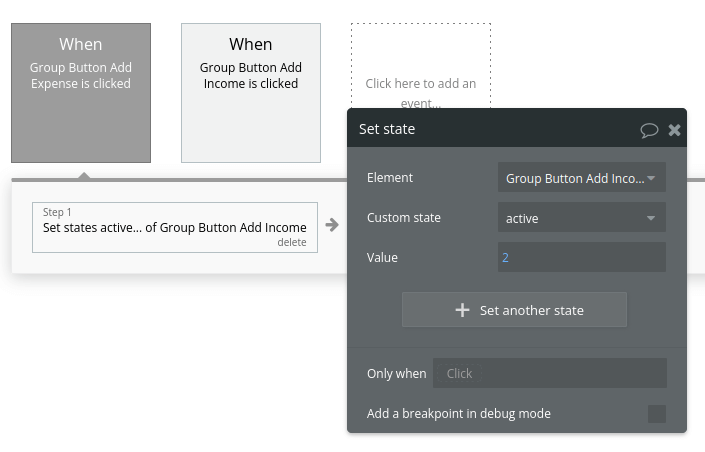
Go back to the design tab, right-click the add expense button and start a new workflow.
Add a new action. Select “Element Actions” > “Set state” again. Fill the element and custom state as we did before, but this time the value is “2”.
Button design is now good to go. It’s time to create a form to add income. This form becomes visible when the custom state is “1” and the “add income” button has a green outline.
Create a group on the page. Add a multiline input to add a description, an input to add the amount (don’t forget to set the content format to currency), and a button labeled “add income.”
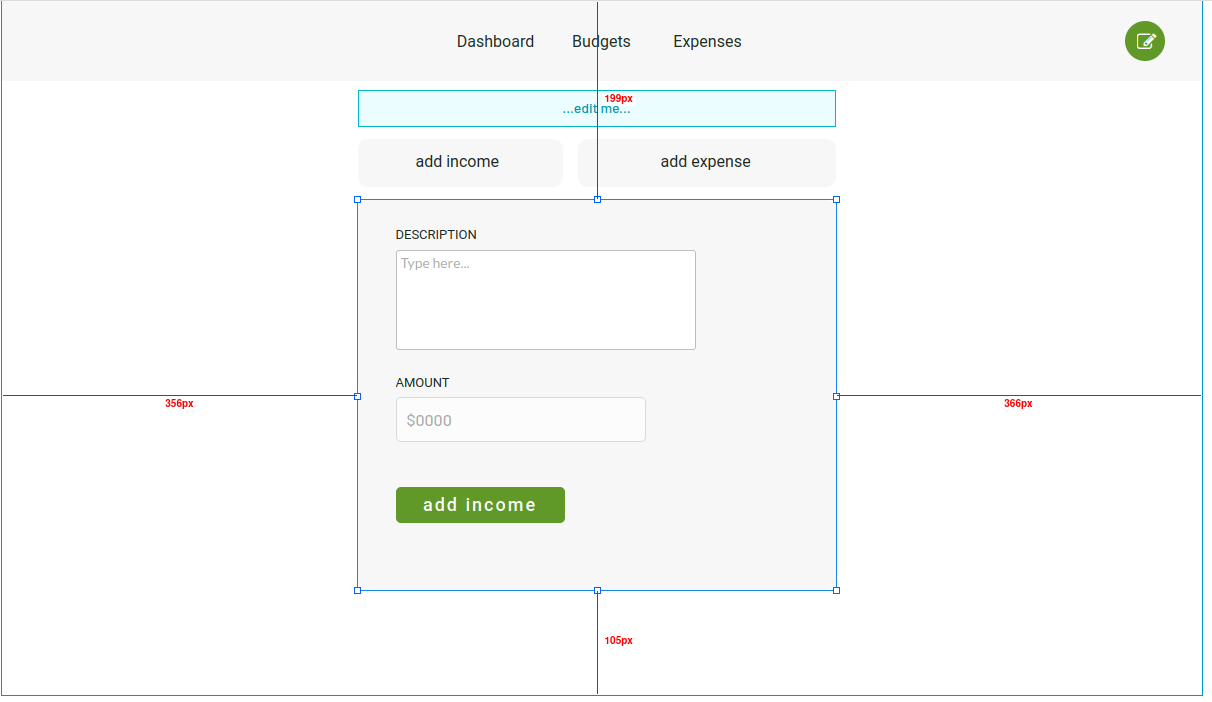
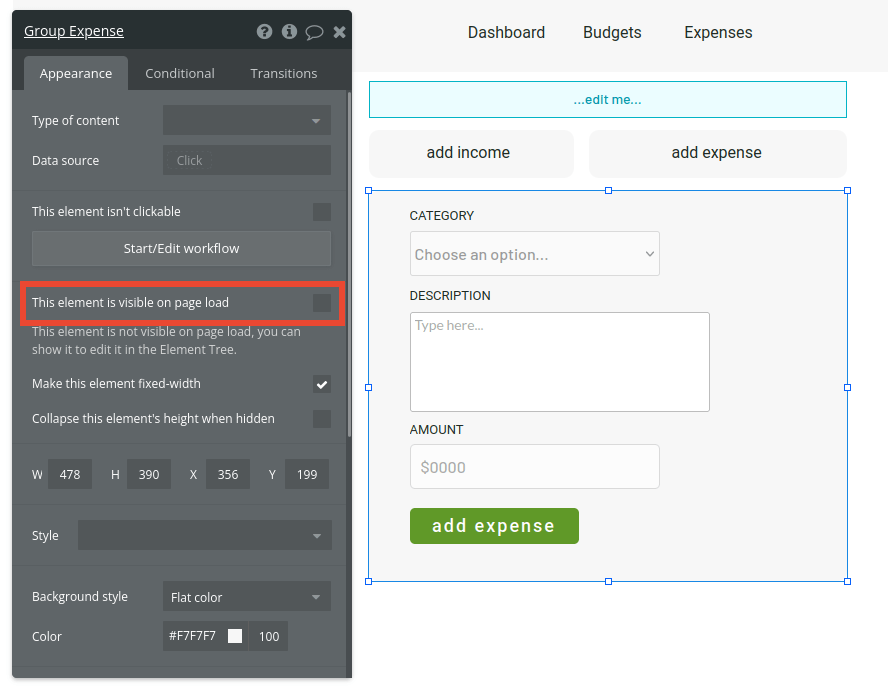
Right-click and edit this group. Untick “This element is visible on page load.”
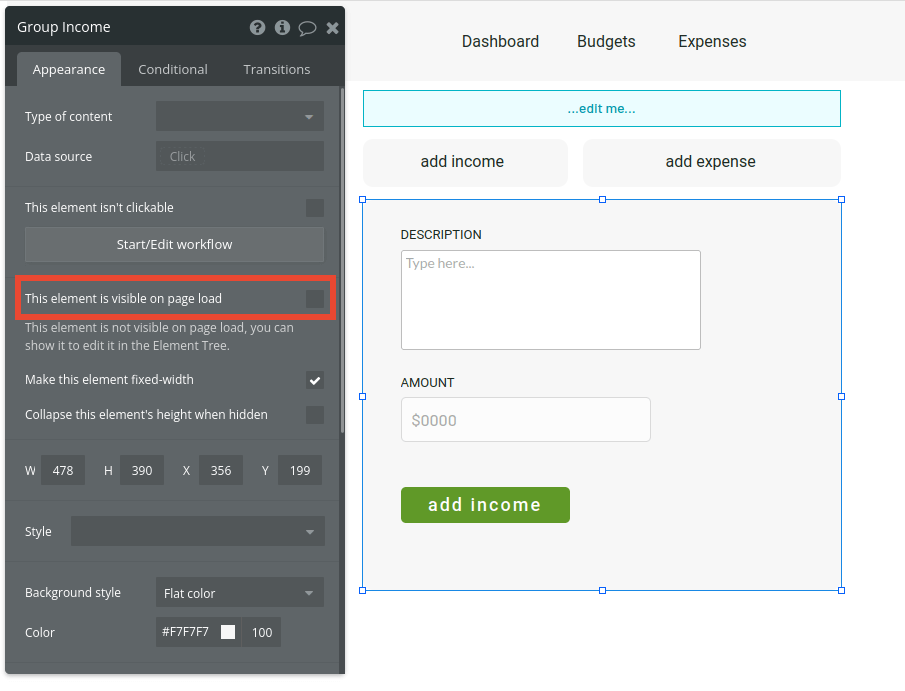
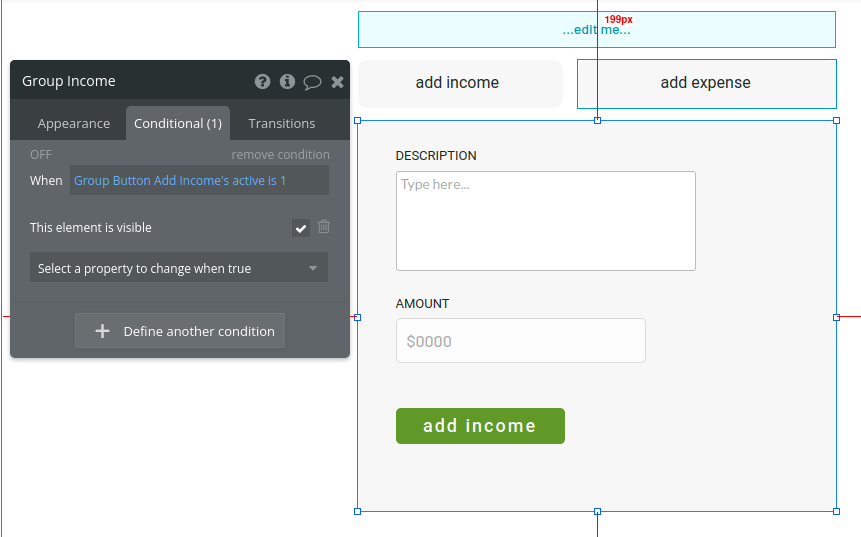
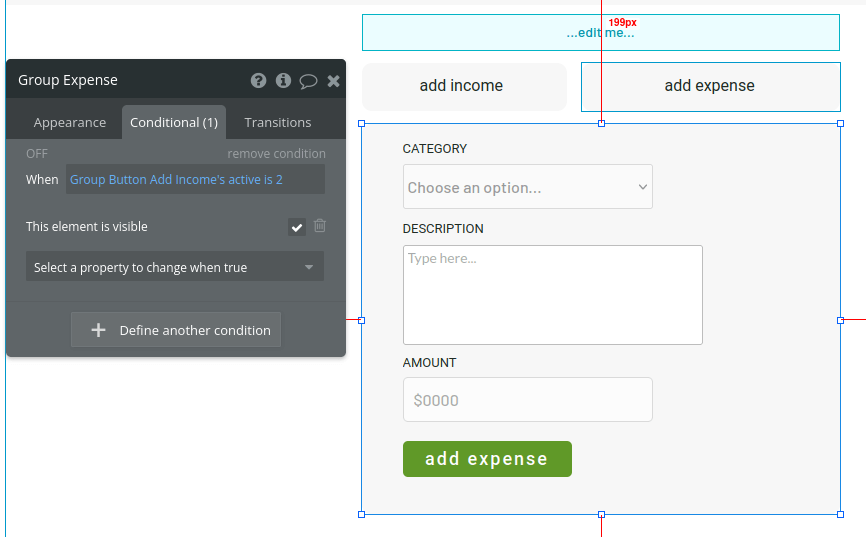
Click the conditional tab. Define a new condition. When the “Group Button Add Income” > “ ‘s active” > “is” > “1”, the property “This element is visible” is ticked.
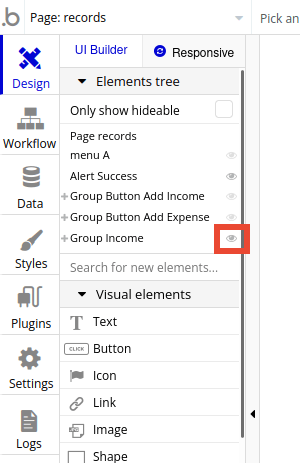
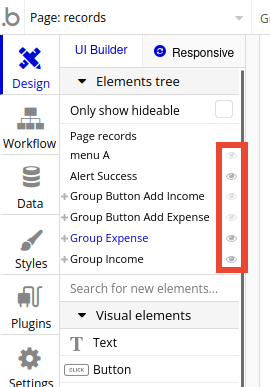
Time to add a similar group to add new expenses. But first, let’s hide the group we’ve just been working on in the elements tree. Doing so will not have an impact on your final app, but it will make working on new features on this page a lot easier.
In the elements tree, click the little eye icon to toggle visibility for the Group Income element.
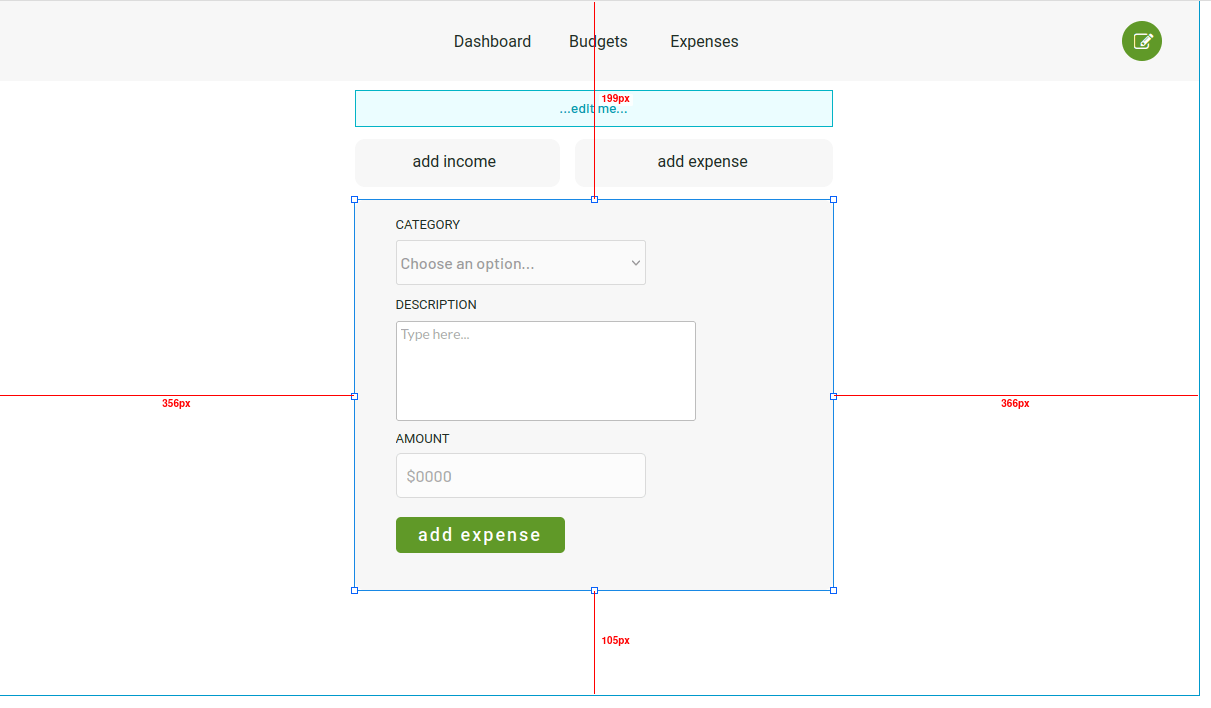
Create a new group to add expenses. Add:
- a dropdown to pick the expense category (remember to set the choices style to “dynamic,” the type of choices to “Expense Category,” the choices source to “All Expense Category,” and the option caption to “Current option’s Display”)
- a multiline input for the description
- an input for the amount (set the content format to “currency”)
- a button labeled “add expense”
Right-click the group, edit it, and untick “This element is visible on page load.”
Click the conditionals tab and repeat the same steps we took for the Group Income. This time, when “Group Button Add Income” > “’s active” > “is” > “2”, then the property “This element is visible” is ticked.
Preview your app and test the functionality of this page. When you click “add income,” that button should have a green outline and the Group Income should be visible.
On the other hand, when you click “add expense,” that button should then have the green outline and the Group Expense must be visible.
Adding a new income record
On the elements tree, reveal the Group Income. Click the eye icon to toggle visibility for each element (this has no impact in the final app; it’s just to help us navigate and work on the Bubble editor).

Inside the Group Income, right-click the button labeled “add income” and start a new workflow.
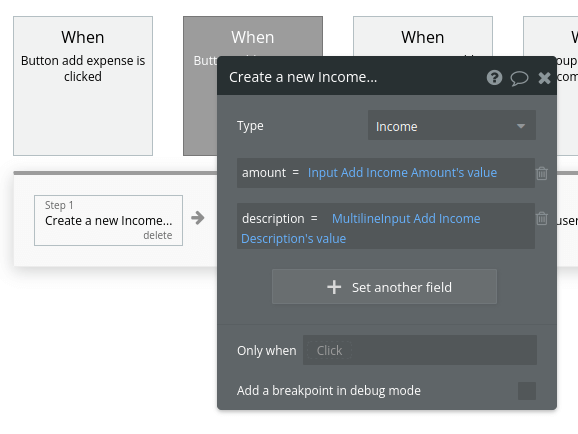
Add a new action: “Data (Things)” > “Create new thing.” Create a new Income, and match the amount and description to the appropriate input fields.
We’ll add this income record to the current budget. Add another action: “Data (Things)” > “Make changes to a thing.” In the thing to change, set it to “Current user” > “’s budget.” Then add the result of step 1 to the income field. Finally, update the income total by doing a sum of “This Budget” > “’s income total” and the input where the user typed the income amount.
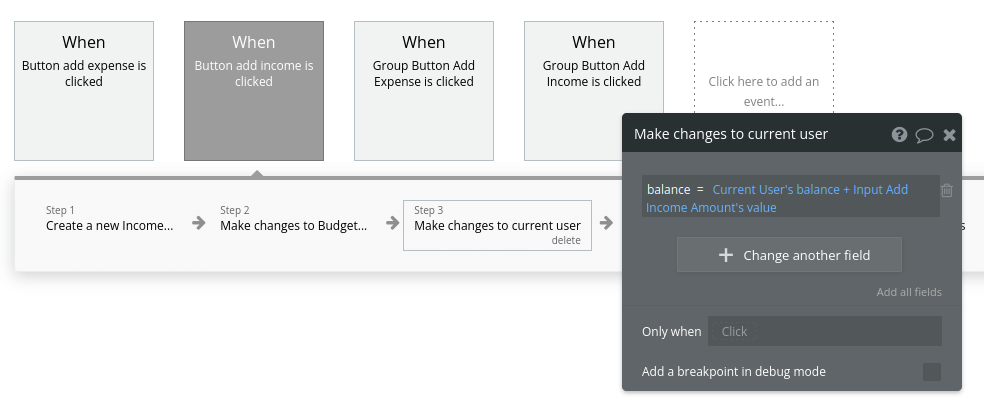
Time to update the current user’s balance. Add a new action: “Account” > “Make changes to current user,” and add the income amount of the input field to the current user’s balance.
Let’s let the user know this action was successful through the alert we set up. Add a new action: “Element Actions” > “Alert” > “Show message,” tick “change the alert message” and write something that illustrates what just happened.

Finally, reset the relevant inputs by adding a new action, “Element Actions” > “Reset inputs.”
Adding a new expense record
On the elements tree, reveal the Group Expense. Click the eye icon to toggle visibility for each element (this has no impact in the final app; it’s just to help us navigate and work on the Bubble editor).
Right-click the button labeled “add expense” and start a new workflow.
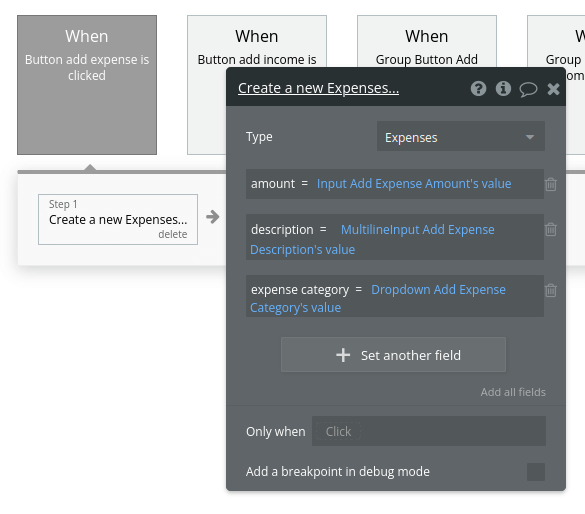
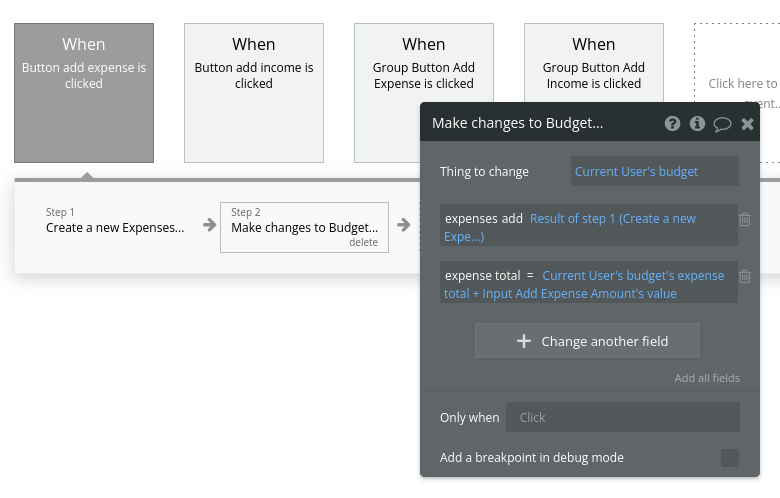
Under “Data (Things)”, click “Create a new thing.” Create a new Expense, and match the data fields to the appropriate data types.
Let’s add this expense to the current month’s budget. Add a new action: “Data (Things)” > “Make changes to a thing”. The thing to change is the “Current user” > “’s budget.”
Click on “Change another field,” and choose “expenses” > “add” > “Result of step 1.” We need to update the total expenses for this month’s budget as well. Click on “Change another field” again, but this time choose “expense total” > “Current user” > “’s budget” > “’s expense total” > “+” > “Input Add Expense Amount” > “’s value.”
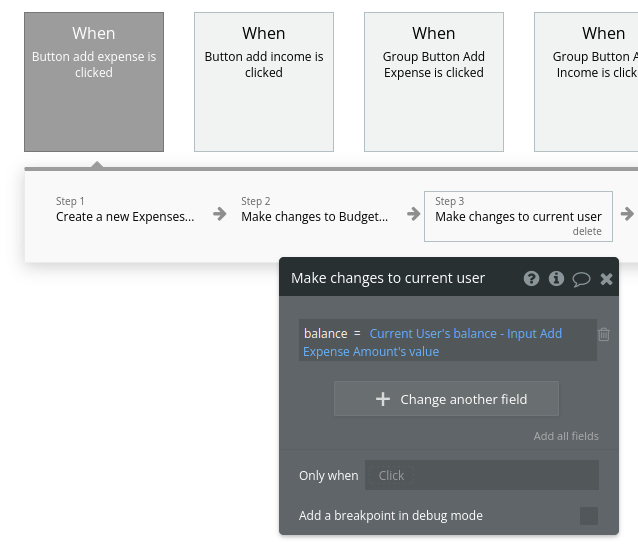
Since this is an expense, the user’s balance has to change. Create a new action: “Account” > “Make changes to current user.” Click to “Change another field,” and select “balance” > “Current user” > “’s balance” > “-” > “Input Add Expense Amount” > “’s value.”
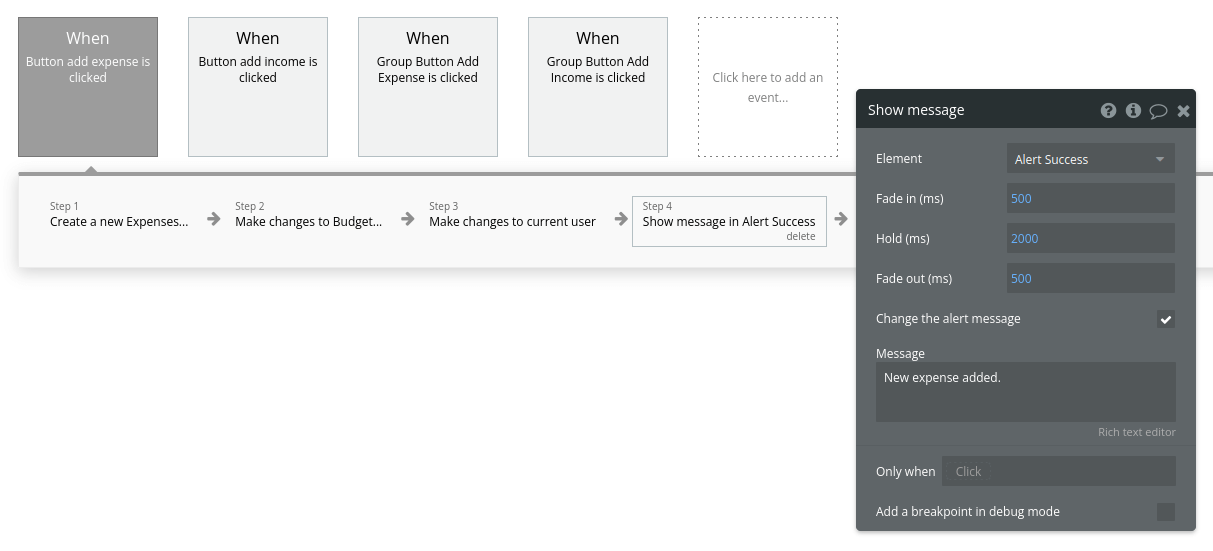
Let’s show an alert to show the expense was added successfully. Add a new action: “Element Actions” > “Alert” > “Show message.” Tick “Change the alert message” and write something that describes what just happened.
Finally, let’s reset the inputs in case the user wants to add more expenses. Add a new action: “Element Actions” > “Reset inputs.”
Setting up the budget page
Now that we have a way to create a budget, let’s add a way to view information about it.
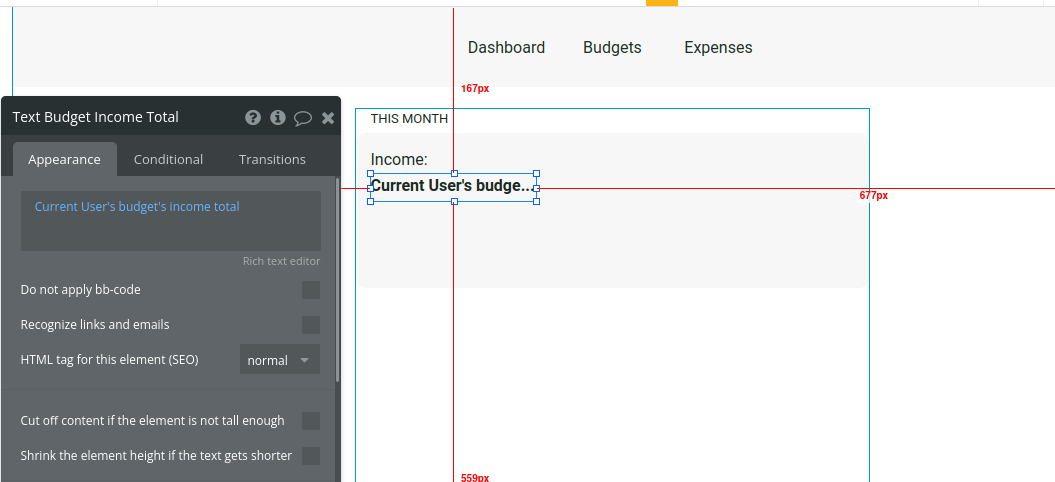
Navigate to the budget page and place the reusable menu there. Add a way to display the current income with a text element using dynamic data:
Repeat the process for expenses:
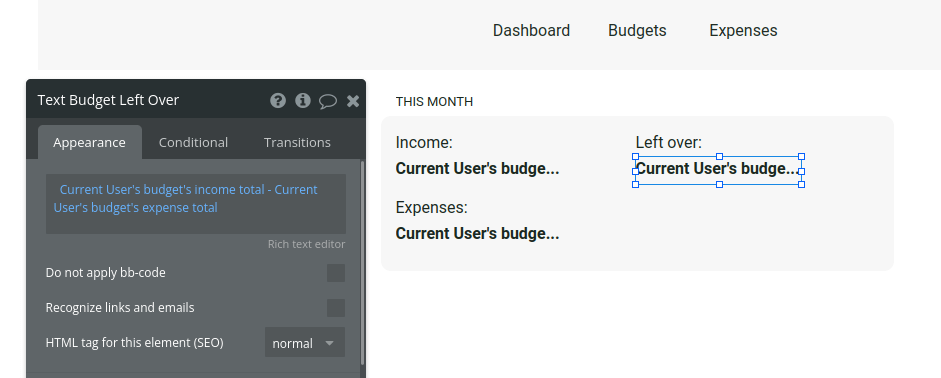
It would be useful to show if the user is saving or losing money this month. Add a text element to show the amount left over. We’ll do a calculation in the text field, where we’ll have the expenses subtracted from the income. To do this, insert dynamic data and choose “Current user” > “’s budget” > “’s income total” > “-” > “Current user” > “’s budget” > “ ‘s expense total.”
Now, let’s add a section below with all the expense categories and the total spending per category.
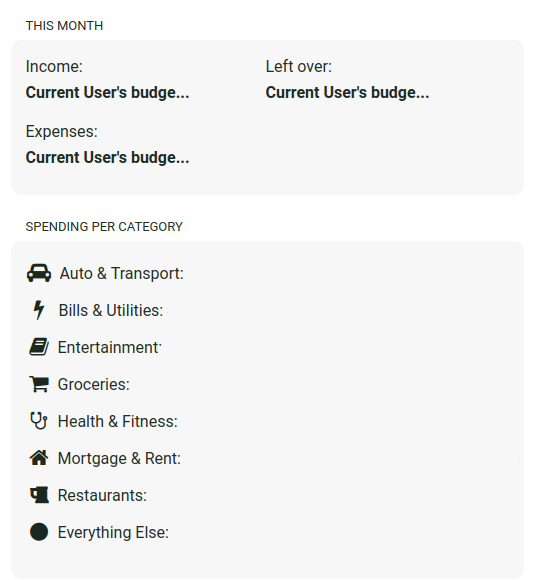
On the “Auto & Transport” text field, display dynamic data to “Search for Expense” > “:each item’s amount” > “:sum.” When setting the search constraints, add 2 constraints to only display expenses created by the current user and of the expense category “Auto & Transport.”
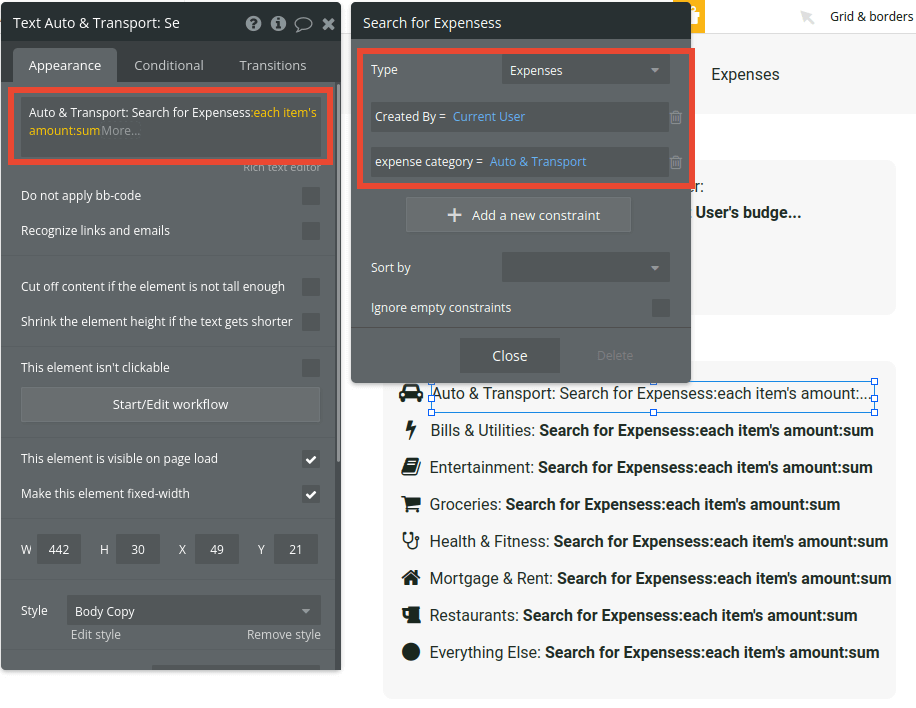
Repeat the process for:
- Bills & Utilities
- Entertainment
- Groceries
- Health & Fitness
- Mortgage & Rent
- Restaurants
- Everything else
Additional features
Once you’re familiar with creating custom data fields and displaying dynamic content, you can start getting creative with the experiences you build. Additionally, you can:
- Integrate financial accounts into your Bubble app: Search for Plaid integrations in the Bubble plugins section
- Set up data types and recurring workflows to archive and reset budgets every month
- Creating an option set to handle the different types of income
- And much more!
Privacy & Security
Now that you have the basics of your app, don't forget to start setting some privacy rules and conditions to keep your data secure—starting with roles in the “Privacy” section of your data tab. You can also check if you're unintentionally exposing any data with an API checker.
Launch
Hiring a developer or dev team to build this app would cost thousands of dollars, if not tens of thousands. As you launch and grow in users, paid plans allow you to host the app on your own custom domain, and these start as low as $25 per month. Some templates and plugins may cost more, but you can build all the functionality of Mint without any additional costs.
Start building
Bubble can help you build a Mint clone or any other product you choose! It’s never been easier to build something incredible without having to code.
Ready to join the no-code movement? Register your free Bubble account and get started today. If you’d like additional help when building your product, our thriving community forum is a great place to source actionable advice and resources. Any maker is encouraged to ask questions within the community to help empower their no-code journey.