
First time creating a web app? We’re here to help you get started and overcome some of the most common obstacles.
One of the ways we’ll make it easier for you is by showing you how to build using a no-code web app builder like Bubble.
No-code programming can take you from idea to fully-fledged digital product in less time than it would take to find a technical co-founder and for a fraction of the cost of outsourcing your development.
In this article, we’ll cover:
- What web apps are and who needs them
- What you need to create a web app
- How to build a web app step by step
- How to launch and iterate on your web app
Web apps: a quick definition
Web applications, websites, responsive websites … what’s the difference?
Sam Morgan, one of our internal Bubble Developers, sums it up this way:
“A web app is an interactive piece of software that runs in your browser.”
Put simply: A website displays static content for visitors — every single person sees the same thing. At the other end of the spectrum, licensed software or native mobile apps run interactive software directly on your device. A web app merges the two.
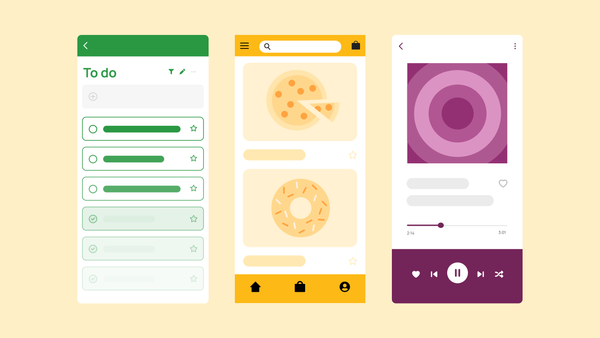
Common web apps include Gmail, Amazon, Airbnb, or Facebook. All of these apps show you a version that’s specific to you — that is, your Gmail inbox looks different than your mom’s (we hope, anyway).
They also allow you to edit and interact with your personal data. For example, you can add Amazon products to wish lists, add items to your cart, check out, and see order details. Facebook lets you update your status and add comments to others’ activity. There’s no one “universal” experience of these web apps: Everyone's experience is shaped by their own data and interactions with the product.
Web applications can also be the browser version of a downloadable software, such as Quickbooks or Notion.
Do I need to create a web app or a website?
Most founders or teams with a product idea need a web app, not a website. The terms are often used interchangeably, but they’re not the same.
Some of the key differences between web apps and websites are:
- Interactiveness
- User roles
- Functionality
- Cost
- Development
Websites are easy to use, but they display a static experience and the experience isn’t personalized or as interactive.
Users can “interact” with them via menus, buttons, and links, but these interactions simply guide a user through existing content — interactivity is mostly navigational. It doesn’t change their experience. Because technical functionality is limited, websites are less expensive and faster to develop.
Web apps offer much more functionality and interactive elements for users. Users may be able to log in to a web app, add and edit their own data, interact with other users, and more. This increased functionality allows for much richer and more complex experiences, but they also require more knowledge and time to develop well.
So, which is right for you?
In short: Websites are the right choice for teams who want to design a static experience for visitors without any complex functionality. They’re a great choice for sharing information or promoting a service.
Web apps are complex, multi-functional products that allow users to interact with and customize the product to suit their needs. If you have a product idea in mind that allows a user to run workflows, add or edit data, and generally interact with your site, you need a web app.
What you need before you create a web app
Web app development is easier than ever, thanks to the advent of no-code tools, no-code development agencies, and other resources and support.
That said, you still need to have some foundational pieces in place before you start building. Think of it like going on vacation. You may know you want to take a vacation to kick back and relax next summer. But before you go, there are some core pieces you need to put in place so you can develop your itinerary and make the vacation happen.
Here’s what you need to start with:
1. An idea
Whether you’re planning a vacation or a web app, it all starts with a great idea.
For a vacation, you might have an idea of where you want to go, who you want to go with, or what kind of vacation you want to have. A web app is similar.
A great web app idea considers the following:
- The problem or task your web app will solve. What exactly is the user hoping to accomplish, and how will your product help them do this? For example, Facebook aims to help users connect with their friends and share updates.
- The user your web app will help. Who has this problem? If this is your first time building a web app, you might be solving a problem you are experiencing, which makes you your own target user!
- The outcomes your web app will help users achieve. That is, what will be different for users with your product? For example, Airbnb helps users find unique, local places to stay, which you don’t always get with a hotel app.
- The functionality that’ll make these outcomes possible. At this stage, it’s totally fine not to know exactly how your app will function on a technical level. But part of the ideation stage is figuring out what your app will need in order to help solve the problems and accomplish the outcomes your users want. For example, in order for Amazon to work, users need to be able to add product listings, search for products, add products to carts, use credit cards, and so on.
- The feasibility of your web app. That is, you want to think through how technically possible your app idea is. A web app that can instantly teleport users to their ideal vacation destination is a great idea, but it’s not technically possible (alas).
In a nutshell, you want to start your web app development process with an idea that makes sense on all fronts. Not every great idea needs “an app for that.”
Flesh out your idea by thinking through the problems, users, outcomes, functionality, and feasibility to make sure that your web app is a good solution to the problem you have in mind.
2. Background knowledge
Just like when you’re planning a vacation, some basic knowledge is crucial before you dive into the web app development process.
You don’t need to be a travel agent to plan a vacation, but you do need to have some knowledge about your destination (or potential destinations), how you might get there, and what you might do during your trip.
Building a web app is similar. When you’re creating your web app, you’ll want to be able to pull from knowledge about:
- Database essentials, such as data types, users, fields, and relationships between data types. Web apps use databases to categorize, sort, and create workflows with data. Database engineering isn't the most glamorous, but thinking like a programmer will help you create your web app more easily. For example, you might want to think through the major categories of “things” (i.e., data types) that your app will need to function, what “subcategories” (i.e., fields) make up each of those data types, and what relationships those data types or fields will have to one another.
- UX / UI design essentials, such as pages, portals, popups, elements, and other design components. Understanding the basics of how web apps look and how users interact with them will make it easier to make a web app.
- Logic, such as if-this-then-that processes and other basic workflows. Every web app uses workflows and logic to connect data, interactions, and complex functionality. This allows you to do things like:
- Make your buttons clickable to take an action
- Change how elements appear, or which items show up (i.e., in search results)
- Allow users to create, add, or edit data items in your databases (i.e., adding a new profile page)
- Generate data based on inputs
By familiarizing yourself with basic logic and workflows, you can build the functionality of your web app much more quickly and effectively.
Databases, design, and logic are the three basic elements of building a web app. No-code tools like Bubble make each of these steps much easier and more intuitive than traditional coding. That said, being familiar with the basics of each will make your development process easier and give you more flexibility to build your app exactly how you envision it.
3. Your technical approach
With your ideas and basic knowledge in place, you next need to decide what your approach to building is going to be.
If you’re planning a vacation, you’ll need to decide if you’re going to DIY it or if you want to hire a travel agent to do the legwork for you.
When it comes to building a web app, this step presents a similar fork in the road. Are you going to build your web app yourself or outsource to a development team? And are you going to use traditional code or a no-code app builder?
Here’s how to decide between the two paths:
Coding the web app yourself
Traditional development (aka “slow code”) means you’ll be writing your own code from scratch, using something like JavaScript, Python, or Java.
Here are some of the pros and cons of traditional coding:
Pros:
- Super customizable. If you know how to code it, you can build it. Your app is a completely blank slate with almost unlimited possibilities.
- Platform-agnostic. You’re not bound to any particular platform with slow code (though you still need to choose one to host your app).
Cons:
- Slower development timelines. Building from a blank slate and having to custom-write every line of code means longer lead and dev timelines.
- Higher costs. Learning to code, or hiring a team of developers to code for you, is usually quite expensive. See also: slower development timelines.
- Requires more specialized knowledge. With traditional coding, you really need to understand programming languages to choose the right one for your product. You also need to know the differences between backend, frontend, and DevOps, and be able to code in all three (or have someone who can do so for you).
If you don’t know how to code or you want to save time while building your app, a no-code web app development platform is likely better suited to your needs.
No-code
Low-code tools, or no-code tools like Bubble, are a great method for building web applications. Simplifying the design, development, and deployment of a web app makes it easier and faster to get your idea off the ground.
With a great no-code tool, you’re not starting from scratch: You can use pre-built templates, components, and plugins to build on best practices. No-code lets you quickly build the foundation of your app and then simply customize as needed, instead of having to manually code every single button, content group, and menu.
You can still design your web app exactly the way you want — you’ll just have a major head start.
Here are some key pros and cons to consider:
Pros:
- Faster development. With Bubble’s no-code tools, founders and developers build apps 2.5x. And faster development also means lower costs.
- Visual builders require less specialized knowledge. You don’t have to learn to code or waste time coding every single component of your app. Use pre-built components when possible and a visual editor to speed up workflows.
- Hosting and infrastructure included. No-code tools like Bubble take care of the hosting of your app so you don’t need to additionally purchase hosting from AWS or other services.
- It’s easier to DIY. You can customize your web app easily and iterate after launch without needing engineers or a technical team.
Cons:
- Platform commitment. You’ll need to decide which platform is best for your needs. If you change your mind later, it may require extra work to transfer.
- Feature limitations. Certain highly-customized features, like code injections, don’t come ready out of the box. However, APIs make your app more customizable. Bubble has many official plugins and integrations with popular platforms like Microsoft Azure and Zapier.
Whether you’re a proficient coder or JavaScript expert or not, you can build your own web apps in a no-code tool like Bubble.
To keep this guide beginner-friendly, we’ll use examples from Bubble’s no-code app builder throughout the rest of this article.
4. Resources
Finally, you need some resources to get started.
When you’re planning a vacation, you need time, money, and some basic tools to get everything booked and planned. Building an app is the same.
The three most essential resources you’ll need:
- Time. No app is built overnight, even with no-code. Of course, with no-code, you generally only need to set aside a few weeks (or even days) to build, not months or years. Either way, you’ll need time to build it — or to hire someone who can.
- Money. Unfortunately, no app can be launched into the world for free, either. Budgeting in advance for labor (including your own!), tools, iterations, and ongoing maintenance can make your launch process a lot smoother.
- Tools. Probably goes without saying, but you need some basic tools to build your app. You’ll need a development platform, for starters. You’ll also need design tools, user testing tools, and resources to launch, host, and maintain your app. You also might want a project management tool to plan and manage your product roadmap.
Thinking through what tools you’ll use, and whose time and money will go into building, launching, and maintaining your web app will make your project more sustainable.
There’s a lot that goes into planning, building, and launching a web app. Just keep in mind you don’t have to do it all on your own. If you have the idea and the resources in place, you can hire a Bubble-Certified Developer to build (or help build) your web app.
How to build a web app with no-code in 11 steps
Once you’ve got the foundational pieces in place, you’re ready to build your web app.
Staring down a blank screen can be really overwhelming, so we broke down our devs’ core process into 11 basic steps. Follow along with this guide as you build to keep you moving forward.
Stuck at any point? Post your question in our supportive community forum, or get step-by-step instructions for hundreds of components and website development tasks in our Academy library.
Stage I: Plan your web app
The most overlooked step in web app development: planning your app.
You might be thinking, “Now, wait, didn’t I just do that?”
We did the foundations for it.
We’ve talked to hundreds of founders, and we’ve found the vast majority of people who think they’ve planned out their app haven’t actually planned sufficiently to make the development process as smooth as possible.
Start by mapping out the scope of your V1. Sketch out details about the key features, databases and data types, pages, content, and workflows needed to solve your audience’s core problem.
All of this will lead to a minimum viable product (MVP) — or, as we like to think of it here at Bubble, V1 of your product.
Here’s how:
Step 1: Map out the essential user stories
As with most things, the best place to start is with your customer.
User story mapping is a framework that helps you prioritize product features based on user needs and experience.
At its core, you’ll visually map out “stories,” or workflows, a user would take in your product to complete certain tasks. To build out these stories, you may want to fill in the following framework:
As a [type of user], I want to [task or action] so that [goal or benefit].
Then, organize and prioritize the needed features for each of those actions. If you’ve never done this before, read our guide to user story mapping to get step-by-step details.
The goal here is to map out everything the user will do with V1 of your app. Keep in mind this is just for your initial release, so keep it simple!
Step 2: Determine your design needs
Don’t be fooled by the word “design” here. At this stage, we’re not yet thinking about design from a “beautification” perspective, but from a functional, UX perspective.
Your design doesn’t need to be fancy at first, just functional. Consider how Amazon.com looked in 2007:
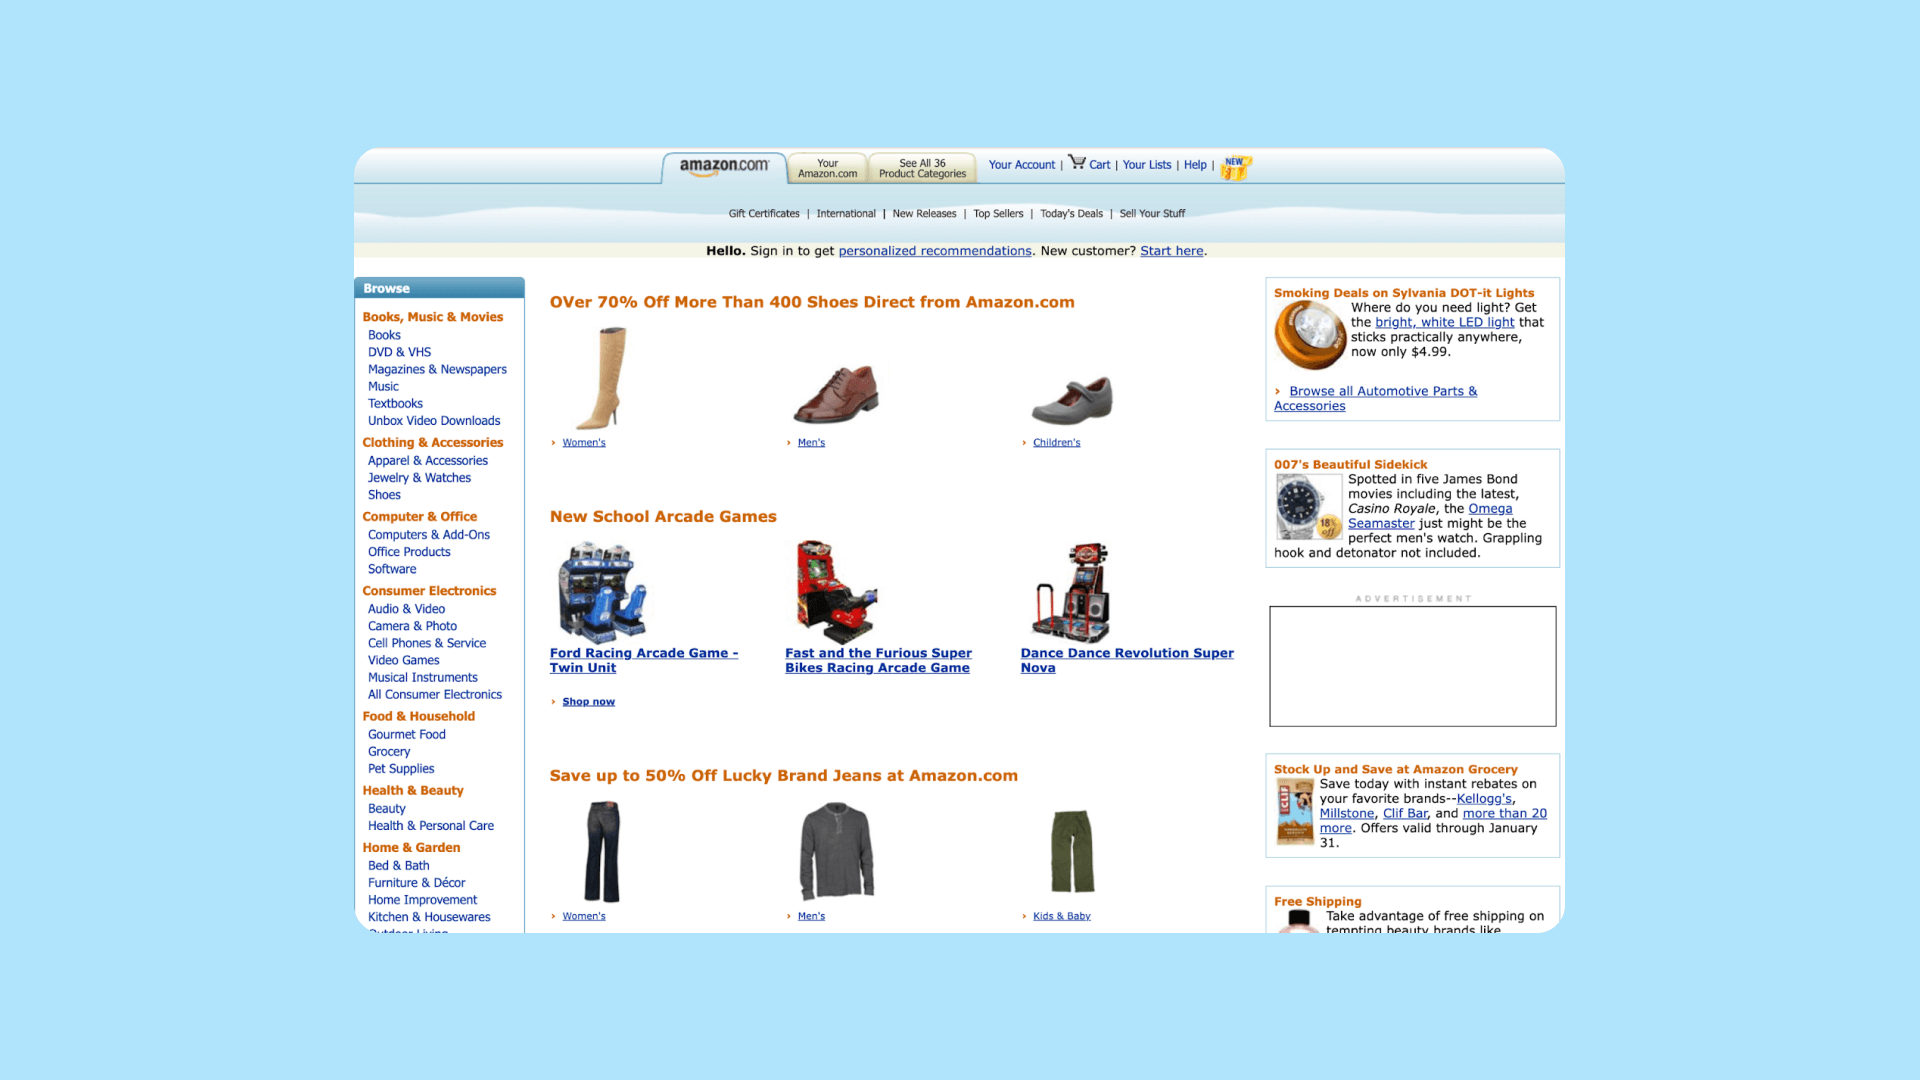
At this stage, you want to think through everything the user will need to accomplish each step mapped out from your user stories.
For example, the action of “logging into the app to see new connections” requires:
- A login page or login pop-up
- User accounts
- Homepages (pre- and post-login)
- The ability to connect with other users
- A “Connections” page
- Notifications for new connections
- …and so on
At the end of this, you’ll have a complete map of all the pages, components, buttons, forms, and such you’ll need to make your web app functional.
Step 3: Determine your data needs
Now that you know all the components your web app needs, you can start thinking about the data behind those and the ways that data will work together.
Go through each user story, action, and/or design items. Then, figure out the data points each one will need to make it functional.
On Bubble, every app comes with a built-in database that you can customize, which makes building this out even easier.
To help think through the data types and fields you’ll need, consider these three questions:
- What are the major categories of data my app idea needs to function? In Bubble, these are your data types. For example, if you're building an app for people to review restaurants, you'll need restaurants, reviews, and users (the user data type always comes pre-built in your Bubble app).
- What subcategories exist under my major categories? These are the fields within your data types. For example, your restaurant data type could include fields for the name, address, phone number, logo image, and cuisine type for each restaurant.
- Do any pieces of data relate to each other? When two types of data need to connect to one another, you can add them as fields in the data type. For instance, your Restaurant will have a "list" of Reviews, so that any reviews will display on its page.
Step 4: Determine your workflow needs
With your data types sketched out, you can now think through the processes that you’ll need to build to create workflows.
In Bubble and other no-code app builders, workflows are where the magic happens. Building workflows allows you to connect data to your frontend design and make your app fully functional.
To sketch out the workflows needed for your V1, go back to your map of design needs. Think through all the processes that need to happen to make each piece work.
For example:
- What needs to happen when the user presses the Log in button? The system needs to verify their credentials and then load their personalized home page.
- What needs to happen when a user clicks the Sign up button? A new “thing” needs to be created in the database to create an account for them.
Workflows are commonly used for things like:
- Making buttons clickable and taking the next action
- Navigating between internal pages
- Showing a confirmation message when a form is submitting
- Hiding elements if someone isn’t logged in or doesn’t have access to them
- Creating or changing data within your databases
- Sending users emails or notifications
Stage II: Build your web app
Phew! It may seem like all we’ve done is plan stuff, but with the right foundations in place, we promise that building your web app will fly by — and you’ll be far less likely to encounter bumps in the road.
From this point on, you can follow along in your own Bubble account (it’s free!).
Step 5: Structure your database
Remember your data types and fields from step 3? Pull them back out. It's time to use them to create the databases for your web app.
Think of your database as simply a structured collection of data.
You have your data types, which are your main categories of data, and data fields, which are stored within data types.
For example, a data type “user” might have fields such as “Name,” “Email,” and “Date of birth.”
When you think of databases, you might think of complex technical structures. In Bubble, your database management system is managed with an intuitive visual editor.
There’s no need to stress about database schemas, SQL syntax, or indexing. Just focus on the logic and flow of your app, and Bubble’s powerful databases keep everything connected and secure in the background.
To start building your databases, go to the Data tab in the Bubble editor.
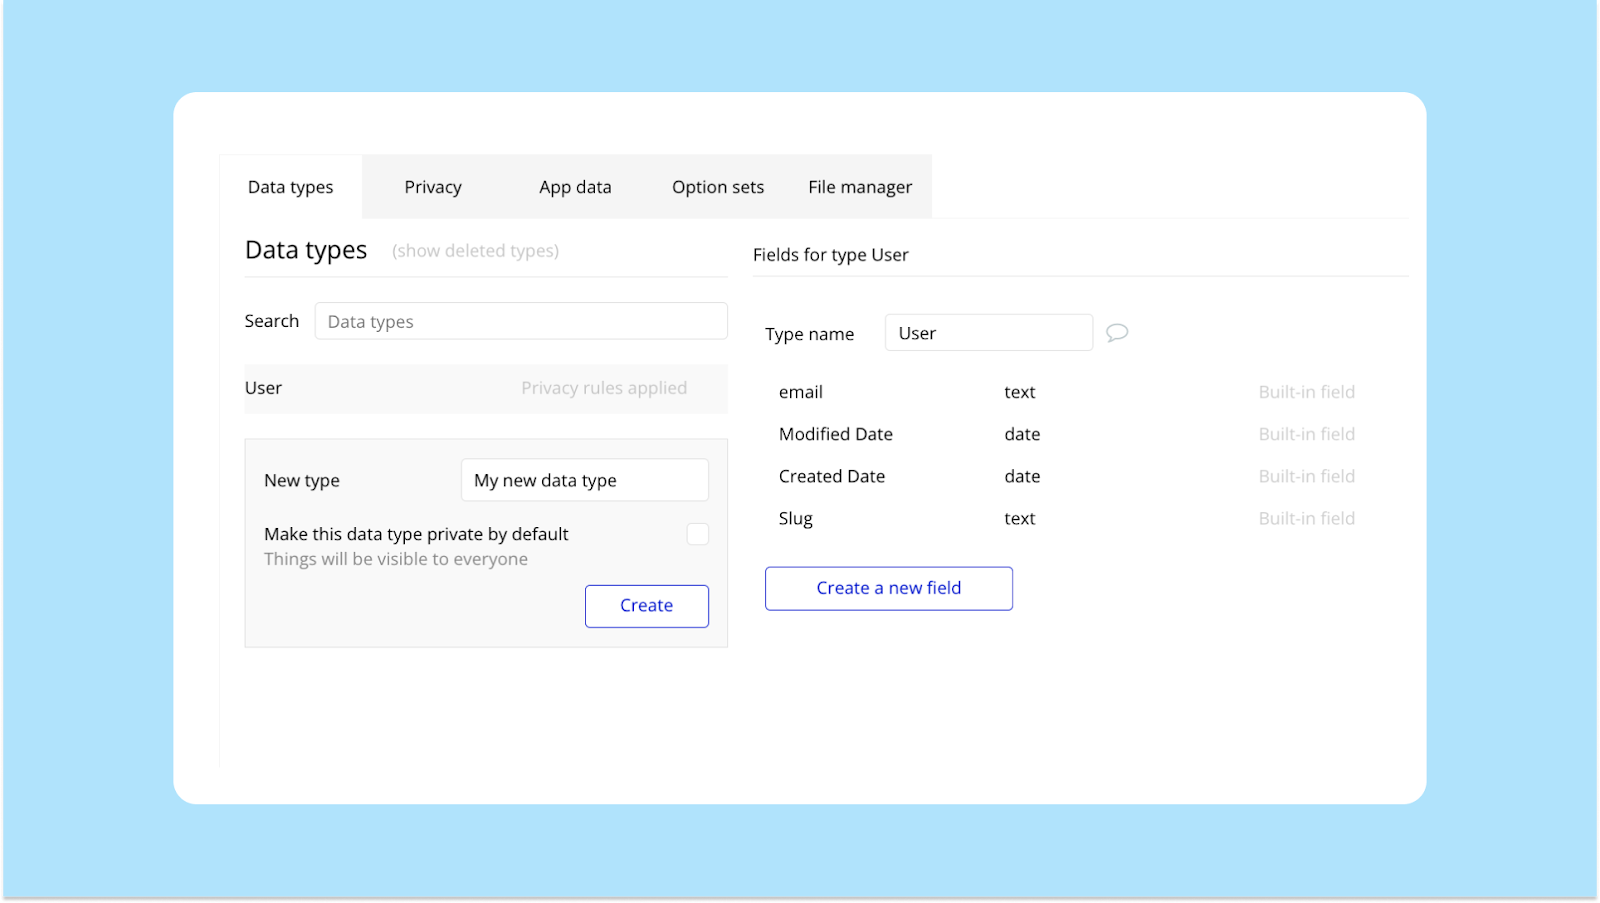
There, you can click Data types to add all the data types you planned out earlier.
Then click Create a new field to add all the relevant fields within each data type.
For a more detailed walk-through, check out our guide to setting up your databases.
Step 6: Design your user interface
With your databases in place, it’s time to turn to the design of your app.
Designing your app can break down into two main categories:
- User Interface (UI)
- User Experience (UX)
The user interfaces make up the visual aspects — the overall look and feel — of your app. This is things like:
- The layout of pages or screens within an app
- Colors
- Typography
- Logos
- Icons and images
At this stage, don’t get hung up on these visual elements. What you don’t want to do is spend a bunch of time making everything picture-perfect, only to have to change the workflows and re-design everything later. For now, focus on a basic, consistent UI that’s easy to iterate on and maintain as you move forward.
At the start, you want to focus more on the user experience of the app. This is the side of design that focuses on how the user moves through the app. Ideally, your web app should be easy to navigate with a logical structure and user-friendly, intuitive design.
Creating great UX and UI for your web app can be — and often is! — the focus of an entire career. If you’re not super familiar with great design principles, work with a designer or start from a template.
In Bubble, great design is easier because you’re not coding everything from scratch.
Instead, go to the Design tab in the Bubble editor, and you can work with our drag-and-drop editor, pre-built components, and even basic templates to get exactly the look and feel you want.
In Bubble, design components are split into three main categories:
- Visual elements, which are the building blocks for your design
- Containers, which hold and organize visual elements in groups
- Input forms, which collect and organize data
Drag and drop the components you need from the component library on the page and customize as needed. Then repeat for each page or screen within your web app.
For a more detailed walk-through, start with our basic design guide. Then dive into how to leverage all of Bubble’s powerful design tools and elements.
Step 7: Add functionality with workflows
Finally: It's time to start knitting everything together with workflows.
In Bubble, a workflow is the combination of an event that triggers one or more actions. In plain English, it’s the magic engine behind your web app that makes it functional.
An event is any action (in the frontend or backend of your app) that tells a workflow to run. It’s the trigger for getting something started.
For example:
- A button being clicked
- A status being changed
- A change in the database
- A user logging in or out
An action is the operation that takes place when an event triggers a workflow. The event tells your database when to do something, and the action tells your database what to do.
Some common actions would be:
- Creating, updating, or deleting things in the database
- Hiding or showing certain elements on the page
- Creating user accounts
- Sending emails
- Navigating to a different page
- Doing something that leverages a plugin, such as making a payment via Stripe
You can connect multiple actions in a row to create more complex functionality.
In Bubble, go to the Workflow tab to create or edit workflows.
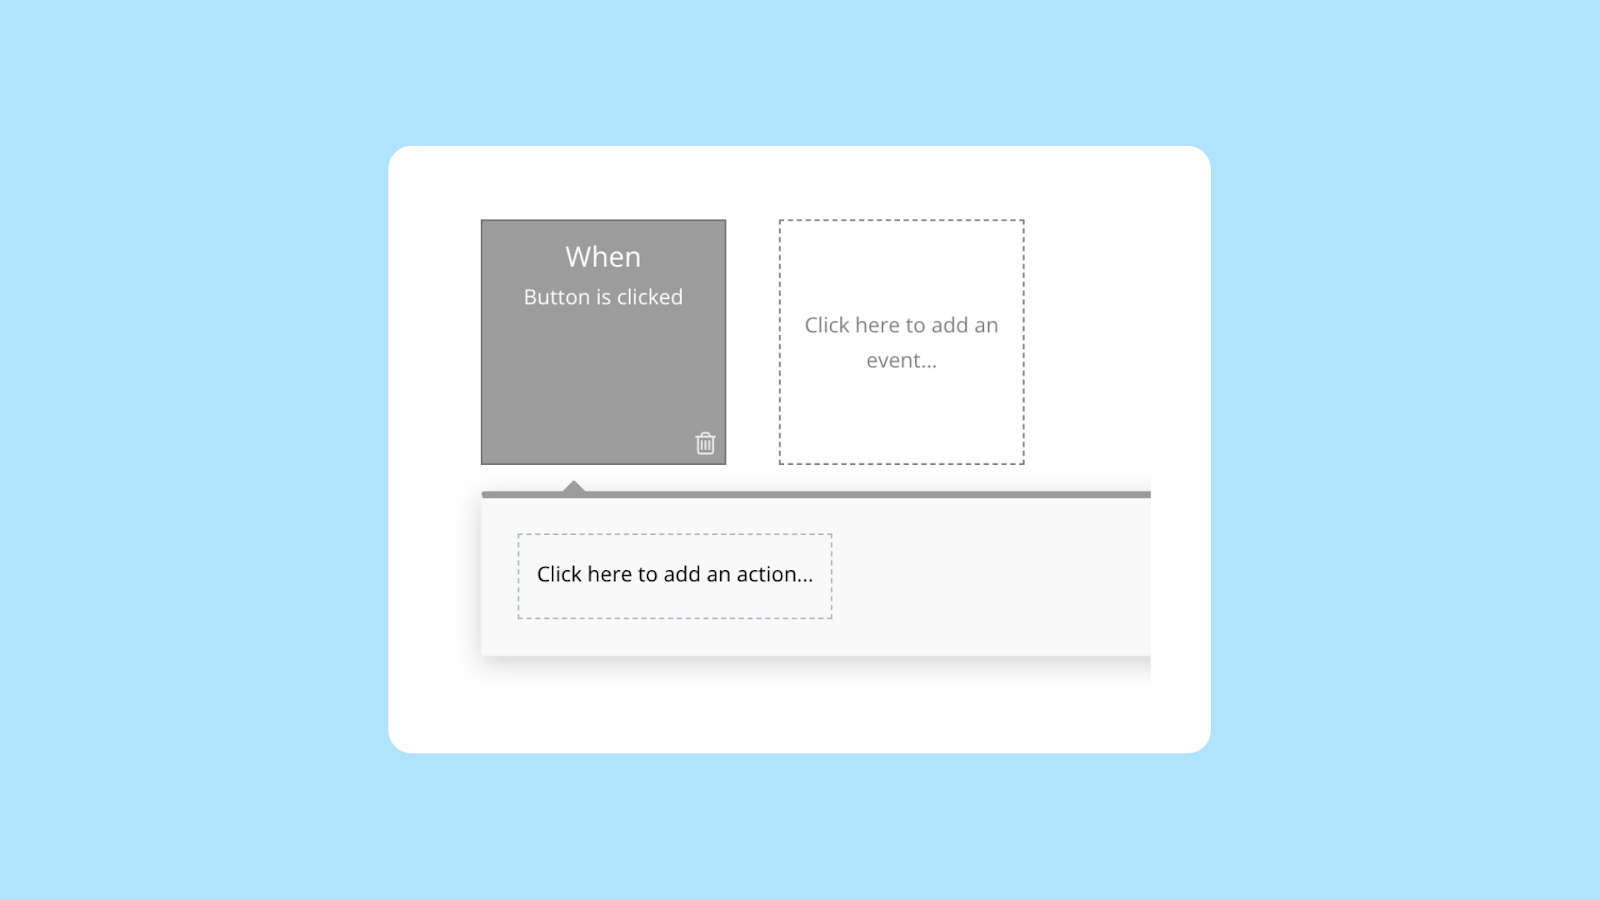
First, you’ll set the event — the trigger for the workflow — and then you’ll add the corresponding action or actions.
For more detailed guidance to setting up workflows, read more about workflows and events, then get a step-by-step on how to set up different actions.
Step 8: Implement privacy settings
Now that your data, design, and workflows are set up, your app should have some basic functionality. It also has a frontend that your users can easily navigate.
The next step is setting up privacy settings.
Web apps need custom permissions to determine what data users can or can't access at any given time.
To do this, go to the Data tab, then click the Privacy tab. From there, you can click on any data type to create a new rule.
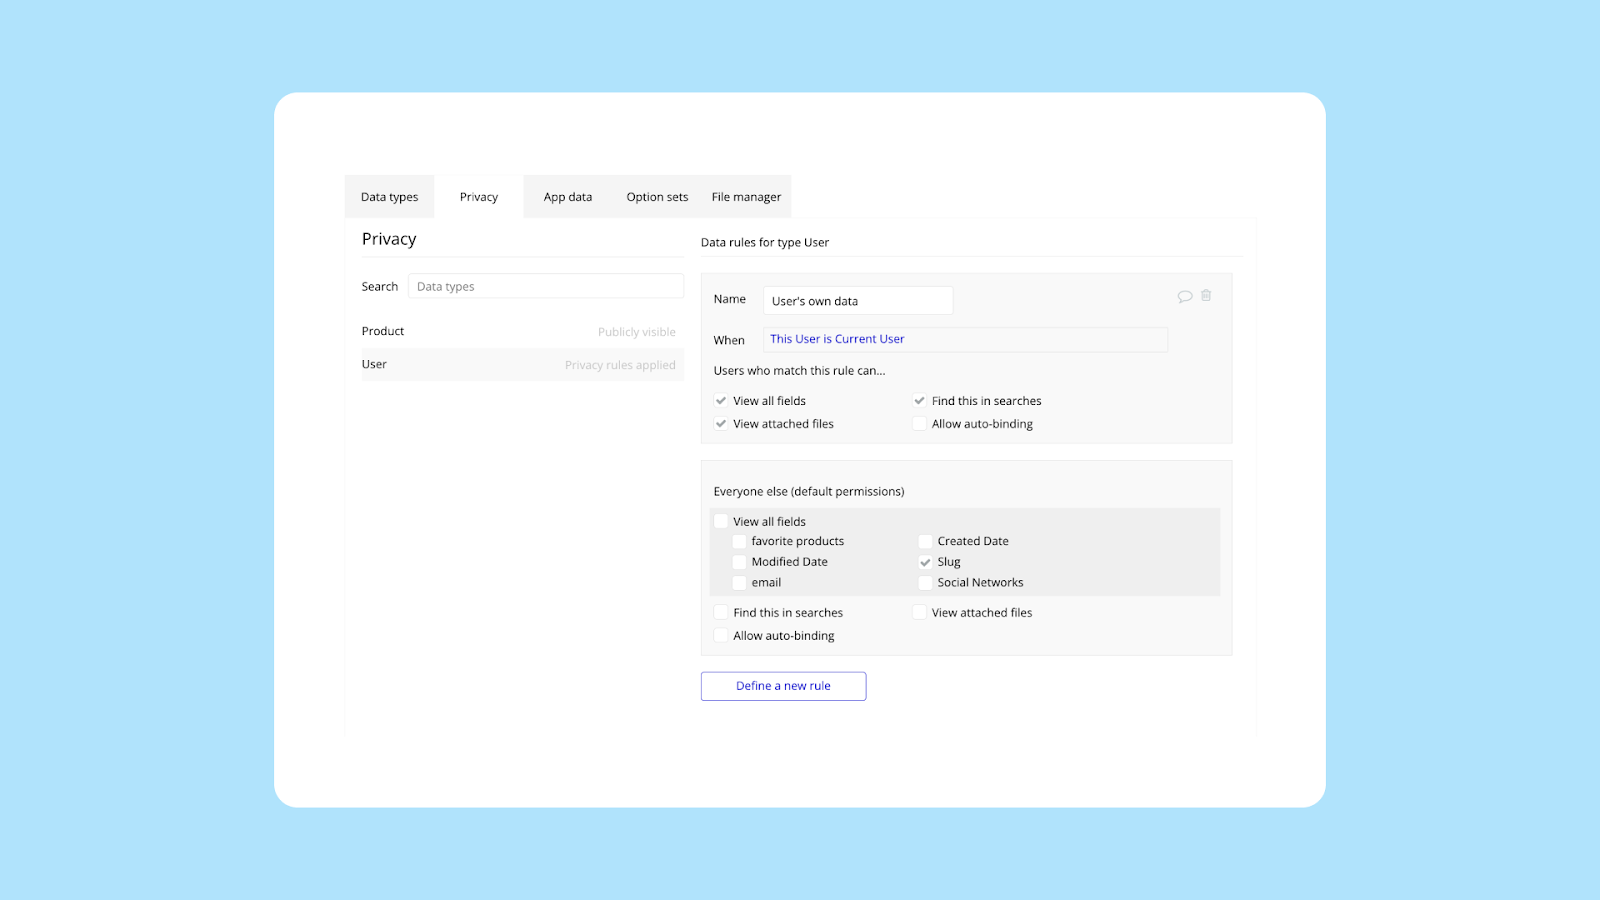
Next you’ll write conditions (when the rule applies) and permissions (who the rule applies to).
Privacy rules protect your data types in the following ways:
- You can stop specific fields from being viewed
- You can stop the data type from being found
- You can stop users from viewing uploaded files
- ...and more
Stage III: Test and troubleshoot your app
Congrats! Your app is officially built. You have all the major functionality, design, and logic in place. All you have to do now is test it and get it out there for users.
Step 9: Test your app in run mode
Bubble’s run mode allows you to preview your app and test all the functionality to make sure it’s working as intended before pushing it live.
If you notice anything wrong, you can use Bubble’s debugger to run workflows action-by-action and check each step of the workflow. The debugger will also help you inspect page elements for attributes, conditions, or data that could be tripping up your workflow.
To try out your app in run mode, just click Preview from the Bubble editor.
Then you’ll want to work through each page, action, and workflow of your web app to make sure everything’s working properly.
When you do find some bugs (it happens to everyone!), use the debugger to help you break down the issue and find the exact place (or places) causing the problem.
If you’re getting stuck on how to find or fix an error in your app, talk to other developers on the Bubble forum or hire one of our expert coaches to get help resolving it.
Stage IV: Launch your new web app
The most exciting stage of all: launching your app to real users! Here’s how to do it with Bubble.
Step 10: Go live!
When you’re ready to launch your app with Bubble, you’ll start by upgrading to a paid plan. Building your app on Bubble is free until you’re ready to launch, so you have all the time you need to build, design, and test.
Bubble isn’t just a full-stack development platform: It's also a service and hosting provider that allows you to deploy your app, scale, and more.
Launching on Bubble is easy. In fact, it takes less than two minutes. All you need to do is click the Deploy button.
For more details on custom domains, launching your app, and so on with Bubble, check out our guide to hosting and scaling.
Step 11: Iterate and expand
Your app is live for users!
This is a huge milestone, but it’s only the beginning of your web app’s journey. Now you want to focus on iterating, expanding, scaling, and improving your app.
With Bubble, iterating on your app based on user feedback or expanding your app with new features is easy. Because each app on Bubble has a development and a live version with visual editors, making changes is as easy as:
- Going back into your editor and adjusting as needed
- Testing and debugging new features
- Redeploying to launch the current version
Even better: Bubble’s version control lets you quickly roll back to a previous update if something goes haywire.
So now you’re in the perfect place to run test your app, set up ongoing usability testing, and iterate and improve future versions of your app.
Start creating web apps with Bubble
Building a web app is no small task. But with Bubble, it’s easier — and more affordable — than ever.
With Bubble, you can work through all of these steps — from idea to launch — in just weeks instead of months or years when you’re writing code. (Don’t believe us? Just ask Bubblers who’ve done it themselves. Carmen Perez built Much on Bubble herself in just two months, and Liesl Leach brought BluBinder to life in just weeks with the help of a Bubble Developer.)
If you want to move faster and bring your idea to life, but need some extra support, Bubble’s certified agencies and developers are here to help.
So what are you waiting for?