Tools like Quickbooks have made it possible for business owners to quickly prepare and send invoices to customers. Although you can purchase this off-the-shelf solution, it’s also possible to quickly build your own alternative using no-code tools like Bubble.
Using our visual programming tool, we’re empowering makers of any background to build beautiful software. Whether you’re building a marketplace, a social network, or a mobile app, our customers use our suite of tools to create rich product experiences.
RELATED: Learn how to build any web app without code with our How To Build series.
Throughout this post, we’ll uncover the process of using Bubble to build your own version of Quickbooks, all without writing a single line of code.
Whether you’re looking to build a dedicated invoicing application, or you’re just interested in utilizing some of the core features from Quickbooks, this guide will share how to start building the underlying workflows for an MVP.
The steps to building a Quickbooks clone with no code include:
Get Started
Before you start, you’ll need to first register your free Bubble account. Click the button below to get started, then you can follow along as we build our product together.
Register your account on Bubble.
New to Bubble? Follow along on our Crash Course introductory videos to get familiar with the basics of Bubble.
We also recommend completing our introductory lessons, which will guide you through the step-by-step process of the most common Bubble features. This will help you get a running start when building your Quickbooks clone.
When kickstarting your project, you can choose to begin by wireframing your product design, or building the necessary fields within your database.
In this case, we’ll start by using Bubble’s visual design tool to shape the user-interface of our platform. If you’re replicating a version of Quickbooks, some of the core pages you’ll want to include are:
- User dashboard: Used to display a list of a users invoices and income data
- Create customer: A page to create a new customer
- Create invoice: A page to create and generate an invoice
- Invoice page: Used to display the content of an individual invoice
A major feature within Bubble is the ability to send data between pages. This allows you to create one generic version of a page, then dynamically display the relevant content from your database when it’s required.
In the case of your Quickbooks clone, you’ll only need to create one page to host each individual invoice. We can then write the necessary logic to display only the relevant content on each page when it’s needed (we’ll cover this in more detail soon).
Configure your database
Once you’ve mapped out the display of your product, you can focus on creating the necessary data fields to power your application. We’ll rely on these fields to connect the workflows behind your product.
Creating a database in Bubble is a seamless process. Start by listing your top-level data types, then add the necessary fields within each category.
When replicating Quickbooks as an MVP, we’ll need to create the following data types & fields:
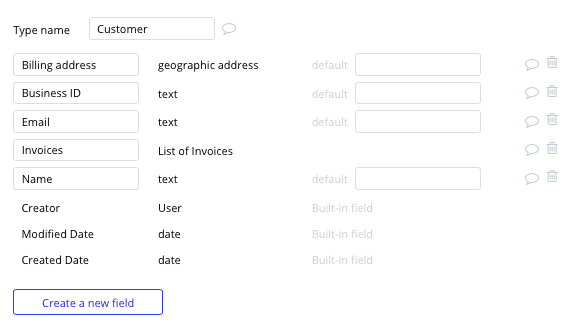
Data type: Customer
Fields:
- Name
- Billing address
- Business ID
- Invoices: List of invoices. Note: Creating a field as a list based on a separate data type allows you to seamlessly integrate all of its relevant data fields.
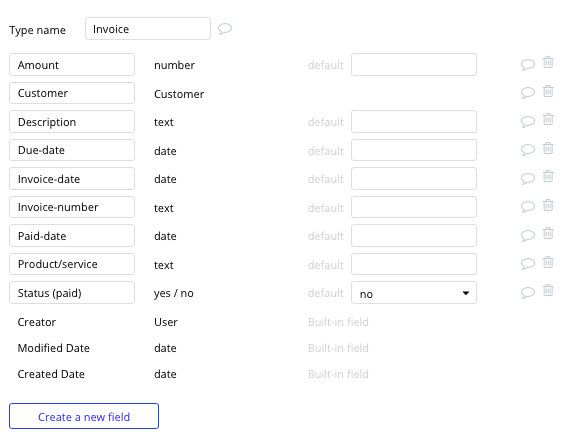
Data type: Invoice
Fields:
- Invoice-number
- Product/service
- Amount
- Customer - customer
- Description
- Invoice-date
- Due-date
- Paid-date
- Status (paid) - yes/no with no default
Building workflows
Now that you’ve structured both the design and database of your application, it’s time to start stitching everything together to make your app functional.
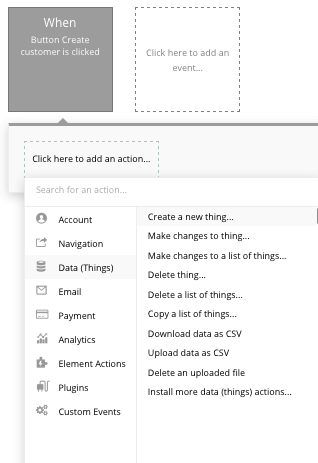
In Bubble, the main way to do this is with workflows. Each workflow happens when an event occurs (e.g. a user clicks on a button), and then runs a series of “actions” in response (e.g. “sign the user up”, “make a change to the database”, etc.)
Creating a new customer
The first feature we’ll build will be a portal to add new customers to our invoicing database. This will allow us to batch and track invoices for specific customers.
On your create-customer page, you’ll start mapping the relevant input fields required for each customer. You can add as many fields as you’d like, but for the sake of our MVP, we’ll only include the most essential customer details.

Once the add customer button is clicked, we’ll trigger a new workflow, creating the customer in our database.
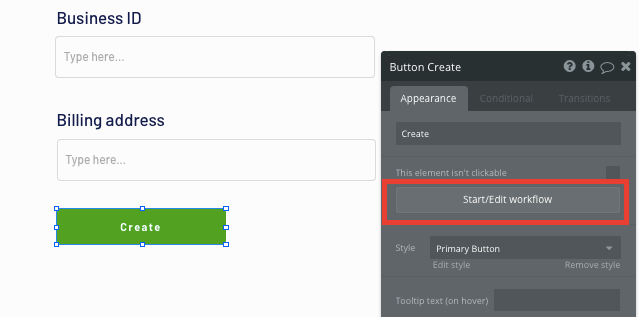
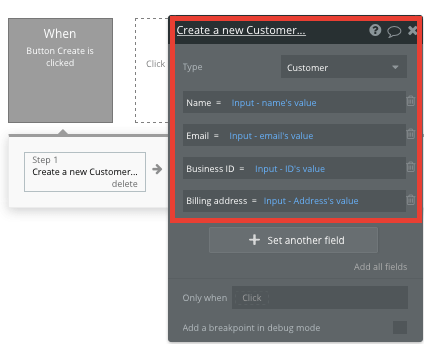
Within this workflow, we’ll need to create a new thing, configuring the data type to a customer.
You’ll then match the relevant input elements on your page to the data fields from the customer type in your database.
Creating an invoice
After building the workflow to create a new customer, we’ll now be able to create a feature that generates a new customer invoice.
The process for building this feature will follow a similar workflow to the one we used to create a customer.
On our create-invoice page, we’ll map out the necessary input fields required for an invoice.
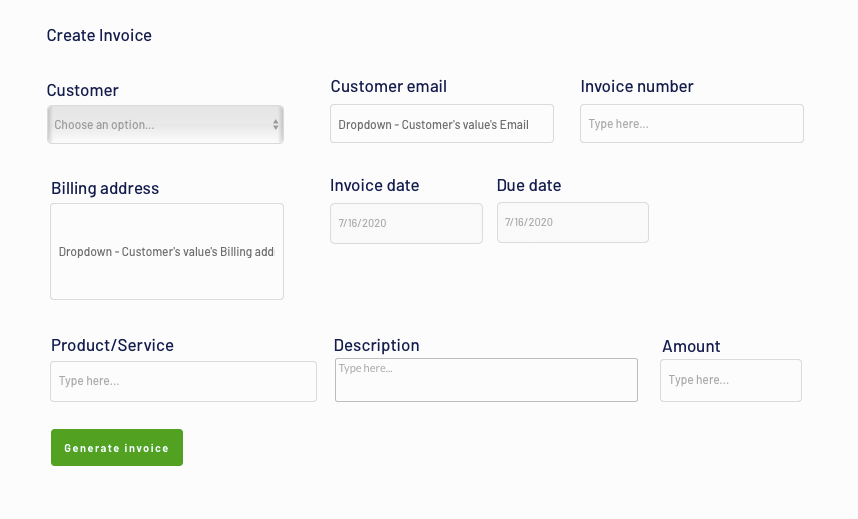
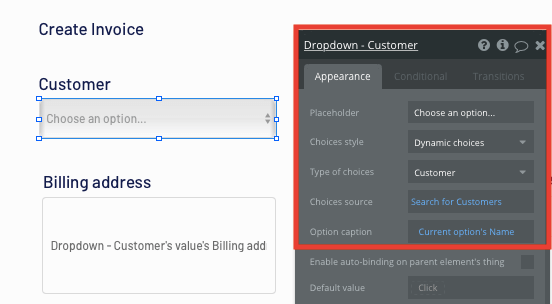
When using a dropdown menu to select a customer, we’ll need to configure this element to display a dynamic list of all the existing customers from our database.
Start by selecting the type of content for this element to be a customer.
Next, we’ll search for all of the customers within our database, then choose to display their name property within the element.
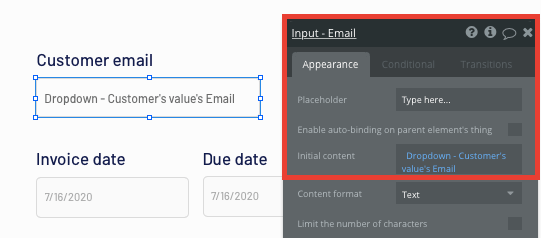
After a customer is selected from the list, we can use this data to pre-fill input elements within the invoice, helping streamline the process of completing a new form.
Simply add the dropdown's value into the initial content field of an input, then this element will dynamically update each time a unique customer is selected.
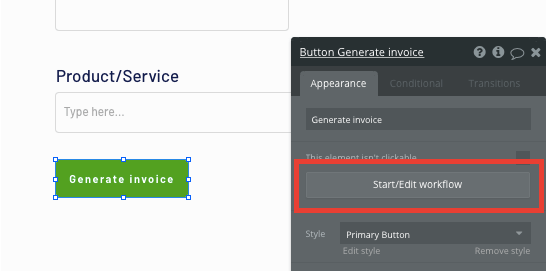
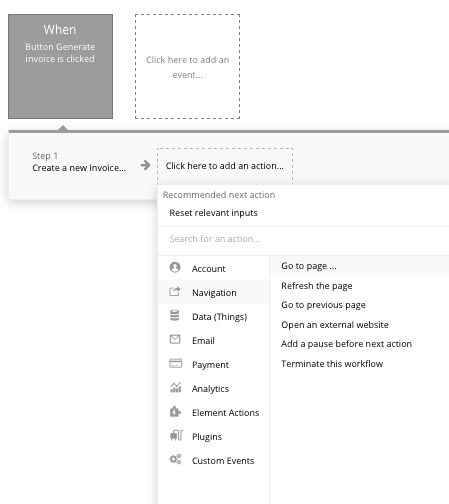
Once a user has added the relevant invoice details into the form, we’ll then need to generate the invoice itself. Throughout this workflow, we’ll be following the same process as we used for creating a customer.
Let’s start by creating a workflow trigger when the generate invoice button is clicked.
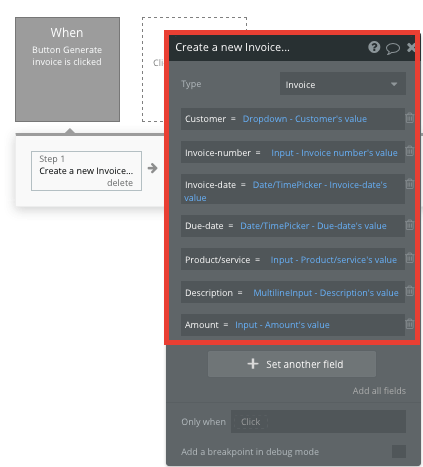
After opting to create a new thing, we’ll once again need to match the on-page input elements with the necessary data fields for our invoice.
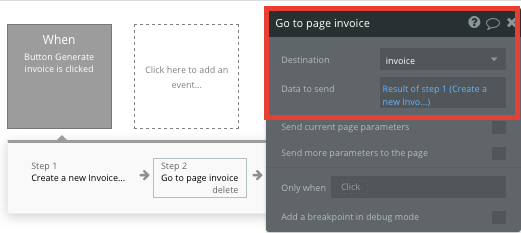
Once an invoice has been generated, we’ll then need to display the final document on a web page.
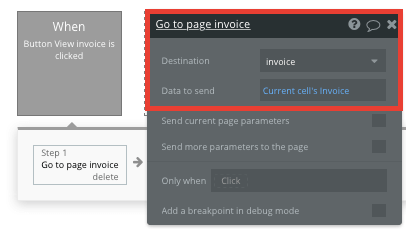
By adding a navigation event to our workflow, we can redirect a user to our invoice page.
When directing a user to this page, we can also send with them the data of our new invoice. This will allow the Bubble editor to display dynamic content from a relevant invoice.
Displaying dynamic page content
Once an invoice has been generated and our workflow directs a user to the dedicated invoice page, we’ll need to display the content of this new invoice.
When building our invoice page, we’ll need to first configure the page type to be an invoice. This will allow the Bubble editor to send and receive invoice data through our workflows.
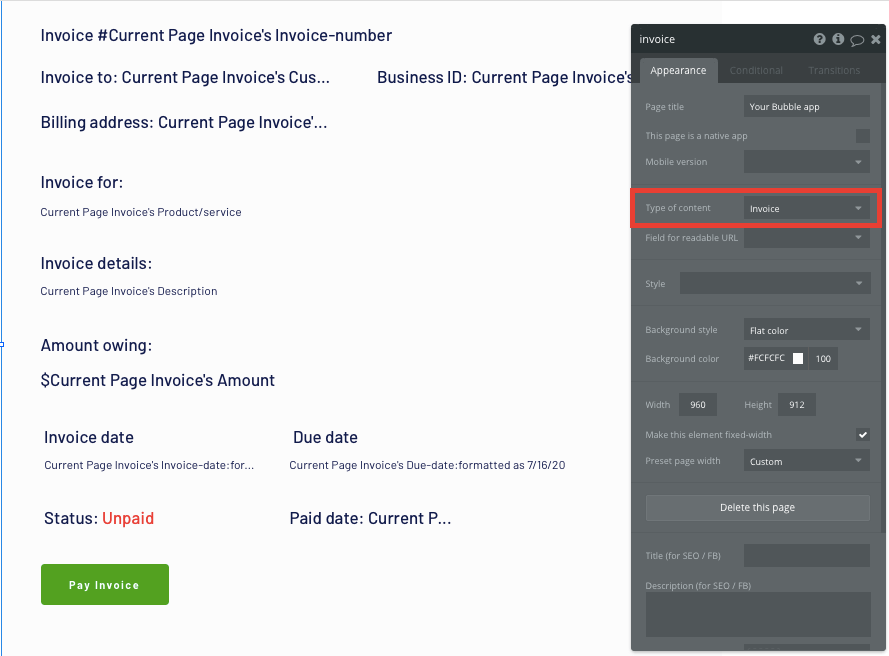
Once the page type has been configured, we can start to display the dynamic content for the invoice.
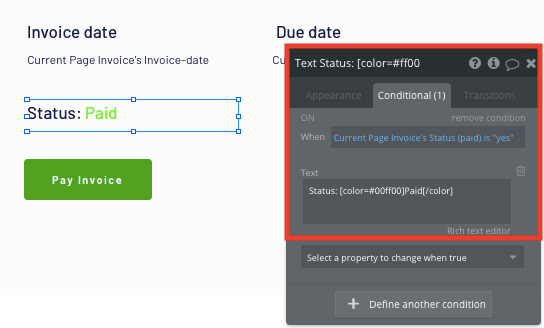
When adding an invoice status to our page, we’ll use a condition to update the text accordingly. Conditions are a powerful way to change the display of elements based on unique behaviors.
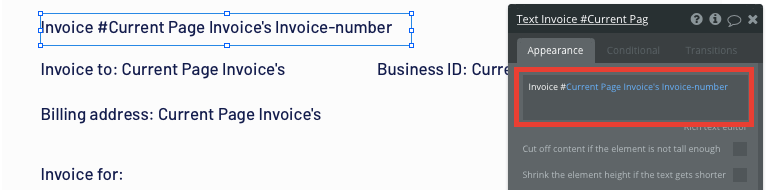
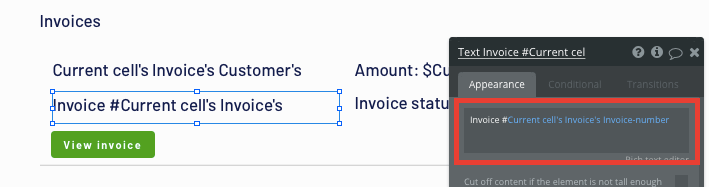
We’ll start by adding a text element that labels the invoice as ‘unpaid’.
From here, we’ll add a condition to this element that classifies when invoices paid-status is ‘yes’.
When this condition is met, we’ll update the text of this element to display the invoice as ‘paid’.
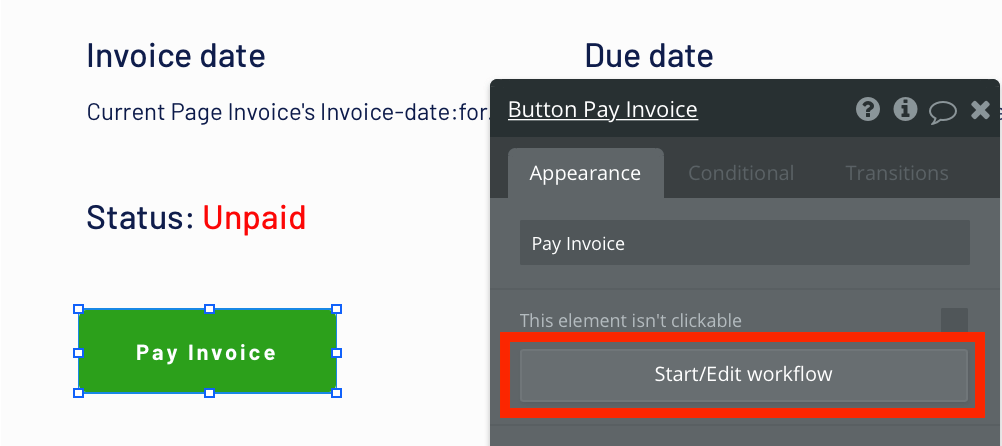
Accepting payments for an invoice
When a customer has received the link to an invoice page, we’ll need to create a feature that allows them to seamlessly pay for this.
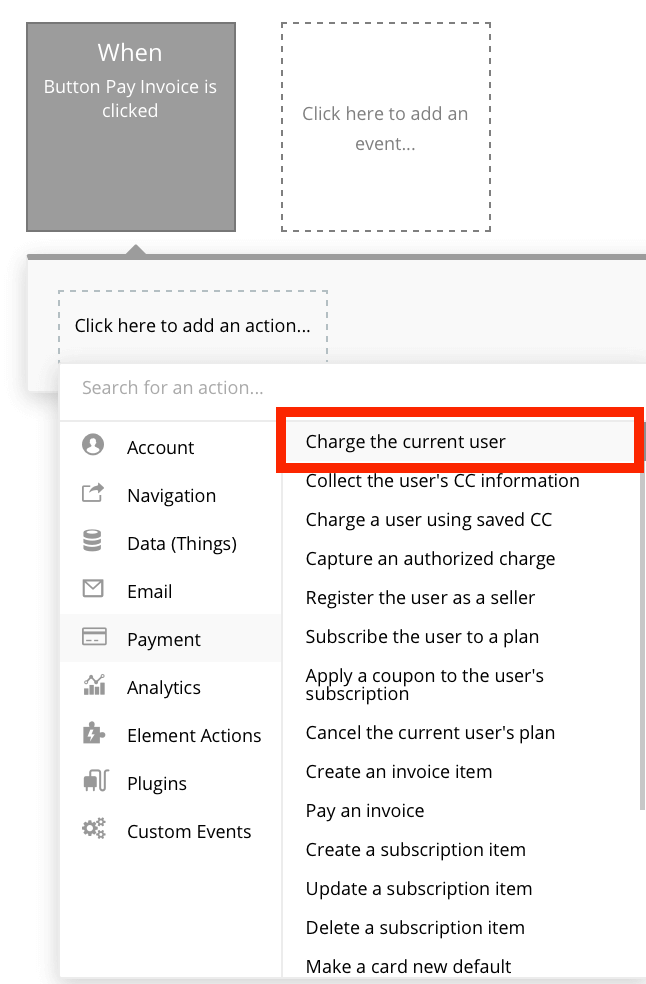
Within Bubble, it’s possible to harness the power of several plugins to facilitate payment transactions. In this guide, we’ll be using the Stripe plugin to process credit card payments.
Note: After integrating this plugin, you’ll need to first configure your API keys within the plugin settings.
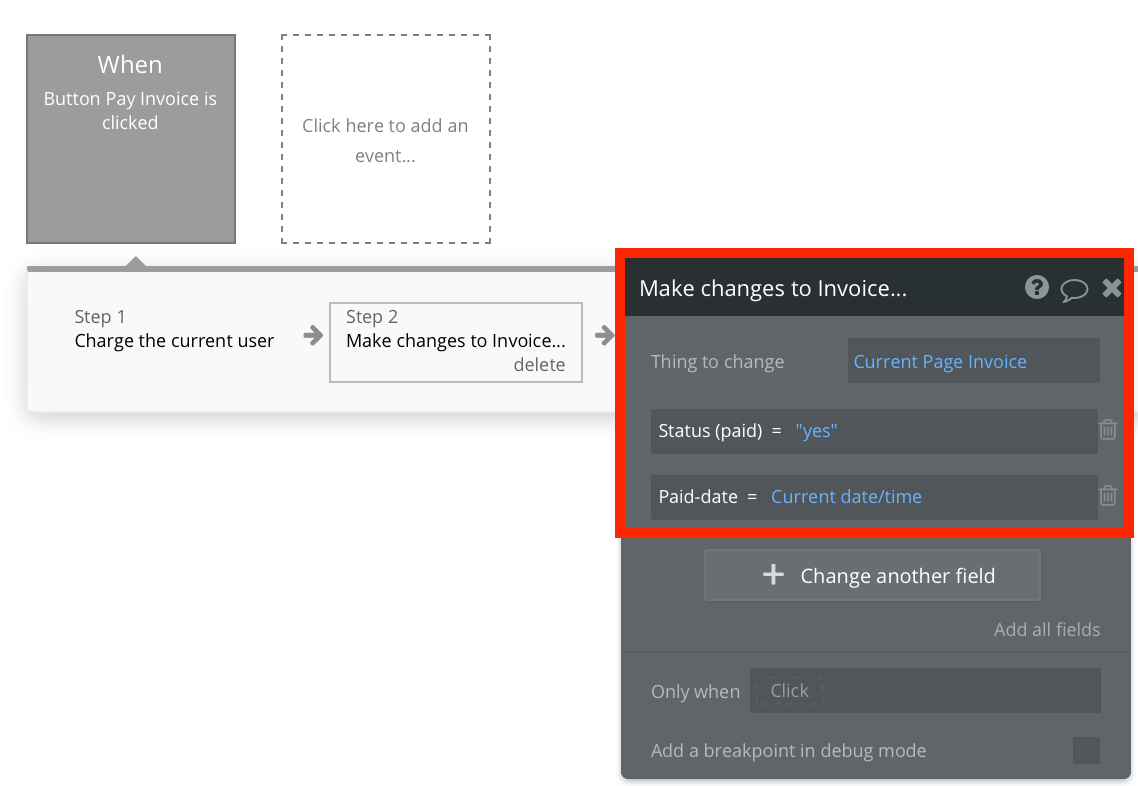
Once we’ve added the Stripe plugin, we can then start to build a workflow when the pay invoice button is clicked.
Within this workflow, we’ll create a payment event, charging the current user.
When using this event, you’ll need to input the dynamic purchase data based on the current pages invoices price.
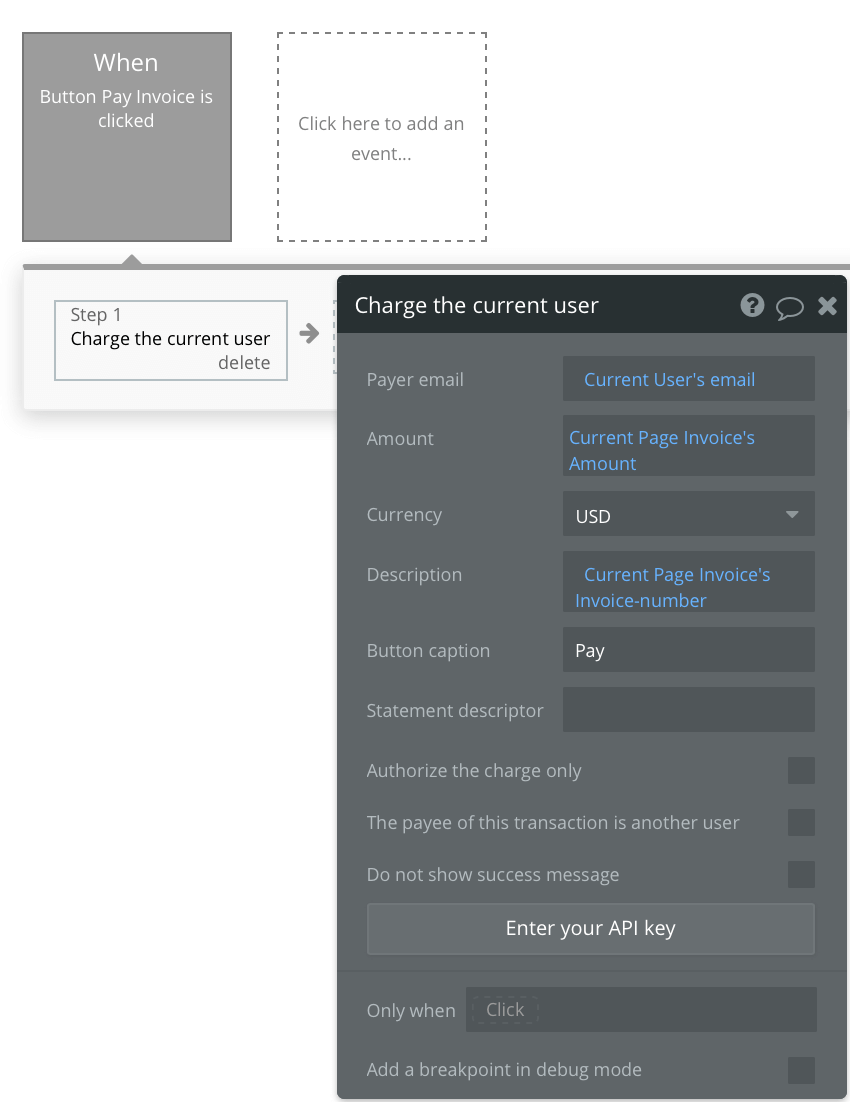
After configuring this payment workflow, the Stripe plugin will now automatically display and process a users card payment.

After a payment has been processed, we’ll then need to add one more step to our workflow that makes changes to a thing.
The thing we’ll want to change is the parent groups invoice, updating the paid-status to ‘yes’, and the paid date to the current date/time.
If you’d like additional guidance when building your payment processing workflow, you can watch a full tutorial in the video below.
Creating an invoice dashboard
The final feature we’ll build in our invoicing application is a dashboard for users to monitor and measure their historical invoices.
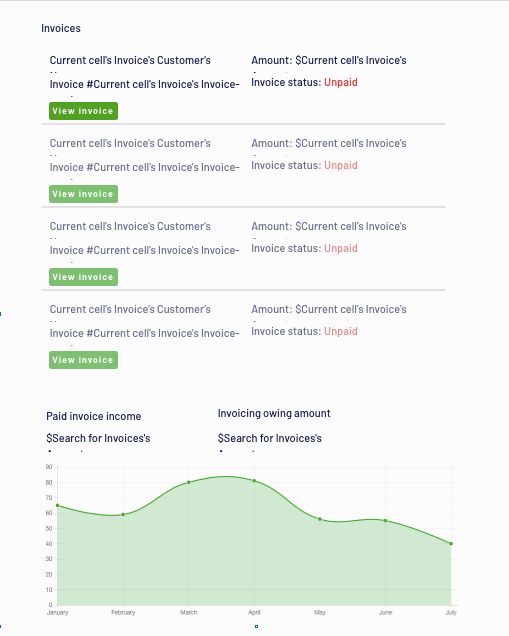
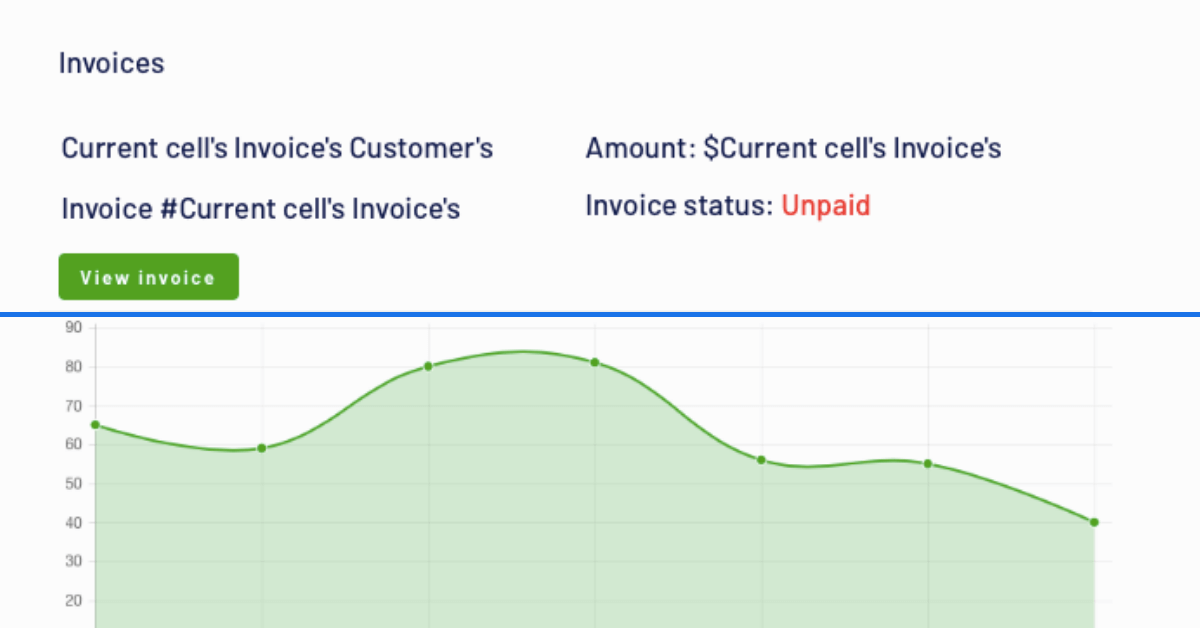
On our dashboard page, we’ll start by adding a repeating group element to display all of a users existing invoices.
Repeating groups are a powerful element that can dynamically display a list of data from your database.
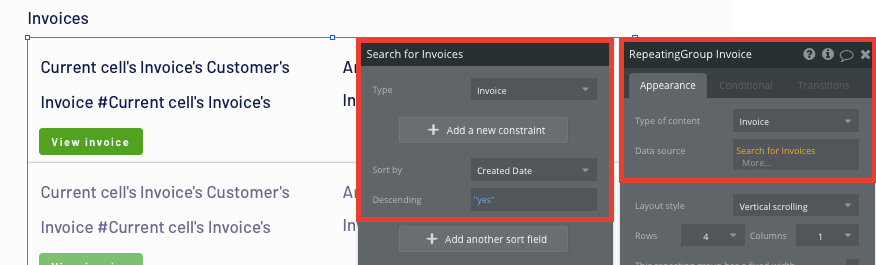
When adding this repeating group, we’ll need to first configure the type of content it will display - invoices.
Next, we’ll then configure the data source, allowing it to display all of the invoices a user has created. Simply configure the data source of the repeating group to search for all invoices.
Now you’re ready to start structuring the dynamic content that will be displayed within each grid. Simply map out the top row with the relevant content you’d like to show, then this powerful element will populate the remaining columns based on your existing data.
Within a repeating group, it’s also possible to create events based inside each individual row. This feature is useful when creating a button to view invoices.
By creating another navigation event when the view invoice button is clicked, you can send the data from the current cells invoice to our invoice page.
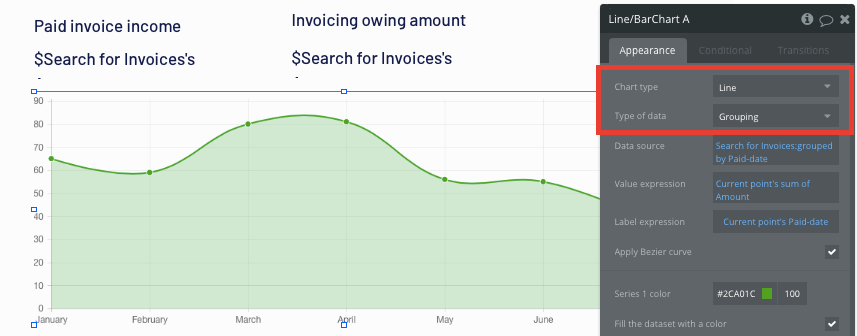
Below our grid of invoices, we’ll also add a line graph and additional data plots, labeling the total amount a user receives or has owing.
By searching for the total sum of all invoices that have a paid status of ‘yes’, it will display how much a user has been paid.

To find the total sum of owing invoices, you can replicate this formula, but only search for invoices where the paid status is ‘no’.
Finally, we’ll also use the chart element plugin to create a graph of a users total invoice payments.
When adding this element, start by configuring the chart type to be a line graph. You’ll also need to opt for a grouped type of data.
Next, you’ll start configuring the data source of the chart by searching for all invoices where the paid status is ‘yes’.
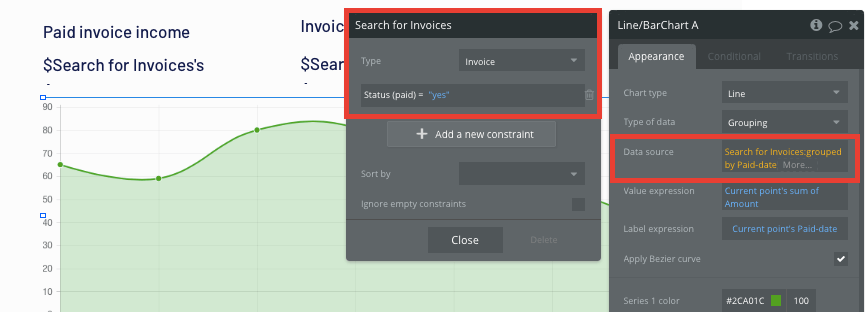
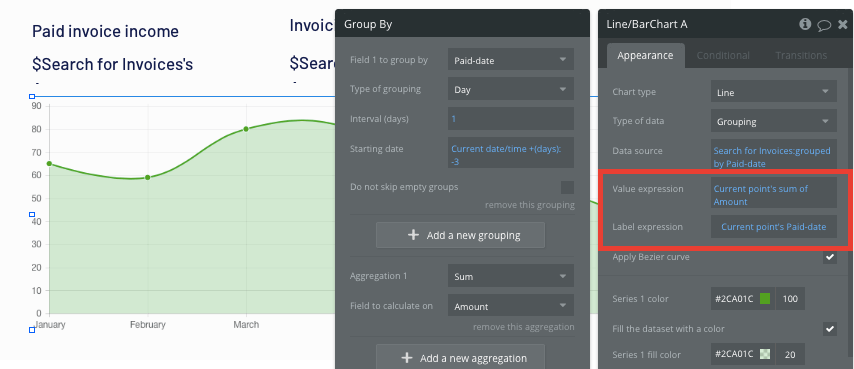
Now, we’ll need to label what data point we’d like to group and record from our list of paid invoices.
By opting to group our invoices by their paid dates, it will display the value of an invoice only when once it’s been paid.
We’ll also need to add the interval for how many days we’d like to batch these invoices by. In this case, our interval will be 1, recording these on a day-by-day basis.
When configuring the date settings, you’ll then need to select an initial starting date. You can choose this by selecting from the current date/time, then subtract the time period that you’d like to start tracking data from.
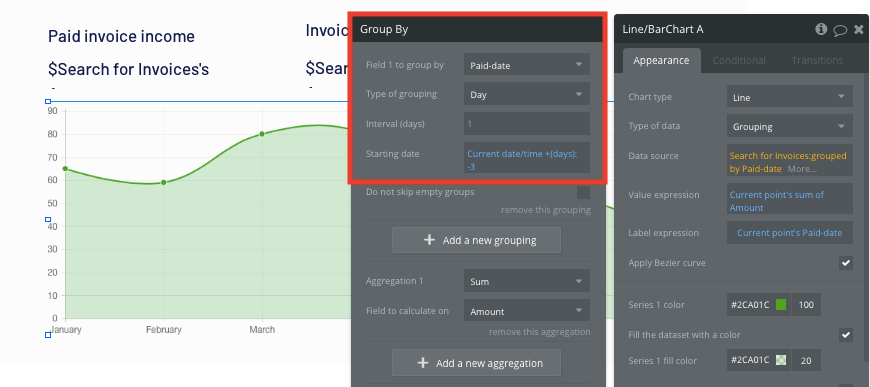
Once we’ve structured the timeline for our line graph, we’ll then to add values in which we’ll be measuring this data by. In this case, we’ll want to measure the total sum of paid invoice amounts.
If two invoices of $1,000 were paid on the same day, it will now batch these into one, $2,000 value.
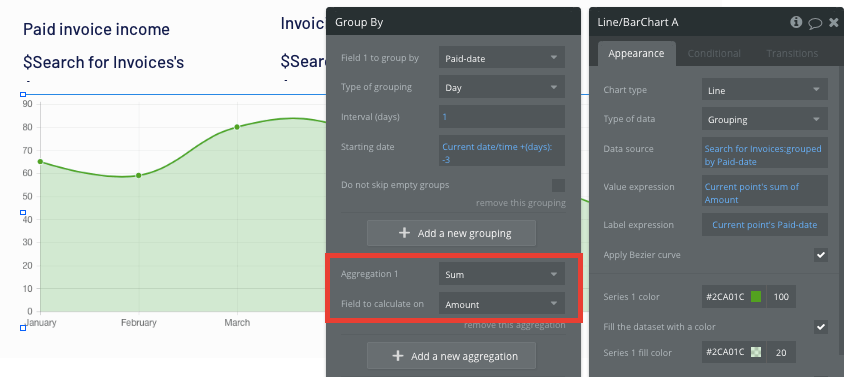
Finally, we’ll then need to verify the values of both our X and Y axis. These will be both the invoice amounts and the invoice dates.
Although this element can seem quite complex, it’s an effective way to monitor real-time invoice data within your application.
If you’d like some additional guidance using this plugin, our previous forum post covers how to use this element in more detail.
Additional features
Now that you’re familiar with creating custom data fields and displaying dynamic content, you can start getting creative with the experiences you build. Additional, you can;
- Create individual customer profiles to batch and display a list of their invoices
- Build a tracking and graphing tool to monitor business expenses
- Use the chart element in unique ways to display different invoice reports
Privacy & Security
Now that you have the basics of your app, don't forget to start setting some privacy rules and conditionals to keep your data secure - starting with roles in the 'Privacy' section of your Data tab. You can also check if you're unintentionally exposing any data with an API checker.
Launch
Hiring a developer or dev team to build this application would cost thousands, if not tens-of-thousands of dollars. As you launch and grow in users, our paid plans allow you to host the product on your own custom domain, starting from as low as $25 per month. Some templates and plugins may cost more, but you can build all the functionality of Quickbooks without any additional costs.
Templates
If you didn’t want to build your invoicing application from scratch, you can purchase one of the templates made by our community members. Some similar templates include:
- Invoices and Payments by Rapid Dev
Start building
Bubble can help you build a Quickbooks clone or any other product you choose! It’s never been easier to build something incredible without having to code.
Ready to join the no-code movement? Register your free account here and get started today.
If you’d like additional help when building your product, our thriving community forum is a great place to source actionable advice and resources. Any maker is also encouraged to ask questions within the community to help empower their no-code journey.
Build for as long as you want on the Free plan. Only upgrade when you're ready to launch.
Join Bubble