If your destination is an address, Uber is one of the leading applications to get you there on time. If you’re on a journey to build your own no-code version of Uber, however, Bubble is the only application you’ll need.
Building a ride-share application like Uber or Lyft would traditional require an advanced background in software engineering, or cost thousands of dollars in outsourced development.
As the no-code landscape rapidly evolves, tools like Bubble have made it easier than ever for makers of all backgrounds to start building software. Our customers are using Bubble to build portfolios, marketplaces, and even social networks.
In this article, we’ll walk through the process of building your own on-demand ride-sharing platform, all without touching a single line of code. If you’ve ever wanted to replicate your own version of Uber, this tutorial is perfect for you.
The steps for building an Uber clone without code include:
Get Started
To get started, you’ll need a Bubble account. Then you can follow along as we build our product together.
Register your account on Bubble
We also recommend completing our introductory lessons, which will guide you through the step-by-step process of the most common Bubble features. This will help you get a running start when building your Uber clone.
When kickstarting your project, you can choose to begin by wireframing your product design, or building the necessary fields within your database.
In this case, we’ll start by using Bubble’s visual design tool to shape the user-interface of our application. If you’re replicating a version of Uber, some of the core pages you’ll want to include are:
- Account settings page - where users can update their account information
- Home page - used to select the pick-up and destination address of a trip
- A driver portal - a page where drivers can view all available trips
- A trip summary page - displaying a summary of each trip once a trip has been accepted
- User account - showcasing a list of all a users previously booked trips
- Rating page - where users can leave ratings for a drive
A major feature within Bubble is the ability to send data between pages. This allows you to create one generic version of a page, then dynamically display the relevant content from your database when it’s required.
In the case of your Uber clone, you’ll only need to create one page to host each trip summary. We can then write the necessary logic to display only the relevant items on each page when they’re needed.
Configuring your database
Once you’ve mapped out the display of your product, you can focus on creating the necessary data fields to power your application. We’ll rely on these fields to connect the workflows behind your product.
Bubble’s pre-built database makes it easy to create different data types with unique fields. When building Uber as an MVP, we’ll need to create the following data types & fields:
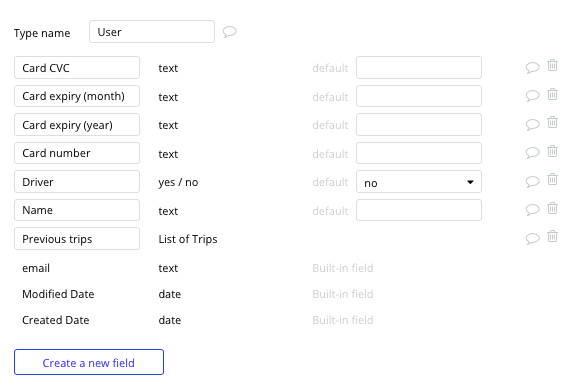
Data type: User
Fields:
- Name
- Driver - yes/no with no default
- Previous trips - list of trips. Note: Creating a field as a list based on a separate data type allows you to seamlessly integrate all of its relevant data fields without having to create additional fields
- Card number
- Card CVC
- Card expiry (month)
- Card expiry (year)
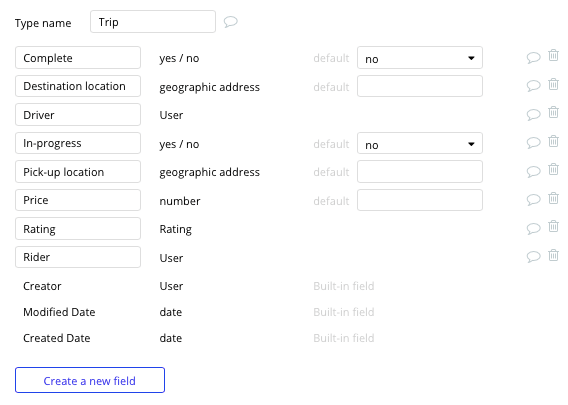
Data type: Trip
Fields:
- Rider
- Rating - rating
- Price
- Pick-up location
- Destination location
- Driver - user
- In-progress - yes/no with no default
- Complete - yes/no with no default
Data type: Rating
Fields:
- Trip - trip
- Star rating
- Driver - user
- Content

Building workflows
Now that you’ve structured both the design and database for your application, it’s time to start stitching everything together - making your product functional.
In Bubble, the main way to do this is with “workflows”. Each workflow happens when an “event” occurs (e.g. a user clicks on a button), and then runs a series of “actions” in response (e.g. “sign the user up”, “make a change to the database”, etc.)
Updating user account details
A powerful function within Bubble’s editor is the ability to create user accounts. Our platform can easily streamline this whole process; we go into more detail on how to create users in our previous How To guides.
The first feature we’re going to build, however, is a page that allows users to edit the details of their accounts, including their name and credit card information. This information will be instrumental when booking rides across the platform.
On our account settings page, we’ll start by adding an array of the text input elements for each data field in a users account.
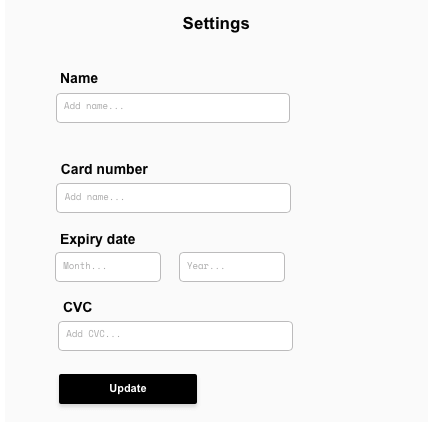
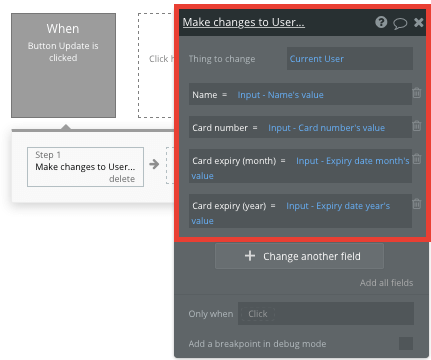
Once a user has added their details, we’ll create a workflow that triggers when the update button is clicked.
Throughout this workflow, we’ll want to make changes to a thing.
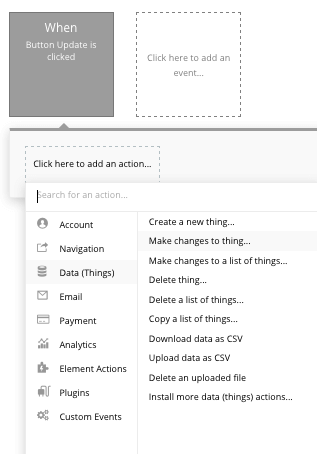
The thing we’ll want to make changes to is the current user. We’ll update their current information by matching each input element with its corresponding data field.
Planning a trip
Once we’ve created our user accounts, we can start building the core features of our product. We’ll begin with a booking function - allowing users to input their desired pick-up and destination address, then generate a trip based on this data.
On our home page, we’ll start by adding a map element and two input fields. You’ll need to begin configuring both the text input fields to an address content format.
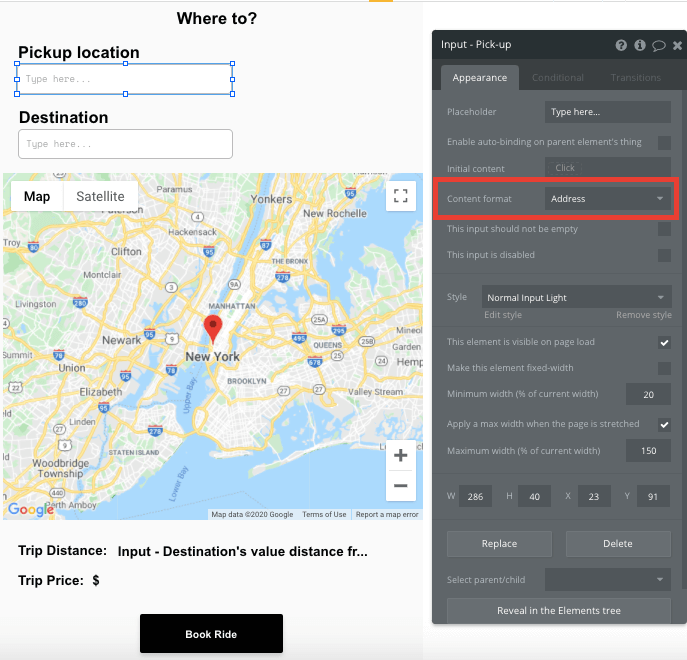
By updating the format of the input fields, they’ll seamlessly integrate with any address on your map.
Next, we’ll need to configure our map to display each of these locations as they’re added. Start by setting the maps marker address to be the pick-up inputs address.
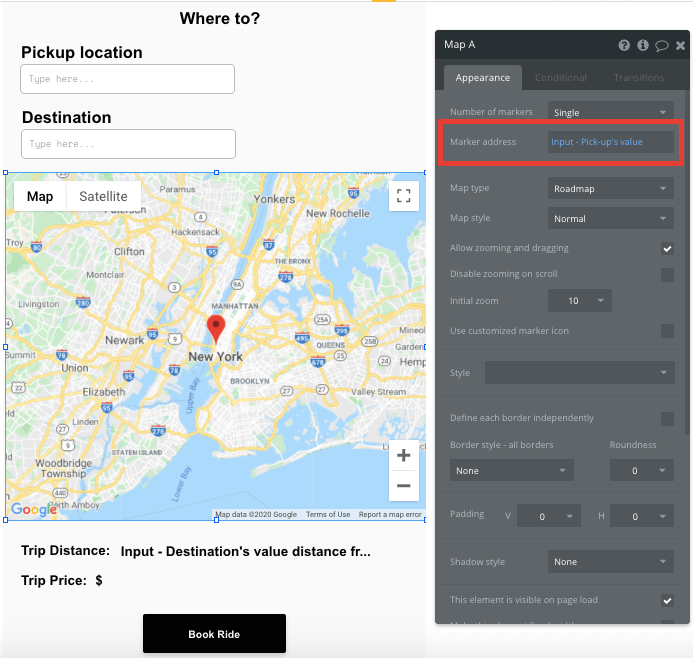
Next, we’ll want to display the destination marker once this address has been added.
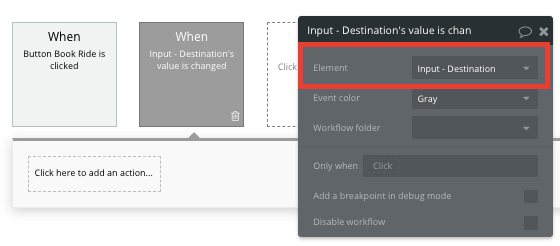
In your Bubble workflow editor, create a new event when an items value is changed.
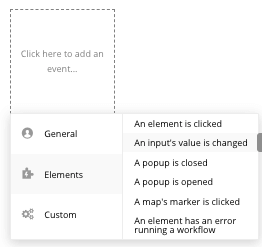
The input we’ll configure this to is our destination input field.
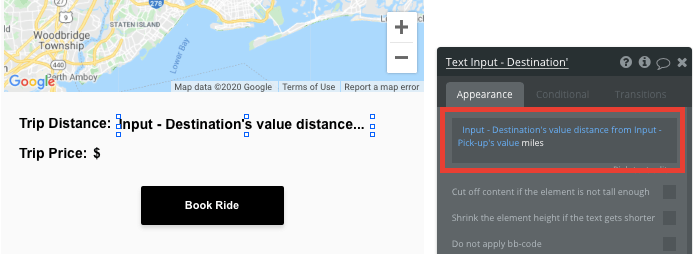
Once the user has added both these addresses, we can produce a trip forecast, detailing the total trip distance and price.
Below our map, we’ll add a dynamic text field, displaying the distance between both the address inputs.
Note: If you’d like to display the path between both addresses as a GPS route, you can use the MapBox plugin to build this feature. The plugin costs just $25.
Generating prices
Once the distance between both locations has been classified, we can build an algorithm to determine the price for the trip.
Using a text input field, we can add our own conditions to set price variations. Conditions make it possible to display unique elements when requirements are met throughout your app.
Our conditions for this element will identify the length between two addresses (measured in miles as per our map), then trigger a certain price if it fits between a unique threshold.
As an example; if the distance from the destinations address and pickup address is > 1, AND the distance from the destinations address and pickup address is < 5, our condition will then display the text of $15.
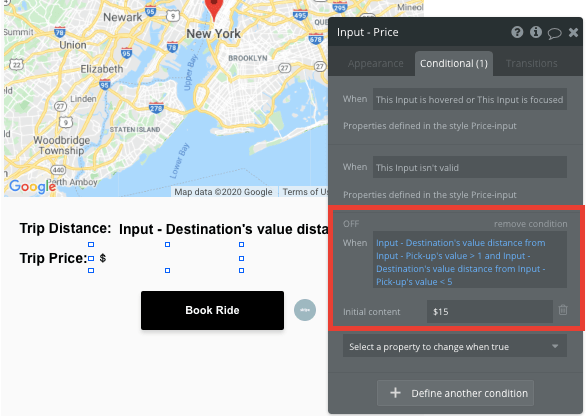
You can continue adding conditions to meet the different price thresholds you’d like to charge.
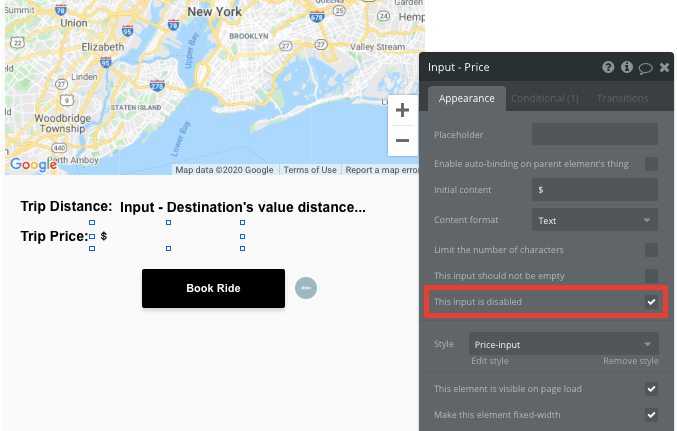
Note: By updating the style of an input field, it’s possible to remove the default background and border of the element.
Finally, we’ll also need to disable this input field, ensuring that users can’t edit the trips price.
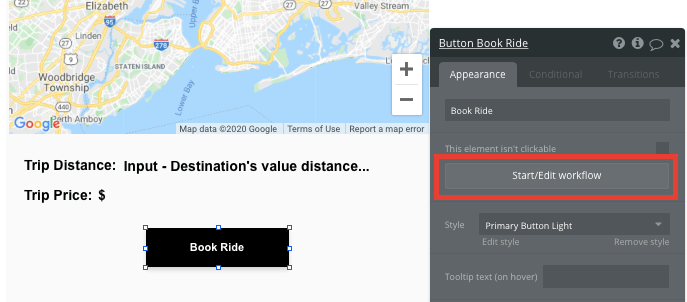
Generating a new ride
Once a user is ready to book a ride, we’ll create a new workflow that triggers when the book ride button is clicked.
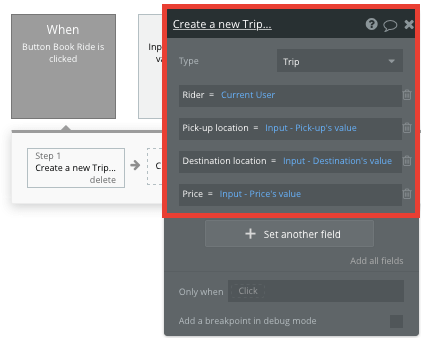
Within this workflow, we’ll want to create a new thing.
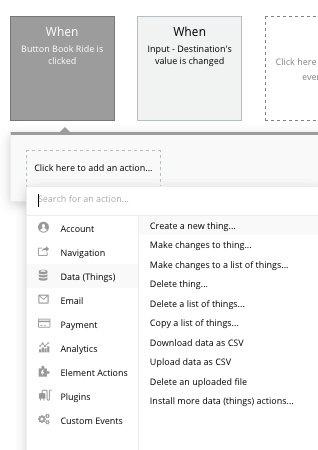
The thing we’ll want to create is a new trip. You’ll then match the relevant elements on your page to the data fields from the trip type in your database.
Processing payments
After generating a new trip within our database, we’ll also need to charge the user. Using Bubble, it’s possible to harness the power of several plugins to easily accept payments and process orders.
In this guide, we’ll be using the Stripe.js plugin to process credit card payments through Stripe.
Note: After integrating this plugin, you’ll need to first configure your API keys within the plugin settings.
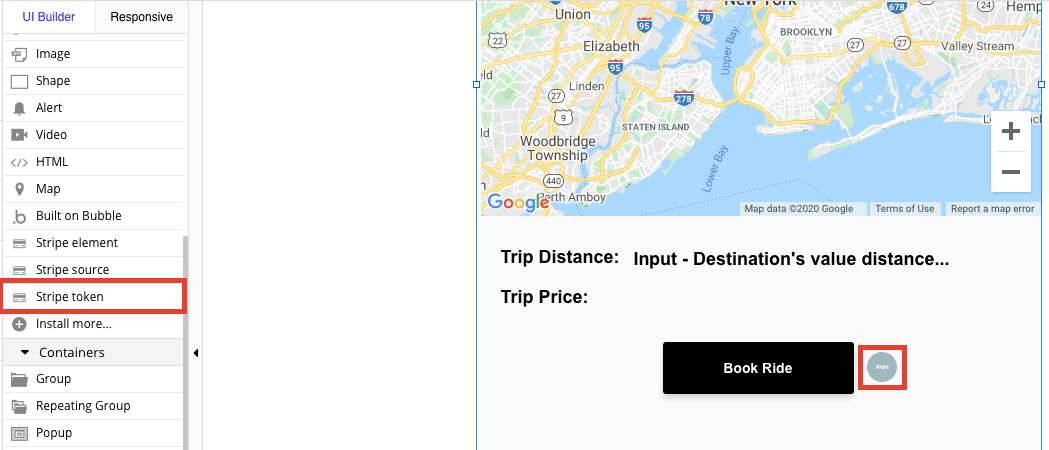
To utilize the Stripe plugin, you’ll also need to add a Stripe token element next to the book ride button.
This element won’t be visible to your end-users, but is essential to powering a new transaction with Stripe.
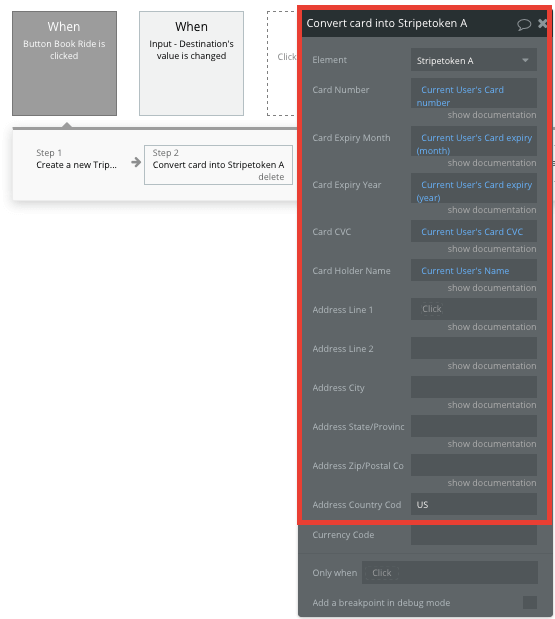
When processing a payment, we’ll add an additional step onto our workflow that generates a new trip.
Select the event ‘convert card into Stripetoken A’. Within this event, you’ll need to configure the current users payment details to match Stripes payment structure.
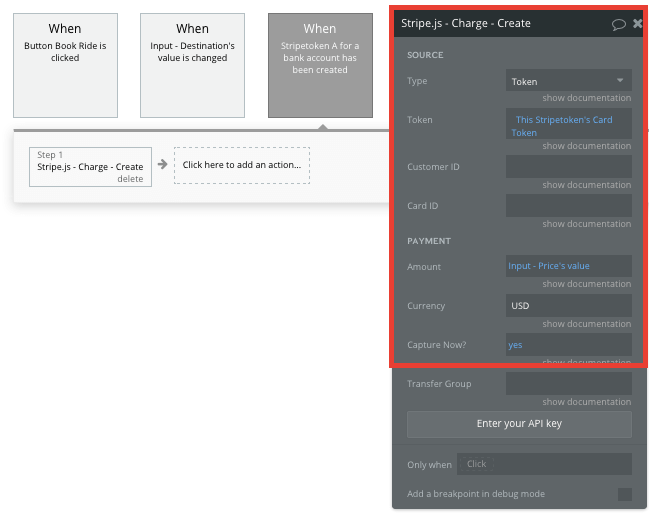
Once a card has been converted into a Stripe token, you’ll then need to create an additional workflow that automatically processes this token from a user's bank account.
Using the ‘Stripe.js - charge - create’ event, you’ll verify the Stripe token, as well as the final amount to be paid (including the currency).
If you’d like additional guidance when building your payment processing workflow, you can watch a full tutorial in the video below.
Building a portal for drivers
Once a new trip has been created, we’ll then need to display this information to our drivers on the driver portal page.
On this page, we’ll add a repeating group element to display a list of all the available trips created by users.
Repeating groups are a powerful element that integrate with your database, displaying and updating with of dynamic content.
When using a repeating group, you’ll first need to configure its data type and source. In this instance, we’ll update the data type to display trips, and the data source to search for all of the trips within your database.
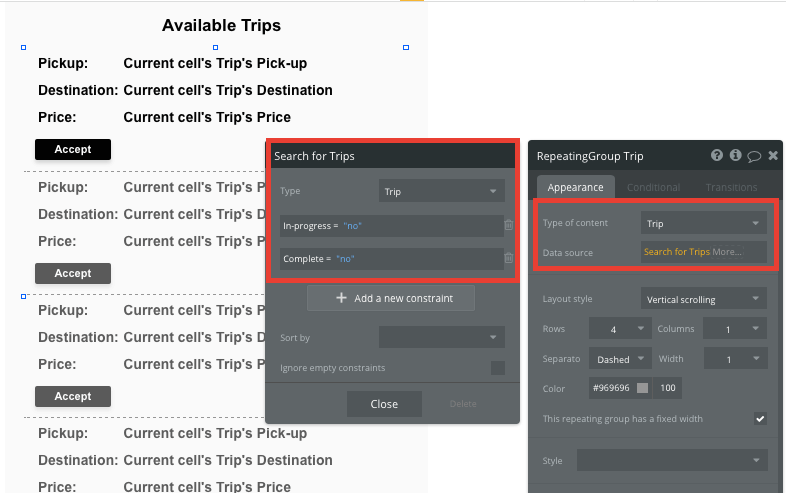
Additionally, we’ll also add two constraints, filtering for only the trips that have their in-progress and complete status set as ‘no’. This will ensure that only trips that are currently active will display in this grid.
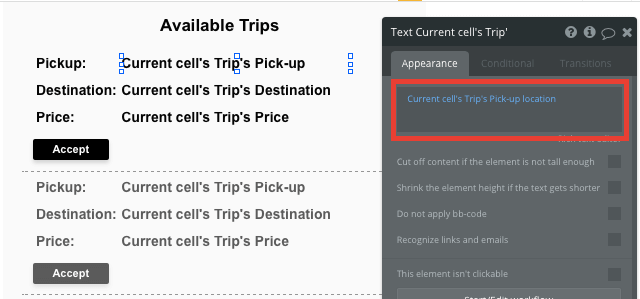
Now you’re ready to start structuring the dynamic content that will be displayed within this grid. Simply map out the first column with the relevant content you’d like to show, then this powerful element will populate the remaining columns based on your existing data.
When a driver is ready to accept a ride, they can click the accept button, triggering a new workflow to update the status of this ride.
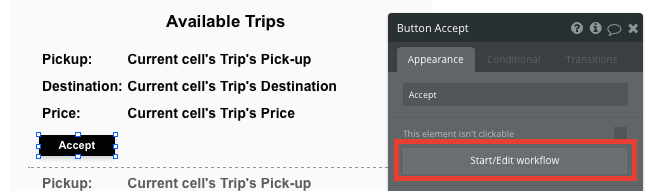
Within this workflow, we’ll want to make changes to a thing.
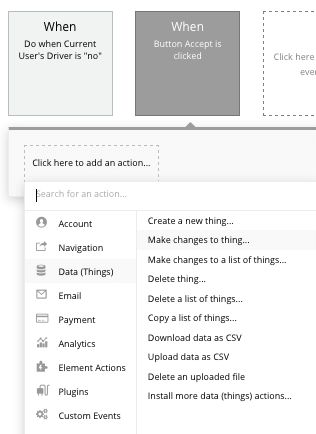
The thing we’ll want to change is the current cell’s trip, updating it’s in-progress status to ‘yes’, then adding the current user as the dedicated driver.
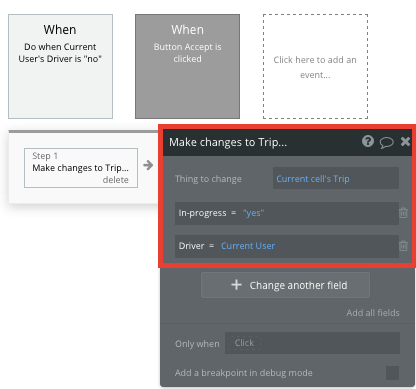
Note: After changing the in-progress status, it will remove this trip from the repeating group.
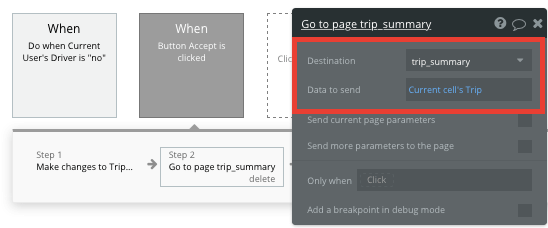
Next, we’ll then want to send the driver to our trip summary page, displaying an overview of this specific trip.
Start by adding another step to your current workflow, opting to go to another page.
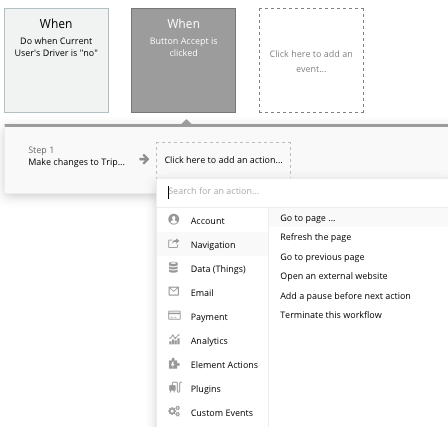
When sending the user to the trip summary page, we’ll also need to send with it the data from the current cell’s trip.
Marking a trip as complete
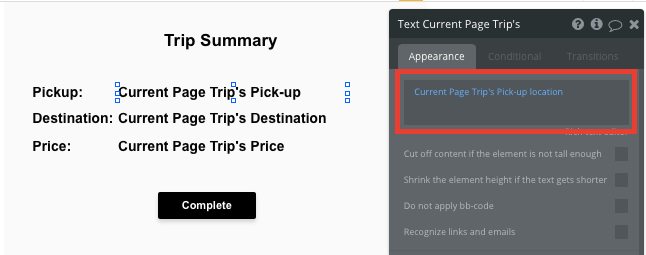
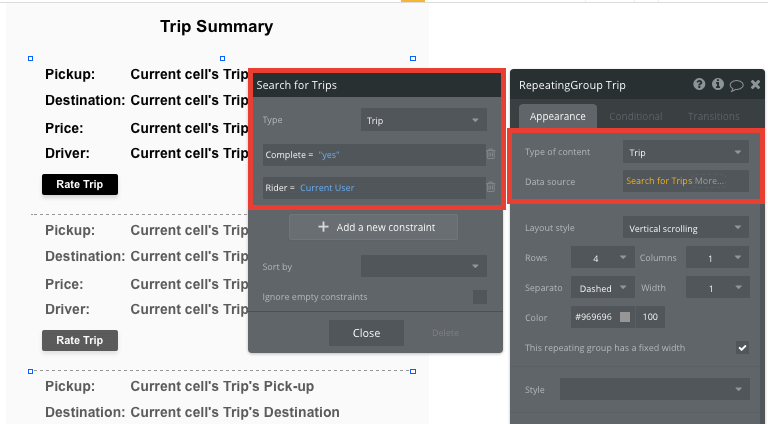
On the trip summary page, you’ll want to display the information from the trip that the driver has just accepted.
To begin with, configure the page type to be a trip.
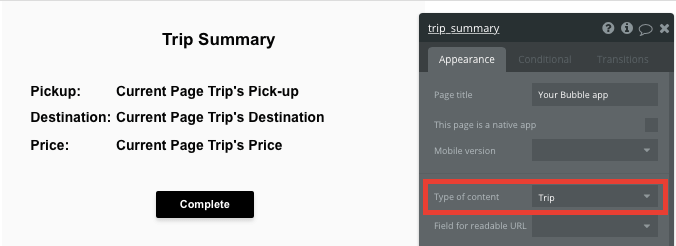
Once again, you can then map out the page content by using dynamic elements, displaying the current trips information.
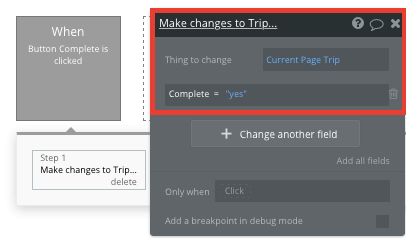
Once a ride has finished, the driver will then click the complete button, updating the status of this specific trip.
By creating another workflow, we’ll opt to make changes to the current pages trip, this time updating the complete status to ‘yes’.
Creating a summary of user trips
After a ride has completed, we’ll want to add a summary of the trip to a user's account, then give them the option to rate their overall experience.
On our user account page, we’ll add another repeating group. This repeating group will once again be configured as a trip data type, but we’ll update the data source to display only the trips where the rider was the current user, and the complete status is ‘yes’.
By adding these additional configurations, it will ensure the user sees only the trips that are relevant to their account.
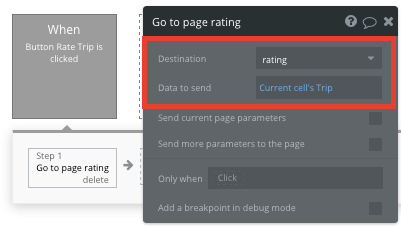
If the user would like to then rate their driver, they can click the rate trip button, triggering another navigational event.
In this workflow, we’ll send the user to our rating page, passing with it the data from the current cell’s trip.
Rating a trip
By creating a dedicated rating page, a user can leave a review for a previous trip they’ve taken.
This page will need to be configured as a trip type.
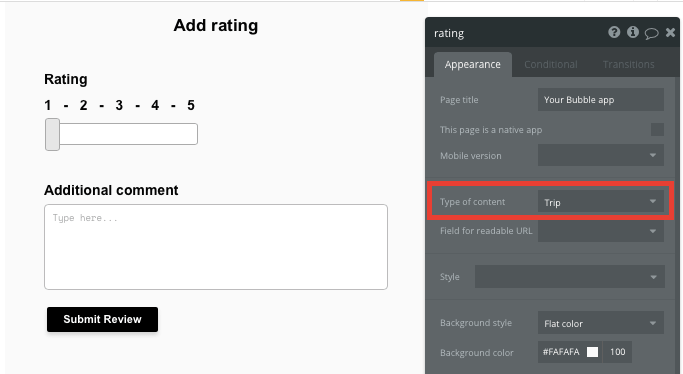
On this page, we’ll use a slider element and a multiline input field, allowing users to add the relevant content for their rating.
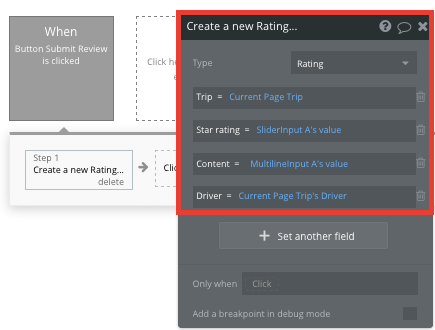
When the submit review button is clicked, we’ll build a new workflow that creates a new thing. The thing we’ll want to create is a new review.
Once again, you’ll map the on-page elements with the necessary data fields under each review.
Additional features
Once you’re familiar with creating custom data fields and displaying dynamic content, you can start getting creative with the experiences you build within your ride-sharing app.
Privacy & Security: Now that you have the basics of your app, don't forget to start setting some privacy rules and conditionals to keep your data secure - starting with roles in the 'Privacy' section of your Data tab. You can also check if you're unintentionally exposing any data with an API checker.
Additionally, you can:
- Create profiles for drivers and display a list of their trip reviews
- Add estimated times for trips
- Add a messaging function, allowing drivers to contact riders. We’ve covered this in more detail in our How To Build guide on WhatsApp.
Launch
Hiring a developer or dev team to build this app would cost thousands, if not tens of thousands of dollars. With the money you save, you can instead focus on growing the user base of your platform.
As you launch and grow in users, our paid plans allow you to host the app on your own custom domain, starting from as little as $25 per month. Some templates and plugins may cost more, but you can build all the functionality of a ride-sharing platform without any additional costs.
Templates
If you didn’t want to build your Uber clone from scratch, you can purchase one of the templates made by our community members. Some similar templates include:
- Ride Sharing On Demand by Rapid Dev
- Complete On Demand Clone by On-Demand Cloner
Start Building
Bubble can help you build an Uber clone or any other product you choose! It’s never been easier to build something incredible without having to code.
Ready to join the no-code movement? Register your free account here and get started today.
If you’d like additional help when building your product, our thriving community forum is a great place to source actionable advice and resources. It’s not only a great place to search through our existing Bubble examples, but any maker is encouraged to ask questions to help them on their journey.