If you are interested in building your own version of AirBnB, finding a whitelabel Airbnb that you can customize, or building a similar type of housing or short-term rental marketplace–but you do not know how to code–then we’ve got a solution for you.
Using Bubble, a no-code visual programming platform, you can easily build and customize any web app for your exact needs and visions, without hiring an engineer or having any background in programming. In this guide, we will walk through the basic setup and structure for building your very own no-code version of AirBnB on Bubble.
This guide to building a "NoCodeBnB" platform that lets users find places to stay, or rent out their spare rooms will cover the following topics:
The steps to building your own AirBnB clone with no code include:
Get Started
Before you start, you’ll need to first register your free Bubble account. Click the button below to get started, then you can follow along as we build our app together.
Register your account on Bubble
Before starting on this app, we recommend completing the introductory lessons, which will guide you step-by-step through some of the most common Bubble features. This will help you get a running start on building your no-code AirBnB clone.
How do people even begin building their apps?
The short answer is that this comes down to personal preference. Some Bubblers like to start by designing their pages so that they can visualize what the user interactions are like, then move on to hook up their pages to the database and workflows. Other Bubblers like to start by defining their app’s database, which influences how they think about page design and workflows. There’s no right answer, so give the different approaches a try over time to see what fits best with your style of thinking.
Designing your app
We’ll start off by thinking about the main pages that a no-code AirBnB needs in order to provide the features your users will expect from a short-term rental marketplace. These pages will act as the primary user interface your users will view the rooms to rent or make bookings on, so it’s important to get them right.
If you come from a web design or WordPress background, Bubble lets you design stunning dashboards and pages that will make your users feel at home. If you have no idea about design, no problem! You can easily kickstart your project by choosing from one of the hundreds of our templates.
One of the advantages of Bubble is the ability to send data to a page. This means that you only need to create one generic version of a page with one simple design. Bubble will automatically populate the elements on the page with the data fields from the data stored on the page. This means you won’t need thousands of different pages for each room in your no-code AirBnB app!
To build a vacation rental marketplace MVP, we’ll build the following pages:
- A login page - allowing users to register or login to your application
- Property backend - a portal where users can create property listings
- Home page - displaying a list of all the rooms listed on the platform
- Individual room page - providing the full information about a room, including user reviews
- Checkout - allowing users to pay for room bookings
Configuring your database
How is the Bubble database different from normal databases?
Bubble has abstracted away a lot of the technical awkwardness in interacting with databases, but a lot of the same core concepts are there. In databases you have tables; in Bubble, you have a table for each “data type.” Bubble’s data types have fields, represented as columns, and you define what type of data a field has, like text, number or yes/no (binary). One difference is with database joins; Bubble simplifies a lot of that by allowing you to define a field type as a data type you have in the app. If this doesn’t make sense to you right now, don’t worry - it becomes clearer after you see an example.
Some users find it easier to start with setting up their data types, which is essentially setting up the database. Every Bubble app comes with a built-in database that you can configure however you need, meaning no setup hassle for you.
We want one data type for each type of ‘thing’ we want in the app. Think of a ‘thing’ as exactly that - a thing that you will be showing, storing data on or using in the app.
Each of these data types should have fields within it that hold properties of that thing. As we continue building the pages, elements on the page will draw upon different fields of different data types.
When building Airbnb as an MVP, we’ll need to create the following data types & fields:
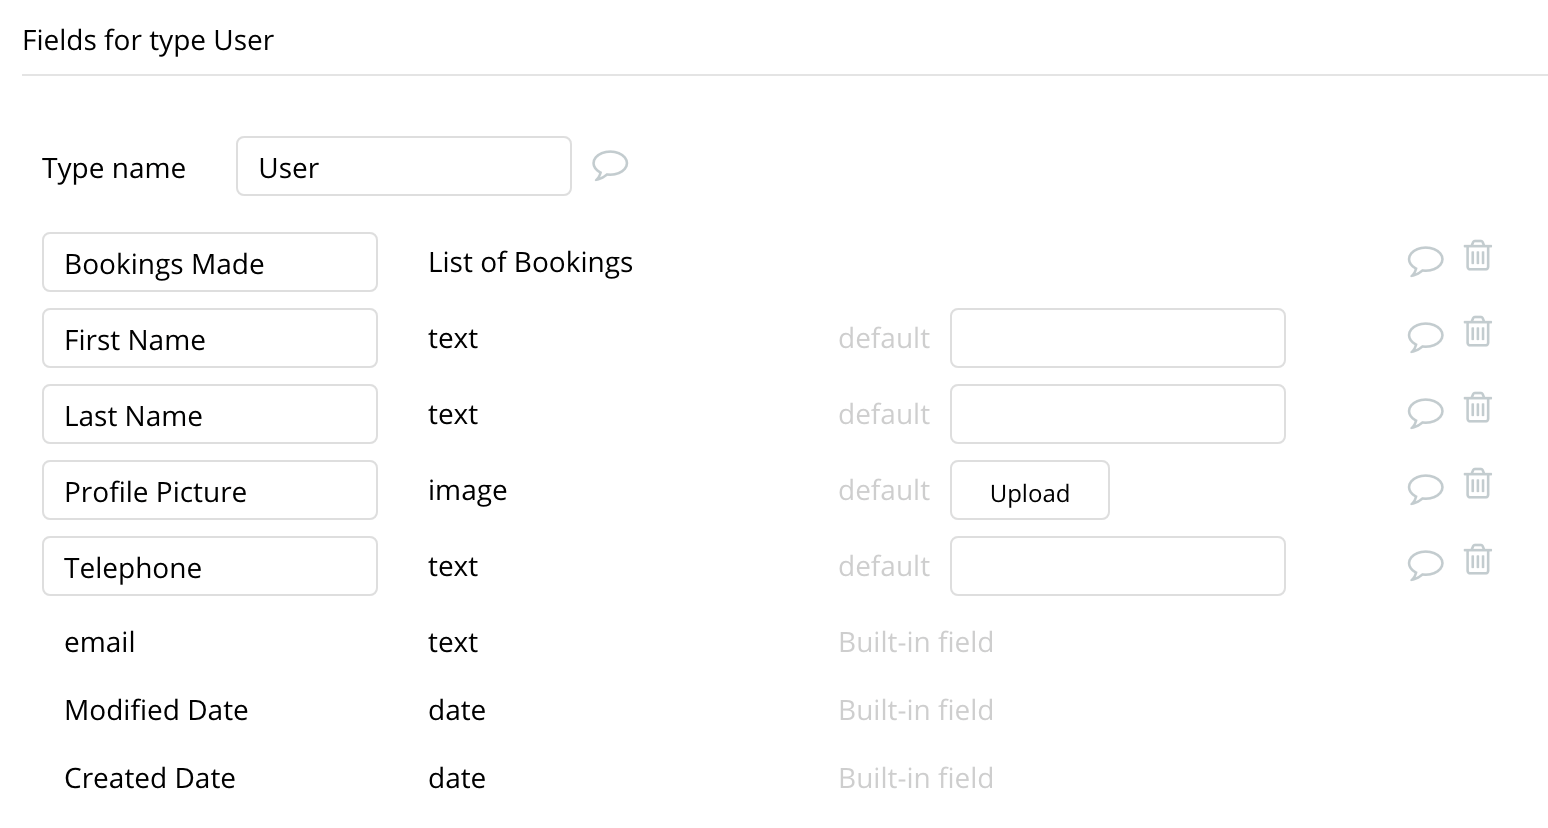
Data Type: User
Fields:
- Email (included by default);
- First name
- Last name
- Profile picture
- Phone number
- List of bookings they have made. Note: the type of data is also set, so we (and Bubble) know what type of data each field is. For example, a first name is a piece of text, so text’ is the data type. ‘Bookings Made’ are a list of Bookings.
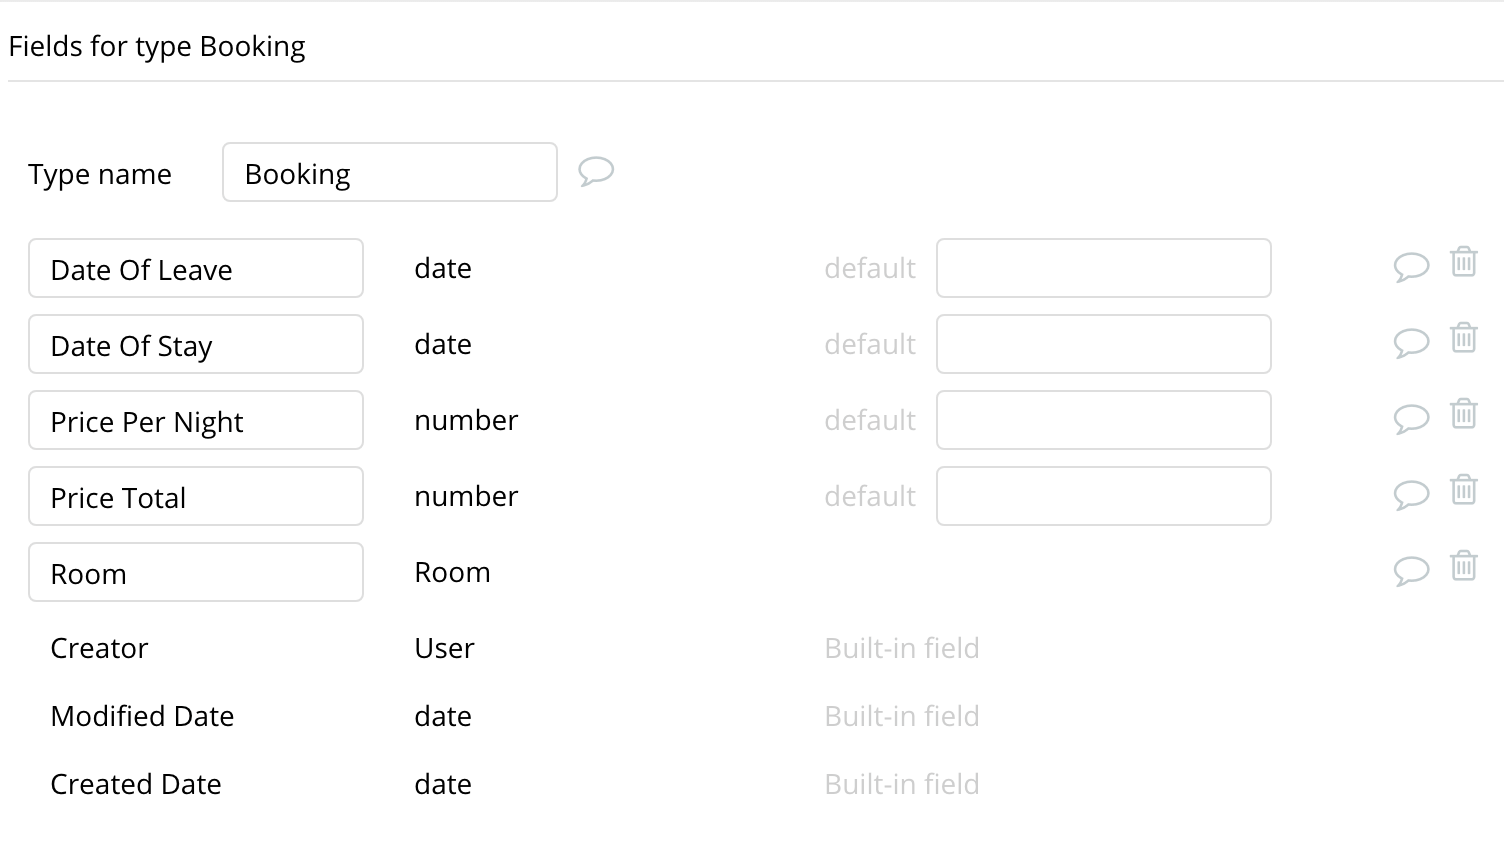
Data Type: Booking - the booking that a user will make when they want to rent a room
Fields:
- Date of Leave (the date when the guest’s booking ends)
- Date of Stay (the move in date)
- Price Per Night of the stay
- Room that the booking is made for (note: this field type is Room so we can correctly link it to the right Room)
Data Type: Room - the room that is on offer to rent by the public. A user might make a ‘Booking’ on this room if they want to stay there.
Fields:
- Title
- Description
- Photos - list of photos
- Price/night
- Reviews - list of reviews
- Users booked - List of users

These are the bare minimum fields we’d need to get the app working. As we build more features, we would likely add more data types and fields. For example, we can add an address for the room, or a “Draft” boolean field to indicate if the room is in draft mode and not yet published. We can then hide and show different design elements or change the way the app behaves based on those bits of data.
Core Features
How do you build features in Bubble?
Along with the page designer and the built-in database, an equally important core Bubble feature is “workflows.” Workflows allow you to define pieces of logic in the form of “When X happens, do actions A, B, C, etc.”. In reality, “if X, then A, B, C” statements are the basic building blocks for most features in websites - they connect what users see on the page with the database behind the scenes.
Now that we have some blank pages and the database set up, we’re going to give the web app some actual functionalities by connecting everything together and performing some basic actions. In Bubble, the main way to do this is with a list of “actions” grouped in a “workflow.”
Each workflow happens when an “event” happens (e.g. a user clicks on a button or the page is fully loaded), and then runs a series of “actions” in response (e.g. “sign the user up,” “make a change to the database” or “hide/show an element” etc.)
To get you started with the basics of the workflows, you’ll need to build the following features:
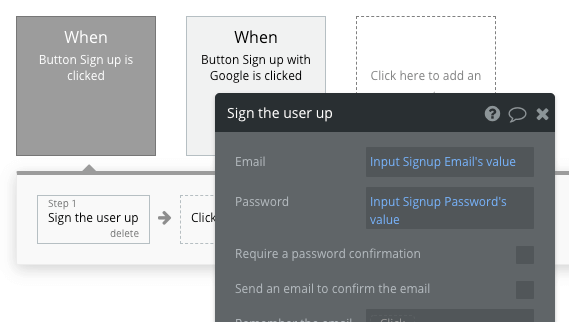
User Signup
To better understand how to create and edit user accounts, check our how we previously covered this in more detail in our How to Build Quora article.
- Create a Button element with the text "Sign up." Click "Start/Edit Workflow" and build the workflow: Account > “Sign the user up” to use the built-in Bubble signup.
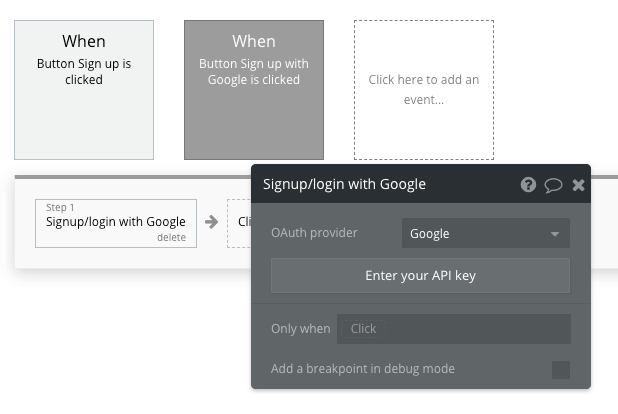
- You can also use Account > “Signup/login with a social network” for Google or Facebook login (“OAuth”) if desired (refer to our Manual on authentication service plugins)
Adding a property to the platform
Once a user has created a profile, we’ll build a feature that allows them to create a room for rent - becoming a host on our platform.
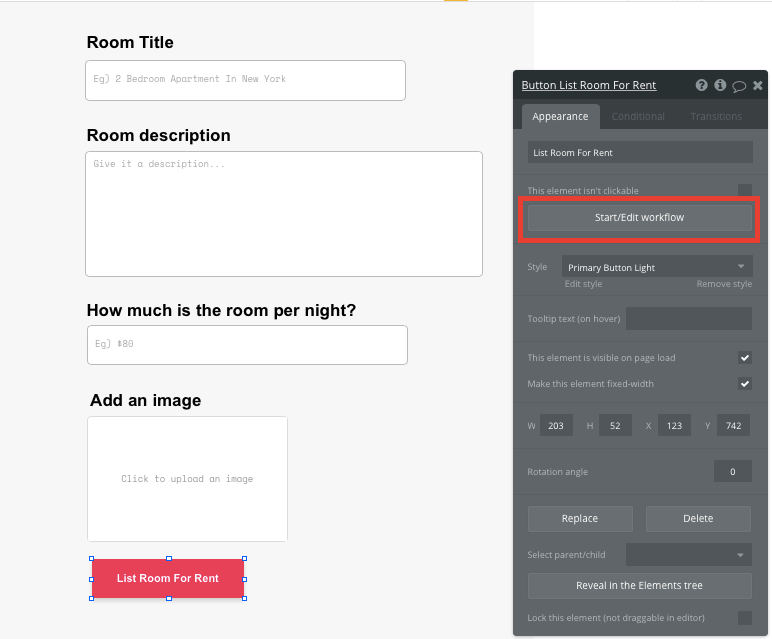
On our create room page, start by using a combination of input fields, including; free-text fields, image uploaders or multi-line inputs fields.
Once a user has added their relevant details within each input, they’ll click the list room for rent button to create a new entry in your database. This button click will be the necessary action to trigger your workflow.
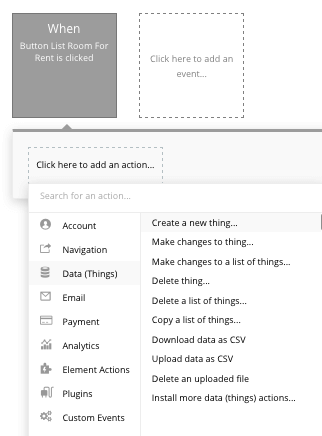
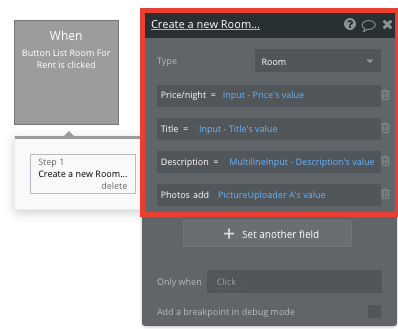
Using the workflow editor, you can select to create a new thing within your database. In this instance, we’ll be creating a new product.
You’ll then need to start adding data to the relevant fields within your database. Map each input field you’d like to create against its corresponding data field.
Display available rooms for rent
Once users have started submitting rooms to the platform, you’re ready to display each item in a feed on the homepage. This can be achieved by utilizing our repeating group element.
Repeating groups integrate with your database to display and update a list of dynamic content.
When using a repeating group, you’ll need to first link the element to a data type within your database. In this instance, you’ll classify the type as a room.
You’ll also need to set the data source as a list of all the submitted rooms from your database.
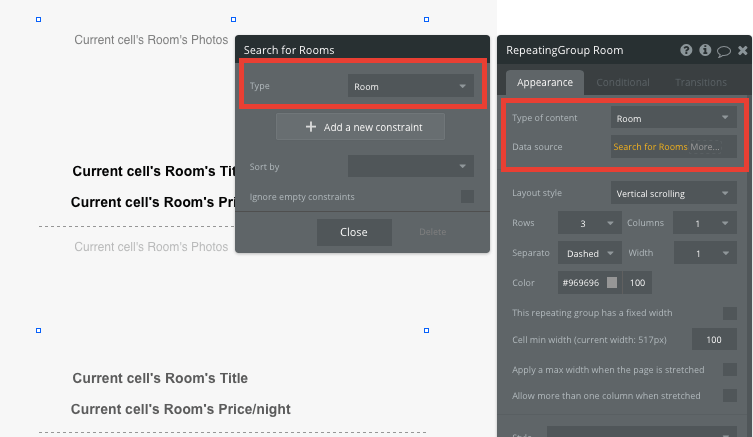
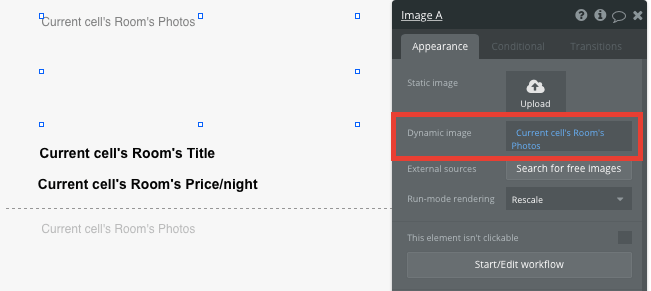
Now you’re ready to start structuring the dynamic content that will be displayed within this grid. Simply map out the first column with the relevant content you’d like to show, then this powerful element will populate the remaining columns based on your existing data.
Send data between pages
Within a repeating group, it’s also possible to create events within each individual column.
This feature will become useful when building navigational features across your platform. As Airbnb’s homepage only displays an overview of each listing (including its name, image and price), you’ll want to display the full rooms details for each unique item on a separate page.
This additional content will need to be hosted on your individual room page.
To power this event, you’ll need to start by creating a workflow that redirects a user to your product page when the rooms image is clicked.
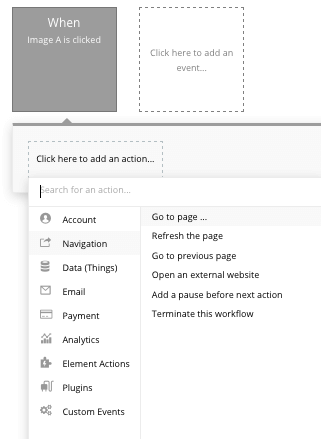
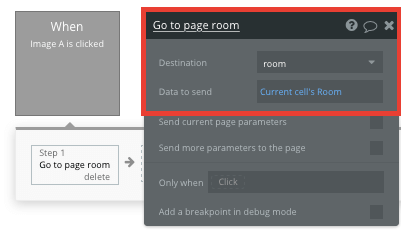
When creating this workflow, use a navigation event to send a user to another page. From here, select the destination page type to be the room page.
You’ll then need to send additional data to this page so the Bubble editor knows which specific room listing to display. The data you’ll need to display is that of the current cell’s room.
Display dynamic content on a room's page
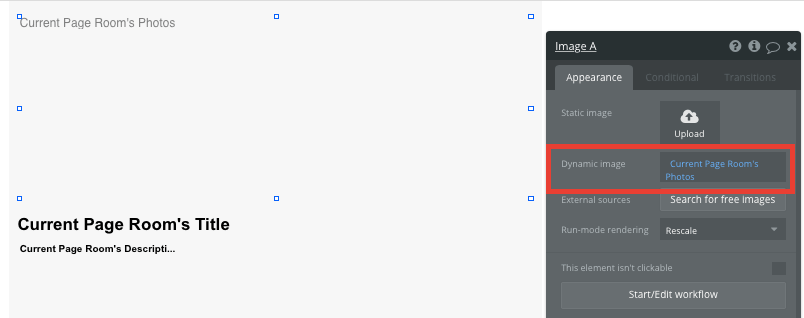
When a user is directed to a specific room page, you can easily pull this event data from your workflow to display the relevant content.
Before we create this function, you’ll first need to ensure that the page type matches the data property that you’re sending through the workflow. In this case, you’ll need to set the room page to a room property.
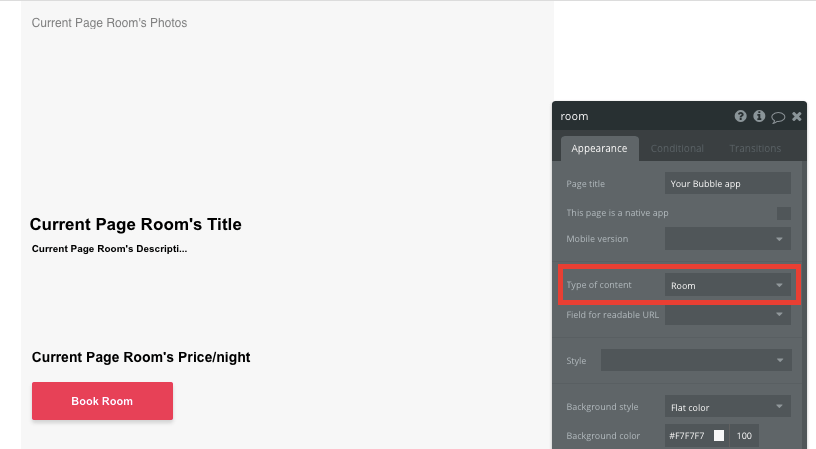
You can now start adding dynamic content into your page elements, displaying the information from the room that has been sent in your workflow.
Book a room
One of the core features of Airbnb is the ability for users to book and pay for rooms. Using Bubble, it’s possible to harness the power of several plugins to easily accept payments and process orders.
In this guide, we’ll be using the Stripe plugin to process credit card payments.
Note: After integrating this plugin, you’ll need to first configure your API keys within the plugin settings.
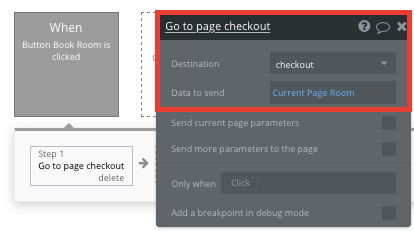
When building your payments experience, you can begin by creating an additional page called checkout. The type of page should also be configured as a room.
Once you’ve created this page, we’ll go back to our room page and create a workflow when the book room button is clicked.
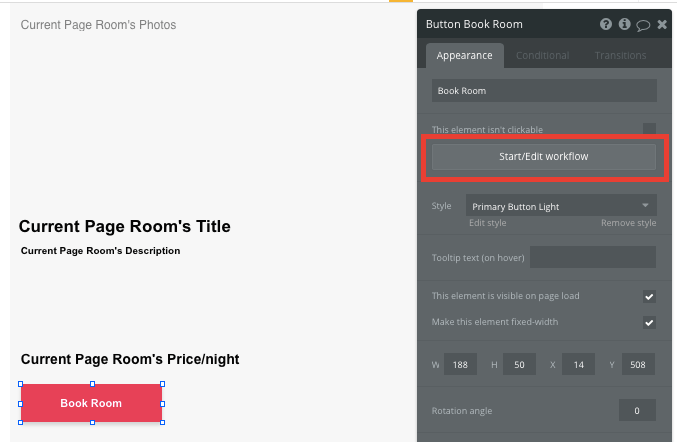
Within this workflow, we’ll create a navigation event, redirecting the user to our new checkout page. We’ll also want to send the data of the current pages room.
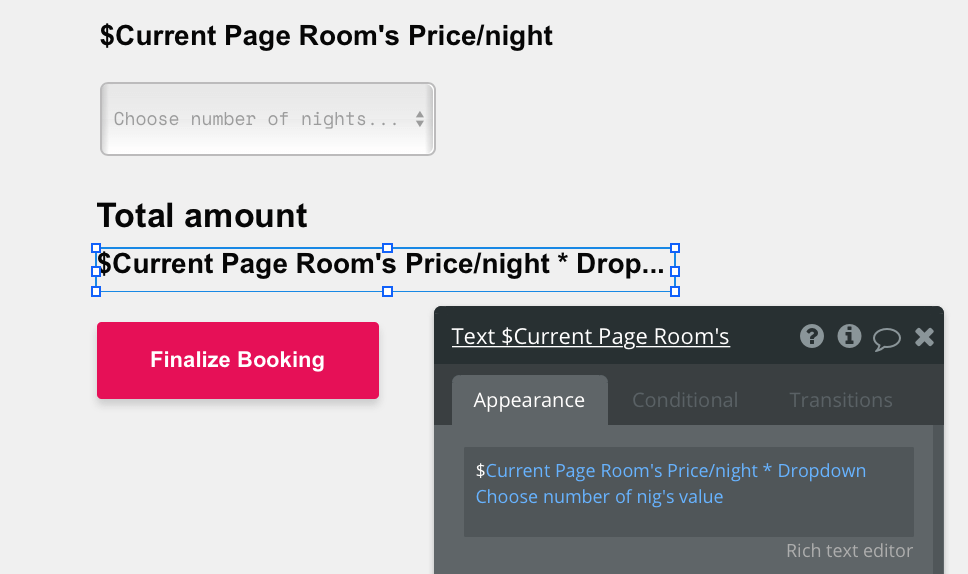
On our checkout page, we’ll then create a function for users to select their total amount of nights for a stay, then display the final price of this booking.
Using a dropdown menu, we’ll add a static choice to select a number of nights.
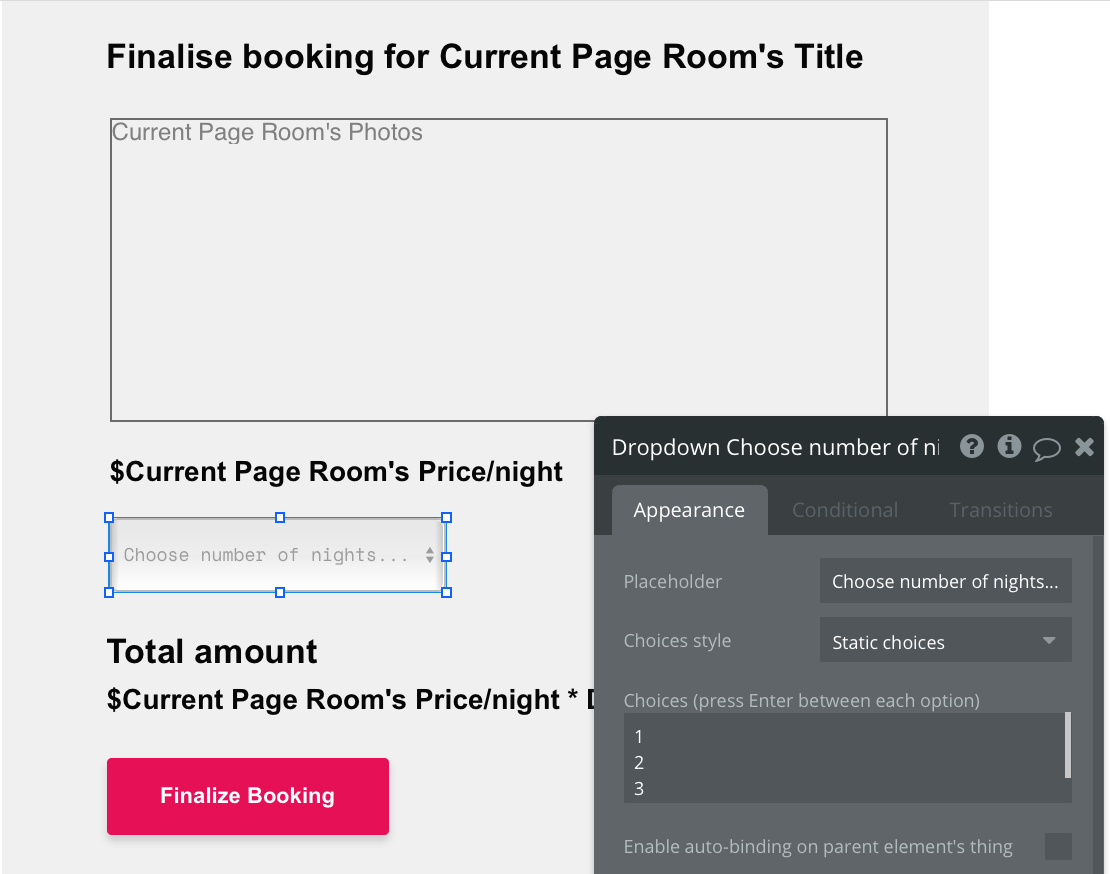
We can then display the final price of the booking by multiplying the price per night by the number of nights selected.
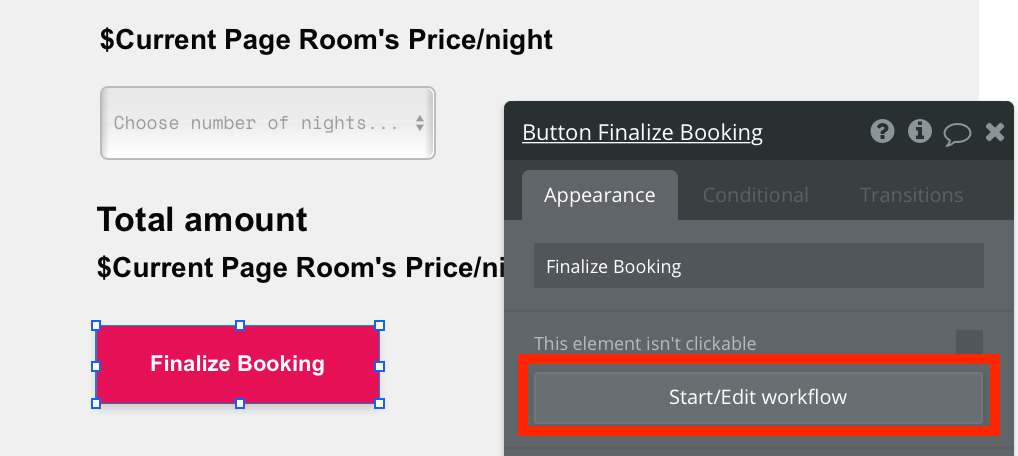
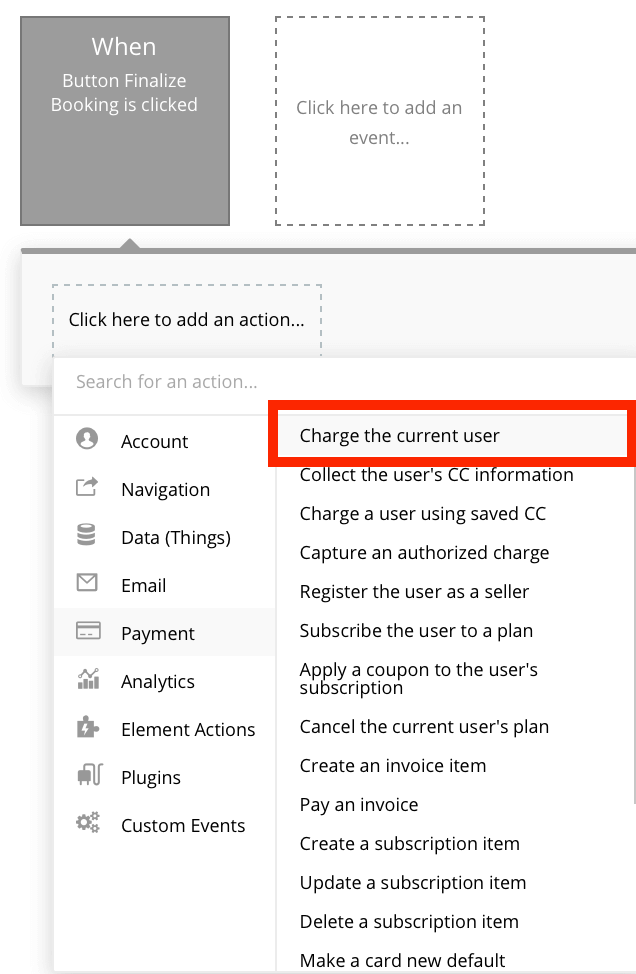
To process the payment for this booking, we’ll create a new workflow when the finalize booking button is clicked.
Within this workflow, we’ll create a payment event, charging the current user.
When using this event, you’ll need to input the dynamic purchase data based on the current page rooms price and the number of nights selected.
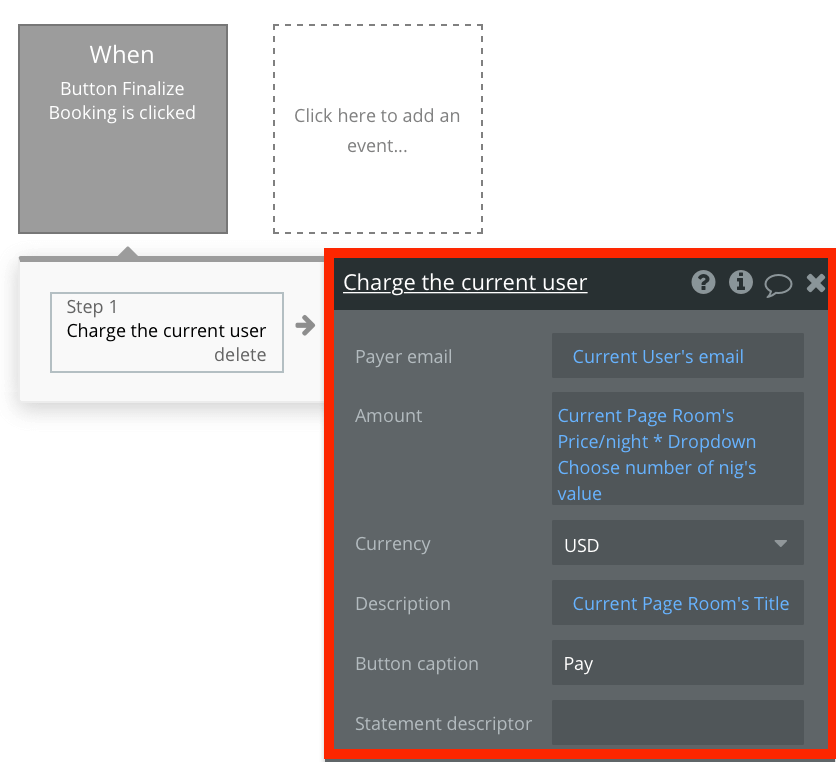
After configuring this payment workflow, the Stripe plugin will now automatically display a form and process a users card payment.
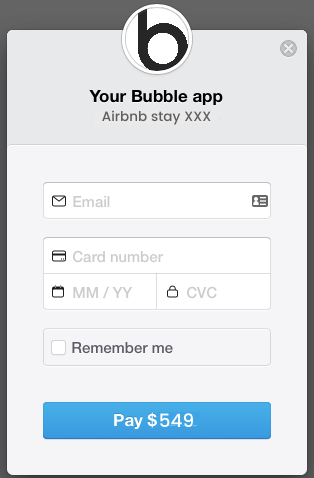
If you’d like additional guidance when building your payment processing workflow, you can watch a full tutorial in the video below.
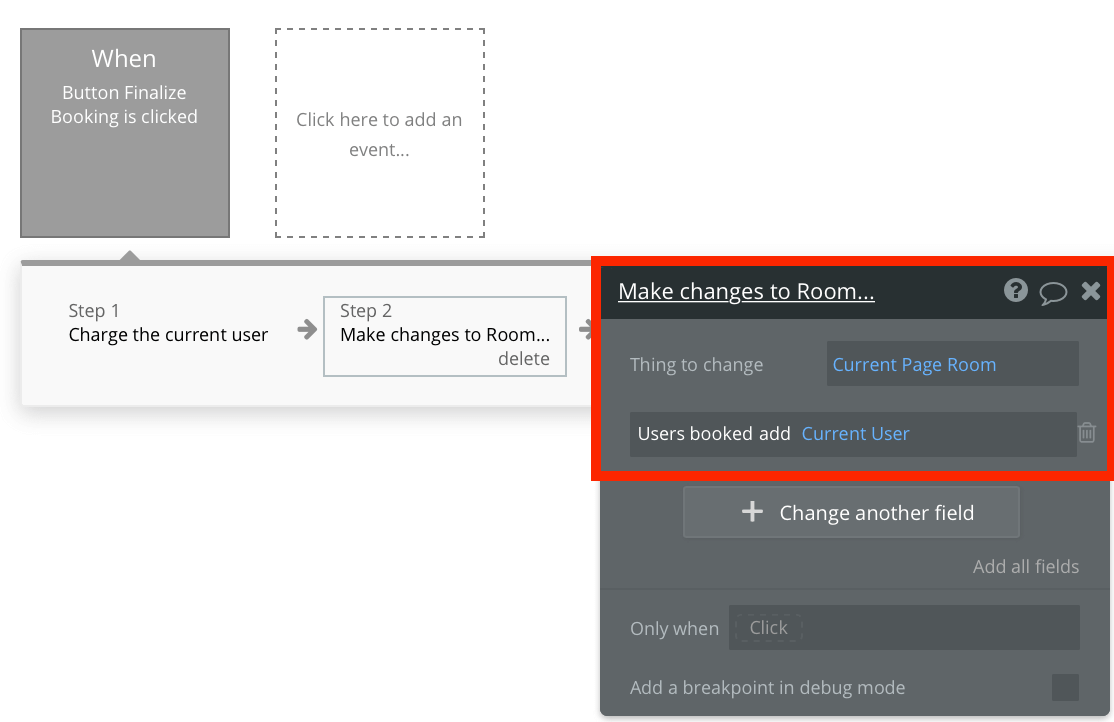
Once we’ve finished processing this payment, we’ll need to create one last step to our workflow - adding the current user to the rooms list of booked stays and vice versa.
Start by creating a step that makes changes to a thing.
The thing we’ll want to change is the current pages room, adding the current user to its list of users booked.
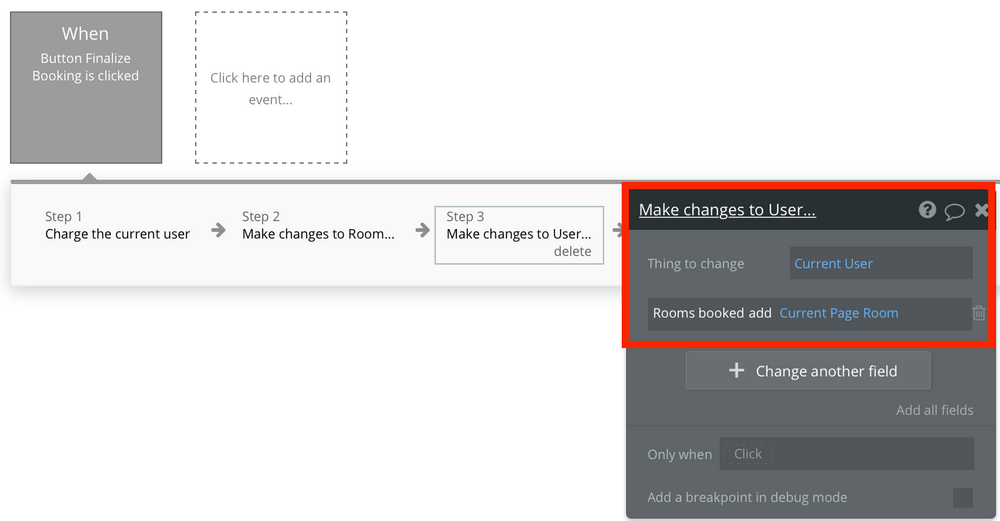
Finally, we’ll then make changes to the current user, adding the current pages room to their list of rooms booked.
Adding user reviews
Once a user enjoys their stay (thanks to your no-code platform 👏), they may want to leave a review and share their experience with users across the platform.
We’ll start building this function by first adding a repeating group on our room page. This repeating group will be used to display a list of all reviews.
Configure your repeating group as a review data type, then update its data source to be only the reviews from the current pages room.
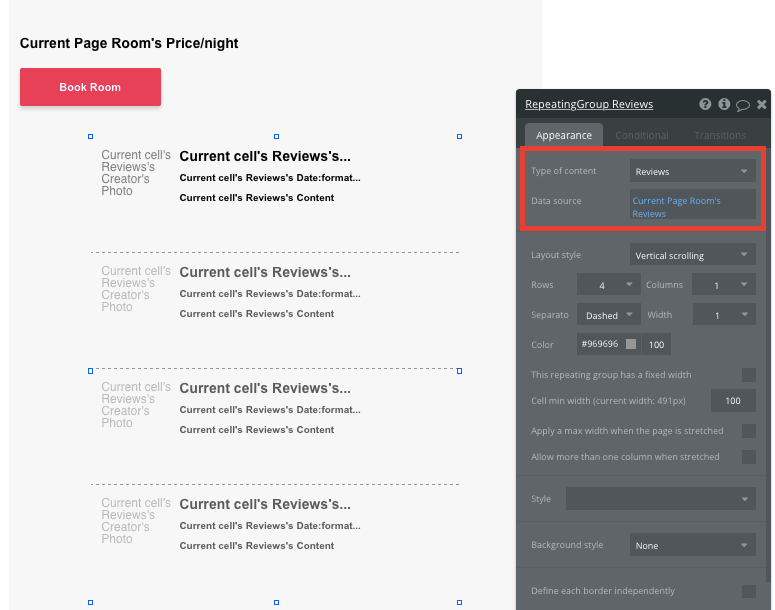
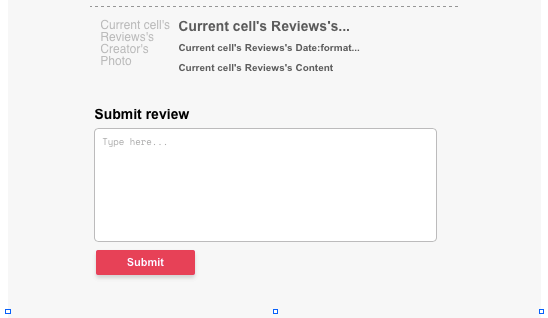
Once again, we’ll map out the top cell of the repeating group to display the relevant content - including the review’s content, the review’s creator’s profile photo, and the date the review was created.
Now that we’ve created a repeating group to support our room reviews, we’ll add an input below this element, allowing users to submit new reviews.
Next, we’ll create a workflow when the submit button is clicked. The purpose of this workflow will be to create a new thing.
The thing that we’ll want to create, is of course, a review. Once again, you’ll make the on-page elements with the necessary fields in your database.
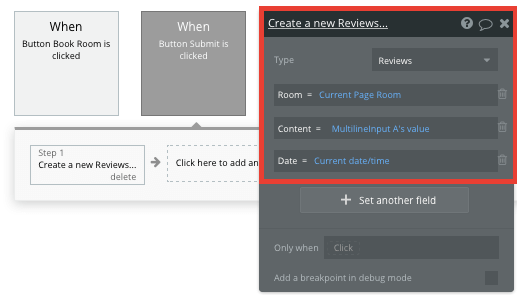
When a new review is created, the on-page repeating group will automatically update with the latest content.
Additional features
Privacy & Security: Now that you have the basics of your app, don't forget to start setting some privacy rules and conditionals to keep your data secure - starting with roles in the 'Privacy' section of your Data tab. You can also check if you're unintentionally exposing any data with an API checker.
Here are some fun next feature ideas to add more functionality to your no code Airbnb clone. These are not only features your users will love, but building these will help you practice designing pages, structuring the database, and building workflows in Bubble.
- Adding a function to filter rooms on the homepage by their city or amenities
- Adding a date range input so the person listing the room can add the availability dates of the room.
- An admin panel where the site owner can manage their bookings, view information on the guests staying in their room or cancel bookings.
- Add star ratings to reviews
- Add user profiles - displaying a summary of the room bookings
Launch
Hiring a developer or dev team to build this app would cost thousands, if not tens-of-thousands of dollars. Well, now you can treat yourself to a night away at one your community members rooms.
As you launch and grow in users, paid plans allow you to host the app on your own custom domain, and these start as low as $25 per month. Some templates and plugins may cost more, but now you can build all the functionality for an Airbnb, validate your idea faster with potential customers and start a tech business without needing to code. There are literally thousands of Bubble users doing this! Me included!
Templates
If you don’t want to build your Airbnb clone from scratch, you can purchase one of the templates made by our community members. Some templates that demonstrate specific kinds of social networks include:
- Home Rentals Marketplace by Rapid Dev
- Canvas Rental Marketplace by AirDev
- Full Marketplace by PlayerOne Studio
- Travel Marketplace Like Airbnb by Nalfe
Start Building
Bubble can help you build a home or room rentals platform with custom features of your choosing! You can build your idea without code. To get started for free, sign up here.
You can also connect with other passionate makers building with Bubble on our community forum.