The power of Bubble and the power of AI multiply in infinite exciting ways when put together. Even if you’re still early in your Bubble journey, you can learn how to connect an app to OpenAI right now and design a user experience that integrates AI-generated content directly into your Bubble app’s ecosystem.
For example, let’s say you want to build a no-code app with Bubble that lets users ask for a recipe and have AI generate one for them in seconds, all without ever leaving the page. That’s exactly the task taken on by Sam Morgan, one of the Bubble Developers who builds and maintains bubble.io.
In his video walk-through, Sam shows you how to build this entire GenAI app from scratch in under 20 minutes. You’ll set up a basic page design, learn how to create API calls from Bubble and customize a call to OpenAI’s API so that it can be used and manipulated in the frontend of your app.
Don’t forget to stick around at the end of the video for Q&A with Sam. And if you’d like an extra hand as you follow along, we’ve summarized his step-by-step instructions below.
Step-by-step instructions on building a GenAI recipe app without code
1. Set up the main page (1:12)
Let’s start by building the basic interface that will allow our users to interact with AI.
First, drag a floating group into your header and customize it:
- Under the layout tab, set the Container layout to Row
- Uncheck Make this element fixed-width so it stretches to fill the page
- Give it a minimum height (Sam uses 60px in his video)
- To stand out more, you can change the page background to a lighter shade of gray. This will contrast with the default white background of the floating group
This header anchors your basic design. You can fill it in however you want. For example, in this video, Sam drags in and customizes a text element to title the site for “MyRecipes.” Next, he adds a button for future functionality, allowing users to view saved recipes. Finally, he sets the layout to Space between and adds 24px of padding.
Next, add a group to contain your main content and customize:
- Add top margins as needed to offset it from the floating group
- Set the Container layout to Column
- Uncheck fixed-width so the group can stretch across the page
- Uncheck Fit height to content so it stretches down
- Add some padding to this group (24px on all sides should be a nice buffer)
And now your page is ready for some actual content!
2. Set up the main content card (2:45)
Next, you’ll want to add a simple content card to this group to contain your text and user interface. Drag a new group into the main content group and customize it:
- Set it as a Column layout
- Uncheck fixed-width
- Set the max width (Sam recommends 528px)
Feel free to take a moment to stylize this card. For example, you could change the background color or round the corners in the appearance tab.
Now, add an input element and rewrite the placeholder text to have a prompt for users such as “What do you want to cook?” Then add a button and label it “Generate recipe.”
You can now organize the input and button elements however you want. In his video, Sam puts them together in a Row on the same line. He also enables the Apply gap spacing between elements option to add some space between the elements.
Don’t forget to rename your elements to make them easier to reference in the future!
The last thing to add beneath this group is another text element. Right now, this text is just a placeholder. Later, it will hold the AI's response. Sam also finishes this section by adding some gap spacing to the card and 24px of padding all around.
Your page is done! Next up: hooking up your AI functionality.
3. Import API call from OpenAI (4:58)
There’s plenty of interesting concepts and endpoints to explore in OpenAI’s documentation, but for now, you’ll want the Chat Completions API.
As Sam mentions, if you’re new to APIs, there’s a lot of information to absorb here, but don’t worry! The most important thing on this page will be the example request shown in the black box. If you make a successful API call to OpenAI’s API, this is what the response should look like as cURL code. Bubble makes it incredibly easy to follow this by letting us import the response directly into the API connector.
Use the copy icon in the top right of the box to copy this cURL code. Navigate back to your Bubble app. In the plugins tab, click the + Add plugins button, then find and install the API Connector. When you close out of the window, you should see the API Connector in your plugins ready to go.
Click Add another API. Title it something clear like “OpenAI.” If you scroll down, you’ll see a default blank API call that comes with your new API. Underneath that, click Import another call from cURL. Then, paste in the cURL you copied from Open AI’s documentation and hit Import.
Now you have two calls in your OpenAI API. Delete the first one and expand your new imported call. Time to start customizing!
4. Customize and initialize API call to ChatGPT (7:15)
Rename your new call something like “Chat completion.”
Beside the name is a Use as dropdown that tells Bubble whether you’d like to use the call as Data or as an Action. Since you’ll be triggering this call from a workflow (when your Generate recipe button is clicked), change this to Action. Leave Data type set to JSON.
Underneath, you can see the endpoint already set up from the import. This should be a POST call and look exactly like this:
https://api.openai.com/v1/chat/completions
Beneath the endpoint, you can see two Headers that have been imported to the call. The first one (Content-Type) should read “application/json.” This doesn’t need to change, but just make sure to check the box labeled Private. Doing so ensures this information won’t be discoverable by your users. In fact, that’s extra important for the second header (Authorization)!
For Authorization, the Value should always start with the word “Bearer” followed by a space, and then your personal authorization token (a string of characters unique to you).
Note: You'll need to sign up for an OpenAI account and pay for credits to get an authorization token.
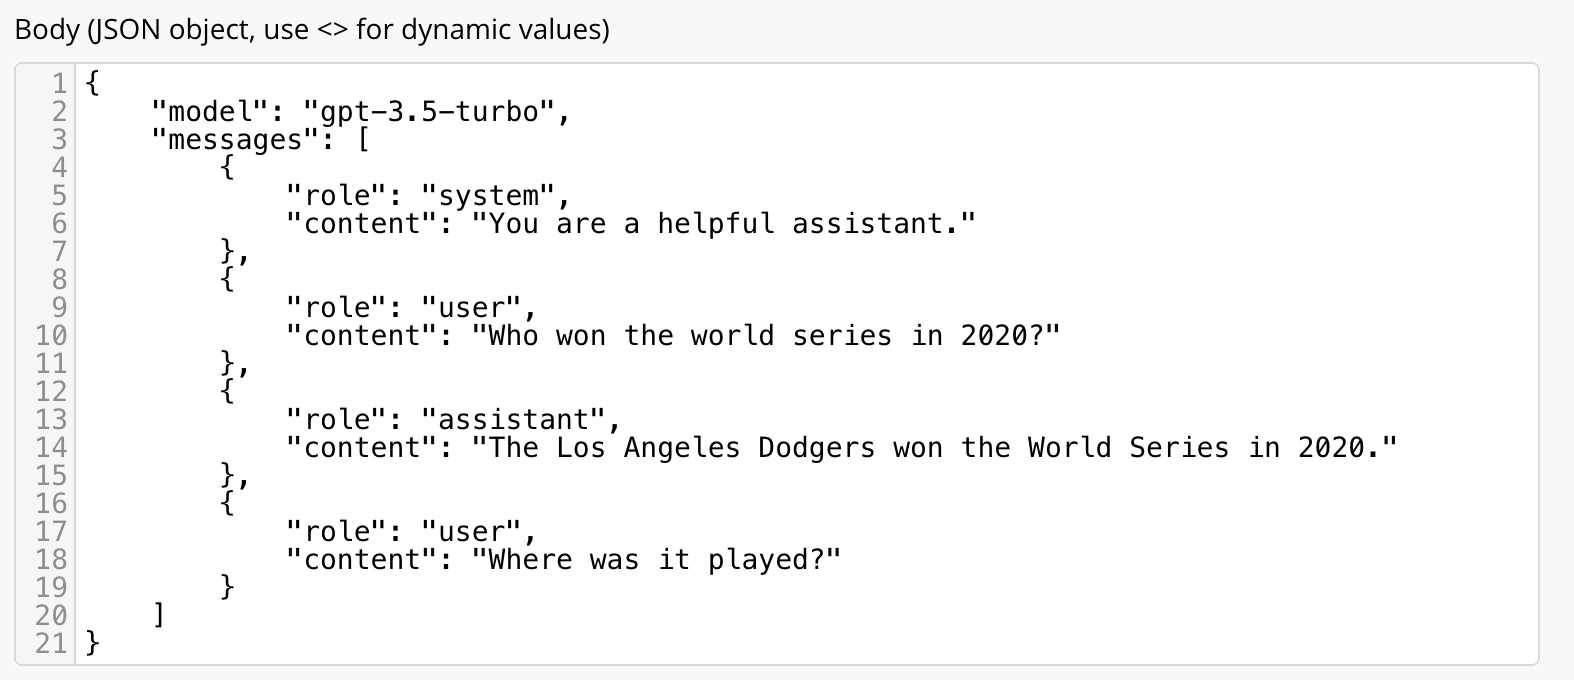
Scrolling further down, leave Body type set to JSON. And beneath that, you’ll see the actual body of your call. The body is composed of two “objects”: the model object (you can leave as “gpt-3.5-turbo”), and the messages object. You’ll primarily be customizing that second one.
There should be a system message first, followed by a user message. The system message is what allows you to tell the AI what its role in this conversation is. The user message is what your app’s users will be specifically asking the AI to generate. Let’s define and customize both of these.
Note: If you have additional messages imported from the call, consider removing them for this tutorial. Make sure you remove the entire line of code contained between { open bracket and } close bracket. These should each be on their own line with the actual message in between. Don’t remove anything else from the call.
Next to “content,” beneath the “system” role, write your instructions for the AI. Make sure to stay inside the quotation marks. If you’d like to borrow some language, below is what Sam writes in his video:
"You are a helpful recipe generation wizard. You will take a user input and generate a recipe based on what they ask for. Make sure to include information about ingredients, measurements and steps to complete the recipe. The user may not give you enough details — if that is the case, you should be creative and suggest a delicious recipe and provide the details anyways. Do not ask follow up questions, just generate a recipe."
Notice that Sam takes steps to tell the AI exactly what you expect — including what it shouldn’t say in response to users. In this case, make sure to tell the AI that it shouldn’t ask follow-up questions and should just generate a recipe with the information it’s been given.
You want the “content” beneath the “user” role to be dynamic so your users can input their own requests later. Right now, though, you need to provide a prompt of your own to initialize the API. To accomplish this, delete the current “content” (which is likely “Hello!”) and the quotation marks. In its place, define this content as a dynamic parameter by typing “<user_message>.” The open and close carrots (“<” and “>”) tell Bubble that this is dynamic data. In fact, this new parameter should now appear beneath the body with a blank Value field.
You can write anything for initialization in the Value field as long as it’s in quotation marks. In this case, it’s a good idea to make it something recipe-related. Try telling the AI something like, “I want to cook chicken tonight.” Make sure to uncheck Private so your users can modify it.
You’re ready to initialize! Click Initialize call.
You’ll see a popup that shows a lot of fields. To see the response in a more familiar format, click Show raw data at the bottom of the popup. This should look very similar to the example in OpenAI’s documentation. It will also tell you how the AI is reacting to the system and user messages you provided.
If the AI isn’t providing the info you were expecting, go back to the “message” content and add more specific guidelines before reinitializing. When you’re happy with the result, click SAVE. And congratulations, you just completed your first API initialization on Bubble!
5. Connect AI to frontend with API call (13:08)
Go back to the design tab.
Add a workflow to the Generate recipe button. You'll want this workflow to fire your API call. Since you initialized your call and set it to be used as an action, select Plugins then choose OpenAI from the menu. Now your user_message is available to modify. Replace the original text with dynamic data: “Input Recipe Request’s value.”
Because you don’t know what characters your users might use in their own message, it’s also a good idea to add the operator “:formatted as JSON.” This will automatically convert any characters JSON considers invalid (like quotation marks) into valid ones.
Now the AI is ready for the user’s prompt. You now need to tell the page to display the AI’s response. To accomplish this, you’re going to create a custom state.
Add a second step to your workflow that's Set state. You can add a new custom state to any element on the page or to the page itself. And you can create a new custom state on the page directly from this action if you click the dropdown menu. From the popup, name the custom state “AI response” and set it to be the Type to be text. Hit Create. Now in step two of the workflow, you can set the value to be the Result of Step 1’s… choices: first item’s message content. This will pull the AI’s response from the API call.
All that’s left to do is go back to the design tab and make the second text box display this response. Easy: Set this text box to be the page’s custom state, “AI response.”
If you preview at this stage, you won’t see anything because the custom state is empty. However, once you type in a request for a recipe and press the button, you should see an AI-generated recipe appear in that text below.
Hurray! You just created a recipe generator on Bubble using AI!
6. Save AI-generated recipes to Bubble database (17:16)
One hiccup: Whenever you reload the page, this custom state will be reset and the recipe attached to it will be gone.
However, thanks to the power of Bubble, you can save each recipe that’s generated. To do this, let’s go to the data tab and create a new custom data type called “Saved recipe.” Add a custom text field called “Instructions.” This will be the AI recipe from the custom event.
But what if you wanted to also include a title or label for each recipe so it can be easily identified in the future? Let’s create a second custom field called “Title.” And let’s go back to the design tab to evaluate the options for creating a title.
First off, you’ll need to add a new button below your recipe labeled “Save recipe” — this is what you’ll use to capture the recipe from the custom state and save it to your database. You could also add an input here for the user to manually title the recipe they just generated before saving it.
Or, as Sam demonstrates in this video, you can take advantage of your OpenAI API call once more and have AI generate a title for us!
Before you add a workflow to your button, let’s jump back to the API connector in the plugins tab and re-examine the body of the API call. Right now, this call is only equipped to take a prompt (“user_message”) and generate a recipe. You want it to also generate an appropriate title.
The simplest way to enable this functionality is to make the “system” content you defined earlier dynamic. Earlier, you told the AI to generate recipes based on a user’s prompt. Copy that text so you don’t lose the language, then remove it from the body. In its place, write “<system_message>” to convert it to a dynamic parameter. Like before, you’ll see a parameter appear below your body with a blank Value.
Now paste the prompt you copied into this blank Value. Uncheck Private on this parameter as well. Fantastic! Let’s reinitalize the call.
Go back to your workflow tab and edit the workflow for when a user hits Save recipe.
Your first action should be to trigger your OpenAI — Chat completion API call. Now you can dynamically set both the user_message and system_message. So, this time, you’ll set the user_message (the prompt) to be the page’s custom state (the generated recipe). Since that recipe may have unique characters, you can add the operator “:formatted as JSON safe” here, too.
For the system_message (the direction), delete the original prompt and replace it with static text that instructs the AI to take the input and generate a title. Here's the exact language Sam uses in his video:
“Take the user input and generate an appropriate title for the saved recipe."
That completes the first step. In step two of this workflow, Create a new Saved recipe. Like before, define the Title as equal the Result of Step 1…’s choices:first item’s message content. Make the Instructions to equal index’s AI response.
That’s it! You now have a functioning GenAI recipe app!
Recap: Q&A with Sam
To learn more from Sam on this topic, check out the summary of his live Q&A session from How to Build Day.
What’s the difference between using an API call as data vs an action?
Sam: “Ask yourself: Will this information be used in a workflow (an action) or as a data source somewhere on the page (data)? For example, you may want to fetch a list of data from an API and display it on a page using a repeating group – that would be a data call.”
Are there limitations to what AIs you can use on Bubble?
Sam: “Nope – you can connect to any AI service that has an API connector. I will say Bubble doesn't allow you to fine-tune an AI model on its servers, but you can connect to an AI service and use the model that they've already trained. If a service doesn't have an API, it probably doesn't want to be connected to in the first place.”
What advice would you give to a user who's looking to generate something other than just text?
Sam: “OpenAI offers a service called Dall-E for generating images, but there are other options available, like Midjourney, Stable Diffusion, and others in development. However, I personally prefer OpenAI — their API documentation is excellent. It's worth noting that when using AI image generation in your apps, it can be quite expensive. So, it's important to have a worthwhile use case and a plan for monetization.
For audio generation, I'd recommend ElevenLabs, a separate company from OpenAI, that does an exceptional job. I actually saw somebody at the Bubble house last year in Spain make a Bubble app using ElevenLabs. [It] allowed me to speak in my normal English voice and it played back the message in my voice, but in Spanish. It was a really unbelievable use case.”
How could a user incorporate multiple inputs to then generate a more specific user message?
Sam: “You can definitely have multiple user inputs and can customize your prompt to have as many user inputs as you want. To do this, just use the open carrot character (‘<’) and the closed carrot character (‘>’) to surround your dynamic parameter name. Also, make sure you're formatting things as JSON safe using the formatted as JSON safe operator. Every dynamic input you create has the potential to contain unsafe characters, such as backslashes or quotes. By using the formatted as JSON safe operator on the frontend, you can ensure that your inputs are safe to use. This way, you can use as many inputs as you need without having to worry about safety issues.”
What would you say are common pitfalls when using APIs in Bubble?
Sam: “One of the biggest mistakes people make is not being patient enough and expecting everything to be easy. For example, when you want to connect to a specific API, you often need to read the documentation repeatedly until you find what you're looking for. Another common mistake is not getting authorization right, which varies from API to API. People often get used to one authorization method and then have trouble switching to a different one. However, the API documentation should always clearly explain what the authorization should look like. The more you read and understand the documentation, the more likely you are to set up the API correctly.”
Do you have any recommendations for good custom AI training platforms that offer an API that they could connect to Bubble?
Sam: “Open AI’s Assistants API is the easiest way to do this. Before that, there was a service called Pinecone for storing context. You could use a vector database to fine-tune the model and have it remember certain context. You could even train it on your entire product manual. With the Assistants API, these tasks are much easier. It allows you to upload as much context as you want, and the AI will remember it all. If you're considering custom GPTs, the Assistants API is basically the API version of a custom GPT.”
How do you go about error handling and checking that the response is coming back in the right way? Any advice around debugging?
Sam: “The API connector has a checkbox to include errors in the response. Make sure this box is checked. After that, you can use the ‘has error’ parameter in your workflow to check if there was an error in the API call. Usually, a custom event called ‘handle error’ is set up on the same page or backend workflow where the API is called, which is triggered only when there's an error. The workflow can then have two paths based on the ‘has error’ parameter. You can use this to show a custom pop-up or handle the error differently.”
Build for as long as you want on the Free plan. Only upgrade when you're ready to launch.
Join Bubble