If you’re looking to learn a new professional skill, Udemy is one of the leading online learning platforms to get started. If you’re interested in building a no-code product, however, go no further than Bubble's detailed How To Build blog series.
Using Bubble's visual programming tool, we’re empowering makers of any background to build beautiful software. Whether you’re building a marketplace, a social network, or a mobile app, our customers use our suite of tools to create rich product experiences.
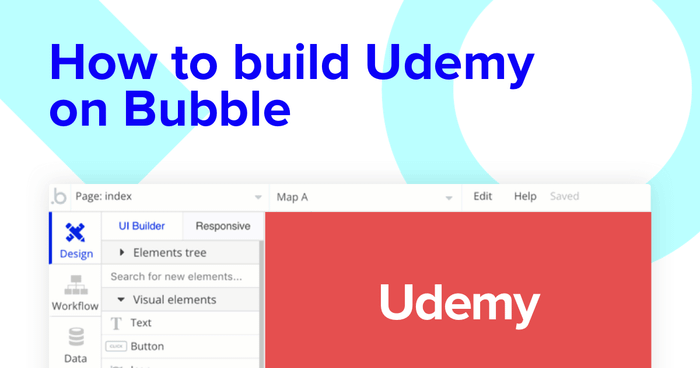
Throughout this post, we’ll uncover the process of using Bubble to build your version of Udemy.
Whether you’re looking to build a dedicated online learning platform, or you’re just interested in utilizing some of the core features from Udemy, this guide will share how to start building the underlying workflows for an MVP.
The steps to building a Udemy clone with no code include:
Get Started
Before you start, you’ll need to first register your free Bubble account. Click the button below to get started, then you can follow along as we build our product together.
Register your account on Bubble.
New to Bubble? Follow along on our introduction videos to get familiar with the basics of Bubble.
We also recommend completing our introductory lessons, which will guide you through the step-by-step process of the most common Bubble features.
This will help you get a running start when building your Udemy clone.
When kickstarting your project, you can choose to begin by wireframing your product design, or building the necessary fields within your database.
In this case, we’ll start by using Bubble’s visual design tool to shape the user-interface of our platform. If you’re replicating a version of Udemy, some of the core pages you’ll want to include are:
- Course creation page: A back-end portal for creators to upload new courses
- Home page: Including a search bar for users to discover relevant courses
- Search results page: Displaying a list of relevant courses
- Course page: A dedicated page to host the content of each unique course

A major feature within Bubble is the ability to send data between pages. This allows you to create one generic version of a page, then dynamically display the relevant content from your database when it’s required.
In the case of your Udemy clone, you’ll only need to create one page to host each individual course. We can then write the necessary logic to display only the relevant content on each page when it’s needed (we’ll cover this in more detail soon).
Configuring your database
Once you’ve mapped out the display of your product, you can focus on creating the necessary data fields to power your application. We’ll rely on these fields to connect the workflows behind your product.
Bubble’s pre-built database makes it easy to create different data types with unique fields. When creating a database, we recommend splitting larger items into separate data types to enhance the speed of your application.
For example, instead of storing all of the data for each course module under one property, we’ll split this content into separate data types, but link them back to the same course.
By forking these as separate data types, it allows us to only load the necessary content when it’s needed, reducing the amount of data the Bubble editor will need to render.
When building Udemy as an MVP, we’ll need to create the following data types & fields:
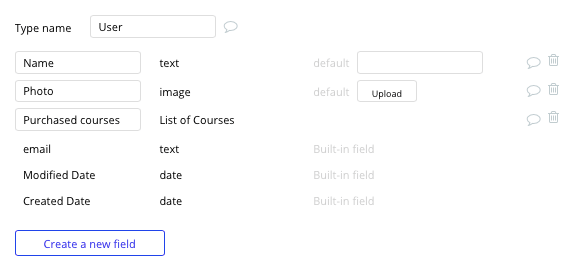
Data type: User
Fields:
- Name
- Photo
- Purchased courses - List of courses. Note: Creating a field as a list based on a separate data type allows you to seamlessly integrate all of its relevant data fields.
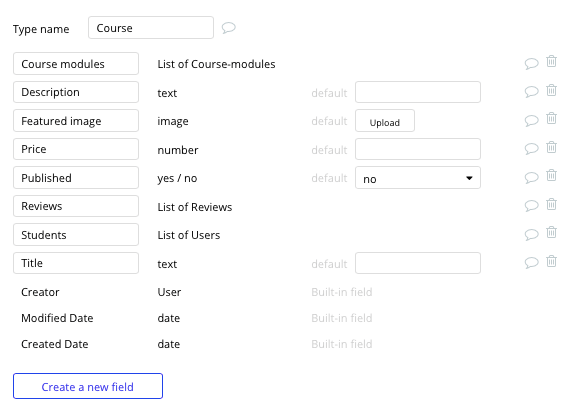
Data type: Course
Fields:
- Title
- Description
- Price
- Featured image
- Published - Yes/no with no default
- Students - List of users
- Course modules - List of course-modules
- Reviews - List of reviews
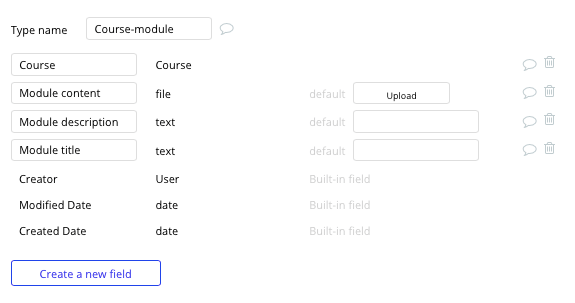
Data type: Course-module
Fields:
- Module title
- Module description
- Module content
- Course - course
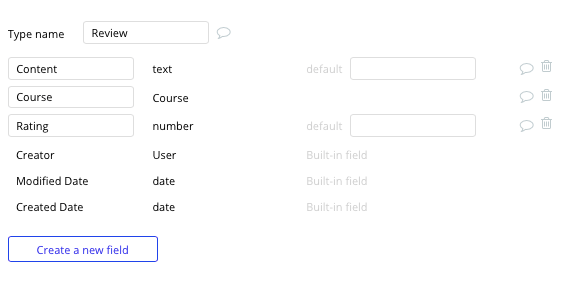
Data type: Review
Fields:
- Content
- Rating
- Course - course
Building workflows
Now that you’ve structured both the design and database of your application, it’s time to start stitching everything together and making your app functional.
In Bubble, the main way to do this is with workflows. Each workflow happens when an event occurs (e.g. a user clicks on a button), and then runs a series of “actions” in response (e.g. “sign the user up”, “make a change to the database”, etc.)
Creating a course
The first feature we’ll build is a function for creators to build and publish their own courses to the platform.
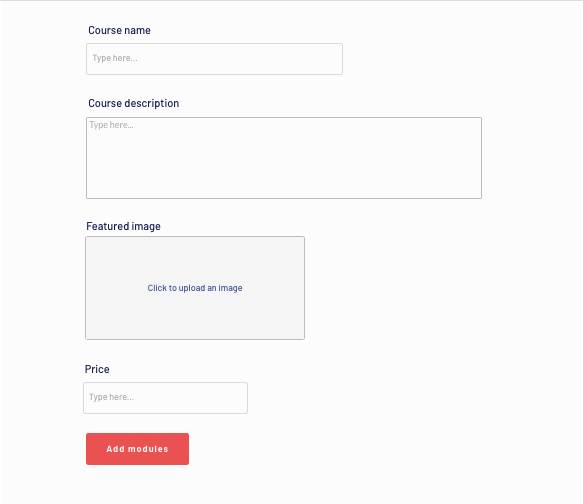
On the upload-course page, we’ll start by adding a variety of input elements that will allow us to add data into our database. This first page will be used to create the initial details of our course itself.
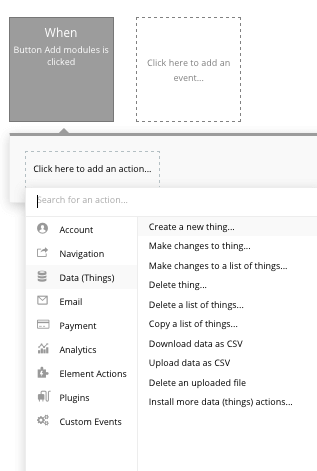
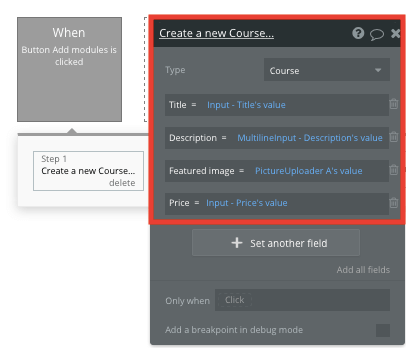
When the add modules button is clicked, we’ll want to trigger a new workflow.
Within this workflow, we’ll be creating a thing - a new course.
We’ll then need to start adding the relevant fields within our database. Map each of the on-page input elements with their corresponding database field.
Now that we’ve created the framework for a course, we’ll add another event to this workflow, sending a course creator to our next page where they can add a list of modules to the course itself.
Using a navigation event, we’ll direct the user to our upload-module page, sending with it the data from the new course we just created.
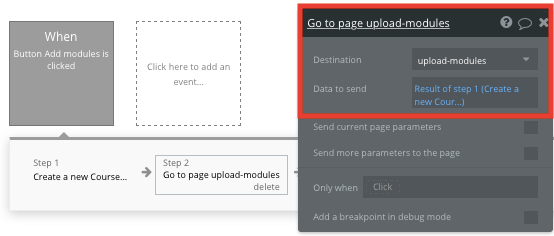
When sending data to a page, it’s important to configure the content type of a landing page to match the data in which you’ll be sending through your workflow.
In this instance, we’ll need to set the upload-module page to be a course type.
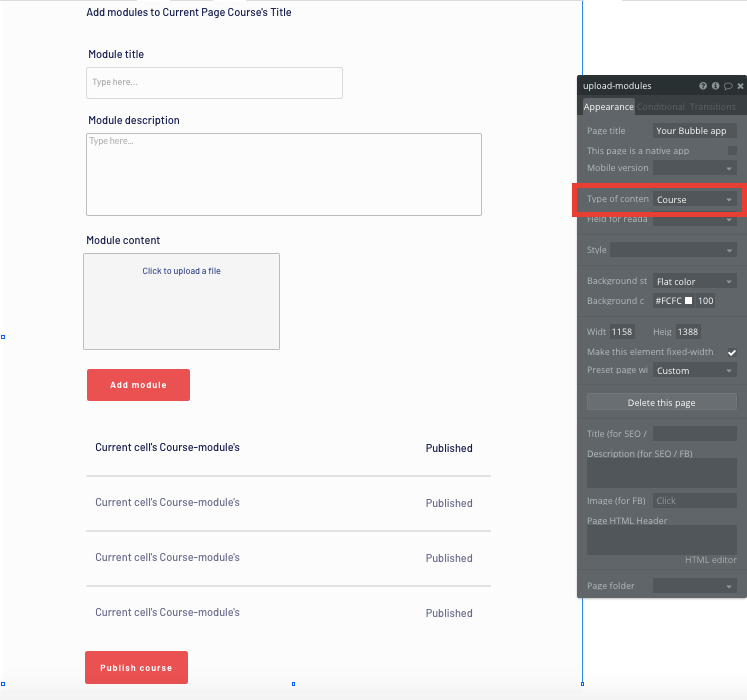
After configuring the page type, we’ll once again use a combination of input fields to create a new module within our current course.
Note: By using a file uploader element, it will allow you to upload content of any format.
Below our page input, we’ll also add a repeating group element to display a list of all the modules added to this current course.
When adding this repeating group, we’ll need to first configure the type of content it will display - a course module.
Next, we’ll then configure the data source, allowing it to display the relevant course modules as they’re created.
To achieve this, we’ll do a search for all of the course modules where the course equals the current page’s course.
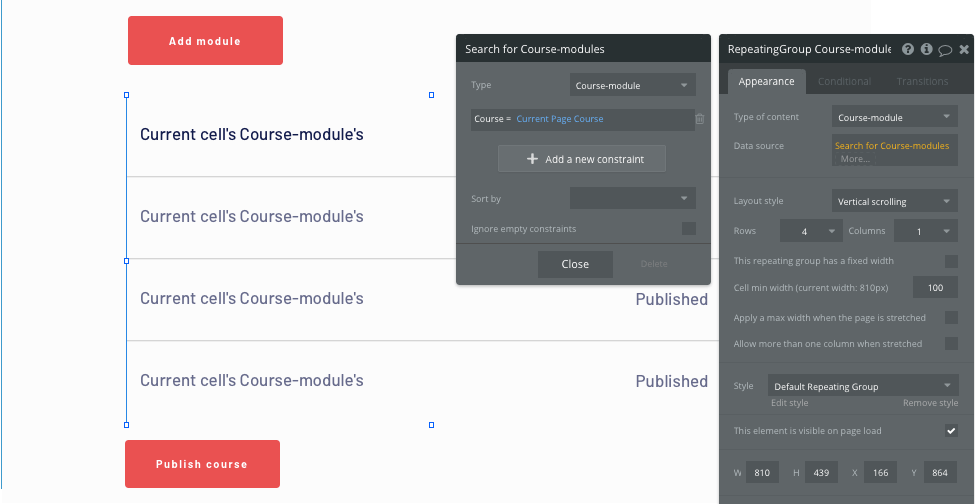
Now you’re ready to start structuring the dynamic content that will be displayed within each grid. Simply map out the top row with the relevant content you’d like to show, then this powerful element will populate the remaining columns based on your existing data.
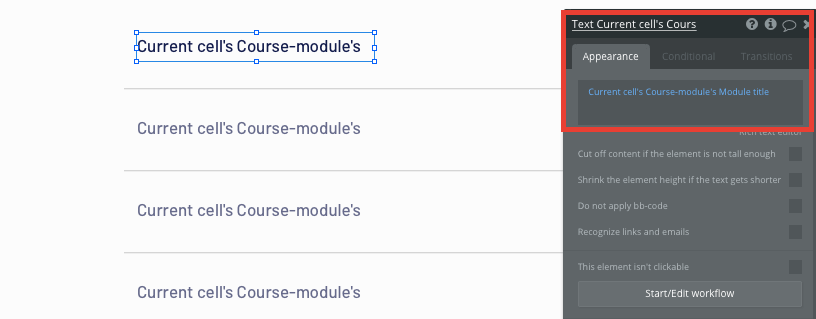
This repeating group will now display a list of all the modules we add to a course in chronological order.
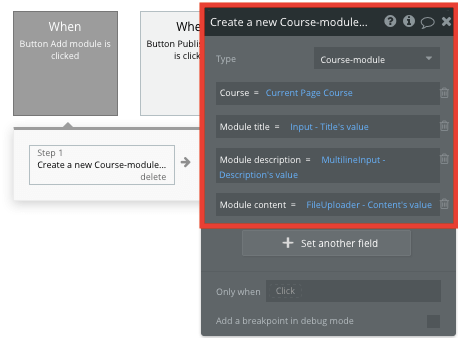
After configuring our page, we’re ready to now create a workflow that adds a new module to our current page’s course.
We’ll create a workflow trigger when our add module button is clicked.
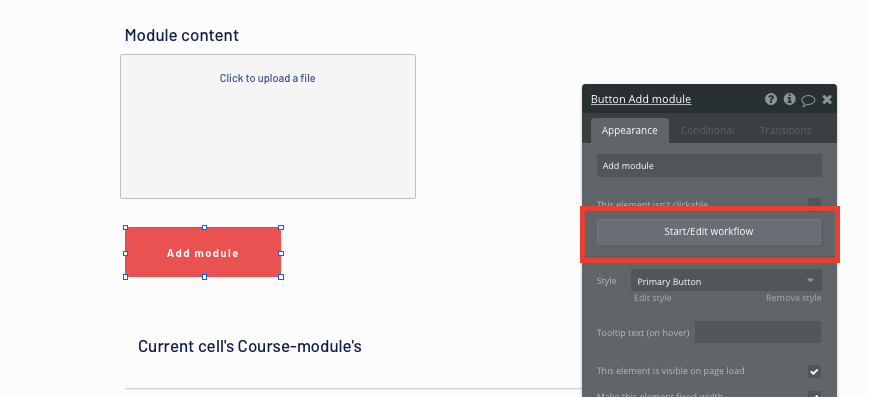
Within this workflow, we’ll be creating a new thing - a new module. Once again, we’ll start matching our on-page elements with the relevant data fields in our database.
Note: At this point, we’ll link the new module to our current course.
Once a new module is added, it will automatically be displayed within the repeating group on our upload page.
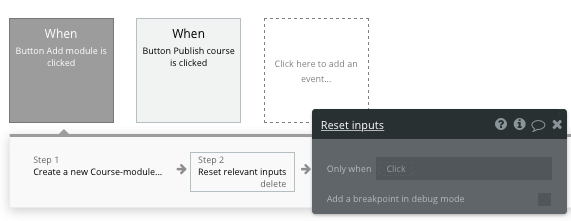
In order to add multiple modules through the same inputs, we’ll also need to add an additional step to our workflow, resetting our input elements once a module is created.
After a creator finishes adding all of their modules to the course, they can finally publish the course by clicking the publish button.
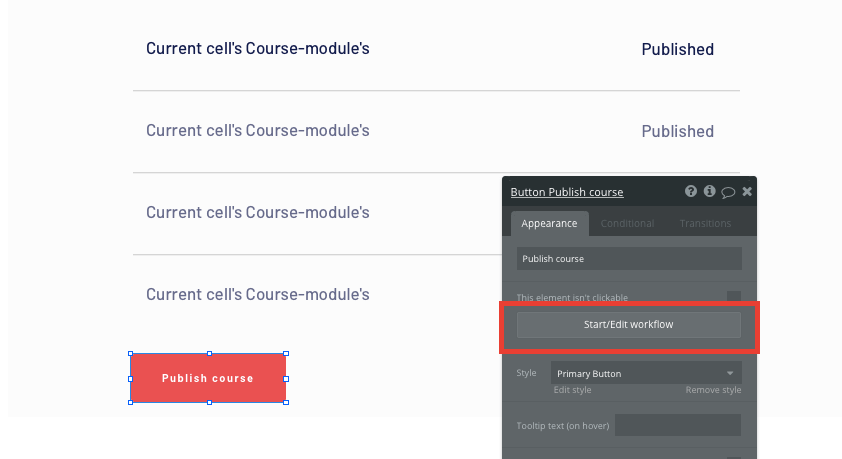
As both our course and course modules have already been created, we’ll be using this workflow to make changes to a thing.
The thing we’ll want to change is the current page’s course, updating its published status to ‘yes’.

Creating a search navigation
Once your platform has a list of courses to display, we’ll build a home page that enables users to search for available content.
When building our home page, we’ll need to include a text input element, allowing users to add a search query for a given course.

In order to process a users search query, we’ll create a new workflow when an input value is changed.
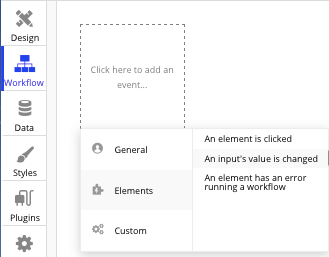
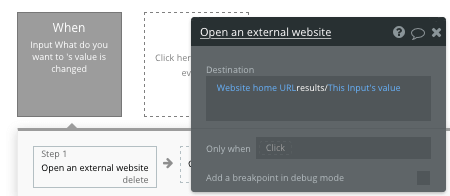
Within this workflow, we’ll then create a navigation event that opens an external website.
By opting to open an external website, it allows us to customize the destination page URL, giving us the option to include the users search query.

The landing page URL that we’ll want to open is our home page URL + the title of our results page + the search bars input value.
Displaying a list of available courses
Once a search query is processed, we’ll need to create a separate results page, allowing us to display a list of all the courses that match a users query.
On this page, we’ll add another repeating group element, configuring its content type to be a list of courses.
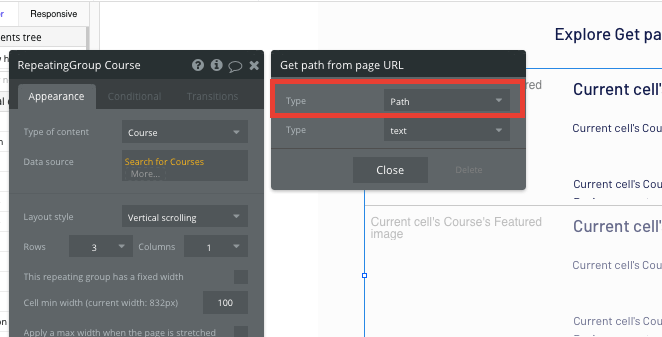
The data source of this repeating group will need to fetch the user query value from our additional URL string.
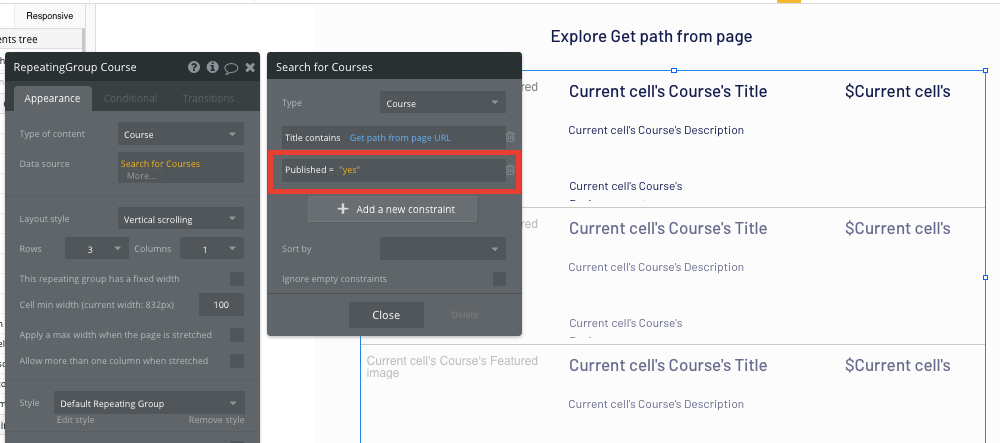
In this instance, we’ll be searching for all of the courses where the title field contains data from the current page URL.
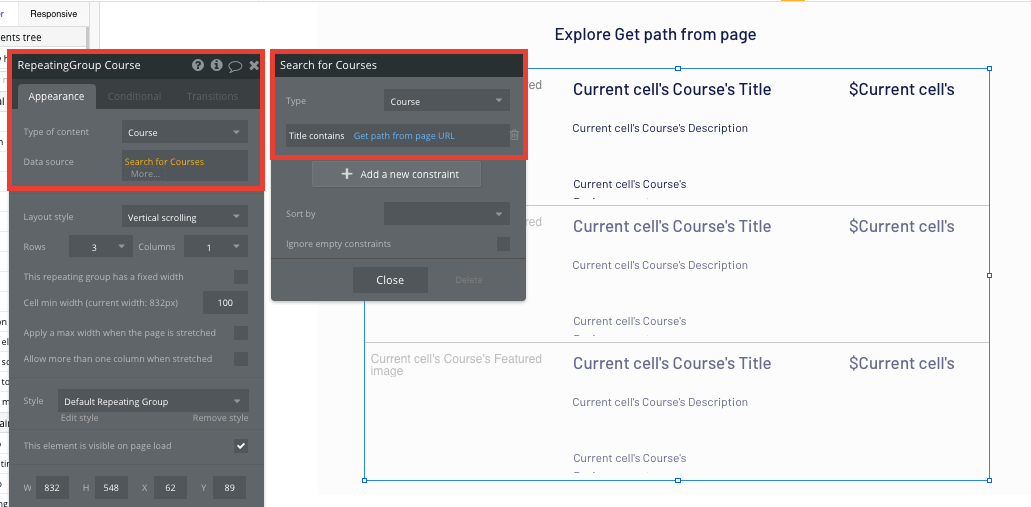
We’ll also need to ensure that we pull this data from the URLs path, not parameter.
We’ll then also need to add an additional constraint to this repeating group - only displaying courses where the published status has been labelled as ‘yes’.
Once we’ve configured this repeating group, we can start to add all of the relevant dynamic content fields to display.
Sending data between pages
Within a repeating group, it’s also possible to create events within each individual column.
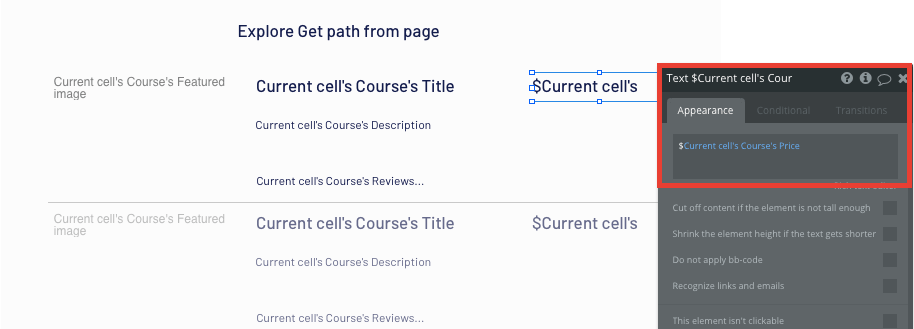
This feature will become useful when building navigational features across your platform. As Udemy’s results page will only display an overview of each course (including its title, featured image and price), you’ll want to display the full course details for each unique item on a separate page.
This additional content will need to be hosted on your dedicated course page.
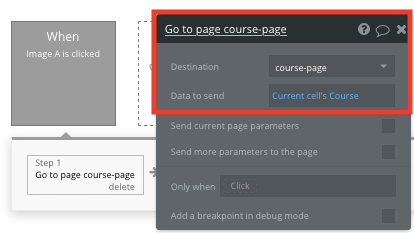
To power this event, you’ll need to start by creating a workflow that redirects a user to your course page when the course’s image is clicked.
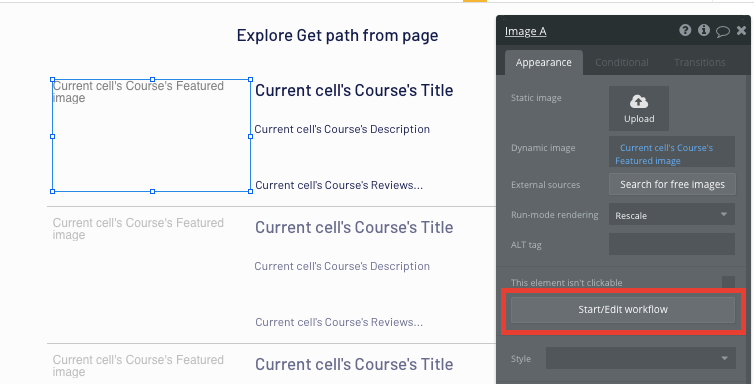
Within this workflow, use a navigation event to send a user to another page. From here, select the destination page type to be the course page.
You’ll then need to send additional data to this page so the Bubble editor knows which specific course to display. The data you’ll need to display is that of the current cells course.
Display dynamic content on a course page
Once a user has been redirected to a specific course page, you can easily pull this event data from your workflow and display the relevant content.
Once again, we’ll need to configure the page type of our destination page to match the data type that’s being sent through your workflow.
In this case, you’ll set the course page to a course property.
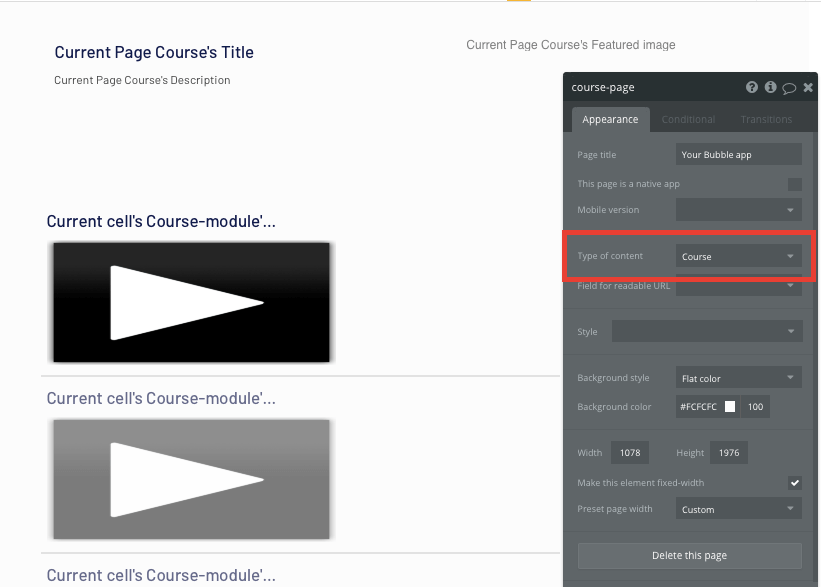
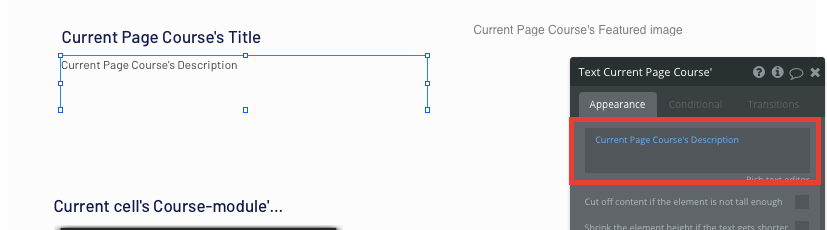
From here, you can then start adding dynamic content into your page elements, displaying the information from the course that has been sent in your workflow.
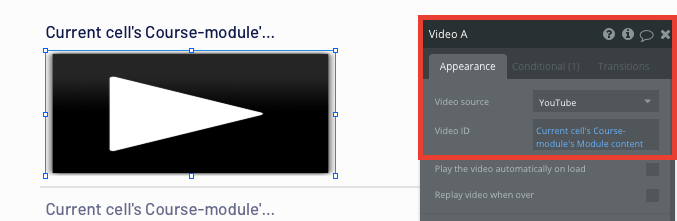
On this page, we’ll also display another repeating group with a list of all the courses modules.
Within these modules, we’ll also include the video files for that contain the actual content of the course.
As we’ll only want to display the content of the course to users who have purchased the product, we’ll configure these elements as not visible by default.
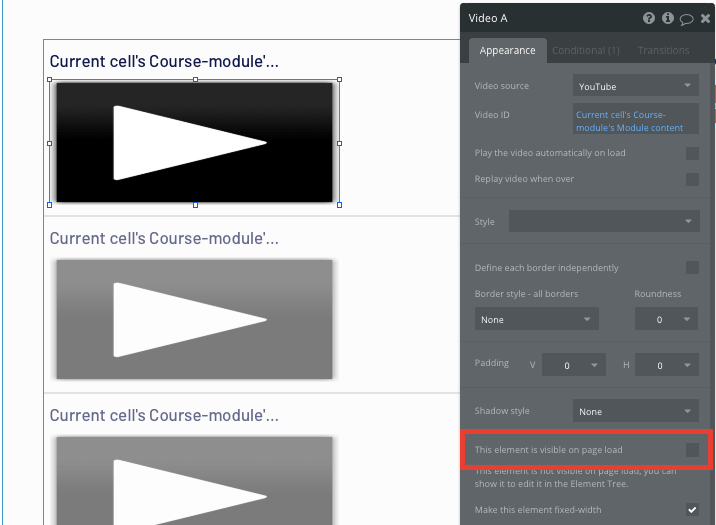
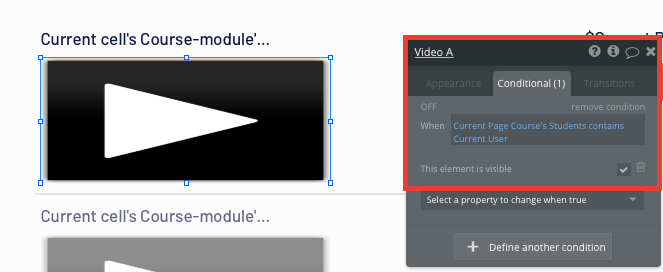
By adding a condition to this element, it allows us to display this content when a user is marked as a student of the course.
Conditions are an effective way for elements to behave in a specific way when pre-defined rules are met.
In this instance, our condition will identify when the current page’s course list of students, contains the current user.
When this conditional is met, we’ll select to make the element visible.
Building a checkout
Once a user has determined that they’d like to purchase a course, we’ll need to build a checkout experience to process payments on our platform.
Within Bubble it’s possible to harness the power of several plugins to facilitate these necessary workflows.
In this guide, we’ll be using the Stripe plugin to process credit card payments through Stripe.
Note: After integrating this plugin, you’ll need to first configure your API keys within the plugin settings.
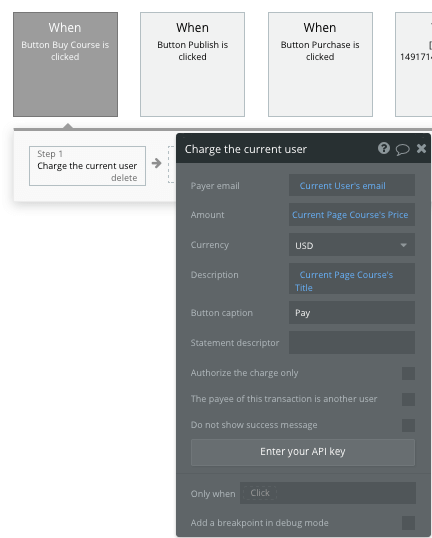
Once we’ve added the Stripe plugin, we can then start to build a workflow when the buy course button is clicked.
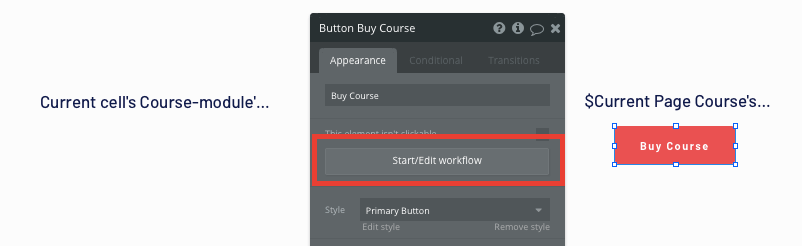
Within this workflow, we’ll create a payment event, charging the current user.
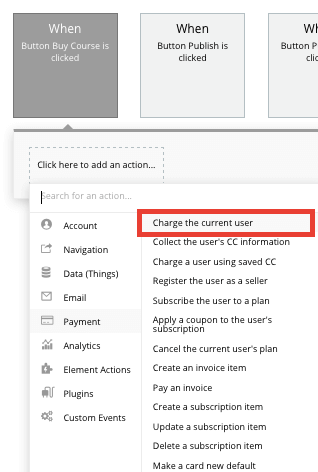
When using this event, you’ll need to input the dynamic purchase data based on the current courses price.
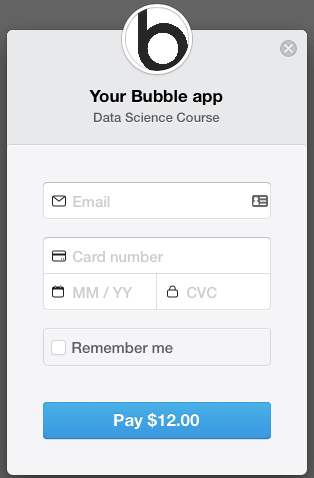
After configuring this payment workflow, the Stripe plugin will now automatically display and process a users card payment.
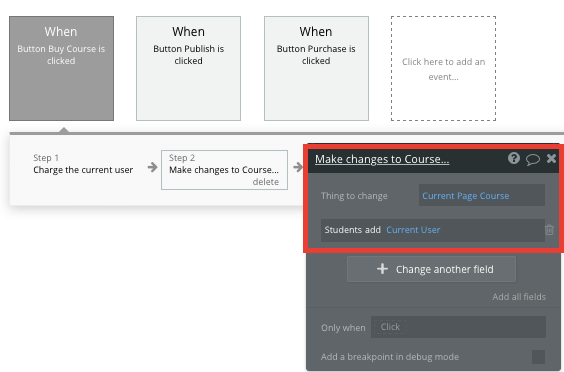
After a payment has been processed, we’ll then need to add one more step to our workflow - adding a user to the courses list of students. When a user is added to the list of course students, they’ll then have access to view the content within a course.
If you’d like additional guidance when building your payment processing workflow, you can watch a full tutorial in the video below.
Creating & displaying user-generated reviews
The final feature we’ll build in our MVP is a function to support user-generated reviews for each course.
On our course page, we’ll need to add an additional repeating group. This will be used to display a list of all the relevant reviews.
The data type will be set as reviews, and the data source will search for all the reviews where the course matches the current page's course.
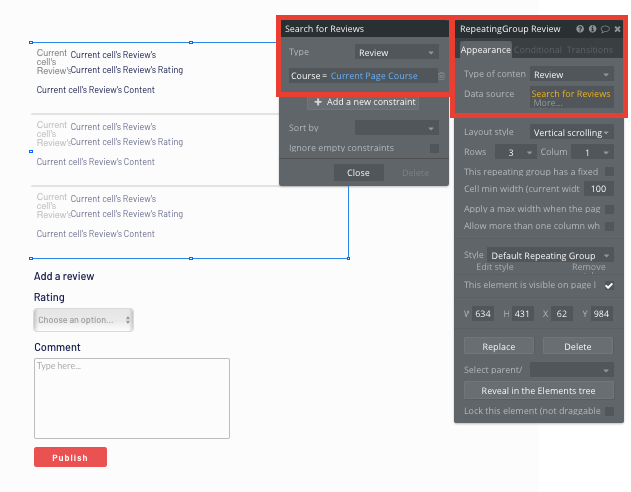
Once again, we’ll then need to map out the dynamic content of the first row, allowing our repeating group to display the full details of a review.
Below this repeating group, we’ll also add an array of input fields, enabling users to create and submit new reviews.
The workflow for creating and displaying user-generated reviews is similar to the process of creating a course itself. When the publish button is clicked, we’ll create a new thing.
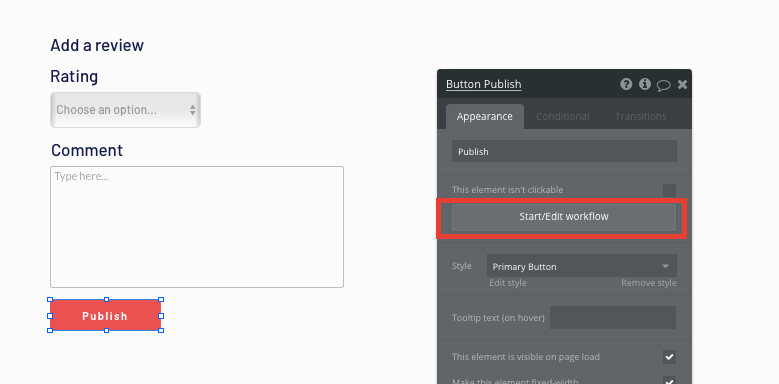
The thing we’ll want to create is, of course, a review, adding to it the rating from our dropdown input, as well as the content from out multiline text input.

Each time this workflow runs, the content displayed within a repeating group will automatically be updated in real-time.
Additional features
Now that you’re familiar with creating custom data fields and displaying dynamic content, you can start getting creative with the experiences you build within your product. Additional, you can;
- Create a bookmark feature for courses
- Add additional data fields for each course - requirements, what you’ll learn, etc
- Create course creator profiles
Privacy & Security
Now that you have the basics of your app, don't forget to start setting some privacy rules and conditionals to keep your data secure - starting with roles in the 'Privacy' section of your Data tab. You can also check if you're unintentionally exposing any data with an API checker.
Launch
Hiring a developer or dev team to build this application would cost thousands, if not tens-of-thousands of dollars. As you launch and grow in users, our paid plans allow you to host the product on your own custom domain, starting from as low as $25 per month. Some templates and plugins may cost more, but you can build all the functionality of Udemy without any additional costs.
Templates
If you didn’t want to build your Udemy clone from scratch, you can purchase one of the templates made by our community members. Some similar templates include:
- Courses like Udemy by Rapid Dev
- Cata.Log - Online Catalog by Rapid Dev
- Marketly Full Marketplace by Rapid Dev
Start building
Bubble can help you build a Udemy clone or any other product you choose! It’s never been easier to build something incredible without having to code.
Ready to join the no-code movement? Register your free account here and get started today.
If you’d like additional help when building your product, our thriving community forum is a great place to source actionable advice and resources. Any maker is also encouraged to ask questions within the community to help streamline their no-code journey.
Build for as long as you want on the Free plan. Only upgrade when you're ready to launch.
Join Bubble