In this post, we’ll walk you through the step-by-step process of building an NFT marketplace like Opensea, Rarible or LooksRare with Bubble. Whether you’re looking to build an NFT marketplace, or you’re just interested in utilizing some of an NFT marketplace’s core features for your own personal NFT storefront, this guide will share how to start building the underlying workflows for your product.
Before we start, it’s important to note that, while there are other solutions for NFT storefronts that describe themselves as “no-code”, they typically only allow you access to a pre-built set of templates, options and contracts. As the creator of the One2all NFT marketplace template, I’ve discovered first-hand that if you ever want to go beyond these pre-built tools, the best platform to build an NFT marketplace on is Bubble. Bubble allows you to have full creative control and ownership over your app and its data and contents. This is especially important if you need more freedom to innovate and see yourself going beyond the built-in features of a more “off-the-shelf” solution.
The steps for how to build an NFT marketplace without code include:
Get Started
Before you start building, you’ll need to first register your free Bubble account. Click the button below to get started, then you can follow along as we build our product together.
New to Bubble? Follow along on our introductory videos to get familiar with the basics of Bubble. This will help you get a running start when building a no-code NFT marketplace.
When kickstarting your project, you can choose to begin by wireframing your product design, or building the necessary fields within your database. In this case, we’ll start by using Bubble’s visual design tool to shape the user-interface of our platform.
If you’re replicating your own version of an NFT marketplace like Opensea, you’ll need to build the following pages:
- Landing Page - a page to highlight NFTs and Collections, including a call to action for the user to explore or search specific NFTs
- Marketplace Page - with search functionality to view a list of NFTs
- Item Page - a single page to view an NFT and its details
- Create Item Page - a Form for creating and minting NFTs
- Connect Page - a page (or modal) to let the user login with their desired wallet (e.g. Metamask)
- Account Page (optional) - a profile page for a specific user to highlight their NFTs
- Collection Page (optional) - a collection page to view related NFTs
A major feature within Bubble is the ability to send data between pages. This allows you to create one generic version of a page, then dynamically display the relevant content from your database when it’s required.
In the case of your no-code NFT marketplace, you’ll only need to create one page for NFTs. We can then add unique conditions to display only the relevant content of each NFT when it’s needed (we’ll cover this in more detail soon).
Configuring your database
Once you’ve wire-framed these pages, you can focus on creating the necessary data fields to power your application. We’ll rely on these fields to connect the workflows behind your product.
Bubble’s pre-built database makes it easy to create different data types with unique fields. When building your No-Code NFT marketplace as an MVP, we’ll need to create the following data types & fields.
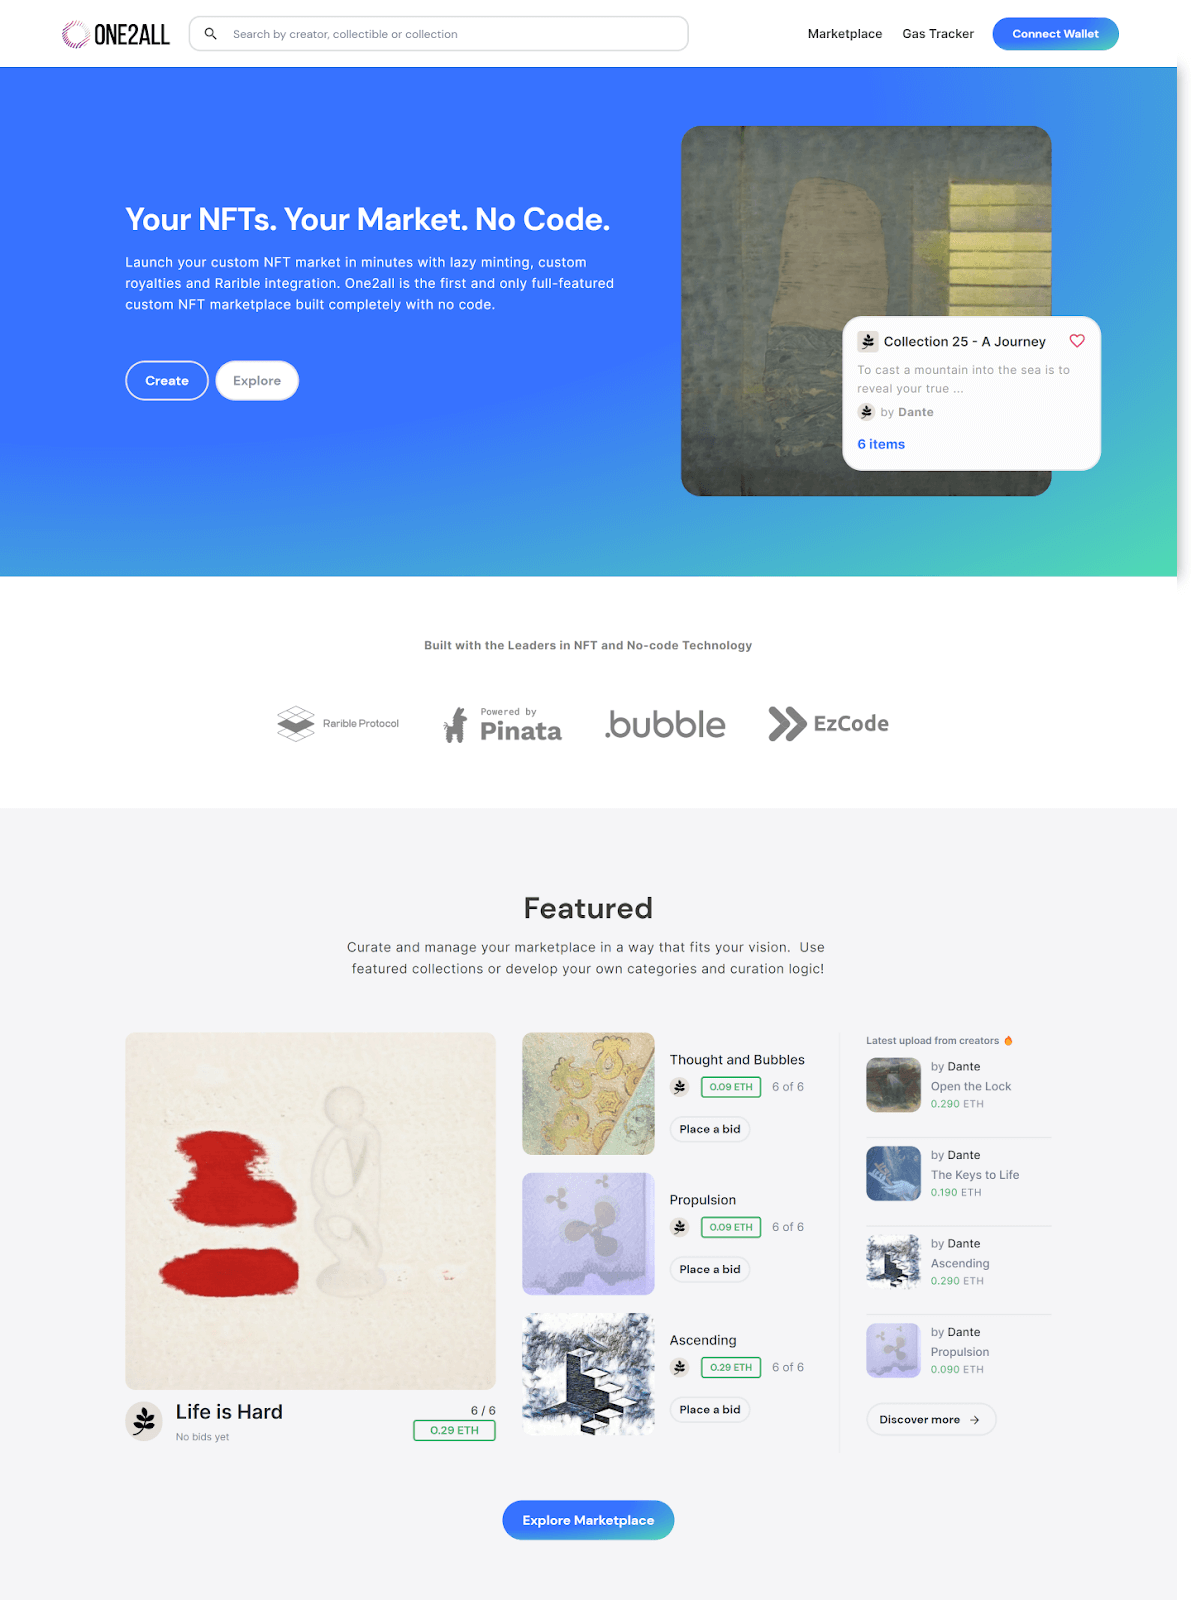
Please note, we will be focusing on the essential data types to get an MVP up and running. If you want to see the full set of data fields please take a look at the One2all template and explore more.
The goal for this MVP is to create a marketplace with Users, Collections and NFTs and to implement the basic functions of minting, viewing and selling.
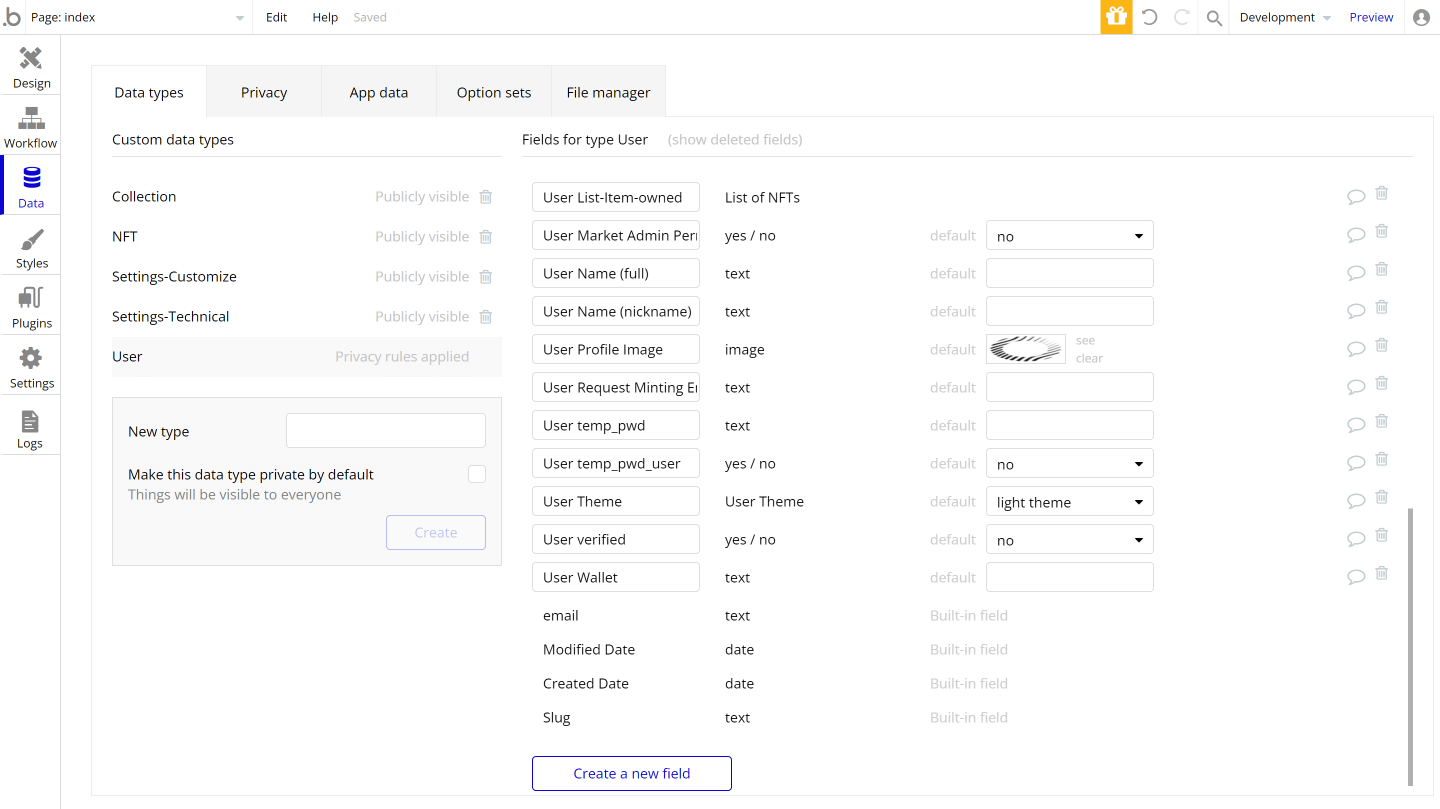
Data type: User
Fields:
- Name (full)
- Name (nickname)
- Wallet (required)
- Email (optional)
- List Owned (List of NFTs Owned)
- List Created (List of NFTs Created)
- List NFTs Liked (List of NFTs Liked)
- List Collections Liked (List of Collections Liked)
- Collections (List of Collections Created)
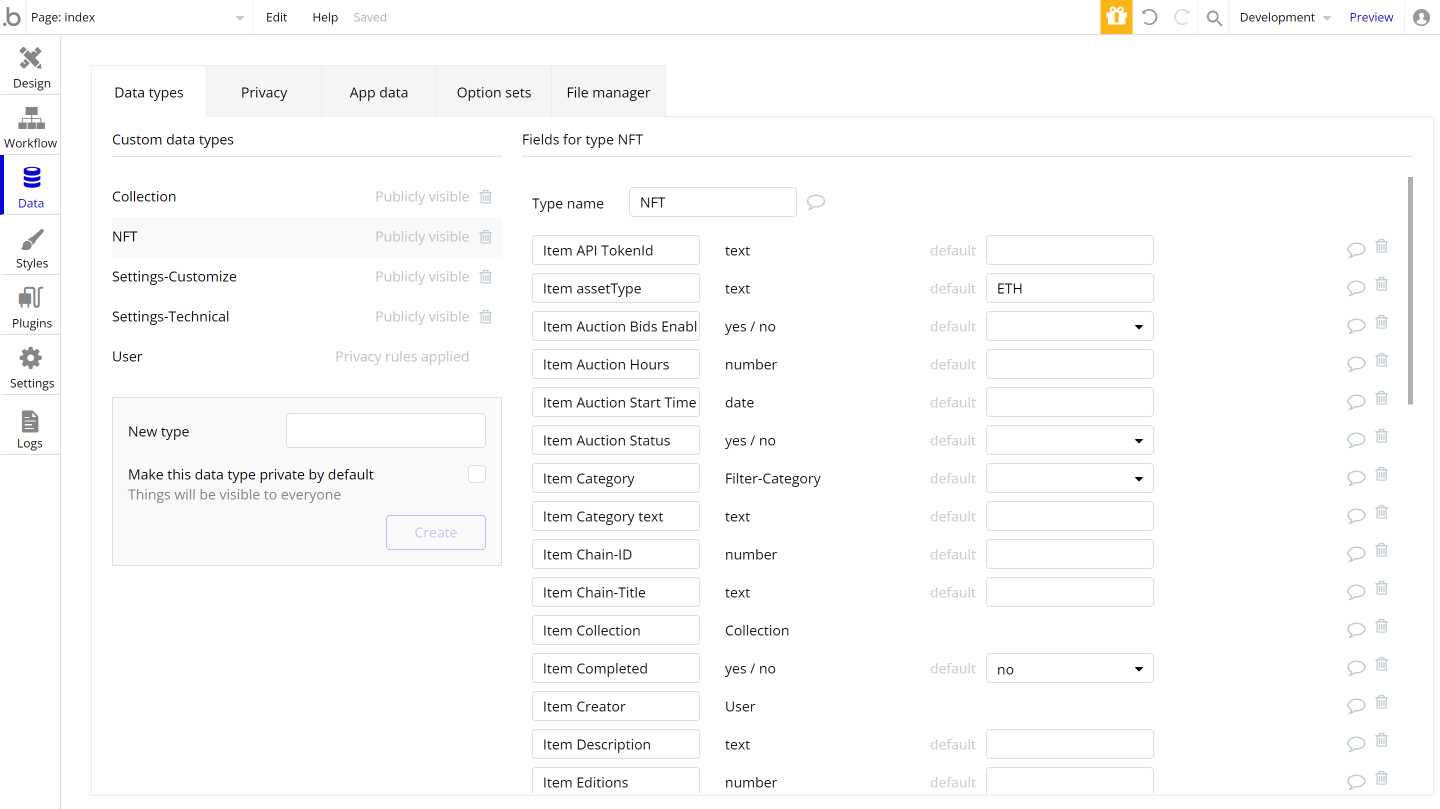
Data type: NFT
Fields:
- Name
- Owner
- Creator
- Status
- Token Type (ERC721 or ERC1155)
- Token ID
- Category (Image, Audio, Video or 3D)
- Category text
- Chain ID
- Chain Title
- Collection
- Description
- Editions (for 1155’s)
- Followers
- Image Cover
- Media (for audio, video and 3d files)
- Price/Best Price
- Sell Order Hash
- Properties
- Royalties
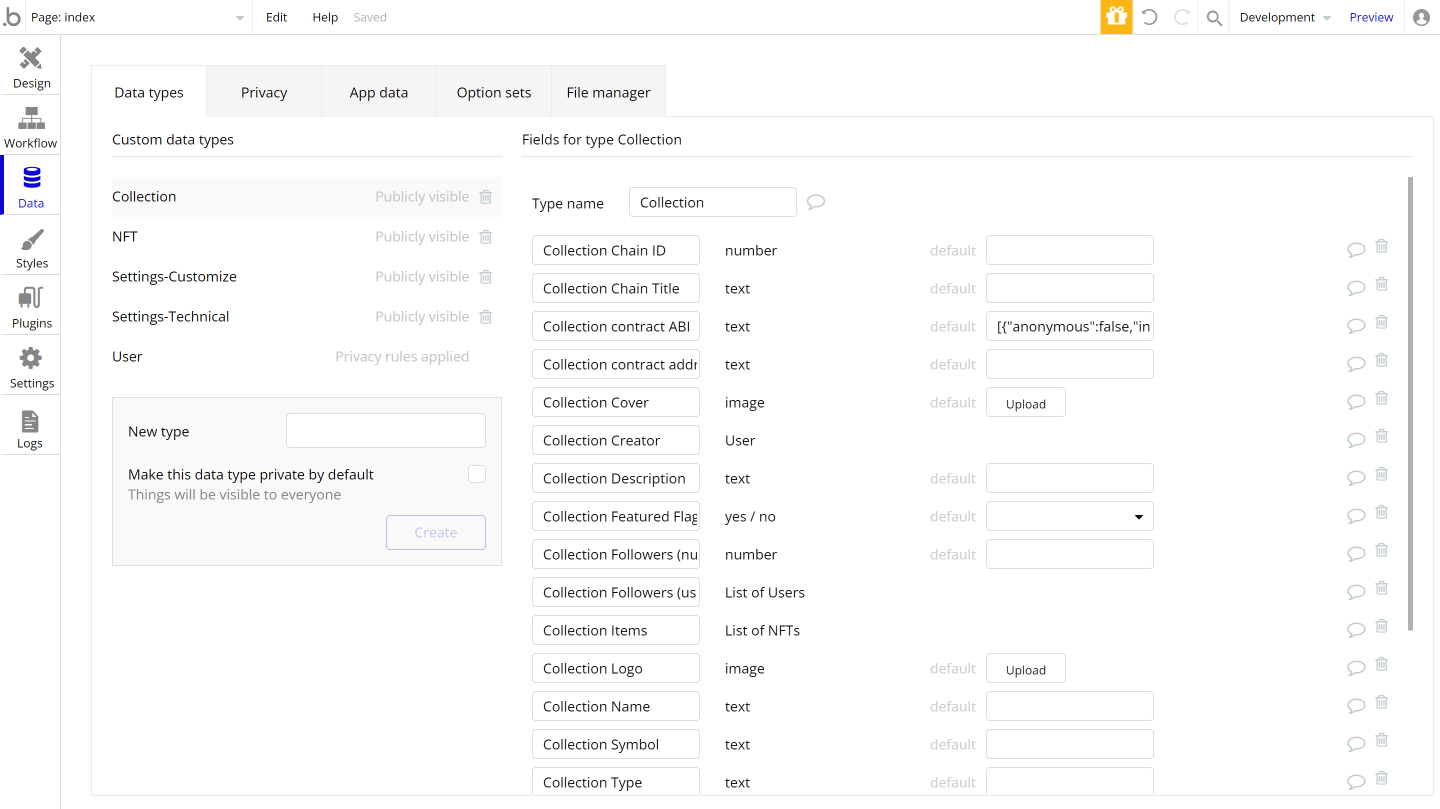
Data type: Collection
Fields:
- Name
- Description
- Chain ID
- Chain Title
- Contract Address
- Contract ABI
- Cover
- Creator
- Description
- Featured Flag (optional)
- Items (List of NFTs)
- Followers (List of Users)
- Logo
- Type (ERC721 or ERC1155)
Building workflows
Now that you’ve structured both the design and database of your application, it’s time to start stitching everything together, making your app functional.
In Bubble, the main way to create functionality in your app is with workflows. Each workflow happens when an event occurs (e.g. a user clicks on a button), and then runs a series of “actions” in response (e.g. “sign the user up”, “make a change to the database”, etc.)
For an NFT marketplace, several workflows must work in concert to create the expected functionality that a user will want. For example, as the NFTs interact with the blockchain, you will need to let your users first connect their wallets. They will typically then want to either mint an NFT or purchase an NFT.
For the purposes of this walkthrough we will be referencing the workflows in the One2all NFT marketplace v2 template. One2all is the only solution focused specifically on helping non-technical founders, creators and entrepreneurs build Bubble no-code NFT marketplaces. We will also leverage several plugins from Ezcode, a close partner of One2all and one of the largest and most experienced Bubble agencies focused on NFTs and Web3.
Connecting a Wallet
The first feature we’ll build is a connect wallet button. For this we will need to leverage the Web3 & Metamask plugin from Ezcode. It provides a comprehensive array of features and actions that will be useful for any web3 app that you are considering. But we will use one call in particular: Connect to Metamask wallet.
To connect to a Metamask wallet you will typically want to drop the Web3 & Metamask element and create a button in a reusable Header Element so that this connect feature can be reused and present on every page you create.
After you have dropped a plugin element and created a new button (you can call it “Connect Wallet”), you will want to click “Start/edit workflow” to create a new workflow and action.
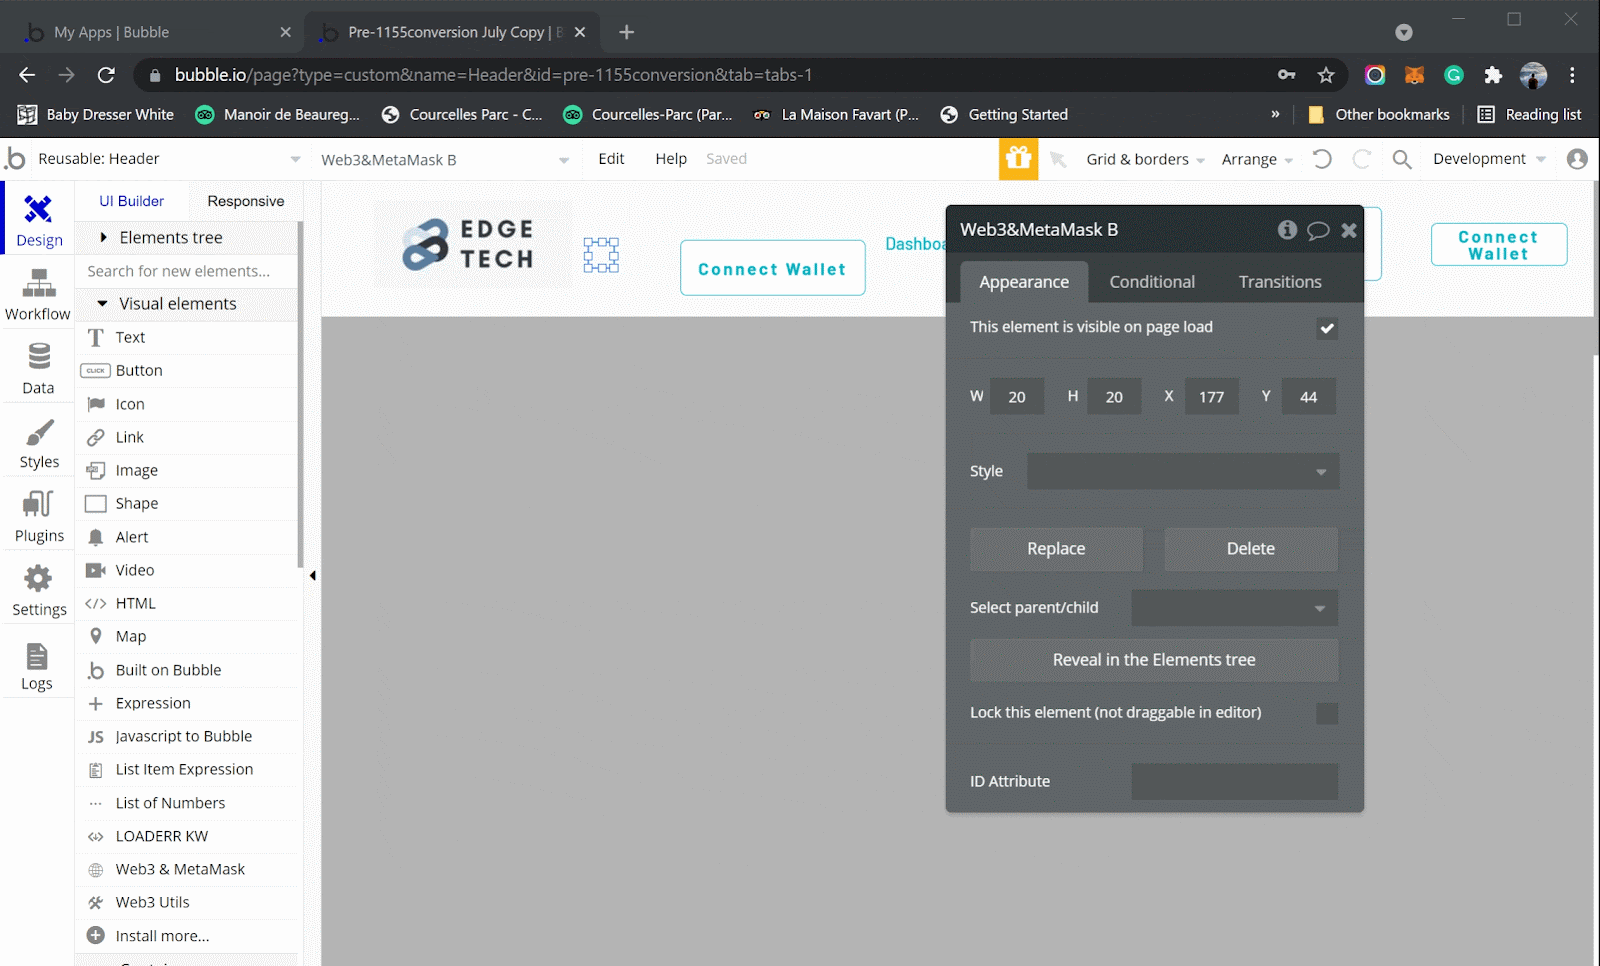
Once you’ve highlighted the correct Button Connect Wallet workflow in the Workflow tab, you will want to add an “Element Action” for “Connect To a Metamask.”
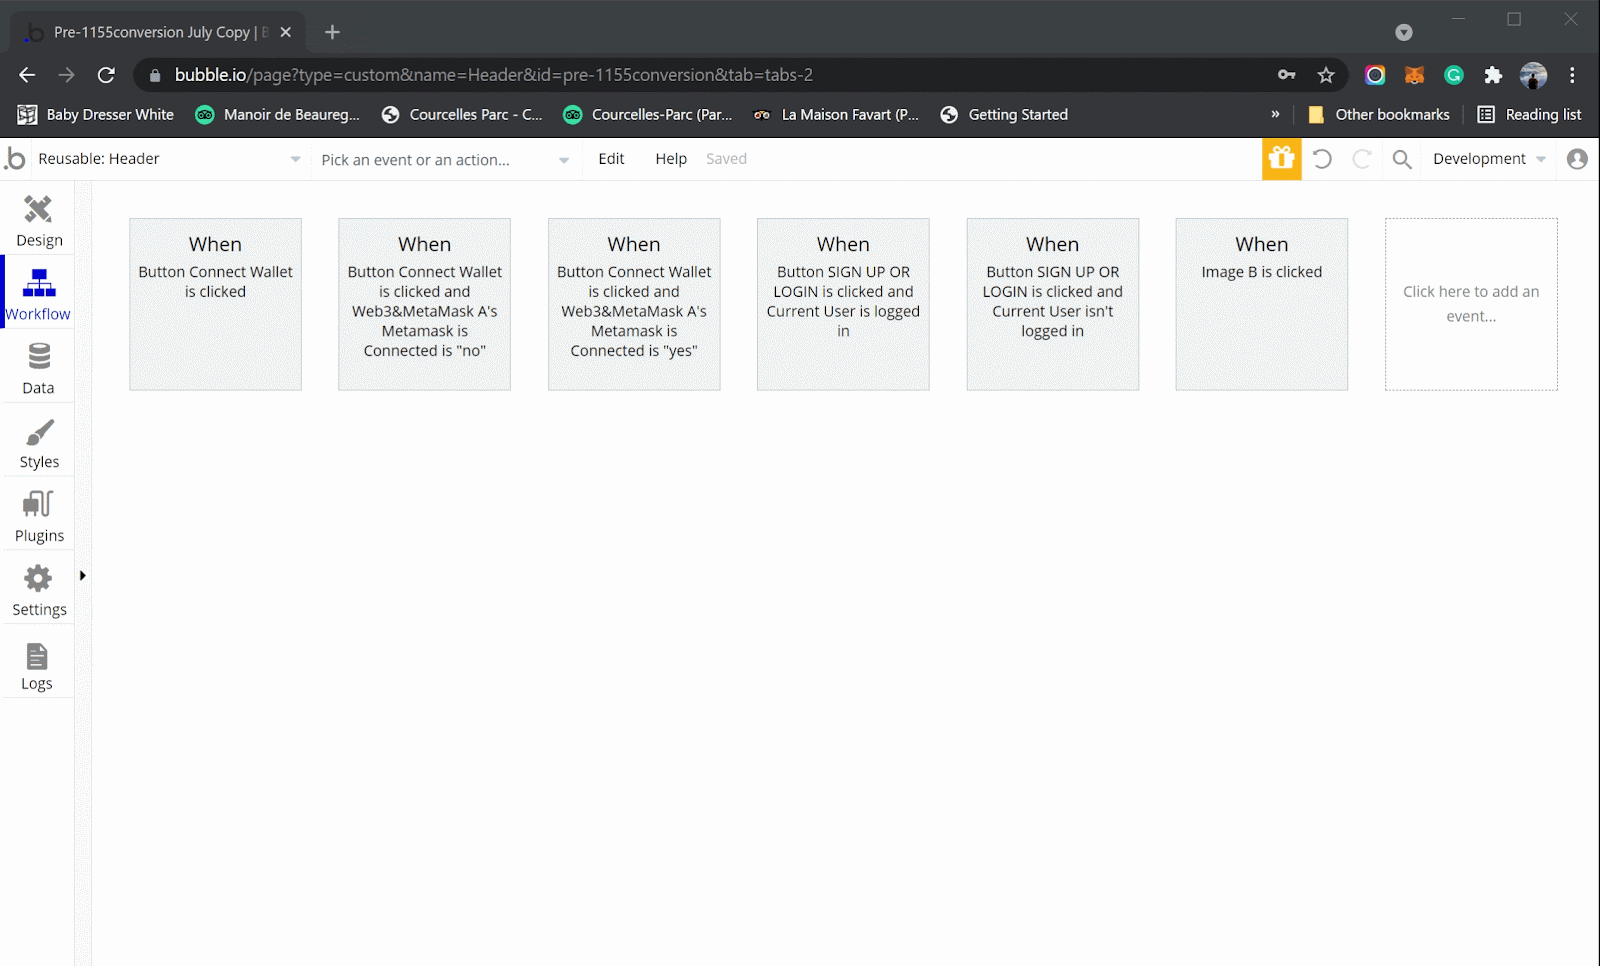
Once you save that action and workflow, your app will now be able to pop up a connection request in a Metamask browser extension.

Additional functionality: It is common practice for Web3 apps to also request that the user sign a custom message from the app in order to authenticate the user. We will not go through this step for the MVP but you can examine the usage of the “Sign” action in the One2all v2 template. By signing the message, the user creates an encrypted password that is then used to log the user in securely each time they connect their wallet.
Minting an NFT
The next feature we’ll build is a minting functionality, which will take place entirely in the Create Item page.
While there are different plugins and back-ends available for minting, we will focus on the Rarible SDK plugin which was jointly developed by Ezcode and One2all in 2021 and continues to be updated very frequently by the Ezcode team. The Rarible SDK offers three critical components: lazy minting (minting without gas for the seller), indexing (querying the blockchain for NFT data) and order book (ability to take buy and sell orders and execute them).
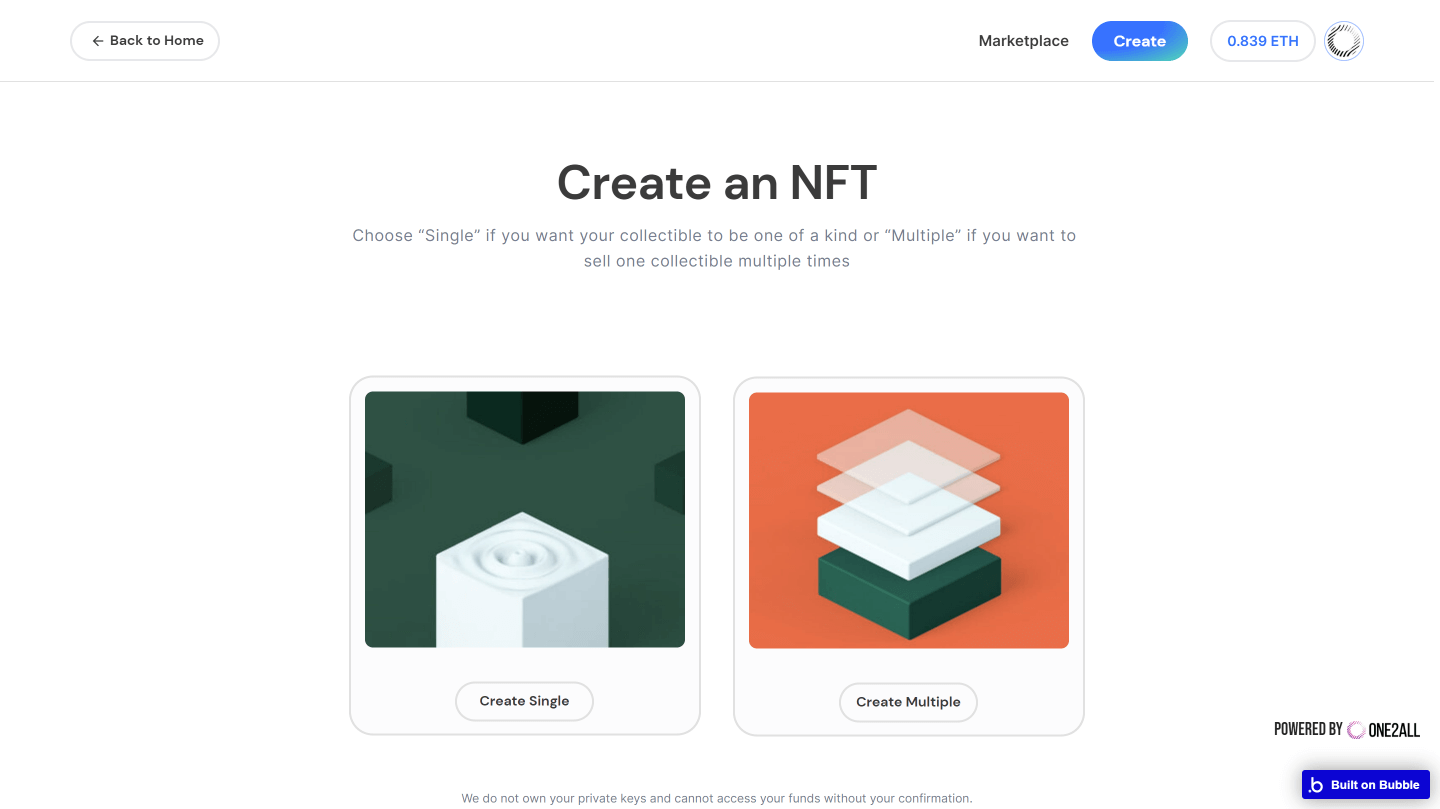
For lazy minting, there are two basic standards for NFTs you can create. One is a “1-of-1” NFT or single edition which is also known as an ERC721. The other is a “multi-edition” NFT also known as an ERC1155. We will focus on minting an ERC721 for our MVP.
An NFT can really be made up of any metadata, and while you can always add more, the standard metadata that are typically included are:
- Name
- Description
- Content (image, audio, video or 3d file)
- Cover Image (if audio, video or 3d)
- Royalty % (% of secondary sale sent to creator)
- Properties (attributes that determine rarity)
- A Collection to mint the NFT to
To mint an NFT, we will effectively need to create a form to collect all of this information. First, let’s start with the simpler inputs and then come back to the media content.
For the Name and Description, these are simply single line and multi-line inputs, respectively:
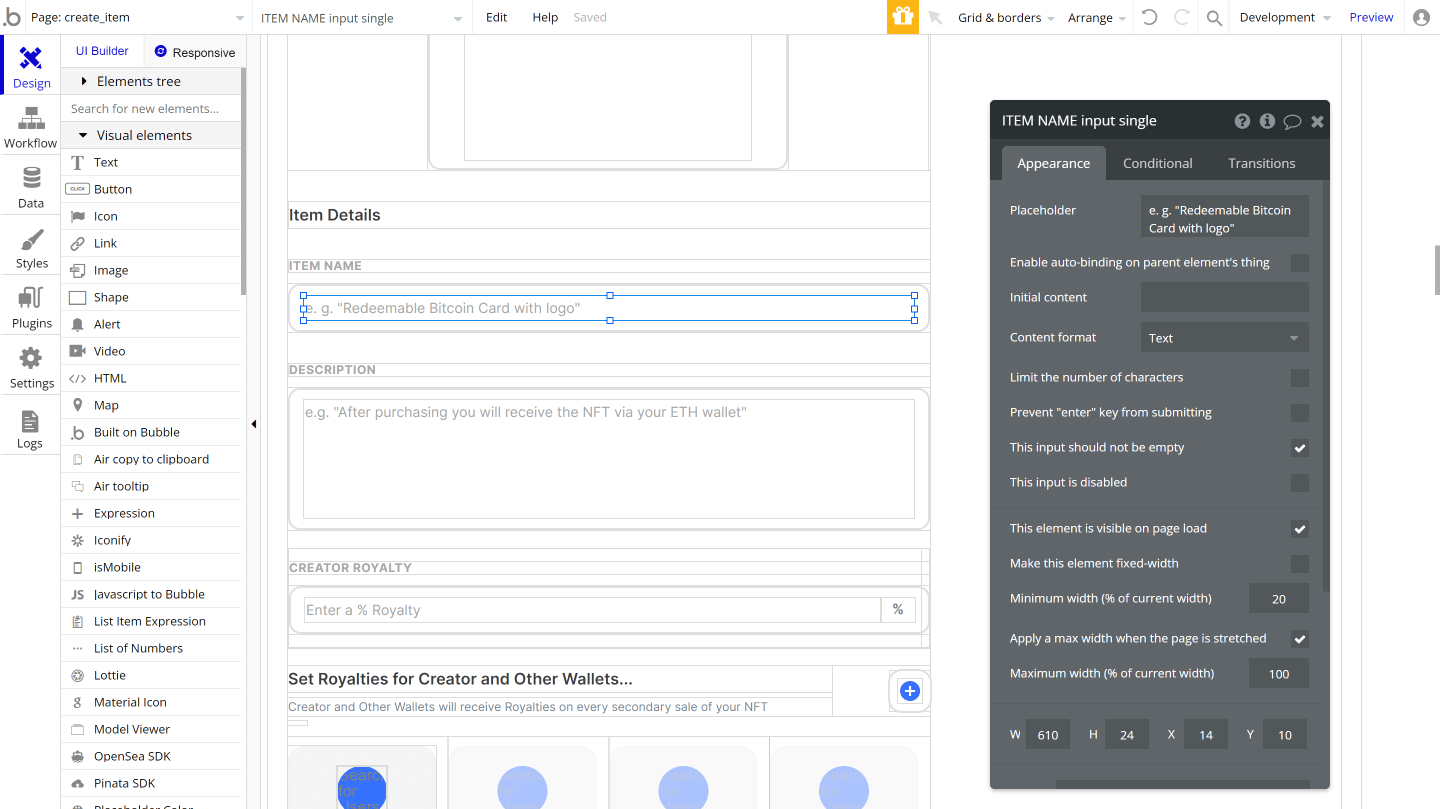
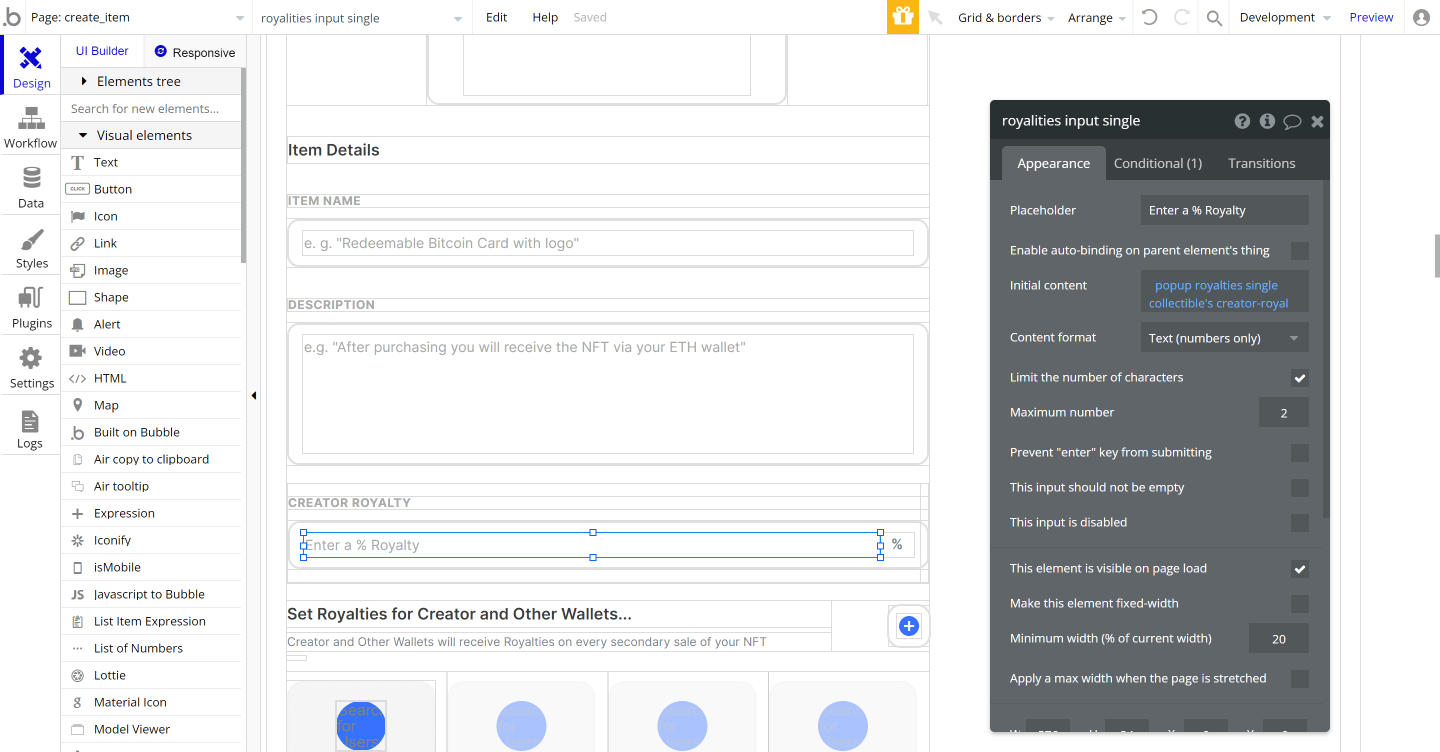
For the Royalty, you can again have a single-line input that takes “text (numbers only).”
Note: A unique feature of the Rarible SDK is the ability to include multiple royalties. Most large marketplaces only allow you to enter one recipient address for royalties so you can consider the ability to add multiple royalties an added and optional feature.
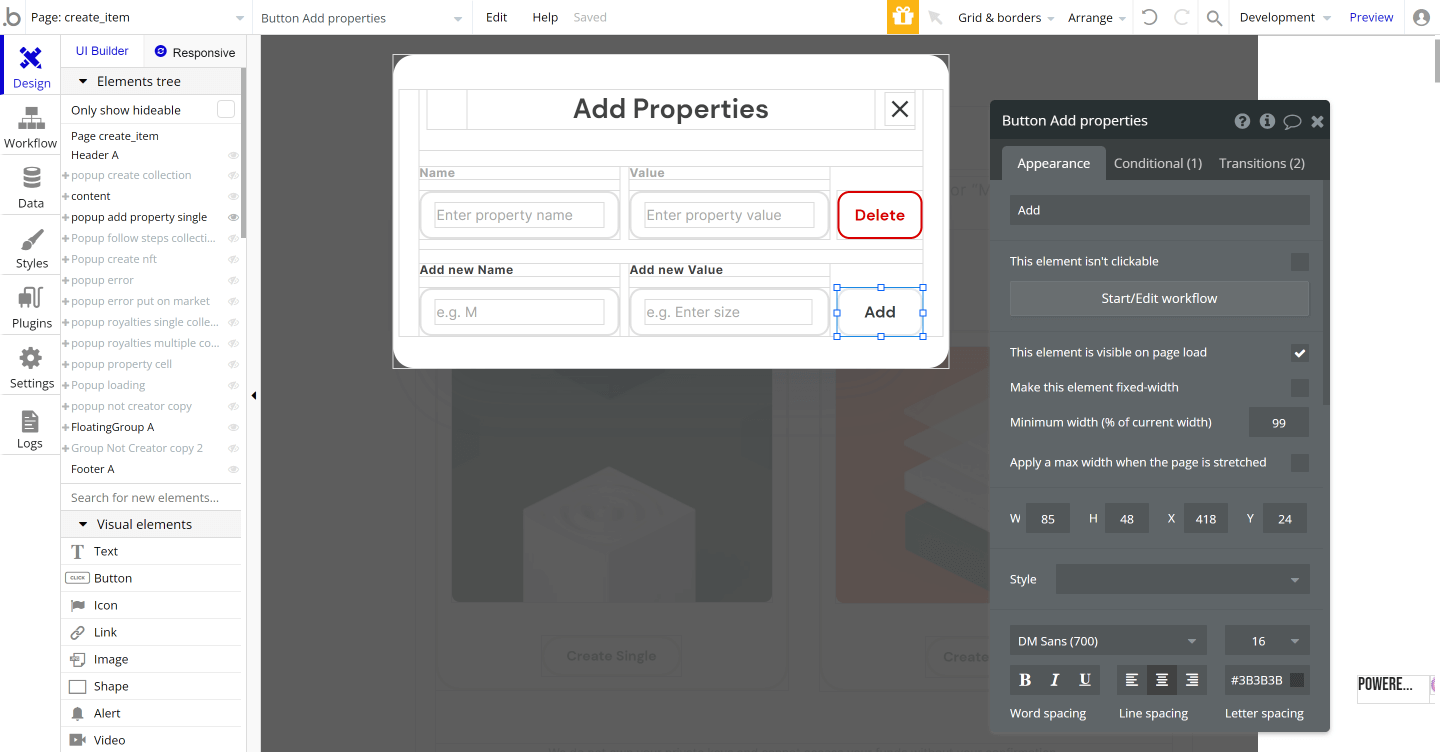
For the Properties, this can be done in a number of ways, including a pop up to add/edit/remove properties as shown in the screenshot. However, you can also go a simpler route to start and simply have two single line inputs (one for the Name of the property and the other for the Value of the property) and an Add button to continuously add properties to a list. You may also want a repeating group of text below that to display the running set of properties you’ve added.
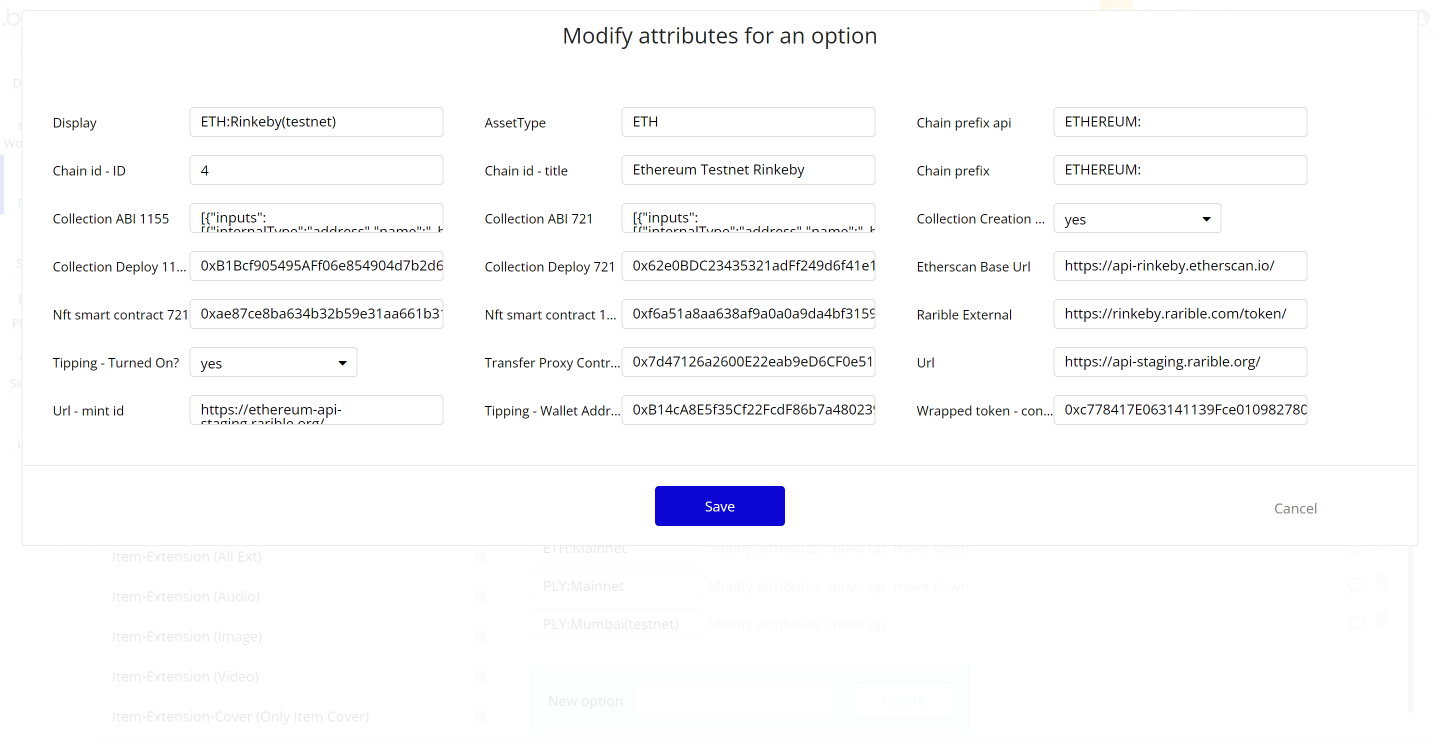
Finally, you will want a collection or contract address to which you want mint. In the One2all template, we also have the workflow for creating/deploying a contract either on or off-chain, but for our purposes, let’s assume we have a set of contracts we can already reference like Rarible’s Public “Rarible Single” collection. You will need to input the collection’s on-chain contract address and include that in the Rarible Mint Token action.
Now let’s come back to the content. An NFT is not strictly limited to any file type but the most common NFT file types are:
Image - JPG, PNG, GIF (including animated GIFs), SVG
Video - MP4, WEBM
Audio - MP3, WAV, OGG
3D - GLB
While these files can typically be stored anywhere, the common practice is to store them in a decentralized file store to preserve autonomy and make them censorship resistant. To accomplish this, many in the NFT ecosystem leverage the InterPlanetary File System or IPFS which effectively is a giant, always-on, peer-to-peer file storage network. Another common back-end is Arweave. While both are effective, we will focus on IPFS and a gateway service called Pinata to access it (Infura.io and Nft.storage are other popular gateway services).
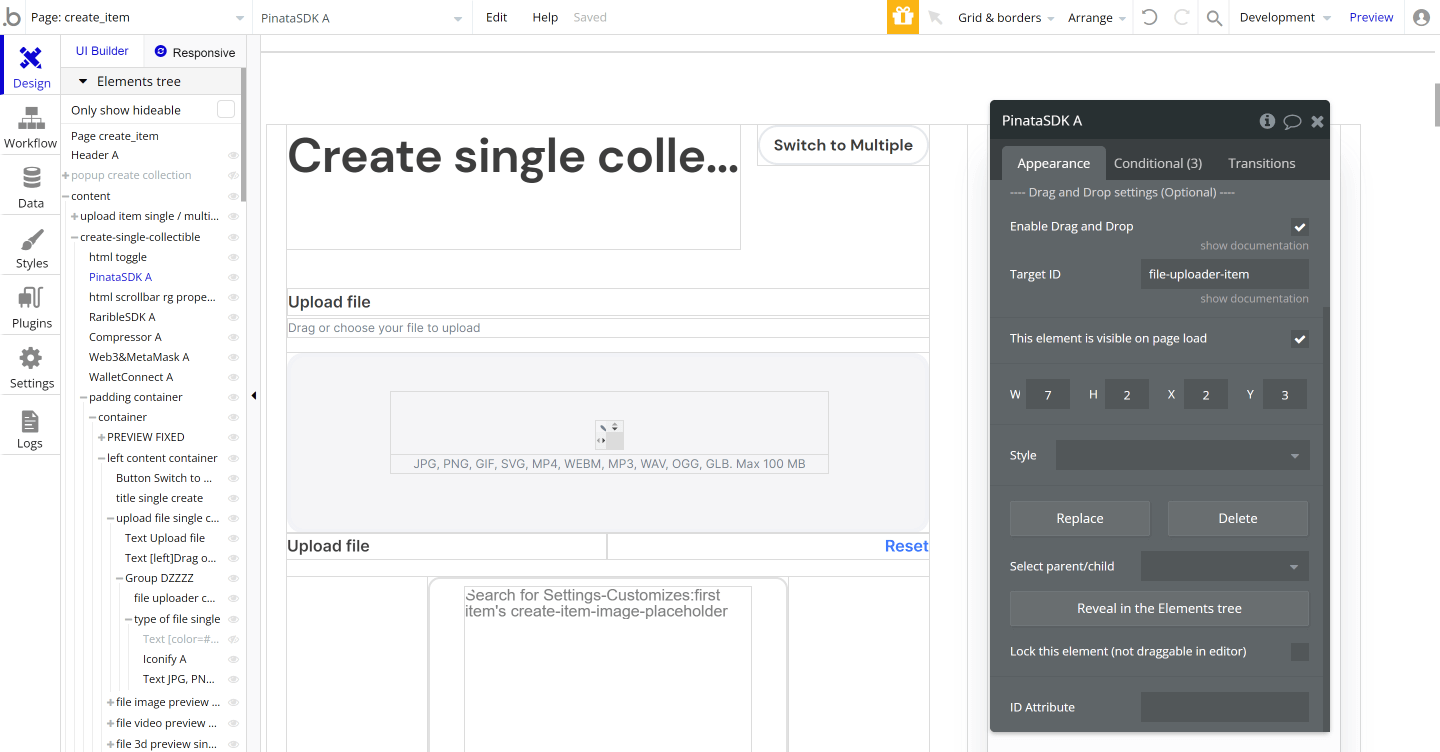
We will be leveraging Ezcode’s Pinata plugin which was custom built to meet One2all’s specifications for large file size NFTs (100mb and larger). The Pinata plugin allows you to transfer single files larger than 50mb through Bubble’s API Connector.
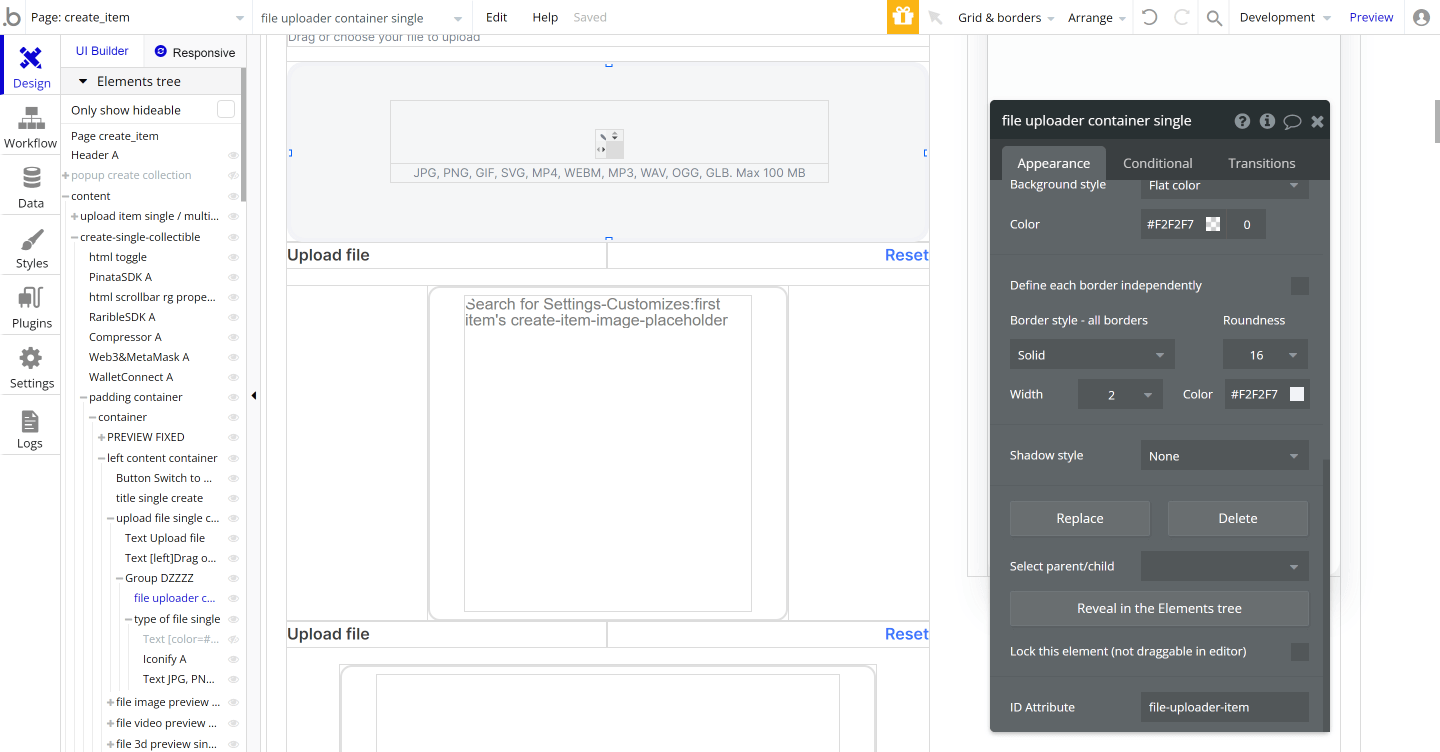
The Pinata plugin leverages element ID’s to effectively turn any element in your Bubble app into a file uploader. In this case, we are targeting an element with the id “file-uploader-item.”
Here is the PinataSDK element and the “Target ID” contains “file-uploader-item.”
Here is the element that has been tagged with the “file-uploader-item”:
This same methodology should be used to load both the primary content of the NFT as well as any cover image to Pinata/IPFS. The service will then return a unique content ID that can then be used to retrieve the content at any time via a simple URL. This content ID is what we will be including in our NFT data.
We’ve now finished our form, one note, it’s a good practice to make the relevant fields required from a form submission perspective. As minting goes, it’s great to help the user understand what fields are required or not as NFTs can have a high level of personal (or financial!) value for their creator!
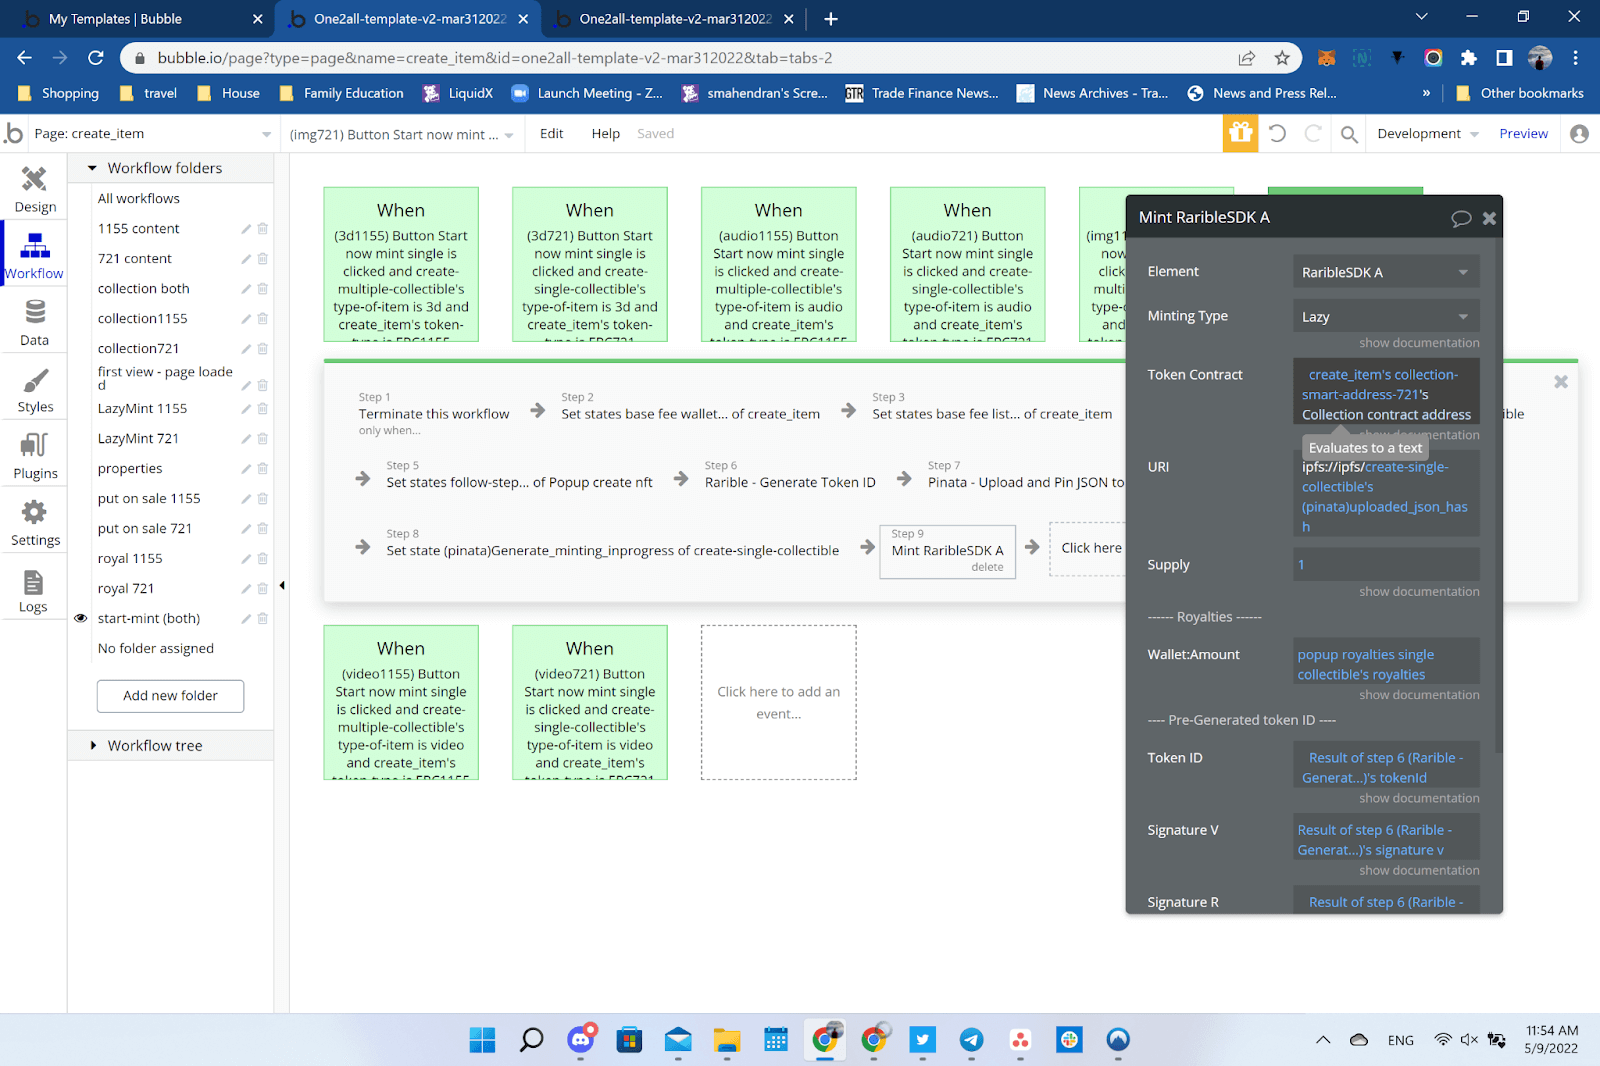
Now we have all our data populated, let’s get minting!
There are three critical steps we need to lazy mint an NFT. Remember, you will need to drop a plugin element for both the RaribleSDK Plugin and the PinataSDK Plugin in your app to be able to see and interact with the following actions:
1) We need to Generate a token ID from Rarible so that the NFT’s url can be included in its metadata. Remember once a file is uploaded to IPFS it can not be subsequently changed or modified!
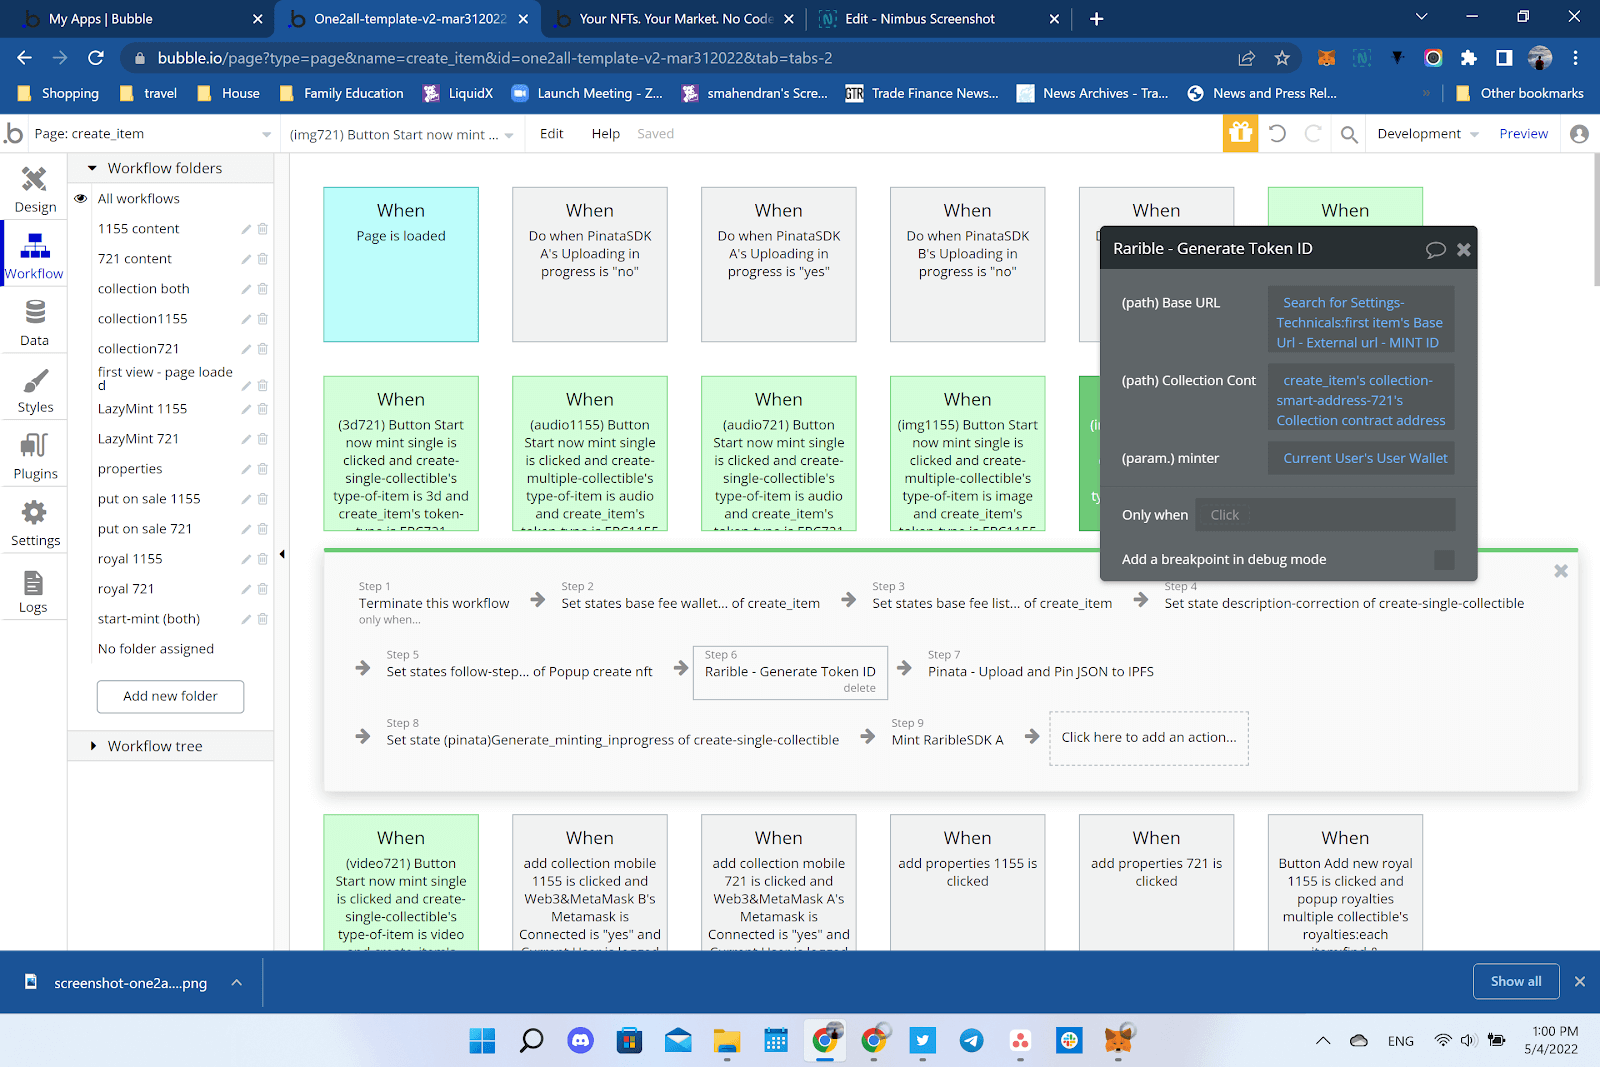
2) We need to upload the metadata (in JSON format and including our content ID’s for the NFTs media) to IPFS via the Pinata Upload action. The JSON fields need to be named and formatted rather specifically, as seen in the following screenshot.

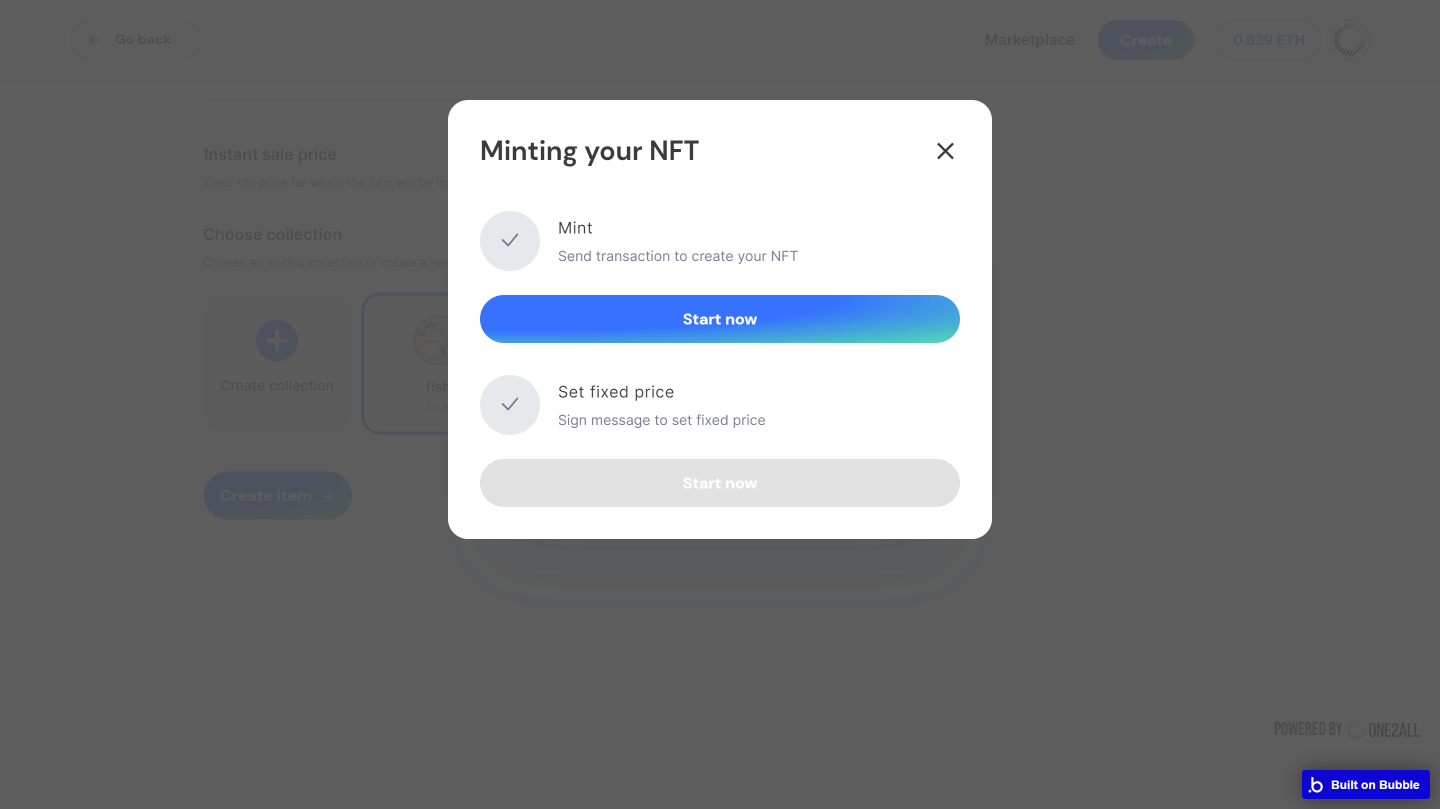
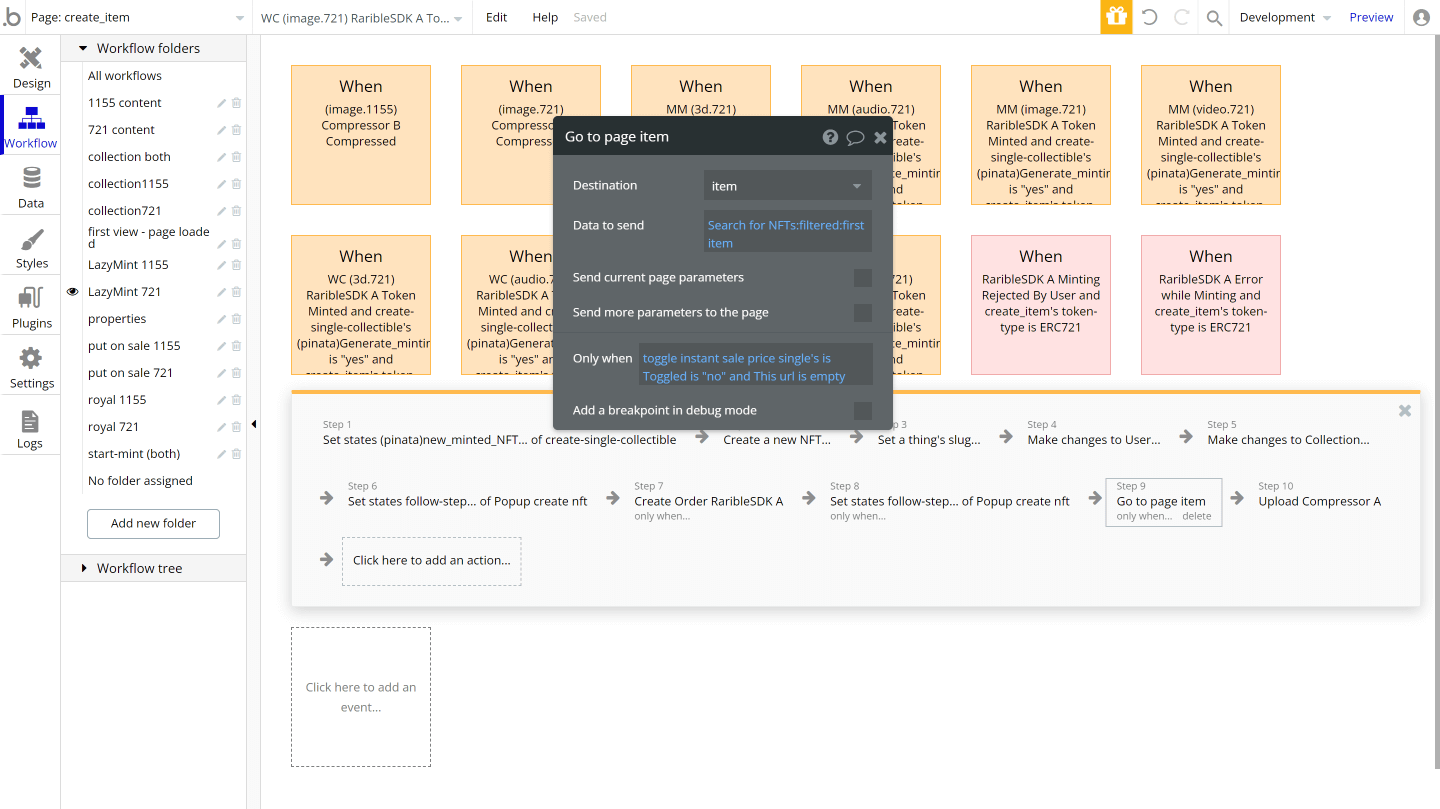
3) Call the “Mint RaribleSDK A” action on your RaribleSDK element. Here is where we will contact the Rarible minting API and transmit all the information contained within our NFT, the royalties attributed to it as well as which contract we will be minting to.
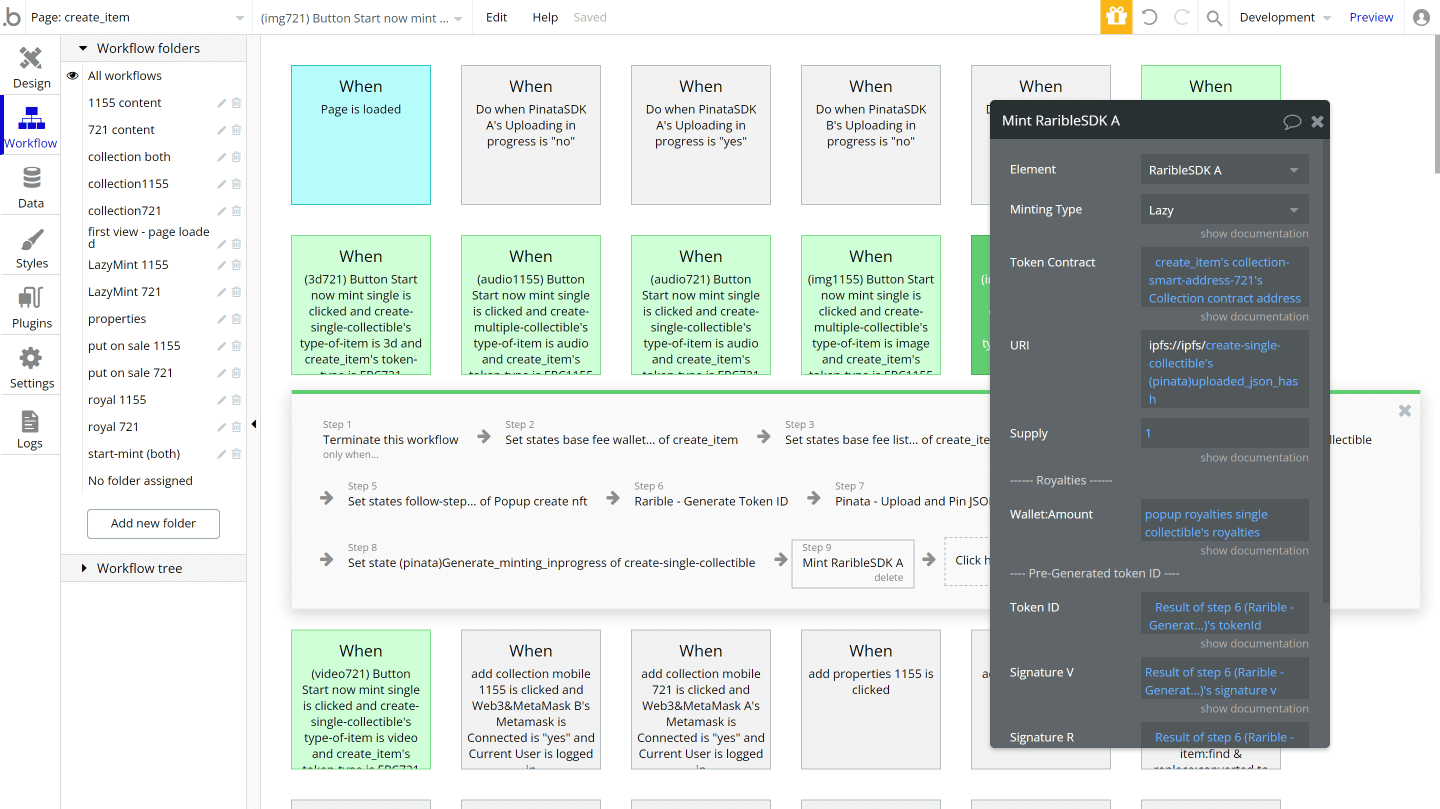
This request will trigger a popup in your Metamask extension.
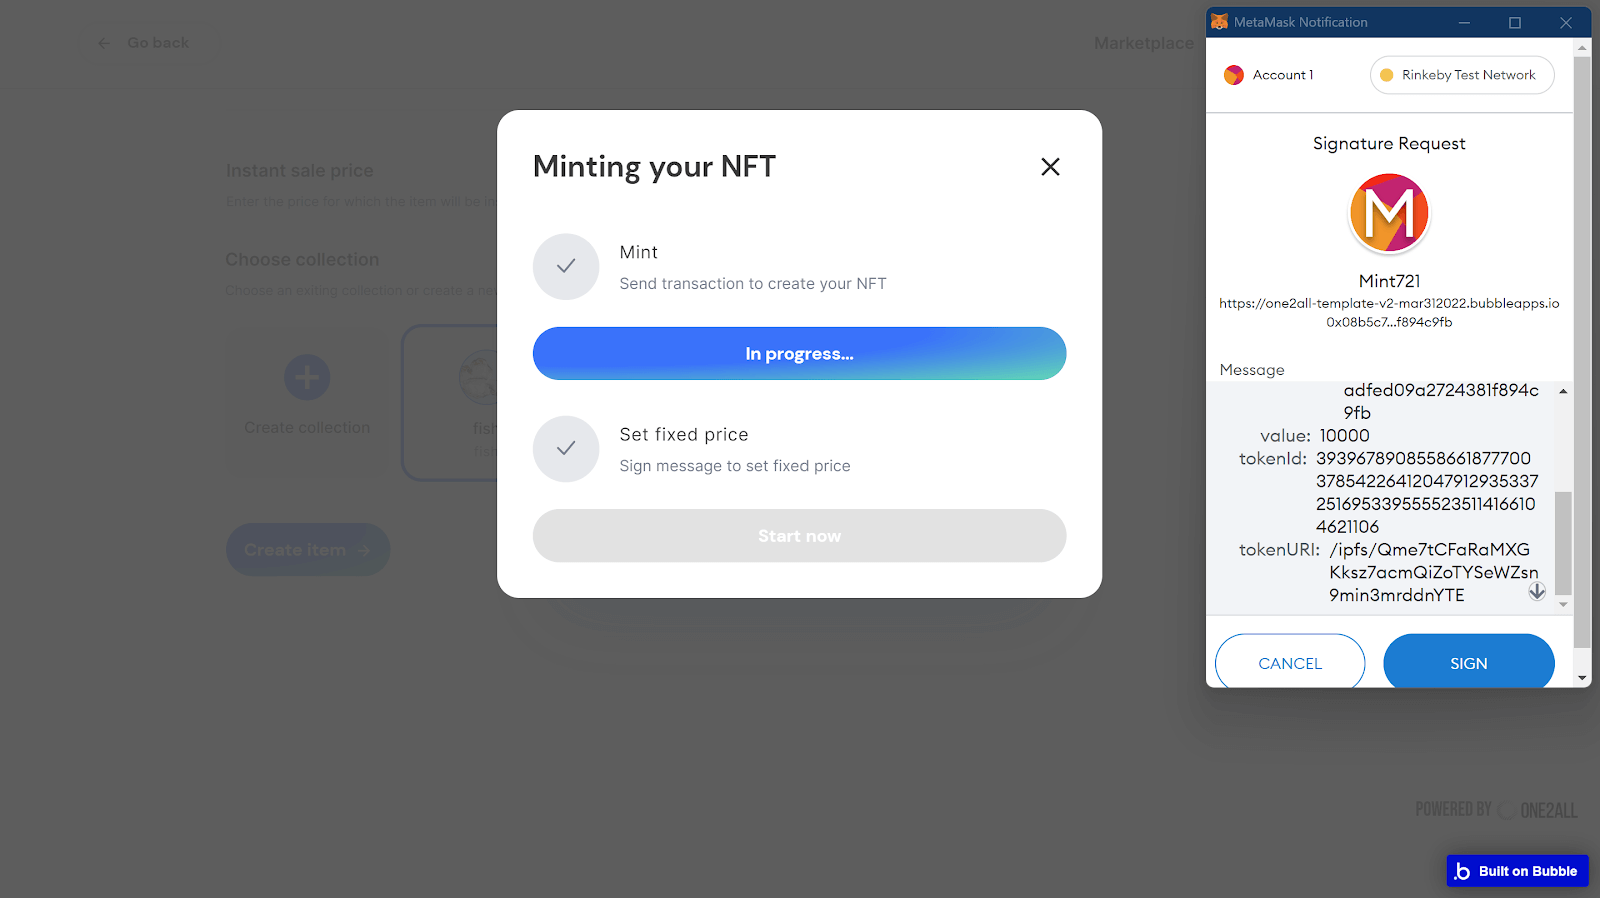
Once you have confirmed the lazy minting (which is gas free to the seller) in your Metamask, you will want to catch any responses back from the RaribleSDK. This will either be one of 3 responses:
- Rejected by User
- Error While Minting
- A Token Minted
Troubleshooting: If you get the message ‘Rejected by User’ or ‘Error while Minting”, try: closing any open popups, unpinning any unused content or files (to save storage), and updating any states and statuses you were using to track the workflow.
If you received A Token Minted, then congrats! You have officially lazy minted an NFT through your platform.
The critical next step here is to finally create your NFT Thing in your Bubble app database. While the core of what makes your NFT is still lazy minted and ready to go on-chain, large NFT exchanges often have a local version of their NFT to track things like “follows” “likes,” and other data that is not critical to keep on-chain.
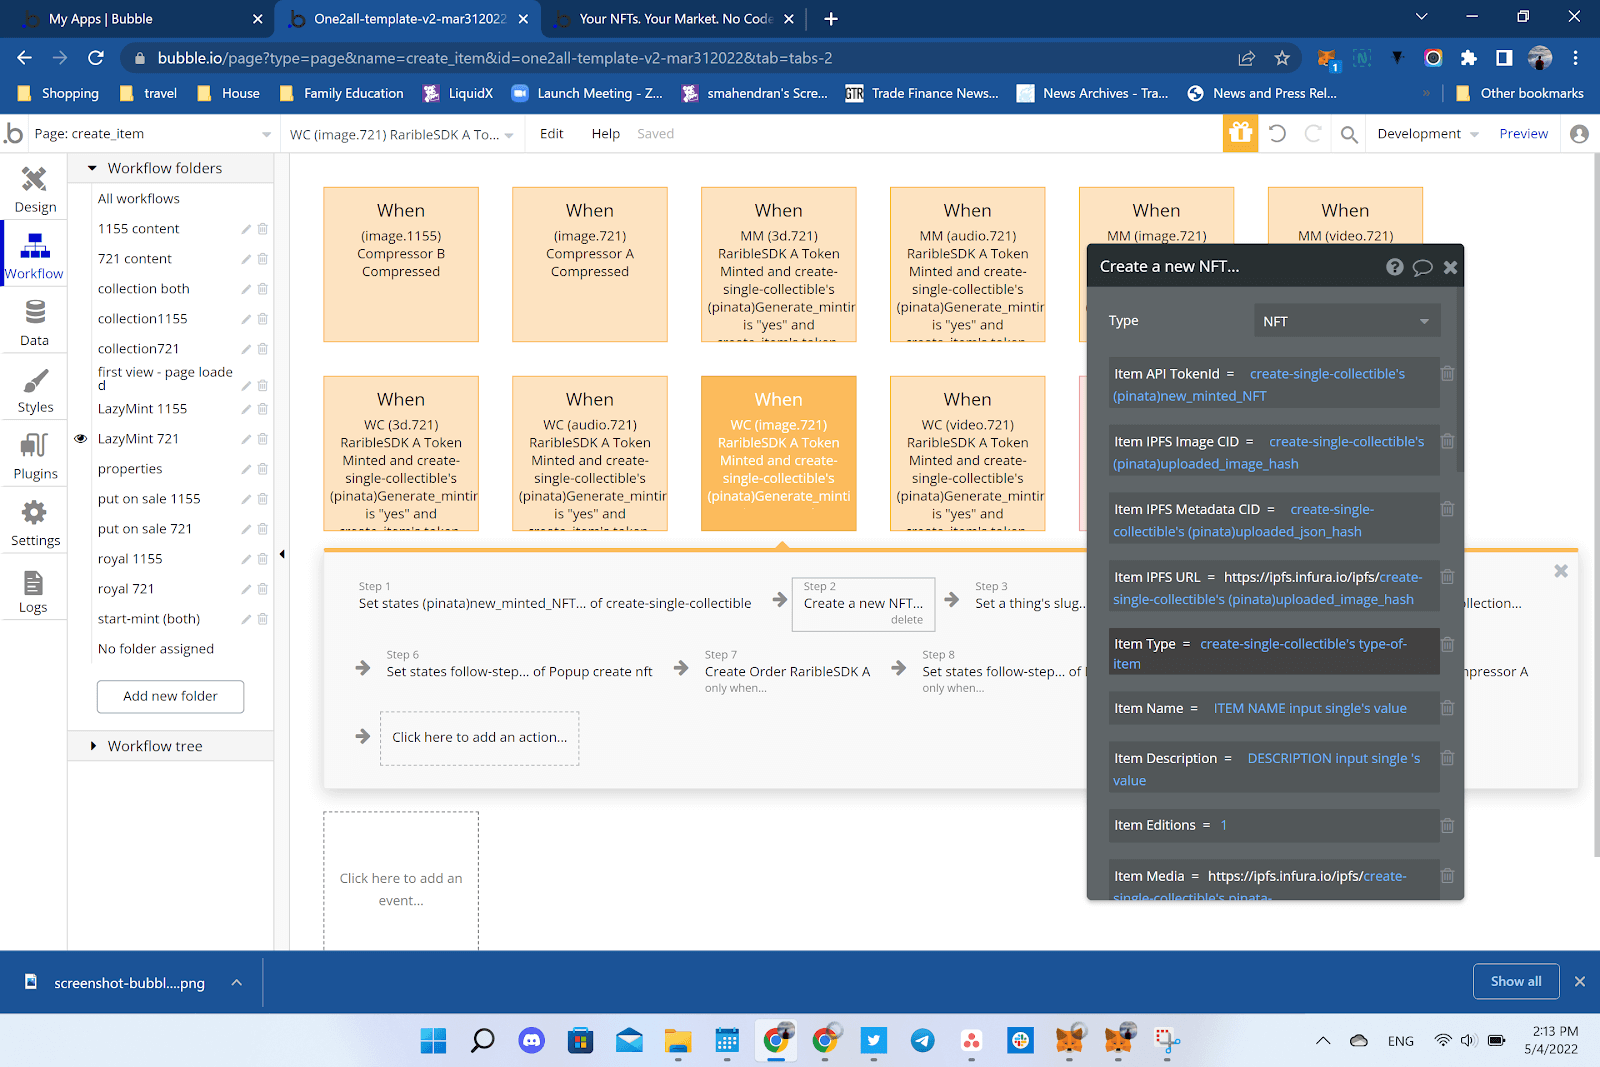
As part of your “Token Minted” workflow, create a new NFT thing and populate it with the metadata you have stored on Pinata and also the TokenID you previously generated.
Once you’ve created your new NFT thing, you can feel free to forward your user to an Item page and send this newly created NFT as data to populate the Item page.
Put your NFT on Sale
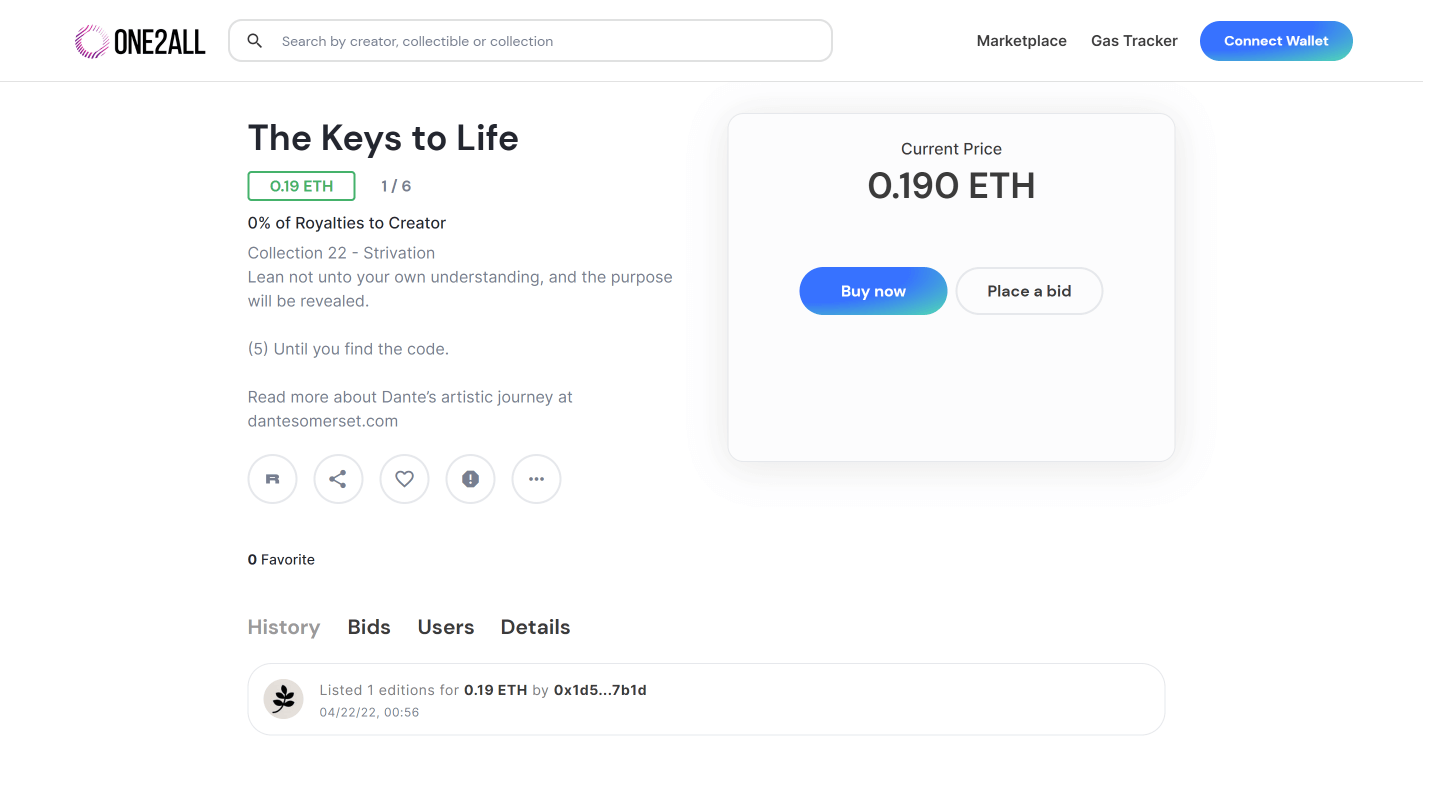
So you’ve minted your first NFT. Now let’s try to put it on sale! This workflow will take place entirely in an “item” page which is a page that will have an “NFT” data thing as its content type:
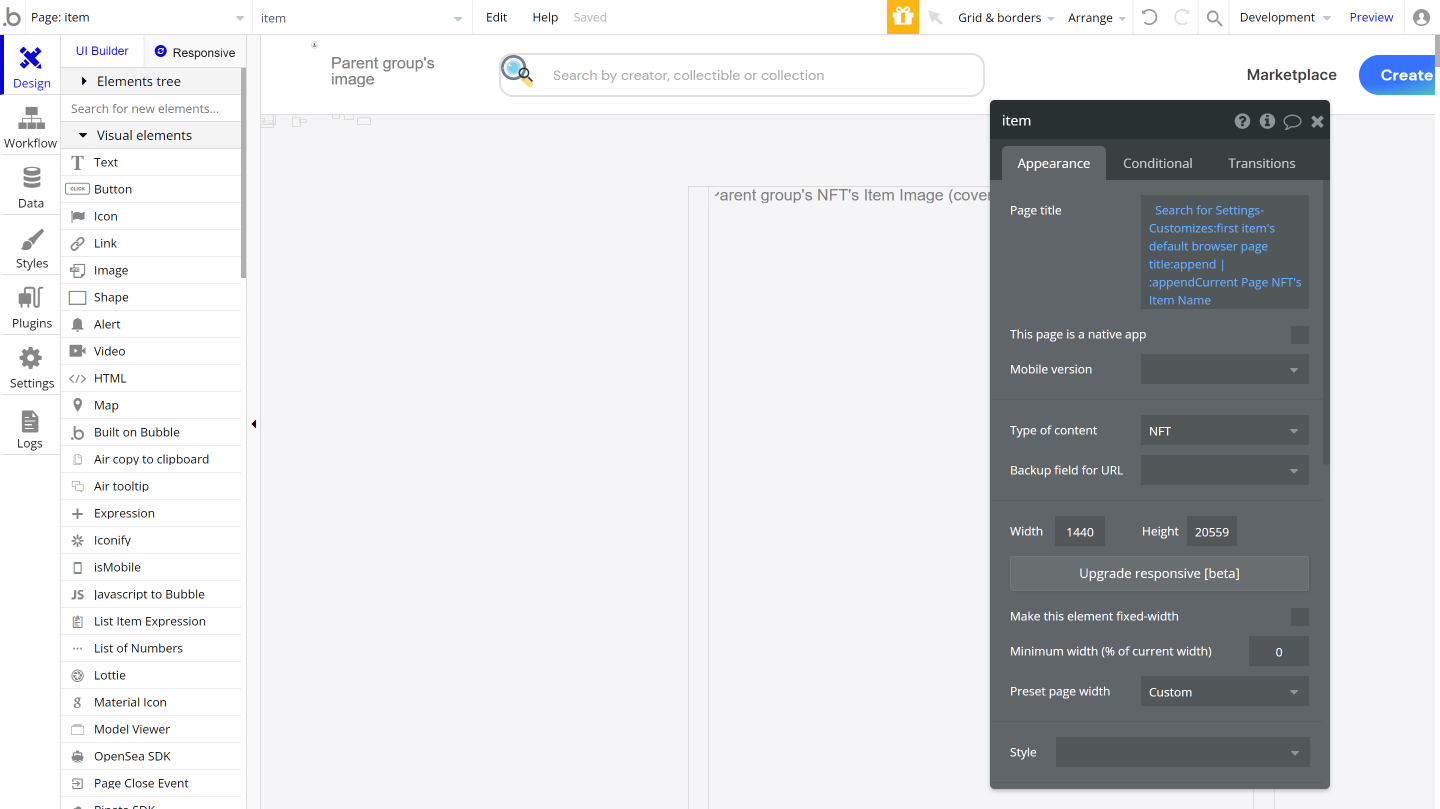
The Item page is a critical part of your marketplace, typically it will include the following at a minimum:
- Content (image, audio plus image cover, video, 3d model view)
- Name
- Description
- Status (On Sale, Not for Sale)
- Price
- Bids (optional)
- History (optional)
- Links to item on other exchanges (optional)
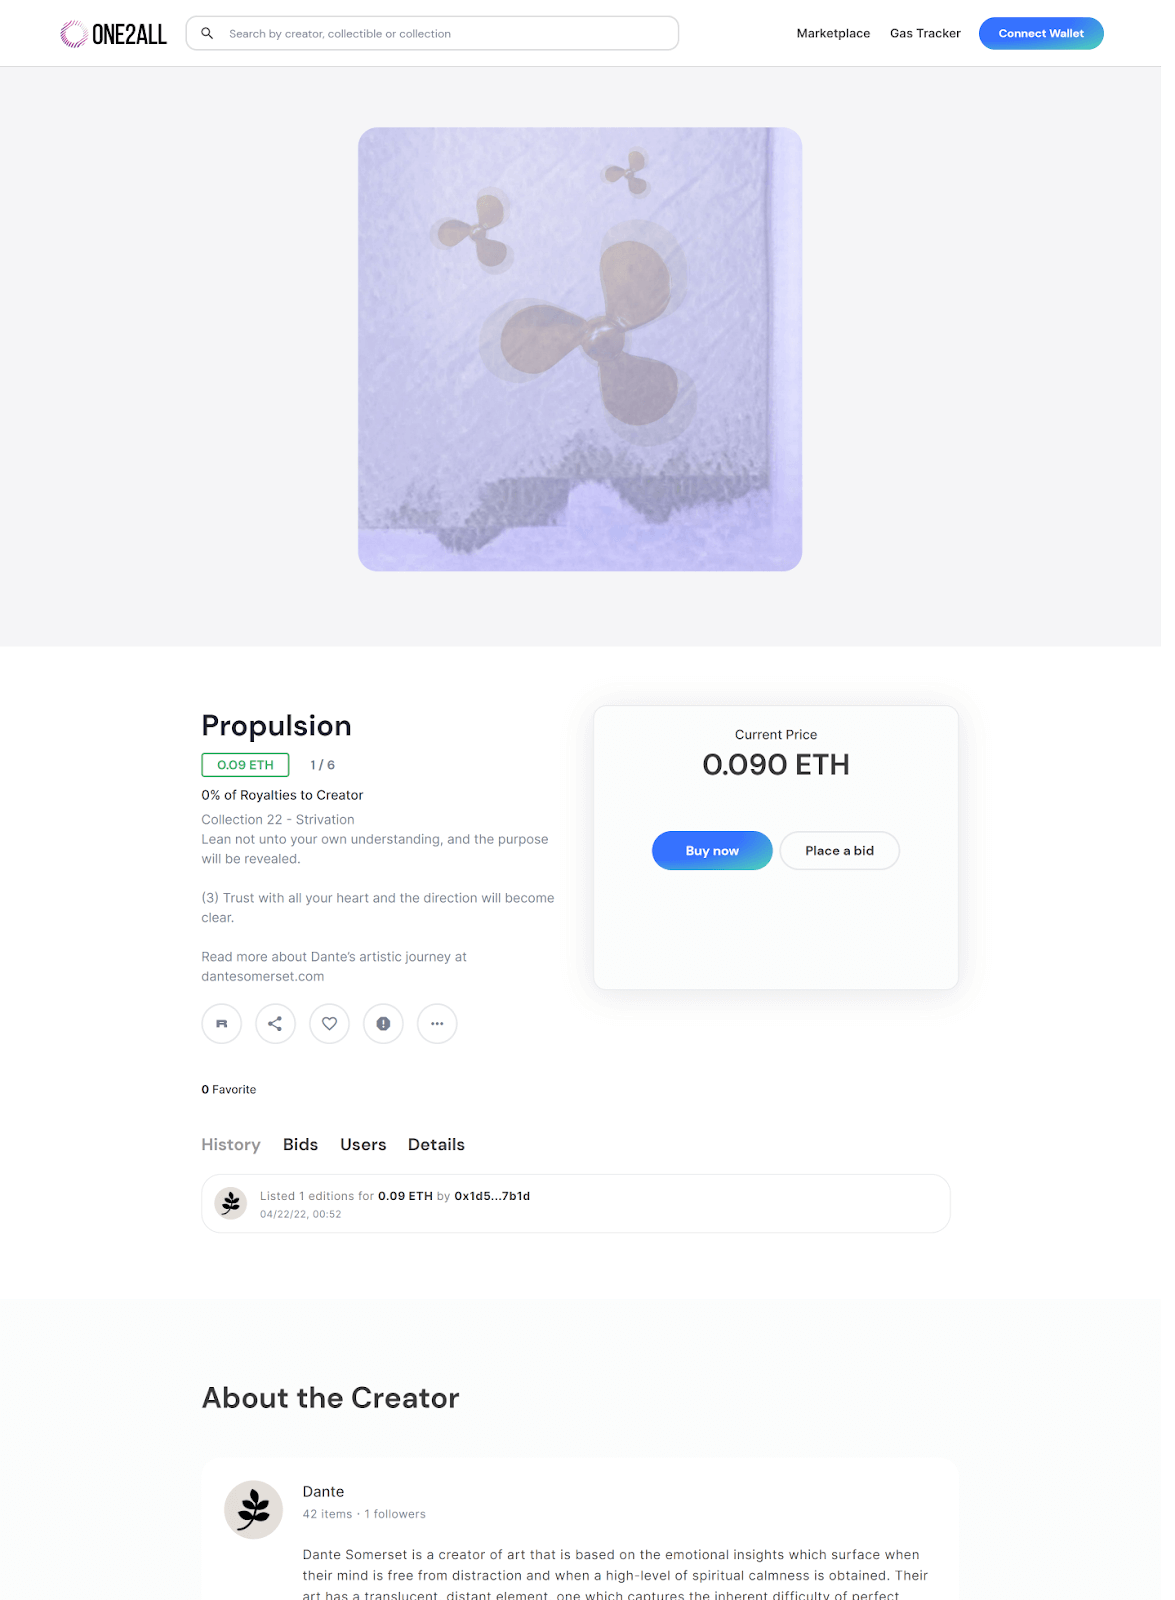
The NFT page can typically be top-aligned, as shown:
Or the design of the page can be left-aligned:
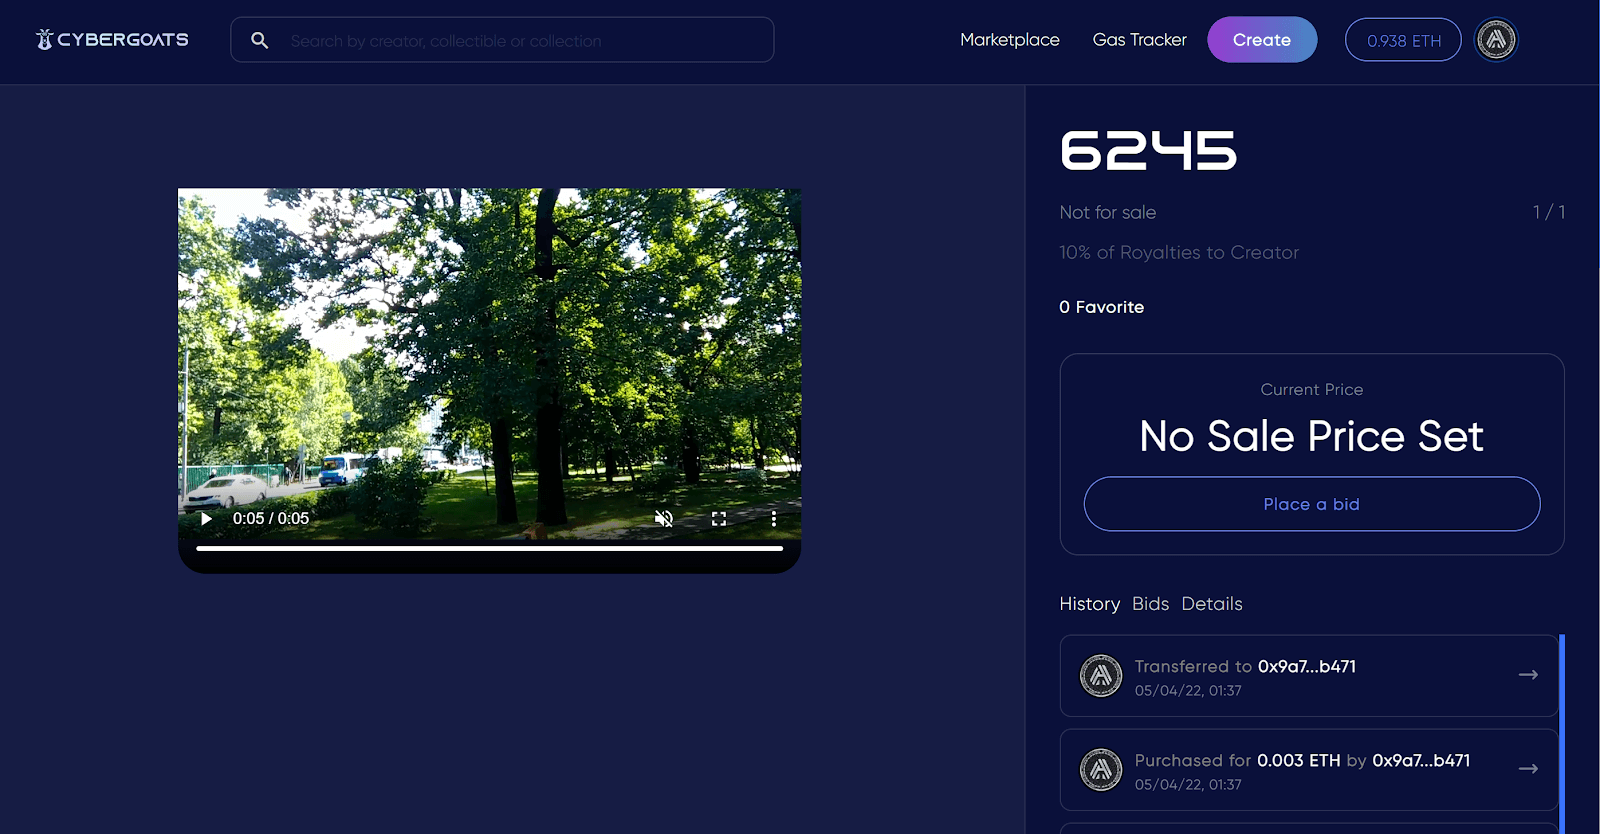
However, at the end of the day, the design of your NFT experience is really what you want it to be. There is no stipulation that you need to follow any of these prior frameworks and with Bubble, you can design your page however you want.
So let’s move forward with the sale process. What you will need is to leverage the Rarible SDK plugin once more.
We will need a button to “Put on Sale” somewhere on the page. Note: your NFT should have a set of clear statuses to identify whether it is already on sale or not. We have used “Not for Sale” and “On Sale” as an example and these align closely with what the large exchanges also use.
The Put On Sale button should launch a popup or modal that then requires the user to enter other critical information like Price. Note: there is a conditional “when” on this button click as well to ensure that it only executes when the Item is “Not for Sale”. You wouldn’t want to send a repetitive Sale request when the item is already on sale.
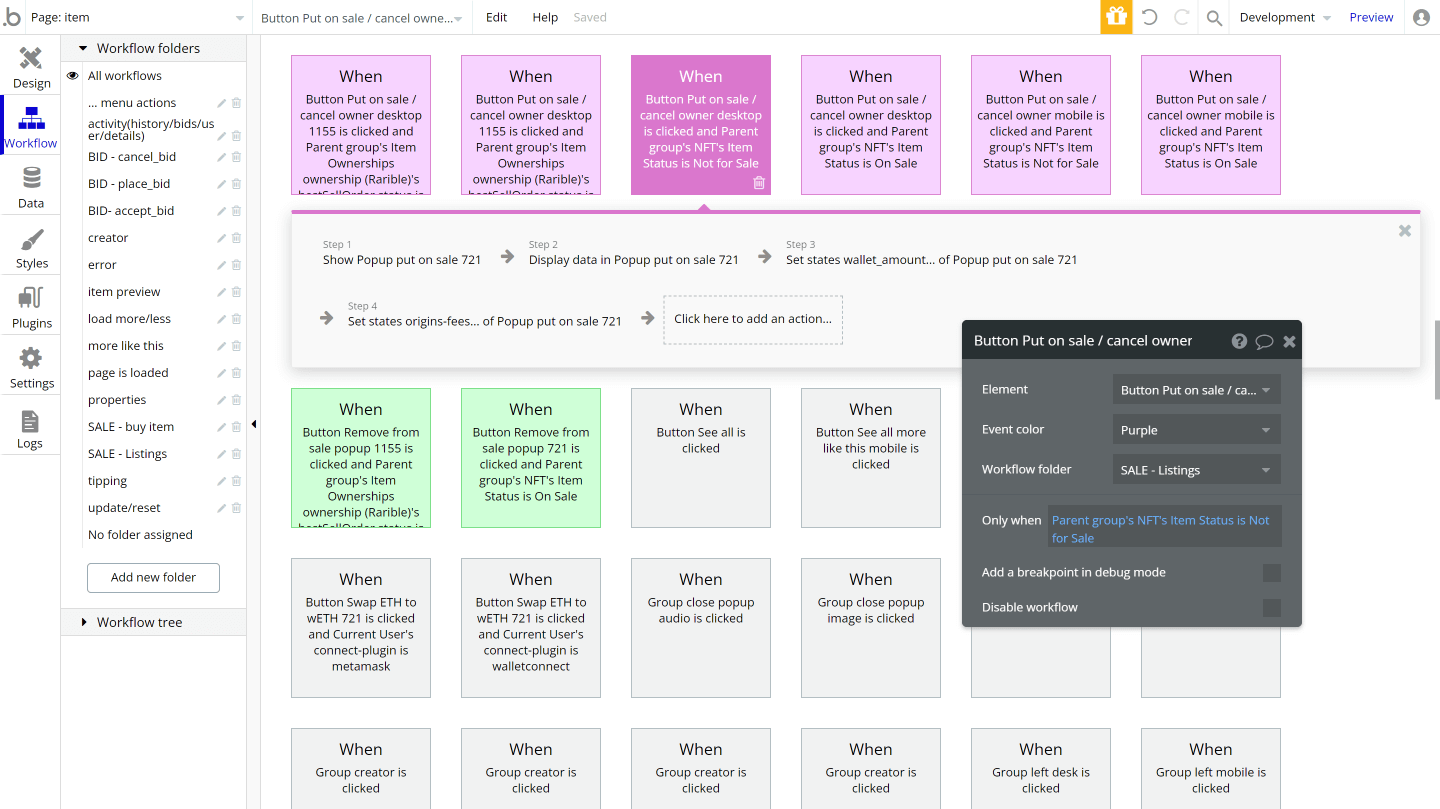
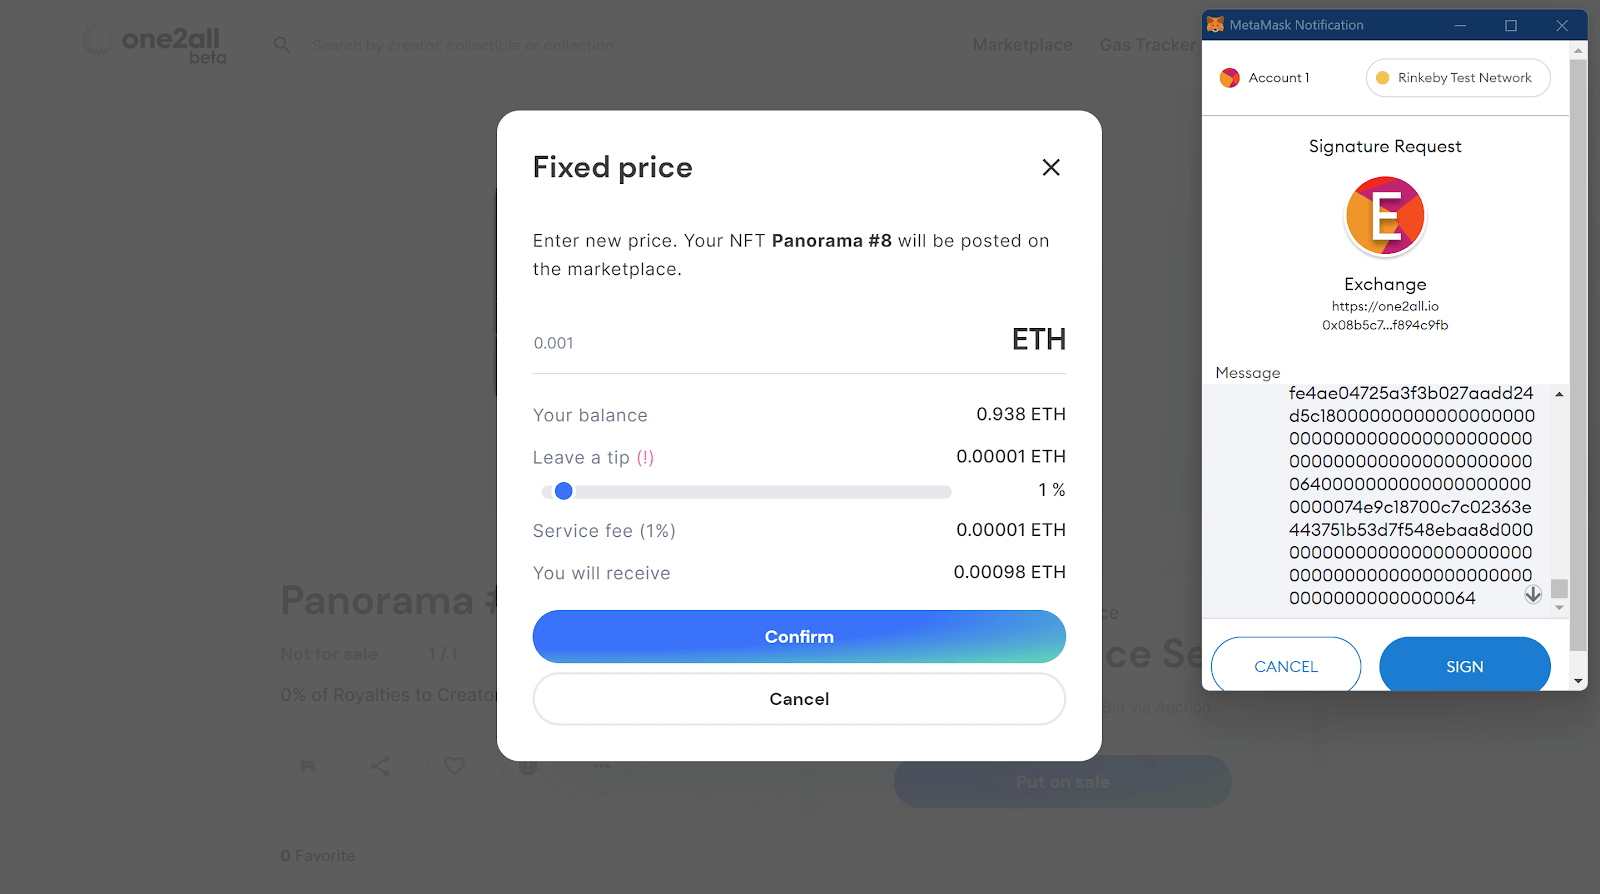
The popup can be relatively simple and just request a price from the user and include a button to call the Rarible SDK as well as a way to Cancel out of the modal. It can also be enriched with other informative information like the User’s balance and the subtotal of any attributed fees.
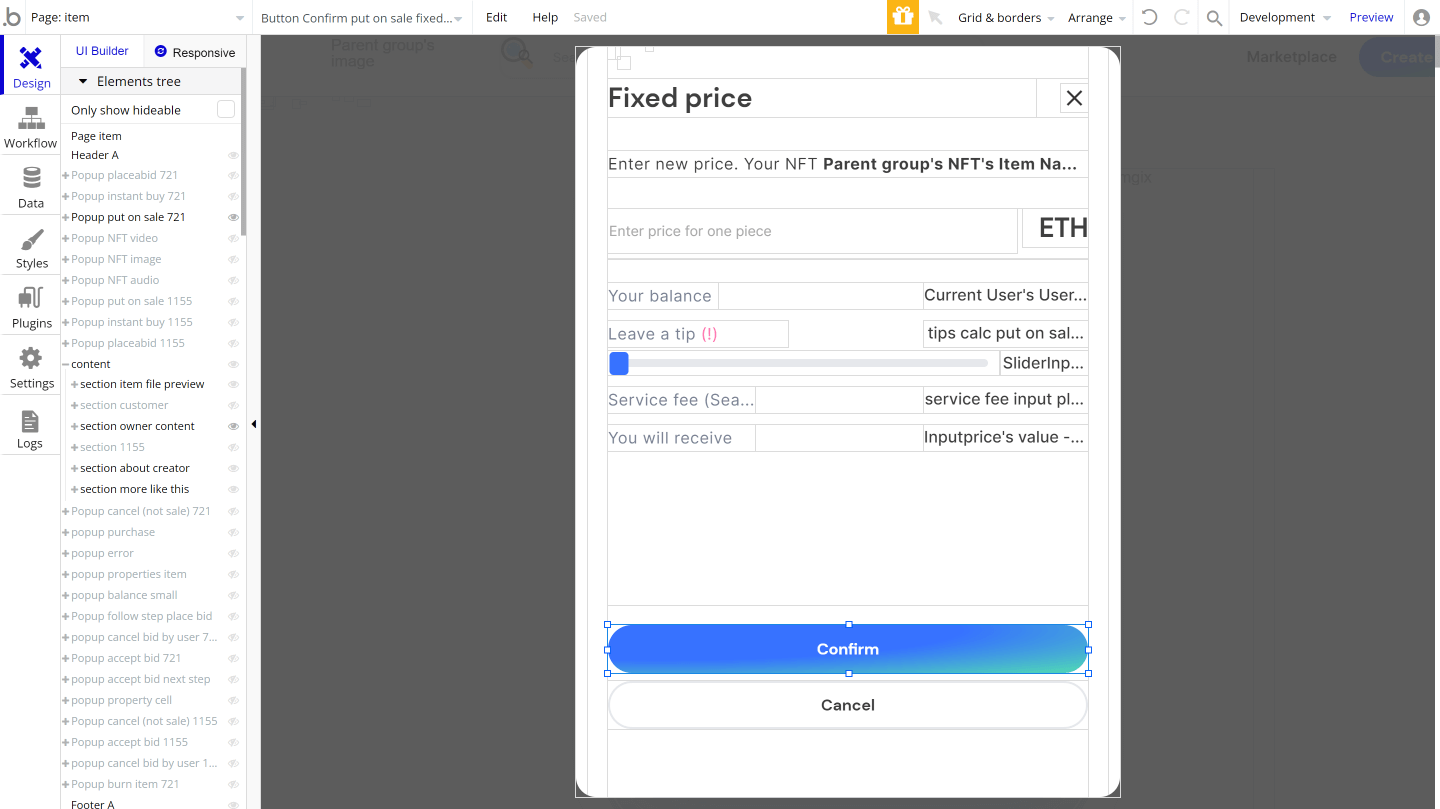
Finally, we’ll link a Confirm button to the “Create Order” action in the Rarible SDK.
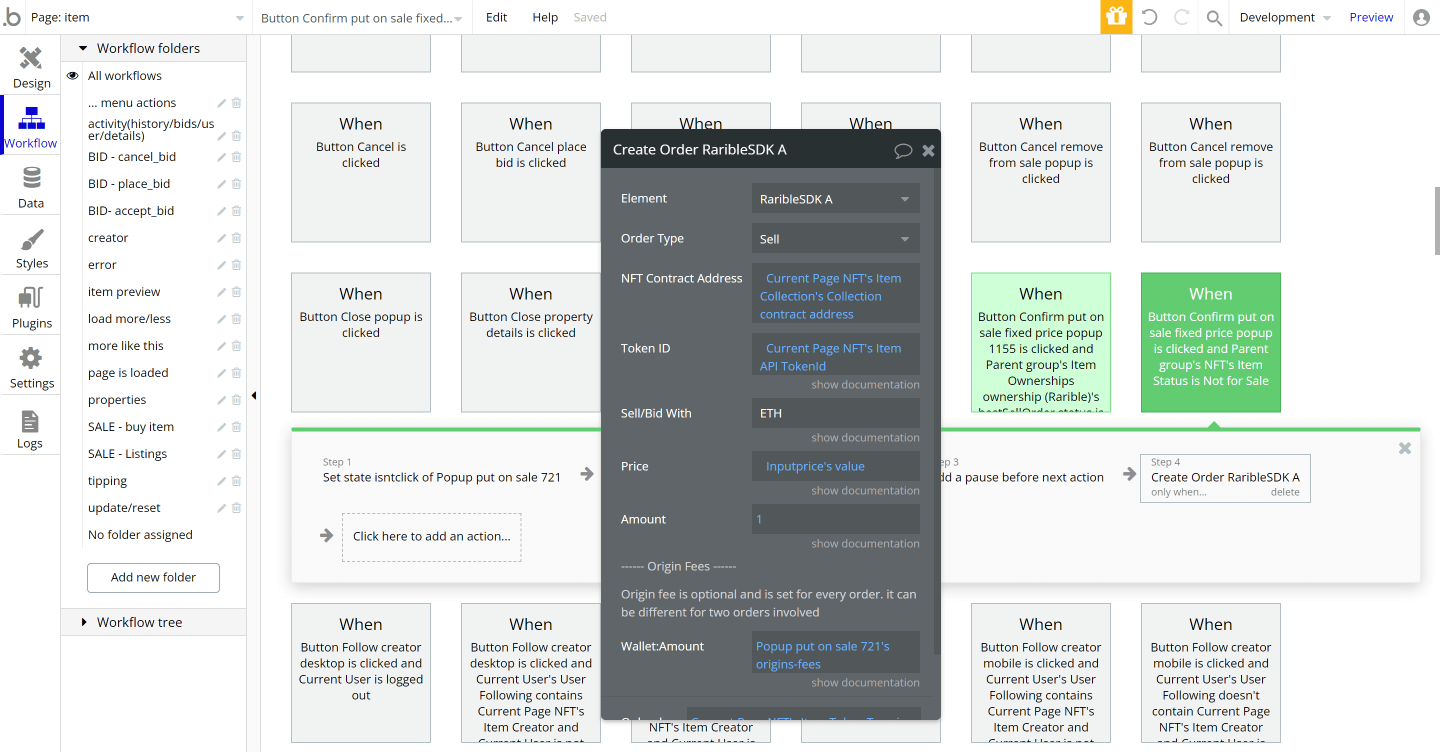
This action will take the NFTs collection contract address, its token ID (which was generated by one of the first calls in our Minting workflow, Rarible Generate Token ID), the targeted denomination and the price.
Once this is called in the app, Metamask will pop up once more for the user to confirm the blockchain transaction.
From here there are once again three potential responses that the SDK will send:
- Sell Order was Rejected by User
- Error while placing Sell Order
- Sell Order Placed
Just like with minting, if one of the first two responses is received, be sure to cancel out of the popup and clear data from any input fields.
As you can see below, the workflow is very similar for both a “Rejected by User” response and an “Error while placing Sell Order” response. First, you want to call an action to reset the input for sell price (so it doesn’t show up again upon launching another sell order). Second, you want to hide the put on sale popup. Third you want to show an error popup with some information for the user as to why this error occurred. Finally, you want to clear any critical states that were used for the transaction in this case “origin fees”, “wallet_amount” and “isntclick”. Set them to “null” or empty values to clear them.

If the “Sell Order Placed” response was received, awesome! You’ve put your NFT on sale. You will want to update the status of your NFT thing to “On Sale”, record the Sell Order Hash (which is effectively the tracking ID for your sell order), and finally record the fixed price in your NFT Thing. A nice touch is to popup an alert or toast message to let the user know that their order was placed.
Buying an NFT
For the last workflow of our guide, we are going to purchase the NFT at a fixed price. For this step in the process, we will again be focusing on the “item” page as that is where a user would go to see the NFT as well as its listing price and take action.
As you’ll note in the screenshot below, typically you will want to display the price at which the NFT is on sale and a button for the user to initiate a purchase. Both of these can pull from the parameters saved to your NFT from the prior workflow.
Again, it’s good practice to pop a modal for the buyer to make a final confirmation. This is effectively an “Are You Sure?” step to make sure the user didn’t accidentally press the Buy Now button.
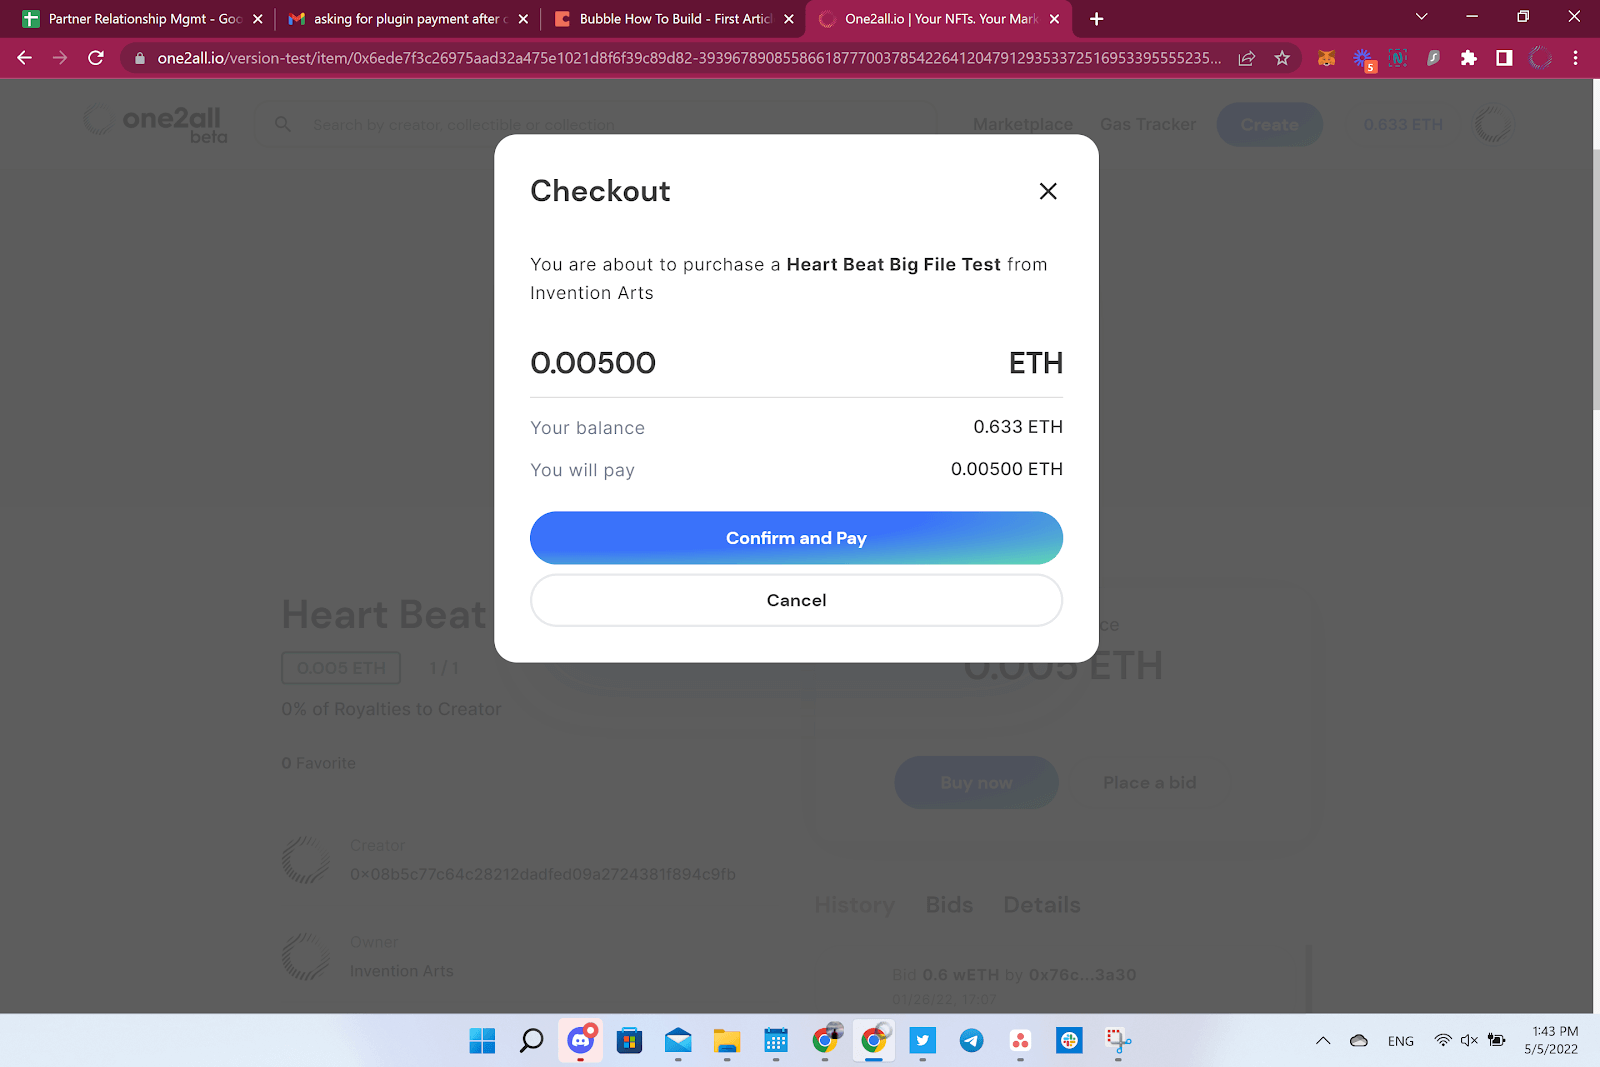
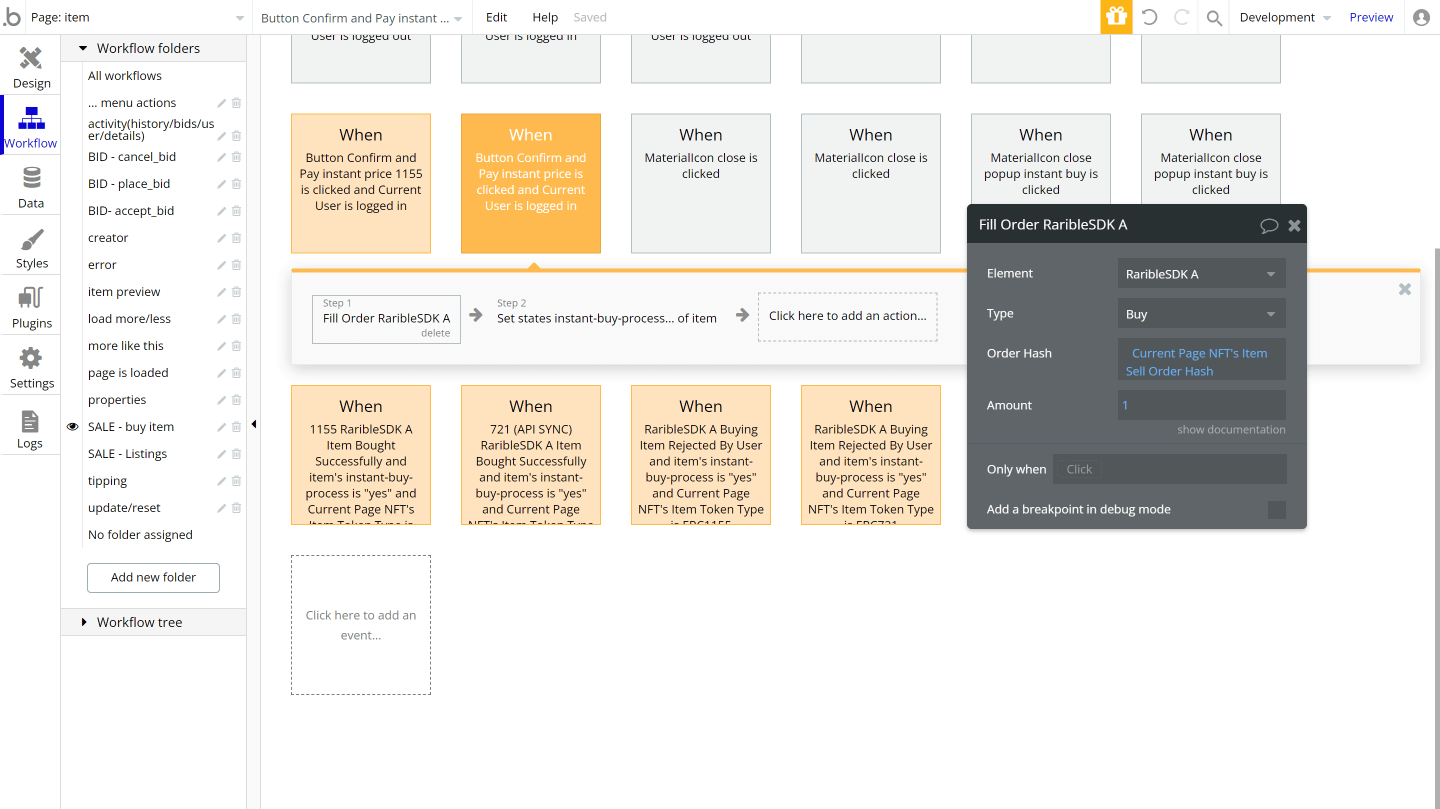
The workflow once confirmed is relatively simple. It is one call to the “Fill Order” action in the RaribleSDK Plugin. The only required input is the Sell Order Hash that we previously saved from the prior step. What is happening here is that the Sell Order Hash uniquely identifies all the critical information (price, seller, time, etc.) related to that order within the Rarible system.
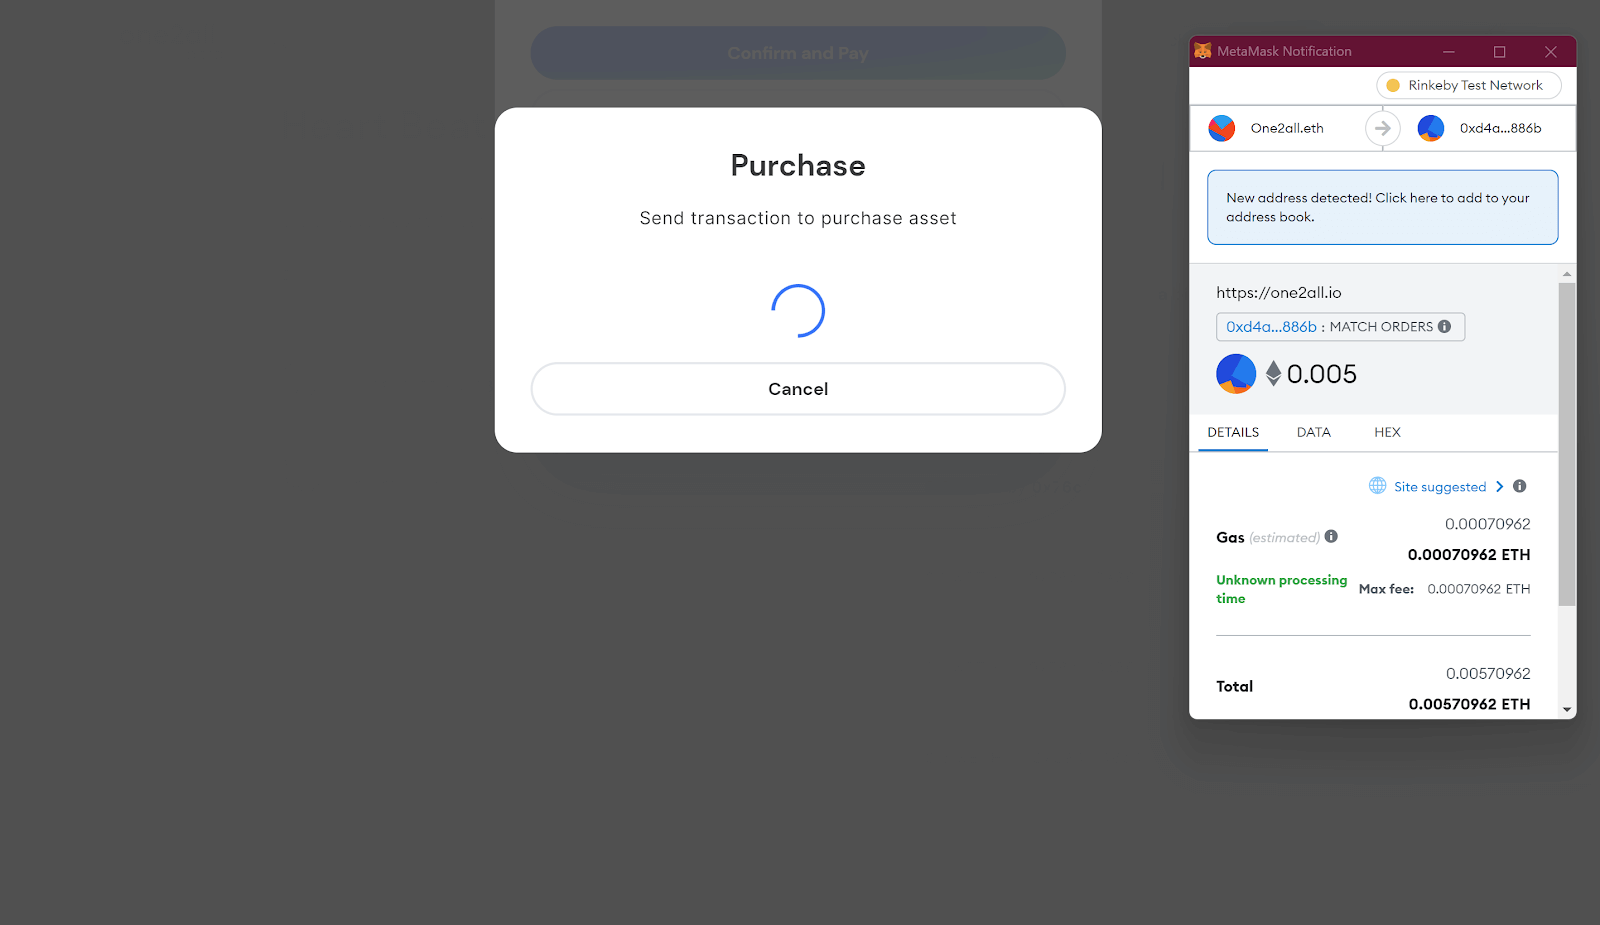
Once this is sent, a Metamask request will once more pop up for the user to make a final confirmation. Note that the price, the targeted chain (Rinkeby in this example) and the gas fees are all critical parameters that the user should take note of. Remember, once a transaction is confirmed on chain it is very difficult or impossible to reverse depending on the type of transaction.
Finally, once confirmed, there will be multiple potential responses from the RaribleSDK:
- Buying Item Rejected By User
- Item Bought Successfully
If you receive the first response check your prior steps in the workflow and ensure that your Sell Order Hash was saved correctly. For the user, you will want to give them a pop up or alert that an error may have occurred and close out of the bidding modal.
If you receive the second response, then the Item has been bought and congratulations are in order! You have completed a full end-to-end for your NFT marketplace!

Additional features
I hope you’ve enjoyed this brief introduction into the world of no-code NFT marketplaces. Both NFT and no-code technologies have incredible room for creative exploration, especially when used in combination. Once you’re familiar with core mechanics of the workflows we’ve gone through, you can start getting creative with the experiences you build. Additionally, you can:
- Launch open auctions with bids
- Create timed auctions of a specific duration
- Search and Filter for specific NFTs and attributes
- Purchase NFTs with Fiat
- Connect with Walletconnect and other wallet providers
- Launch on other chains like Polygon, Tezos, Flow and Solana
Privacy & Security
Now that you have the basics of your app, don't forget to start setting some privacy rules and conditions to keep your data secure - starting with roles in the 'Privacy' section of your data tab. You can also check if you're unintentionally exposing any data with an API checker.
Launch
Hiring a developer or dev team to build this app would cost thousands, if not tens-of-thousands of dollars. As you launch and grow in users, paid plans allow you to host the app on your own custom domain, and these start as low as $25 per month. Some templates and plugins may cost more, but you can build all the functionality of an Opensea or Rarible without any additional costs.
That said, if you are interested in bringing in an experienced team to help build your platform, please feel free to reach out to me directly at [email protected]. We pride ourselves on helping customers realize their unique visions and innovations in the emerging world of NFTs.
Start building
Bubble can help you build a no-code NFT marketplace or any other product you choose! It’s never been easier to build something incredible without having to code.
Ready to join the no-code movement? Register your free Bubble account and get started today.
If you’d like additional help when building your product, our thriving community forum is a great place to source actionable advice and resources. Any maker is encouraged to ask questions within the community to help empower their no-code journey.
If you would like to reach me directly, please do not hesitate to DM me on Twitter at @theahchu or to email me at [email protected].
Build for as long as you want on the Free plan. Only upgrade when you're ready to launch.
Join Bubble