When Slack came into fruition in 2009, it was set to disrupt the way teams communicated, removing the need for legacy processes that were time deficient.
When Bubble was founded in 2012, our goal was to also revolutionize the current landscape, removing the need to understand complex development languages to build powerful software.
Over the past 8 years, we’ve built a product that powers makers from all backgrounds with our cutting-edge no-code development tool.
You no longer need to be a seasoned software engineer to build a valuable product. In fact, our customers have used Bubble to build marketplaces, directories, and even social networks.
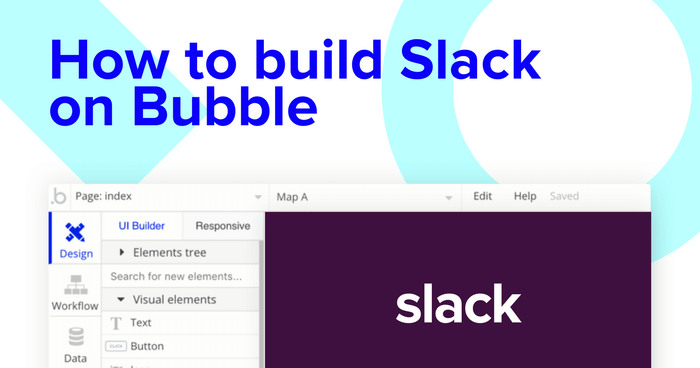
In this post we’ll uncover the process of using Bubble to build your own whitelabeled version of Slack. Whether you’re looking to build an exact replica, or you’re just interested in utilizing some of the core features from the product, this guide will share how to start building the underlying logic of a channel-based team chat platform.
Throughout this guide, we’ll highlight how to build the following key features from Slack:
- The ability to create a new channels
- Support for updating user account details
- A function to send and display dynamic messages within an individual channel
- Functions to intuitively navigate between different team channels
The steps to building Slack with no code include:
Get Started
Before you start, you’ll need to first register your free Bubble account. Click the button below to get started, then you can follow along as we build our app together.
Register your account on Bubble
New to Bubble? Follow along on our Crash Course introductory videos to get familiar with the basics of Bubble.
We also recommend completing our introductory lessons, which will guide you through the step-by-step process of the most common Bubble features. This will help you get a running start when building your no-code Slack clone.
When kickstarting your project, you can choose to start by wireframing your product design, or building the necessary fields within your database.
In this case, we’ll start by using the visual design tool to shape the user-interface of our product. If you’re replicating Slack, some of the core pages you’ll want to include will be:
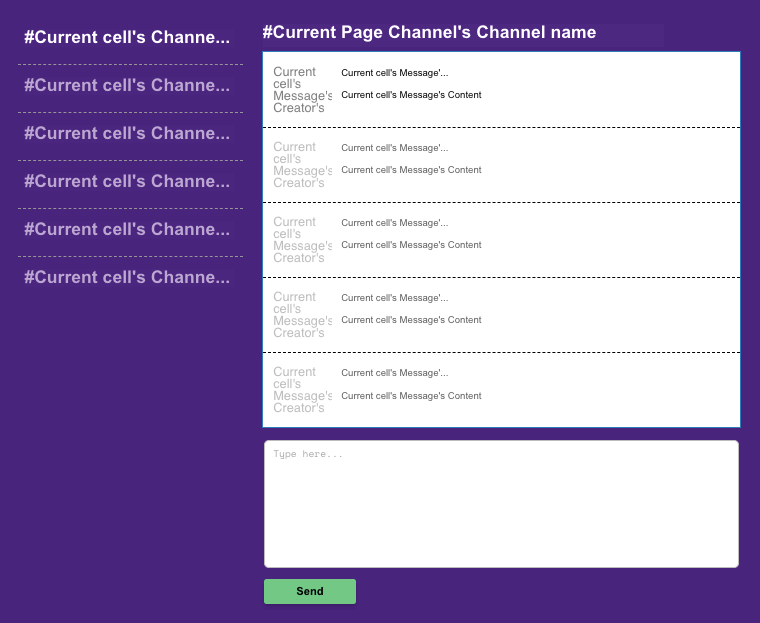
- A home page: This will include 2 repeating groups - one displaying a list of your channels, and another displaying a list of your messages
- A settings page: This is where you’ll create new channels and update profile settings
A major feature within Bubble is the ability to send data to a page. This means that you only need to create one generic version of a page that can reflect information about specific users or things from your database.
In the case of your Slack clone, you’ll only need to create one home page to host your messages within each channel. We can then write the necessary logic to display only the relevant content for each channel when it’s required (we’ll cover this in more detail soon).
Configuring your database
Once you’ve mapped out the display of your product, you can focus on creating the necessary data fields to power your application. We’ll rely on these fields to connect the logic behind your product.
Creating a database in Bubble is a seamless process. Start by listing your top-level data types, then add the necessary fields within each category.
When replicating Slack as an MVP, we’ll need to create the following data types & fields:
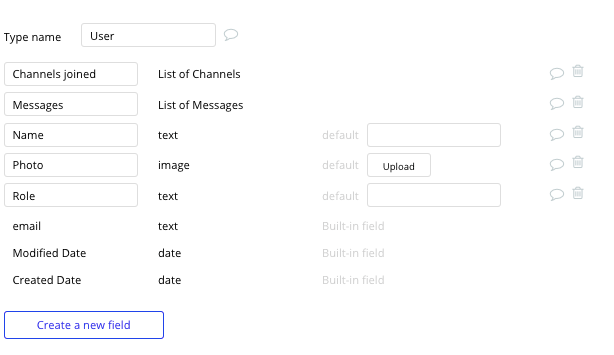
Data type: User
Fields
- Name
- Profile photo
- Title
- Channels joined - Note: Creating a list based on an overall data type will allow you to seamlessly integrate all of its relevant data fields without having to create additional field values.
- Messages sent - List of messages
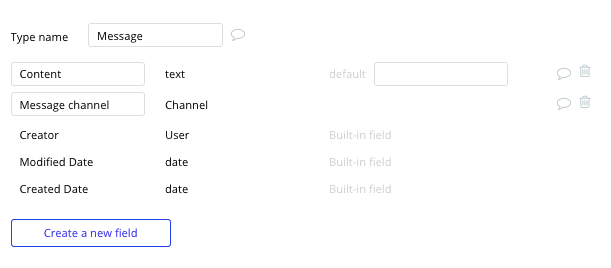
Data type: Messages
Fields:
- Content
- Messages channel
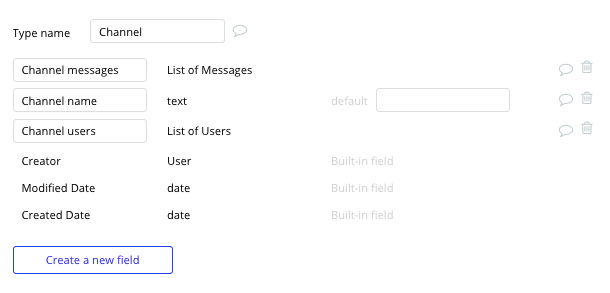
Data type: Channel
Fields:
- Channel name
- Channel messages - list of messages
- Channel users - list of users
Building workflows
Now that you’ve structured both the design and database for your application, it’s time to start stitching everything together to make your product functional.
In Bubble, the main way to do this is with “workflows”. Each workflow happens when an “event” occurs (e.g. a user clicks on a button), and then runs a series of “actions” in response (e.g. “sign the user up”, “make a change to the database”, etc.)
Updating account details
If you’ve reviewed our initial Bubble training lessons, you’ll understand how to create user accounts for both yourself and additional users of your application.
As some general housekeeping, we might also like to update or add additional details to each user, making it easier to determine a user's role within your Slack channels.
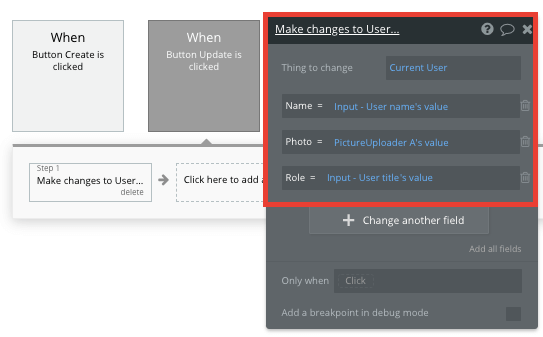
By creating a settings page, you can utilize our input elements to make changes to a users profile data. This can include their name, job title, and profile photo.
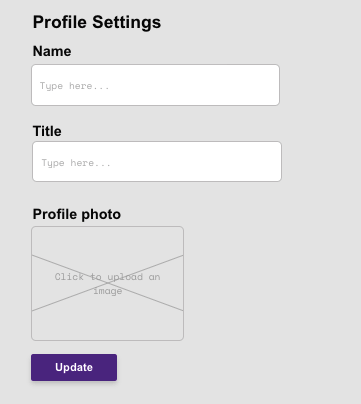
After adding input elements to the page, we’ll create a workflow to make changes to the current user’s details once these fields have been repleted.
Start by creating a workflow when the update button is clicked.
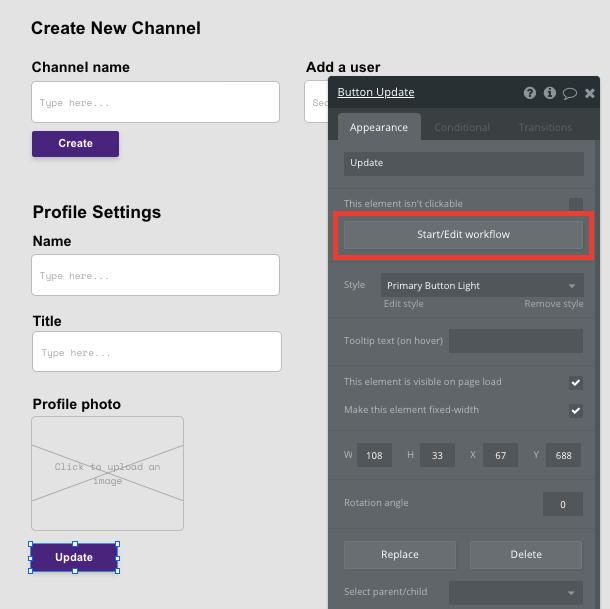
From here, select to make changes to a thing within your database.
You’ll want to make changes to the relevant inputs within your database. Start mapping each data field you’d like to change against each of the relevant inputs on your page.
Creating a channel
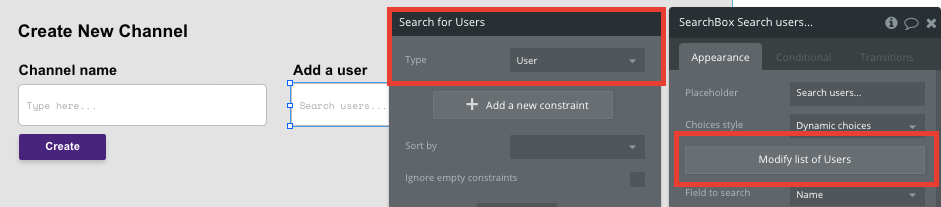
Moving forward, the first proper feature we’ll need to build is a function to support the creation of new channels. We’ll create this on our settings page by using 2 basic input elements - a text input and a search bar.
When creating a channel, we’ll have the freedom to call it whatever we’d like (general, random, no-code chat) within the input. The search bar, however, will be used to add an existing user into this channel.
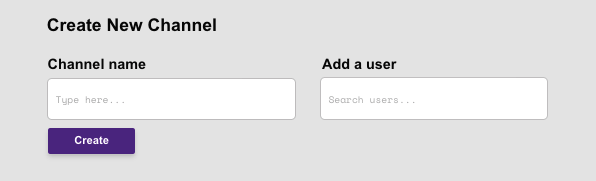
In order to automatically search for existing users within your database, we’ll need to first configure the data this input can pull.
By selecting the search field as ‘user’ it will index all entries and even offer search suggestions as they’re typed.
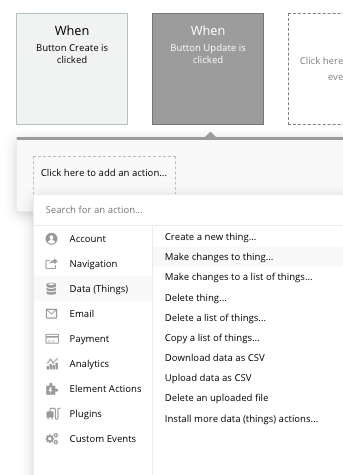
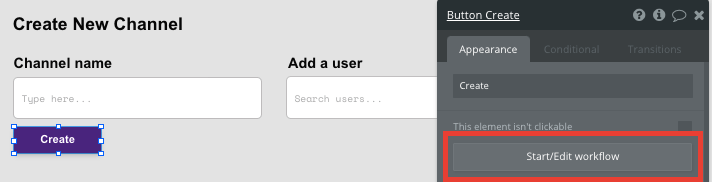
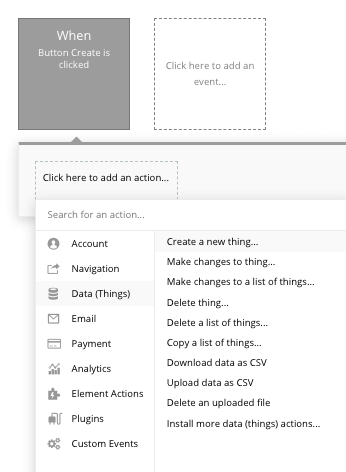
Now when you create a new channel, you can simultaneously add users into the channel. When building this function, we’ll need to start a workflow based on the button click from the create button.
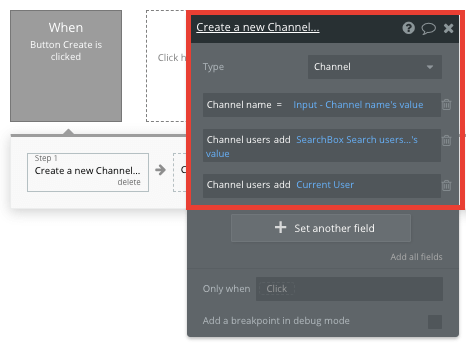
In your workflow editor, you’ll then select to create a new thing. The thing you’ll want to create is, of course, a channel.
Start mapping each data field you’d like to create against each of the relevant inputs on your page. When creating a channel, we’ll want to add a channel name, the current user (yourself) to the channel, and the search box’s user.
Displaying channels
Now that you’ve built the framework for your product, it’s time to build the core features to facilitate channels and chats.
On your product home page, we’ll use a combination of repeating group elements to display a list of all your channels and messages within these channels.
Repeating groups are a powerful element that integrate with your database to display and update a list of dynamic content.
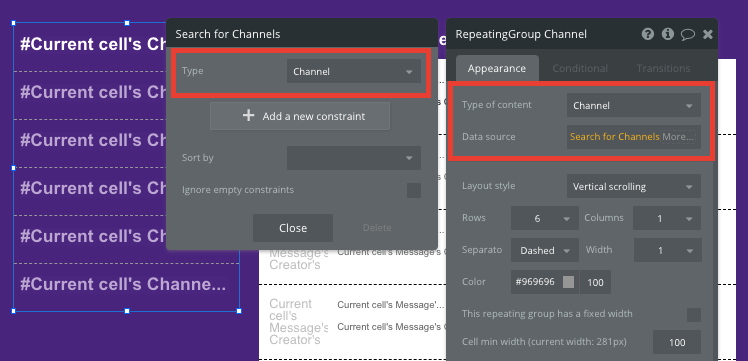
We’ll start by configuring the repeating group that displays your list of Slack channels.
You’ll need to update the content type of this element, then link it to a data type within your database. This will allow the repeating group to display any relevant data that meets these parameters.
In this instance, you’ll classify content type as a channel, and you’ll search for all of the channels within your database.
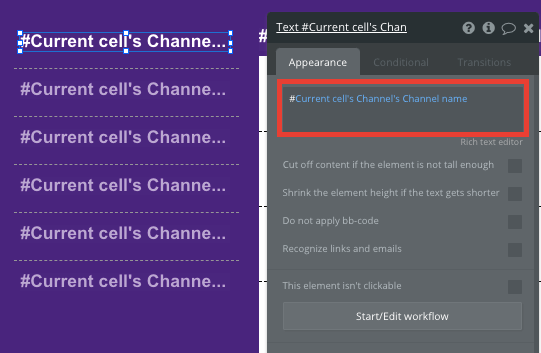
Now you’re ready to start structuring the dynamic content that will be displayed within the grid. Simply map out the top column with the relevant content you’d like to show and this powerful element will populate the remaining columns based on your existing data.
Before moving on to configuring the repeating group that displays our messages, we’ll need to create a workflow that updates our home page each time we click on a new channel.
Within Slack, every time you click on a channel, you expect the messages on the right column to update accordingly.
Using Bubble, we can achieve this event by sending data between pages.
Essentially, each time we click on a new Slack channel from our list, we’ll resend a user to the home page again, but each time, it will load the content that’s relevant to the current channel.
Note: When you’re sending a user to the same page they’re already on, it won’t completely refresh the page.
Let’s start by creating a workflow when a channel is selected from our repeating group.
From here, we’ll want to select the navigate function and send a user to a page.

The page we’ll want to send the users to is our home page, and the data we’ll be sending across is from the current cell’s channel.

Now that we’ve sent this data through to the home page, we’ll need to fetch this and display it in our messages repeating group.
Note: For the channel’s data to properly send between a page load, you’ll need to update the content type of the landing page to be the same as the data type you’ll be sending. In this case, we’ll need to set the home page content type to a channel property.
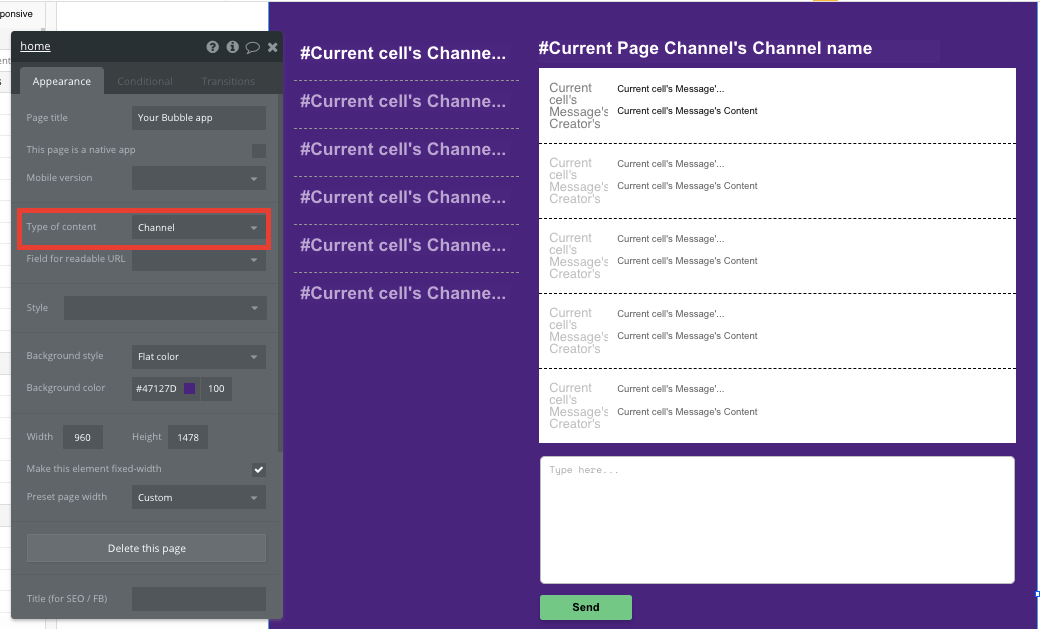
Now we’re ready to start displaying the dynamic messages within each selected channel.
We’ll start by configuring the data source for your repeating group again. As we’ve sent the channel data through to the current page, we’ll perform a search for messages where that are attributed from the current page's channel.
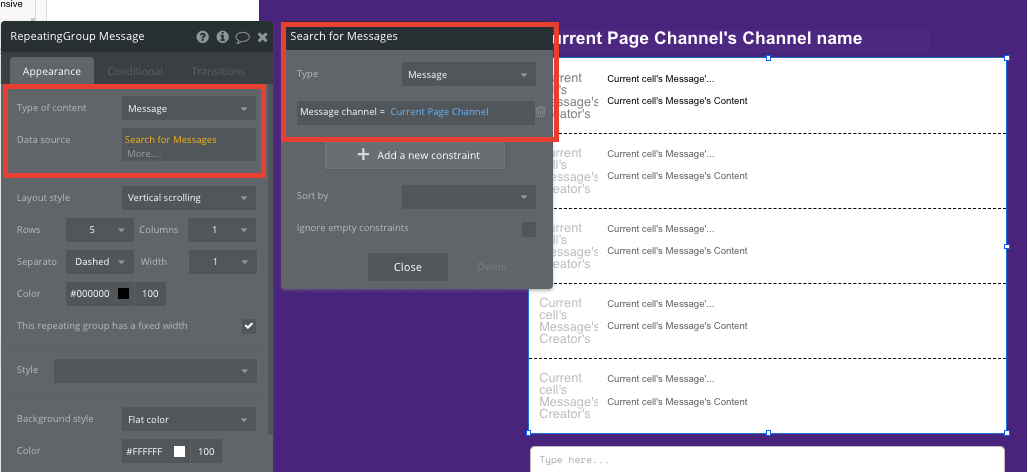
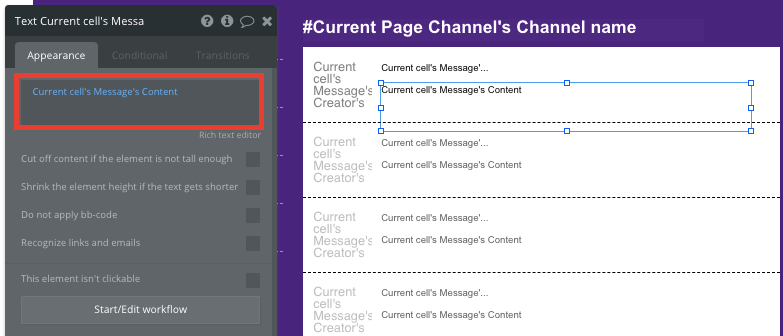
Once the data source of the repeating group has been configured, we’ll map out the top column of the element once again. This can include the message’s content, the message’s creators name, and the message’s creator’s profile photo.
Creating messages
The final feature we’ll need to build is a function to support chats within a channel.
By adding a multiline input field below our messages repeating group, we’ll create a new message each time a user clicks the send button.
Within this workflow, we’ll want to create a new thing, then select to create a new message.
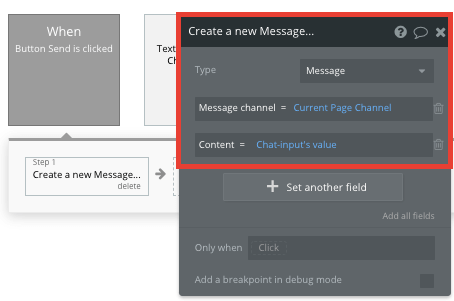
Once again, you’ll map out each of the on-page input fields with their relevant database fields.
Note: Bubble will automatically register the user who creates each message, meaning you won’t need to add additional data fields to identify this data.
Once you create a new message, your repeating group element will update in real-time with the new content you’ve created.
Additional features
Once you’re familiar with creating custom data fields and displaying dynamic content, you can start getting creative with the experiences you build. Additionally, you can:
- Create private channels between 2 users
- Use our rich text editor plugin to support unique forms of messages
- Create additional workspaces
Launch
As you launch and grow in users, paid plans allow you to host the app on your own custom domain, and these start as low as $25 per month. Some templates and plugins may cost more, but you can build all the functionality of a messaging application without any additional costs.
Templates
If you don’t want to build your Slack clone from scratch, you can purchase one of the templates made by our community members. Some similar templates include:
- Slackly - Team Messaging by Rapid Dev
- Pro Messaging by Dot Studios
- Pastel Messaging by Dot Studios
Start Building
Bubble can help you build a Slack clone or any other product you choose! It’s never been easier to build something incredible without having to code.
To get started for free, sign up here.
You can also connect with other passionate makers building with Bubble on our community forum.
Build for as long as you want on the Free plan. Only upgrade when you're ready to launch.
Join Bubble