It’s never been easier to stay connected with world events through dedicated news aggregator apps. With products like Digg and Apple News, the latest headlines are easily accessible across any mobile device.
With the power of no-code tools, it’s also never been easier to build your own mobile news app. Tools like Bubble have made app development accessible to makers of all backgrounds. Without any coding skills or experience, it’s possible to create dynamic apps that end-users will love. Our users are leveraging Bubble to build marketplaces, mobile apps, and even social networks.
In this post, we’ll walk you through the process of using Bubble to build your own news mobile app, just like Apple News.
Whether you’re looking to build a successful news app, or you’re just interested in using some of the core features from Apple News, this guide will share a step-by-step look into building the underlying workflows for creating your own app.
How to create a news app, step by step:
Get started
To get started, you’ll need to first register your free Bubble account. Follow the link below to get started, then we can build our product together.
We also recommend completing our introductory lessons, which will guide you through the step-by-step process of the most common Bubble features. This will help you get a running start when building your Apple News or Google News clone.
When kickstarting your project, you can choose to begin by wireframing your news app design, or building the necessary fields within your database.
In this case, we’ll start by using Bubble’s visual design tool to shape the user-interface of our platform. If you’re replicating a version of Apple News, some of the core pages you’ll want to include are:
- Upload page: A portal where publishers can create and publish stories
- Home page: Displaying a list of recently published stories
- Story page: A page to host each individual story
- Publisher page: A page to display a list of stories from a specific publisher
A major feature within Bubble is the ability to send data between pages. This allows you to create one generic version of a page, then dynamically display the relevant content from your database when it’s required.
In the case of your Apple News clone, you’ll only need to create one page to host individual news stories. We can then write the necessary logic to display only the relevant news story on each page when it’s needed (we’ll cover this in more detail soon).
Configure your database
Once you’ve mapped out the display of your product, you can focus on creating the necessary data fields to power your app. We’ll rely on these fields to connect the workflows behind your product.
Bubble’s pre-built database makes it easy to create different data types with unique fields. When creating a database, we recommend splitting larger items into separate data types to enhance the speed of your app.
For this example, we’ll create two separate data types for each news story. One data type will include the basic details of a story (including the title, the featured image, and publisher), while the other data type will include larger content files like the content of the full news reports themselves. By creating these as separate data types, it allows us to only load the necessary information when it’s needed, reducing the amount of content the Bubble editor will need to render.
You can also create a single story data type with a text field for links to external websites where stories are hosted.
When building our own news app, we’ll create the following data types & fields:
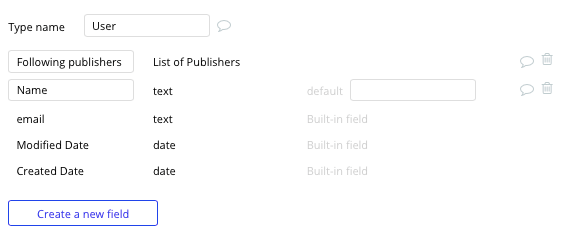
Data type: User
Fields:
- Name
- Following publishers - list of publishers. Note: Creating a field as a list based on a separate data type allows you to seamlessly integrate all of its relevant data fields without having to create additional fields.
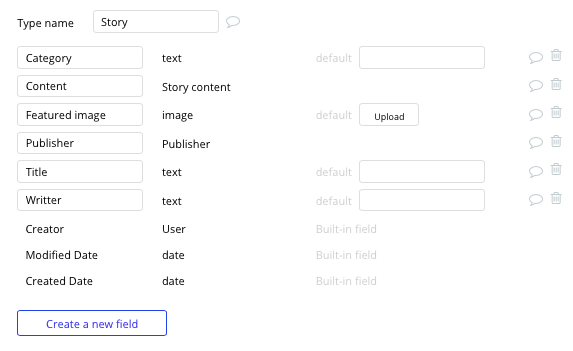
Data type: Story
Fields:
- Title
- Featured image
- Writer
- Category
- Publisher - Publisher
- Story content - news posts (Note: If your app only intends to aggregate news pieces from an external news website, consider building a field "story link - text" and build a workflow that navigates to these links instead of the next "story content" data type.)
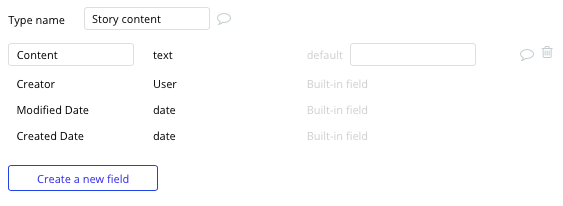
Data type: Story content
Fields:
- Story content
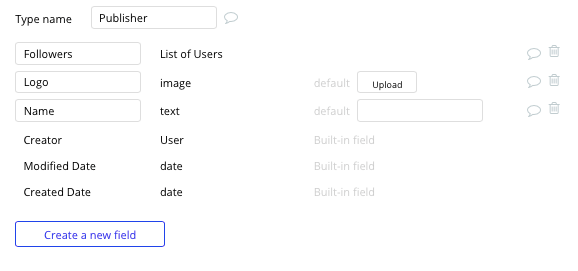
Data type: Publisher
Fields:
- Name
- Logo
- Followers - List of users
Build workflows
Now that you’ve structured both the design and database of your news app, it’s time to start stitching everything together and making your mobile app functional.
In Bubble, the main way to do this is with workflows. Each workflow happens when an event occurs (e.g. a user clicks on a button), and then runs a series of “actions” in response (e.g. “sign the user up,” “make a change to the database”, etc.)
Create a news story
The first feature we’ll build is a function for publishers to create and upload news content to the platform.
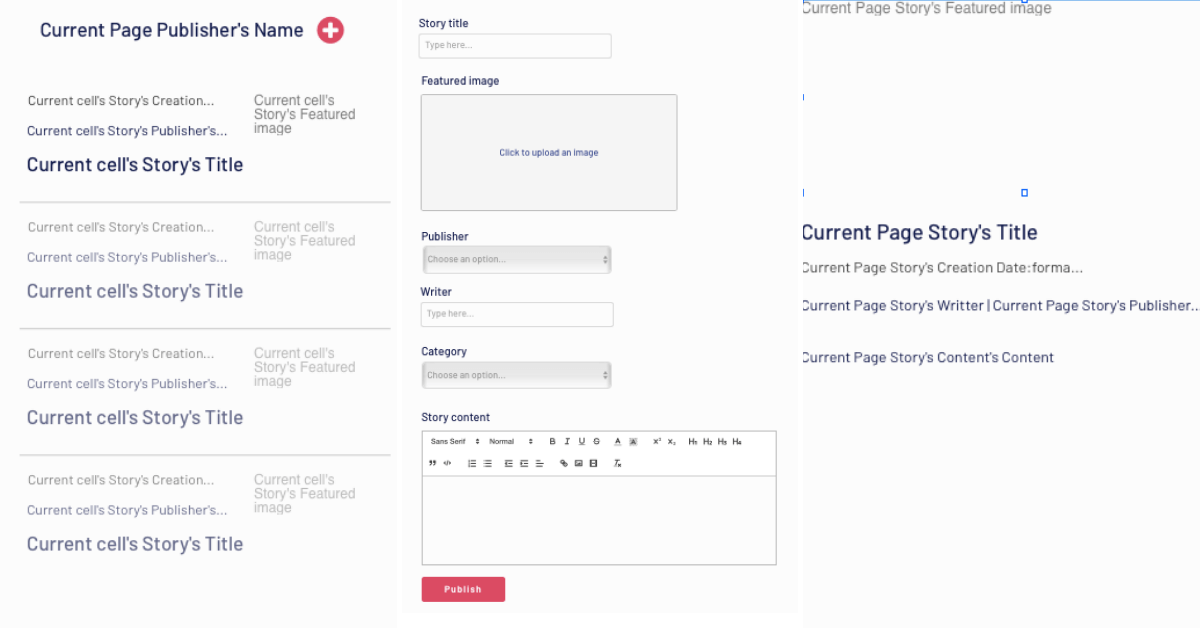
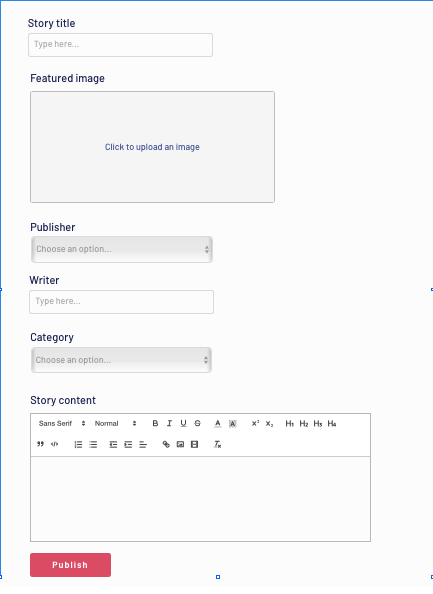
On the upload page, we’ll start by adding a variety of input elements that will be used to add data into our database. These fields can include text inputs, an image uploader, and a dropdown selection.
Note: When building a product that requires text to be marked-up or formatted, we recommend using the rich text editor plugin. This input element will allow users to customize the style of content they add into this field.
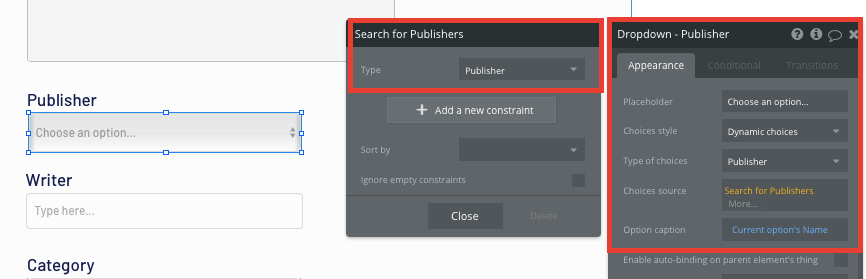
We’ll also need to configure the publisher dropdown menu to display a list of dynamic choices.
As each new article will be added to a publishers’ list of total articles, we’ll need to select an existing publisher from our database.
Note: This initial list of publishers can be manually added to your database or a fixed set of publishers can be added as an option set.
When configuring this dropdown menu, we’ll select the type of choices to be a publisher. Next, our data source will search our database, pulling a list of all the current publishers.
Finally, we’ll set the source caption to display a publisher's name.
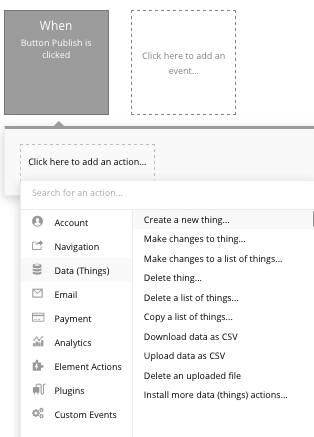
Once a writer has added the relevant details within each on-page input, they’ll click the publish button to create a new story.
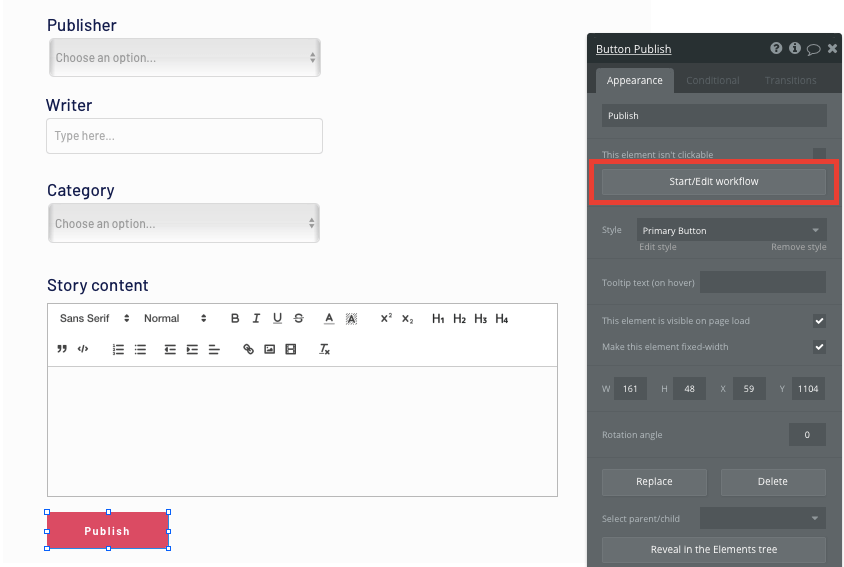
You’ll then create a new thing within your database, with the data type set to a story.
We’ll then need to start adding the relevant fields within our database. Map each of the on-page input elements with their corresponding field in your database.
We’ll first start by creating the story content type. Then we’ll link this to the story itself.
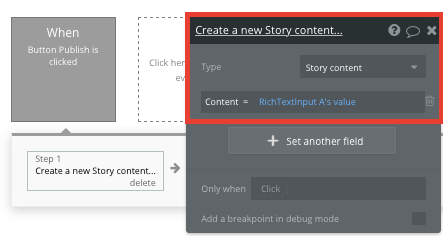
Next, we’ll add an additional step to this workflow, creating another thing — only this time we’ll create the story itself.
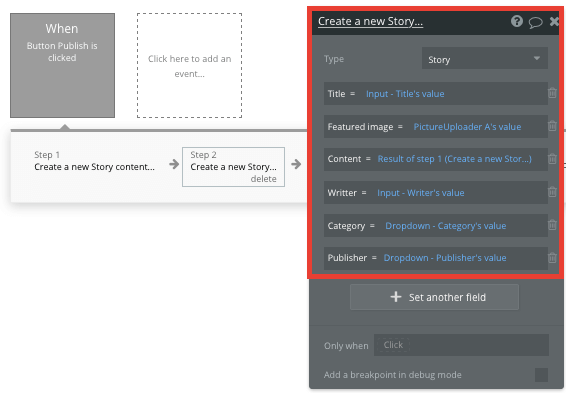
By linking the initial story content we created with this story, it’s possible to seamlessly integrate this data across your platform.
Each time this workflow is triggered, a new story will be created.
Display dynamic content in a feed
Once publishers begin posting content to your mobile app, we’ll need to start writing the logic on your home page that displays each story as a dynamic list to create a news feed. This can be achieved by using our repeating group element.
Repeating groups integrate with your database to display and update a list of dynamic content.
When using a repeating group, you’ll need to first link the element to a data type within your database. In this instance, you’ll classify the type of content as stories.
You’ll also need to set the data source as a list of all the stories in your database.
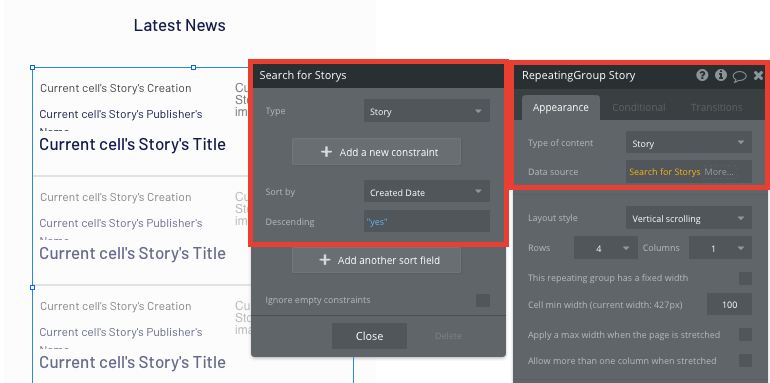
We’ll also sort this repeating group by the creation date of each story, displaying the list in reverse chronological order.
Now you’re ready to start structuring the dynamic content that will be displayed within each grid. Simply map out the top row with the relevant content you’d like to show, then this powerful element will populate the remaining columns based on your existing data.
Send data between pages
Within a repeating group, it’s also possible to create events within each individual row. This feature will become useful when building navigational features across your news website or application.
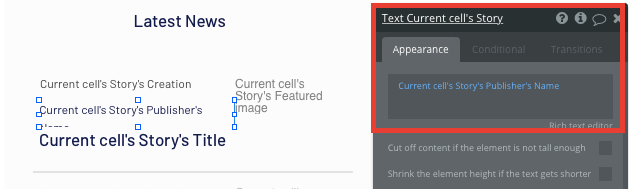
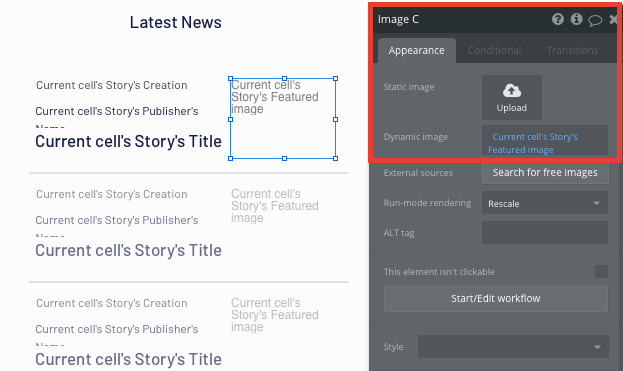
The homepage of our news application only displays a preview of each story—including the publisher, a featured image, and the story title. It doesn’t, however, display the full content of a story until a user clicks-through to the story page.
To display this content, we’ll use our workflow editor to send data between pages.
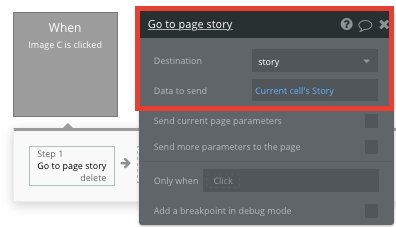
You’ll need to start by creating a workflow that redirects a user to the story page when a story’s image is clicked.
When creating this workflow, use a navigation event to send a user to another page.
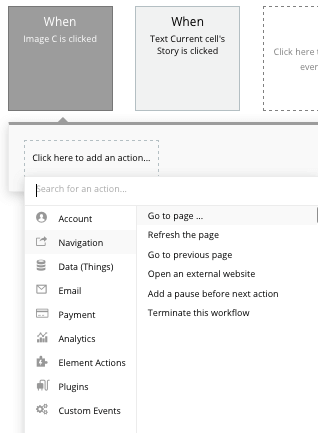
From here, select the destination page type to be the story page.
You’ll then need to send additional data to this page so the Bubble editor knows which unique story to display. The data you’ll need to send is that of the current cell’s story.
Display dynamic content on a story page
When a user is directed to a specific story page, you can easily pull this event data and display the relevant content from the story.
In order to build this function, you’ll first need to ensure that the destination page type matches the data property that you’re sending within the workflow. In this case, you’ll need to set the story page to a story property.
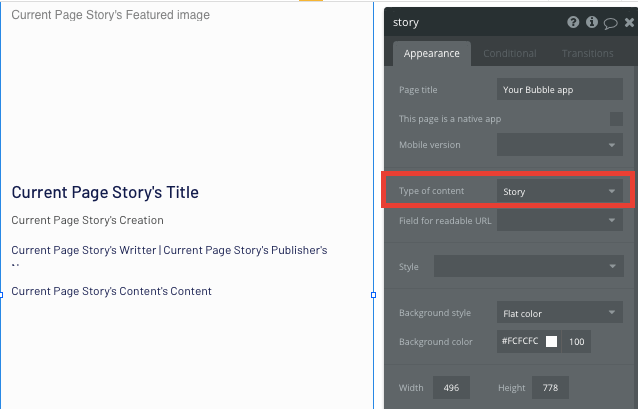
By classifying the type of content for a page, Bubble can easily pull and send relevant data from existing sources.
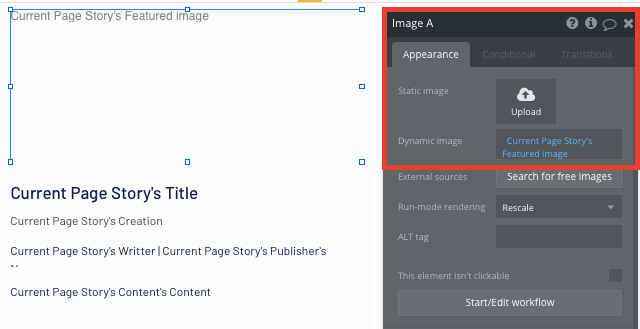
You can now start adding dynamic content into the fields that display information from a unique story.
Display all of a publisher's articles
After reading a news story, a user might decide to view a full list of articles created by the publisher.
Building a separate page for publishers is as easy as building our initial home page if you created a publisher data type.
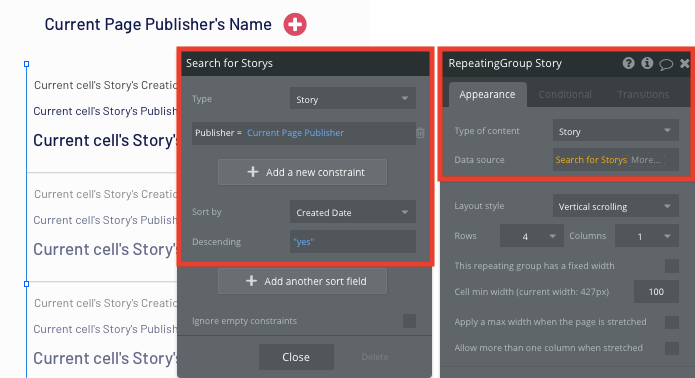
On this page, we’ll need to start by configuring the page type to be a publisher.
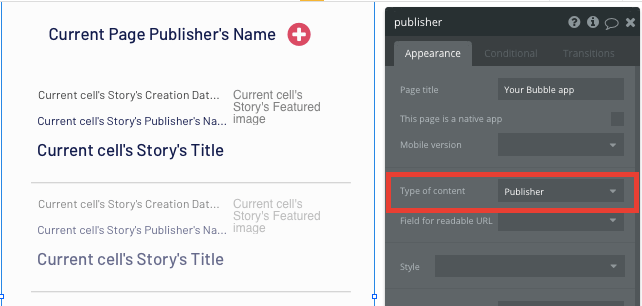
Next, you can copy the repeating group from the home page, then update the configurations.
In this instance, the data source of our repeating group will search for all existing stories where the publisher is the current page’s publisher.
Follow a publisher
The final core feature we’ll create for our news application is the ability to follow a publisher on the platform.
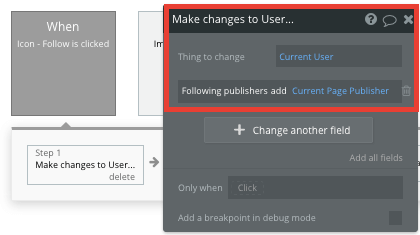
On the publisher page, we’ll add a follow icon. When this icon is clicked, we’ll create a new workflow that makes changes to a thing.

The thing we’ll want to change is the current user, adding the current page’s publisher to their list of following publishers.
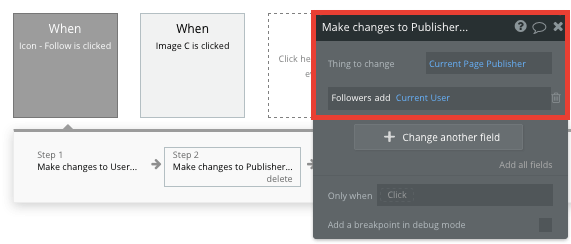
Next, we’ll also need to update the current page publisher’s list of followers—adding the current user.
Add additional premium features
Now that you’re familiar with creating custom data fields and displaying dynamic content, you can start getting creative with the experiences you build within your news app. For example, you can:
- Add a repeating group of recommended articles at the bottom of each story
- Create a function for users to bookmark stories to read later
- Build a search function to discover new articles across the platform
- Allow users to sort their news feed or saved articles by topics, such as business news, political news, local news, and more.
- Create push notifications for breaking news reports or other news alerts.
- Allow users to receive or follow location-based news, such as regional news or breaking news in their area.
Launch your news app
Hiring a developer or dev team to build this news app would cost thousands, if not tens of thousands of dollars. However, with Bubble, app development is streamlined, allowing you and your team to create your own news apps or other mobile applications easily.
As you launch and grow in users, our paid plans allow you to host the product on your own custom website URL, starting from as low as $25 per month. Some templates and plugins may cost more, but you can build all the functionality of a news app without any additional costs.
News app templates
If you don’t want to build your news app idea from scratch, you can purchase a news app template made by our community members. One such template is News Aggregator Like Digg by Rapid Dev.
Start building your own news app
Bubble can help you build a news app or any other product you choose! It’s never been easier to create apps and build something incredible without having to code.
Ready to join the no-code movement? Register your free account here and get started today.
If you’d like additional help with your app development, our thriving community forum is a great place to source actionable advice and resources. Any maker is also encouraged to ask questions within the community to help streamline their no-code journey.
Build for as long as you want on the Free plan. Only upgrade when you're ready to launch.
Join Bubble