Project management tools are essential products that can help you stay on top of any no-code build. Tools like Trello, Monday, and Asana have become ubiquitous as they help coordinate our busy lives.
But what if you wanted to build your own project management tool yourself?
Well, using Bubble’s no-code development tool, it’s never been easier for anyone to start building powerful software - all without writing a single line of code. Our customers are using Bubble to build websites, mobile apps, and even social networks.
Throughout this guide, we’ll uncover the process of using Bubble to build your own productivity tool like Trello. This guide will walk you through the step-by-step process of designing your product and building the underlying logic for an MVP.
The steps to build Trello with no code include:
Get Started
Before you start, you’ll need to first register your free Bubble account. Then you can follow along as we build our product together.
Register your account on Bubble
We also recommend completing our introductory lessons, which will guide you through the step-by-step process of the most common Bubble features. This will help you get a running start when building your Trello clone.
When kickstarting your project, you can choose to begin by wireframing your product design, or building the necessary fields within your database.
In this case, we’ll start by using Bubbles visual design tool to shape the user-interface of our product. If you’re replicating a version of Trello, some of the core pages you’ll need to include are:
- Dashboard page - A page where users can create and view a list of their boards
- Project page - A board page, including individual lists and tasks
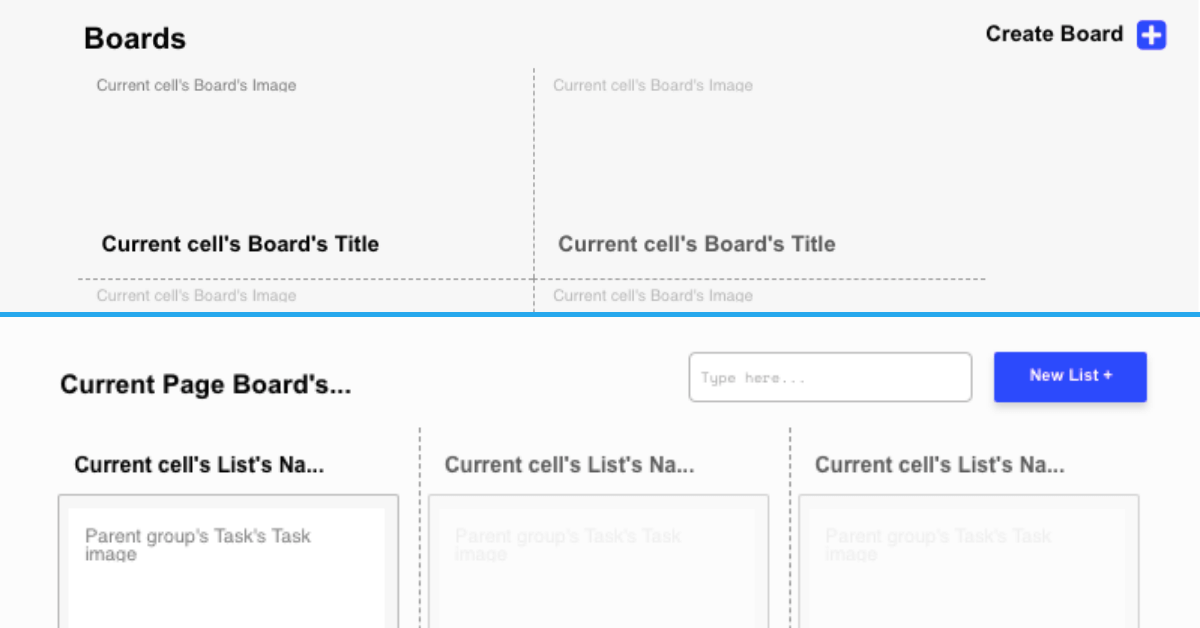
A major feature within Bubble is the ability to send data between pages. This allows you to create one generic version of a page, then dynamically display the relevant content from your database when it’s required.
In the case of your Trello clone, you’ll only need to create one page to host your individual boards. We can then write the necessary workflows to display only the relevant cards on each board page when they’re needed (we’ll cover this in more detail soon).
Configuring your database
Once you’ve mapped out the display of your product, you can focus on creating the necessary data fields to power your application. We’ll rely on these fields to connect the workflows behind your product.
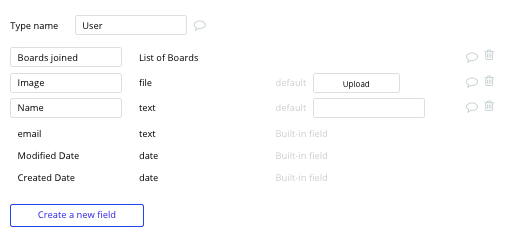
Bubble’s pre-built database makes it easy to create different data types with unique fields. When building Trello as an MVP, we’ll need to create the following data types & fields:
Data type: User
Fields:
- Name
- Image
- Boards joined - List of boards. Note: Creating a field as a list based on a separate data type allows you to seamlessly integrate all of its relevant data fields without having to create additional data points
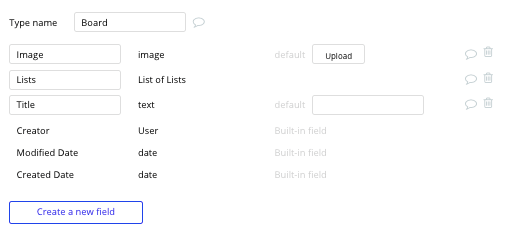
Data type: Board
Fields:
- Board title
- Featured image
- List - List of lists
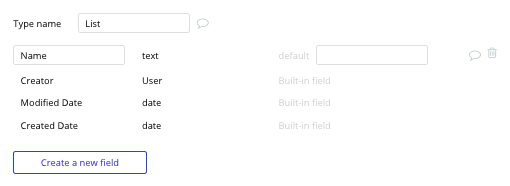
Data type: List
Fields:
- Name
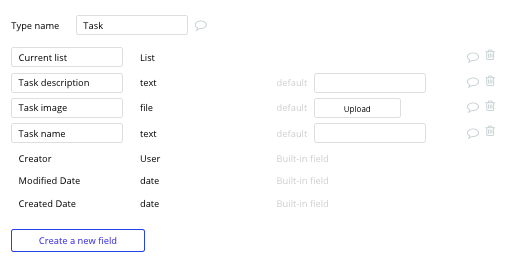
Data type: Task
Fields:
- Name
- Description
- Image
- Current list - List
ADVANCED DATA TIP: There is no single "right" way to build a Bubble Database. The answer to "what's the correct way to structure my app?" is often: it depends on what you're optimizing for. To learn more about alternative data structures for optimizing apps at scale, check out our manual entry on Connecting data types with each other.
Building workflows
Now that you’ve structured both the design and database for your application, it’s time to start stitching everything together and making your product functional.
In Bubble, the main way to do this is with workflows. Each workflow happens when an event occurs (e.g. a user clicks on a button), and then runs a series of “actions” in response (e.g. “sign the user up”, “make a change to the database”, etc.)
Creating a new board
The first key feature we’ll need to build is a function that allows users to create a new board. On our dashboard page, we’ll start by adding both an icon element and a popup.
Within our popup element, we’ll add a text input, image uploader, and button element. When the button element is clicked, we’ll create our first workflow.
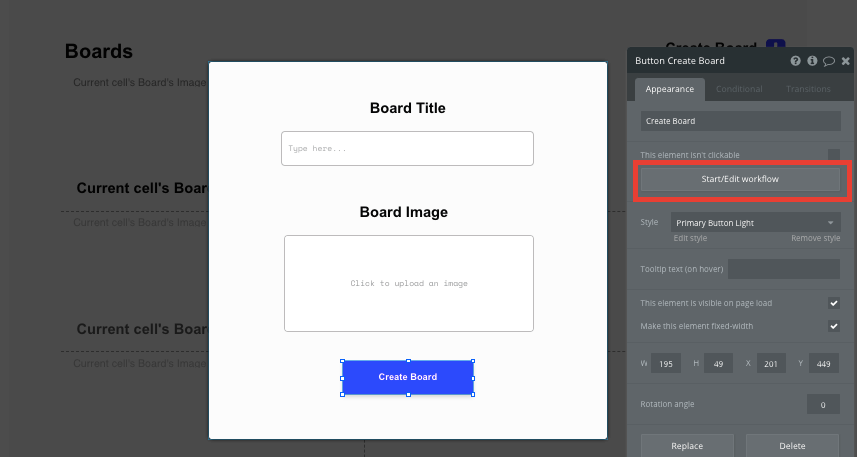
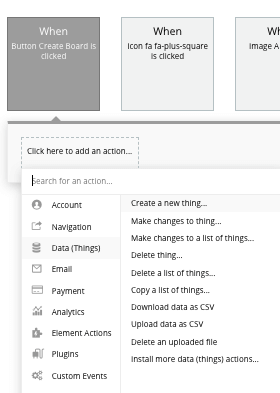
This workflow will be used to create a new thing - a new board.
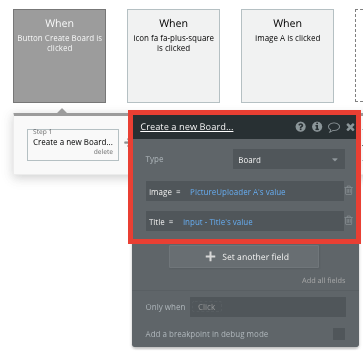
When creating a new board, we’ll match our on-page elements with their corresponding fields within our database.
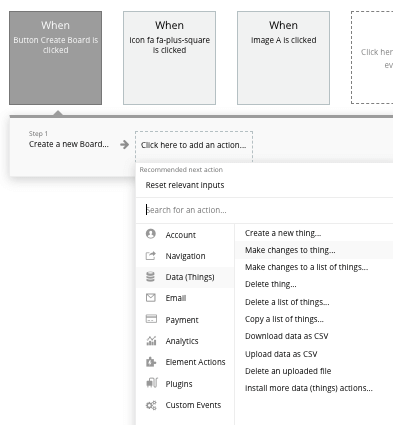
Next, we’ll add the current user to this board by making changes to a thing.
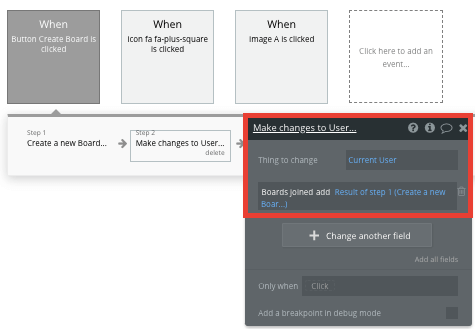
We’ll want to change the current user, adding this new board to their list of boards joined.
Once we’ve built this workflow using our popup, we’ll need to take a step back to our home page and create an additional event using our icon element.
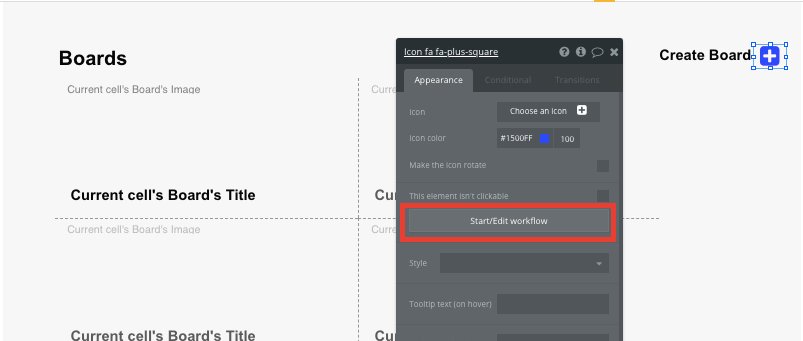
When this icon is clicked, we’ll need to display our popup, allowing users to then follow the previous workflow to create a new board.
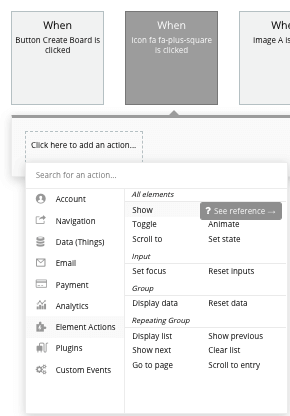
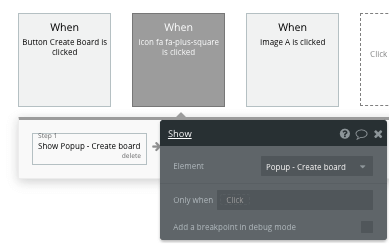
Now this workflow will seamlessly allow users to create a new board without having to leave the homepage.
Display a list of boards
Now that it's possible to create new boards, it’s time to display each item in a feed on the homepage. This can be achieved by utilizing our repeating group element.
Repeating groups integrate with your database to display and update a list of dynamic content.
When using a repeating group, you’ll need to first link the element to a data type within your database. In this instance, you’ll classify the type as a board.
You’ll also need to set the data source as a list of all the boards that contain the current user.
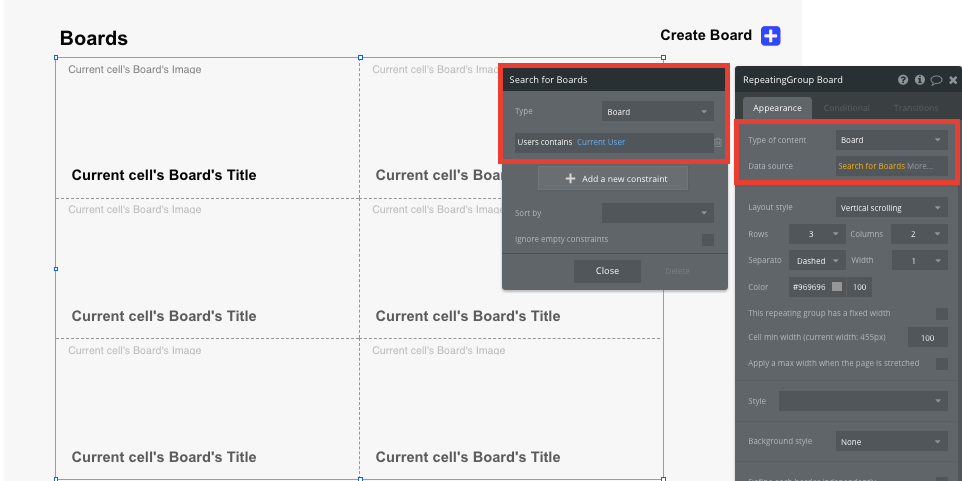
Now you’re ready to start structuring the dynamic content that will be displayed within this grid. Simply map out the first column with the relevant content you’d like to show, then this powerful element will populate the remaining columns based on your existing data.
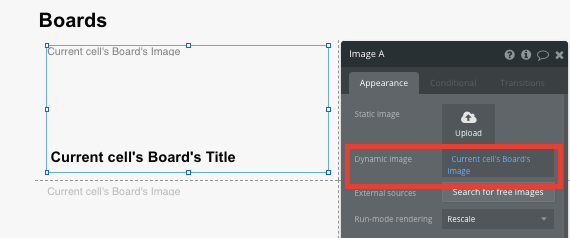
Sending data between pages
Sending data between pages is an essential function for most dynamic products. We’ve covered this feature in more detail throughout our introductory lessons on "Sending data to pages."
Within a repeating group, it’s also possible to create events that trigger from each individual column.
This feature will become useful when building navigation functions across your product. Within our Trello clone, we’ll create a navigation feature that redirects a user to our project page when an individual board is clicked.
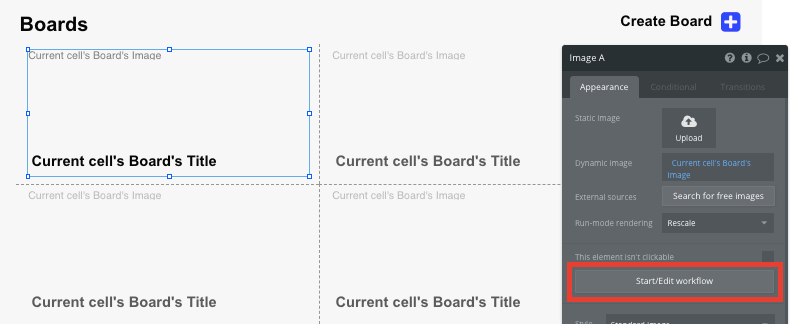
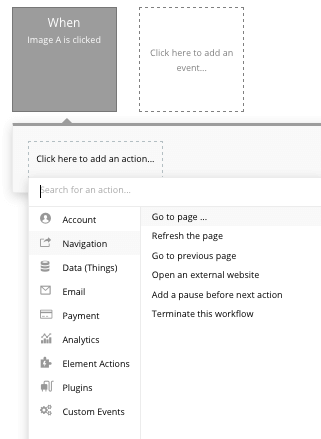
For this workflow, use a navigation event to send a user to another page. From here, select the destination page type to be the project page.
You’ll then need to send additional data to this page so the Bubble editor knows which specific project to display. The data you’ll need to display is that of the current cell’s board.
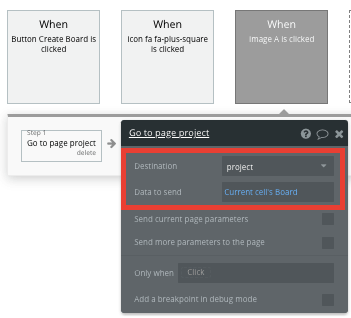
Display dynamic content on a boards page
When a user is directed to a specific boards page, you can easily pull this event data from your workflow to display the relevant content.
Before we create this workflow, you’ll first need to ensure that the page type matches the data property that you’re sending through your event logic. In this case, you’ll need to set the project page to a board property.

From here, you can then start adding dynamic content into your page elements, displaying the information from the board that has been sent in your workflow.
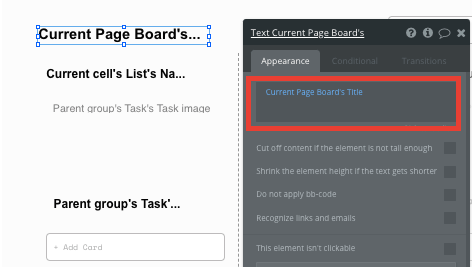
Creating a new list
Once a user can access a board, we’ll then need to build the next key feature - allowing them to create a new list. This time, we’ll use a text input field and a button to support this workflow.
When the create button is clicked, this will trigger a new workflow.
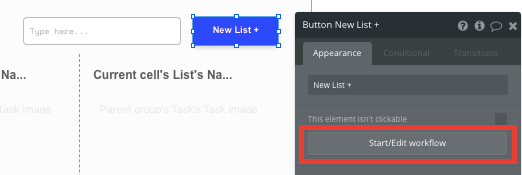
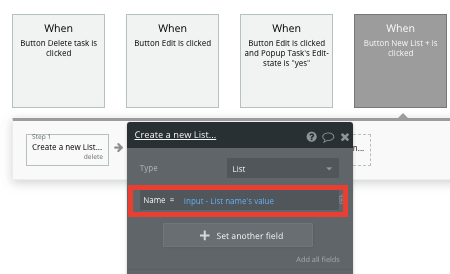
Within this workflow, you’ll need to create a new thing. The thing we’ll want to create is a new list. When configuring the data field of the list, we’ll start by adding our text inputs value as the list name.
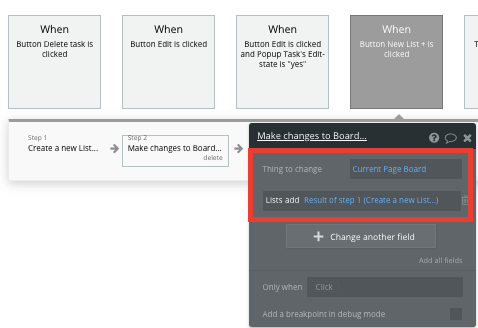
Next, we’ll then need to add this list to the current pages board. Once again, this can be achieved by adding an additional step in our workflow that makes changes to a thing.
The thing we’ll want to change is the current page board, adding our new list to its field of total lists.
Displaying lists within a board
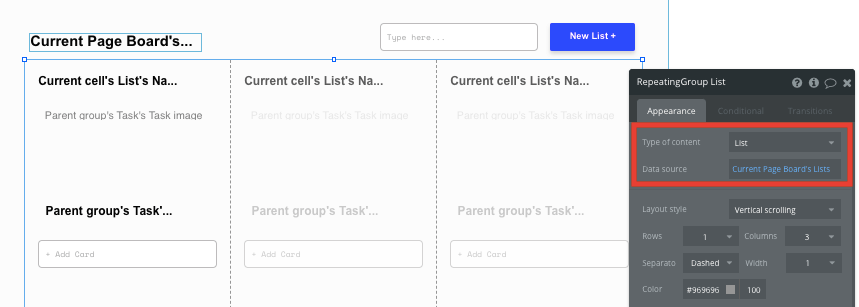
Now that we’ve created a new list, we’ll need to start displaying these within our board. This can easily be achieved by utilizing our repeating group element once again.
In this case, our repeating group will be configured as a list, and the data source will be set as the current page boards, lists.
Creating & displaying tasks within a list
Once a user can create lists, we’ll then need to build a feature where they can add tasks within each list.
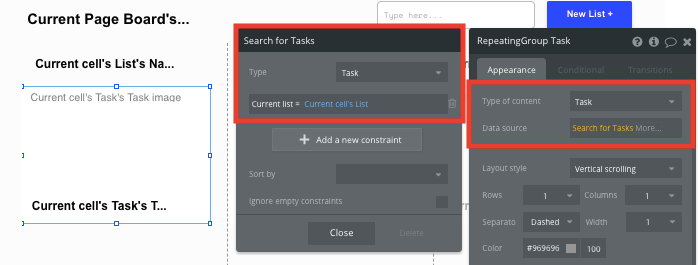
When displaying a card inside a list, we’ll need to add another repeating group within the first column of our list repeating group.
Note: This new repeating group will only have one column and one row, so it may just appear as a regular group.
The repeating group will be configured as a task, and within the data source, we’ll search for tasks where the tasks list is the current cells list.
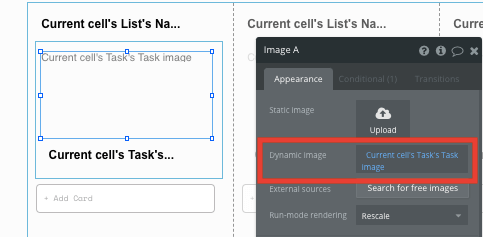
Once again, you’ll then need to map out the dynamic elements within the repeating group that you’d like to display. This could include the current tasks image and title.
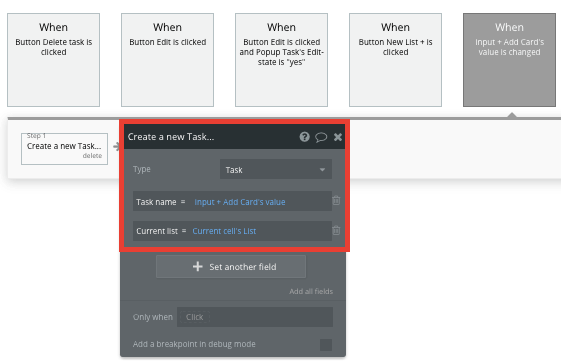
Once we’ve mapped where our task cards will be placed, we’ll build a workflow to create a new task within each list. This feature can easily be added by using another text input field (placed below our task repeating group).
To start this workflow, we’ll need to trigger an event when the value of an element changes. The element we’ll link this to is our additional input field at the bottom of each list.
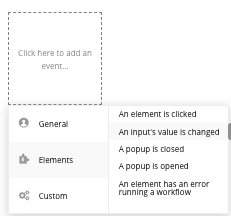
When this text input element has been changed, we’ll need to create a new thing - a new task.
When creating a new task, we’ll use the value of our text input to update the tasks name field. We’ll also set the tasks current list to the current cells list.
Moving cards between lists
One of the most popular features of any digital kanban board is the function to move items between lists. Using Bubble’s free draggable elements plugins, we can easily build this feature and create an intuitive user experience within your product.

This plugin will add two new elements to your Bubble editor - a draggable element, and a drop area.
To start building this feature, we’ll first need to move our task repeating group into the new drop area element.
Note: To help visualize this feature, we've set the color of our drop area element to black.
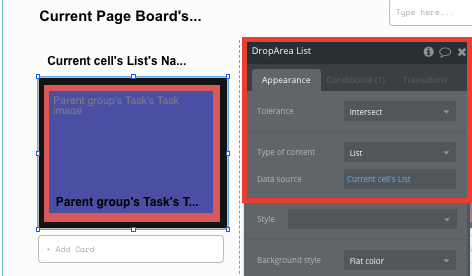
We’ll also need to configure this drop area element to pull the data from the current list that it sits within.
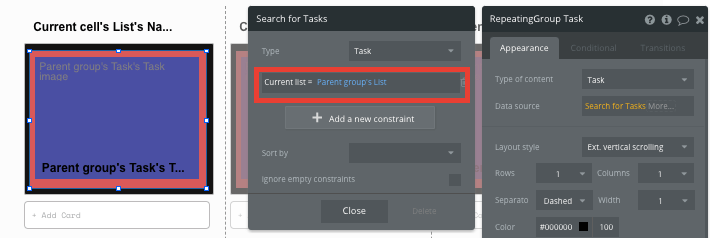
Our repeating group (featured in red), will now pull the data from the drop elements data source. The source of this repeating group will remain the same, only it will now recognize the current tasks list as the parent groups (drop area element) list.
Finally, we’ll then need to add a drag element (purple) within this repeating group.
When adding a draggable element, you’ll need to select the box that ‘makes this element droppable’, the also set the behavior to ‘moves back’.
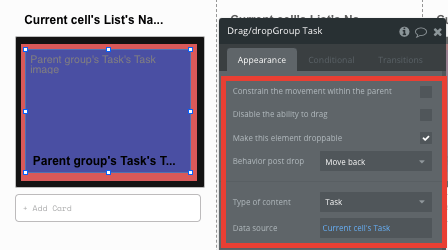
The data source of this element will remain as the current cells task.
Once you’ve finished configuring each of these elements, you’ll then add the same dynamic content within your card as we did before.
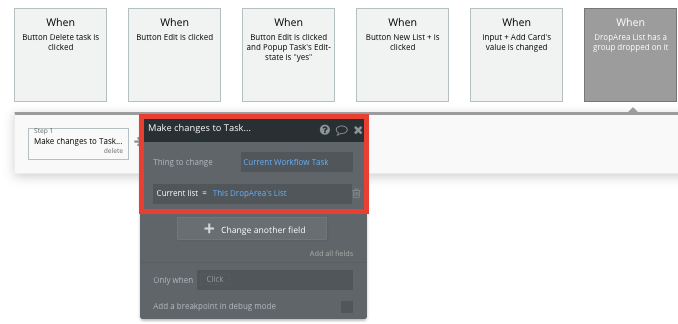
Although these cards can now be moved, we’ll need to create an additional workflow that updates a cards current lists when it’s placed within a new column.
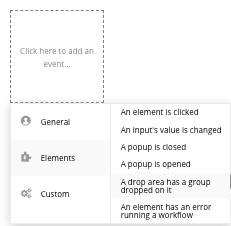
In your workflow editor, you’ll now be able to trigger an event when a drop area has a group dropped in it.
Next, we’ll need to make changes to a thing, updating the current tasks list to the list that the drop area sits within.
Editing the content of a card
When a task is created, users also need to be able to edit the content within each card. This will allow them to update the task title and even add a description with more details. Using custom states within Bubble, we can easily add this function to your product.
To get started, we’ll add another popup on our project page, this time setting it as a task type of content.
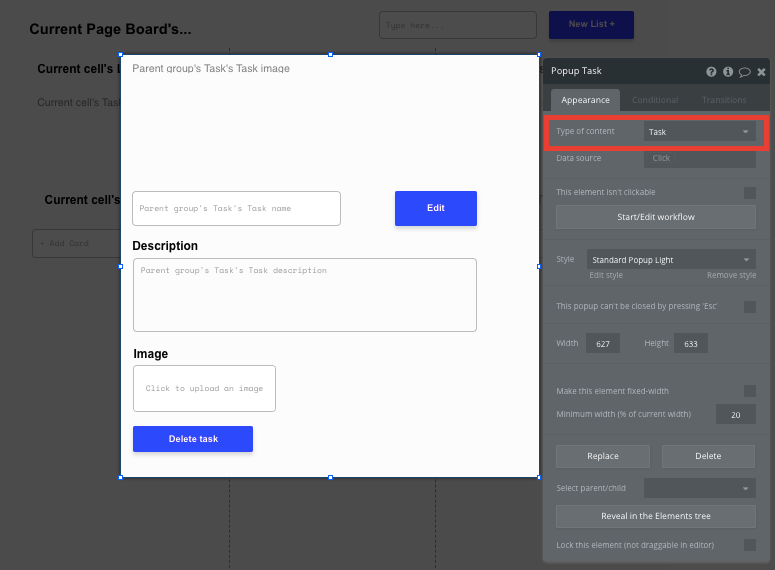
On this popup, we’ll then add a combination of elements, including; a text input, multiline input, buttons, and an image uploader.
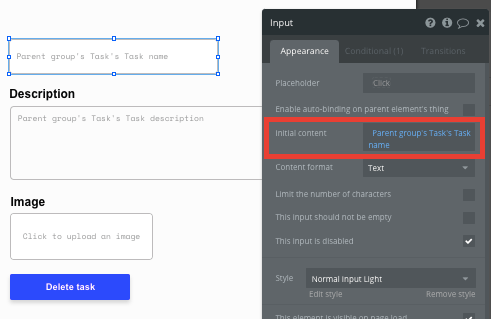
Instead of displaying content as plain text fields, we’ll be using our input fields, setting their initial content as the parent groups (popup) tasks properties.
By default, text input fields can be edited by users. We’ll need to disable this feature, ensuring that it can only be edited once the edit button has been clicked.

Now, we’ll build a new workflow when our edit button is clicked.

Within this workflow, we’ll want to set a state.
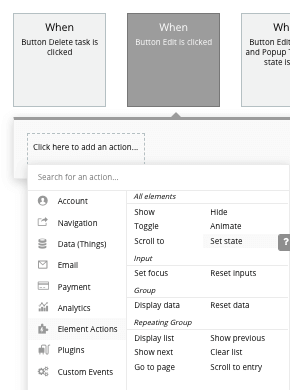
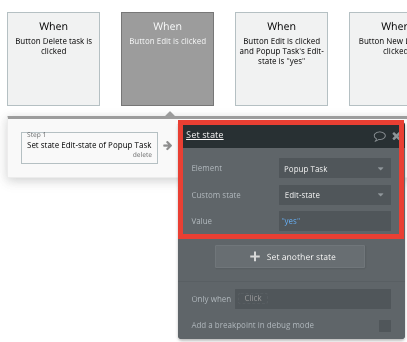
This new state will be based on our popup element and will need to be a ‘yes/no’ value. We’ll call this state ‘edit-state’. This will allow us to determine if our task is in an edit mode.
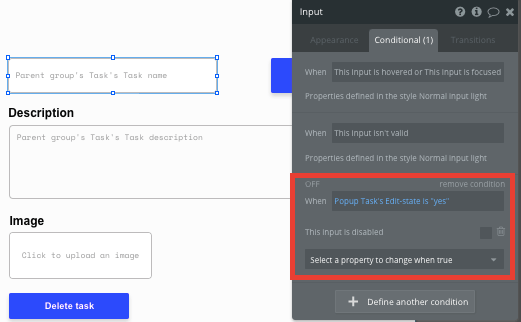
Next, we’ll need to add a condition to the input elements on our popup. Conditions are a powerful way to set rules for elements.
In this case, we’ll set a condition that recognizes if the popups state is ‘yes’, in which case, this input element won’t be disabled.
At this current time, our users will be free to make changes within the input fields. We’ll then need to build a function that saves the new values when the edit button is clicked again.
Back in our workflow editor, we’ll create another event that’s triggered when the edit button is clicked. This time, well add a condition to this event trigger, only allowing it to execute when the popups current state is ‘yes’.
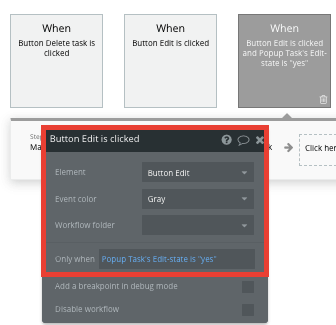
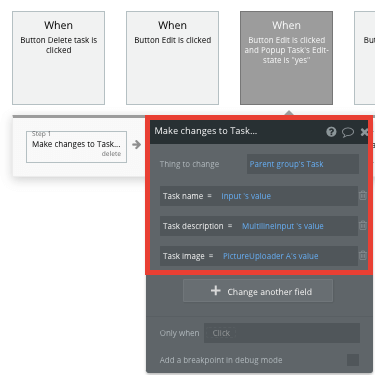
Within this workflow, we’ll once again make changes to a thing, updating the data for the current popups (parent groups) task.
We’ll then match our input fields with the relevant fields in our database.
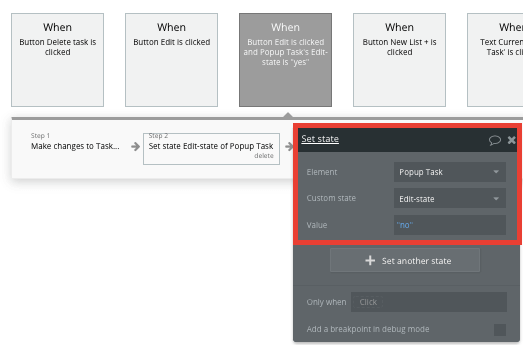
Finally, we’ll add an additional step that sets the state of our popup to ‘no’ - closing our editing feature.
Now that our popup has been created and configured, we’ll need to backtrack and create a workflow that displays this popup. This can be triggered when an element within our tasks repeating group is clicked.
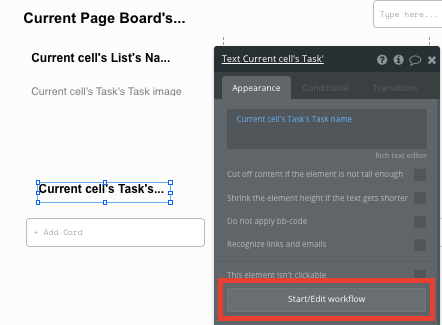
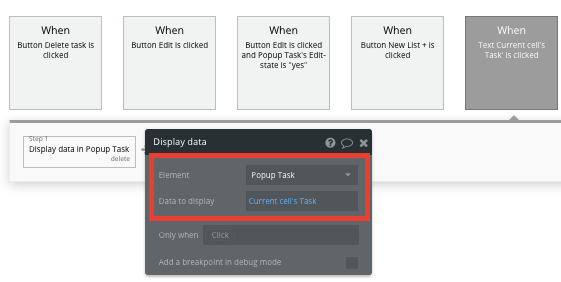
We’ll start this workflow by displaying data into an element.
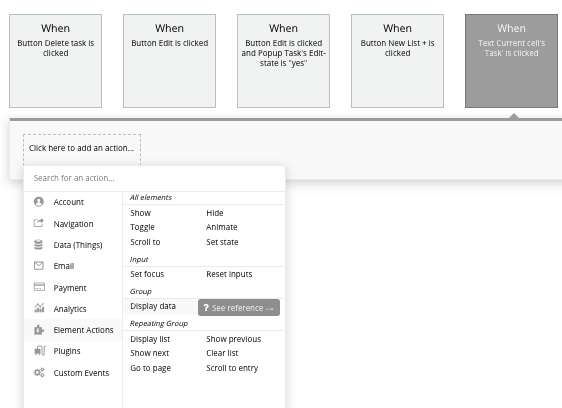
The element we’ll need to display this data to, will of course, be our task popup. This data will need to include the current cells task.
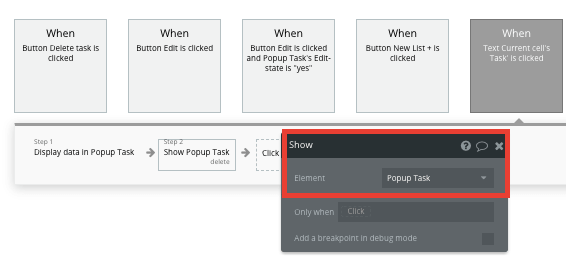
The last step in this workflow will show our popup element.
Deleting a task
When editing a task, users might also need to delete a card in the circumstance that it’s no longer needed.
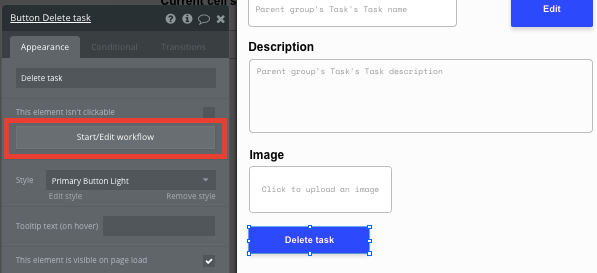
By adding a delete button onto our task popup, we can easily build a workflow to execute this event.
Simply start by creating a workflow when the delete button is clicked.
Next, we’ll select to delete a thing.
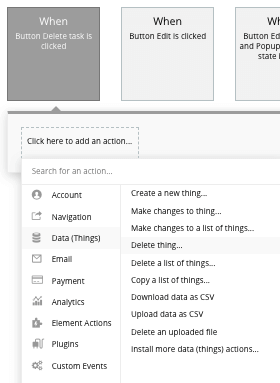
The thing we’ll want to delete is the parent groups task.
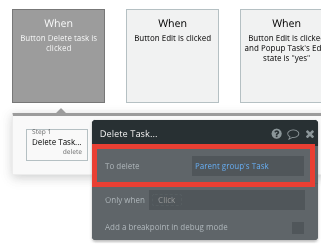
Once a task has been deleted, we’ll then need to close our popup. Simply use the hide element event to build this function.
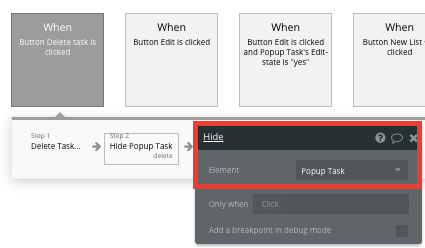
When deleting any type of data across your product, you can follow this simple workflow.
Additional features
Once you’re familiar with creating custom data fields and displaying dynamic content, you can start getting creative with the experiences you build within your project management app.
Privacy & Security: Now that you have the basics of your app, don't forget to start setting some privacy rules and conditionals to keep your data secure - starting with roles in the 'Privacy' section of your Data tab. You can also check if you're unintentionally exposing any data with an API checker.
Additionally, you can:
- Add support for files and labels to cards
- Create a function to add multiple users to a board
- Create a feature for users to comment on individual cards.
Launch
It would traditionally cost thousands to hire a developer to build a custom project management tool from scratch. Now, this entire application can be built for free using Bubble. As you launch and grow in users, paid plans allow you to host the app on your own custom domain, and these start as low as $25 per month. Some templates and plugins may cost more, but you can build all the functionality of a project management tool without any additional costs.
Templates
If you don’t want to build your Trello clone from scratch, you can purchase one of the templates made by our community members. Some similar templates include:
- Task Boards like Trello by Rapid Dev
- Ez Task Manager by Ez Code
Start Building
Bubble can help you build a Trello clone or any other product you choose! It’s never been easier to build something incredible without having to code.
Ready to join the no-code movement? Register your free account here and get started today.
If you’d like additional help when building your product, our thriving community forum is a great place to source actionable advice and resources. It’s not only a great place to search through our existing Bubble examples, but any maker is encouraged to ask questions to help them on their journey.
Build for as long as you want on the Free plan. Only upgrade when you're ready to launch.
Join Bubble