How many times have you discovered a really cool new app or software, signed up, and then had no idea where to begin?
This doesn’t just happen with digital products. Ever been to an Airbnb and couldn’t figure out how to get the shower water hot? Or driven a rental car and couldn’t find the switch for the high beams?
All of these examples highlight the importance of usability testing.
Usability testing is a crucial step in the product development process — especially for digital products. It helps make sure your product is easy to navigate, intuitive, and user-friendly.
In this article, we’ll cover:
- What exactly is usability testing?
- Benefits of usability testing
- The main type of usability testing
- How much usability testing costs
- How to do usability testing
- Usability testing methods
- Tools for usability testing
What is usability testing?
Usability testing is a type of user research that helps you understand how the user interacts with, navigates, and uses your app. The goal is to make sure your products are easy-to-use and that new users can easily do what they set out to with your product, without a lot of additional support.
Usability testing asks questions like:
- What path do users take to accomplish their goals? Is this the intended or most efficient path in our app?
- Do users easily understand how to navigate the app?
- Are there any bugs or gaps impacting the user’s ability to accomplish tasks?
- How easy-to-use do users think our app is?
- How quickly are users able to accomplish their tasks?
Usability testing generally follows a set process.
- First, you’ll define your goals for the test and recruit participants.
- During the test, you’ll ask real or potential users to complete a series of tasks testing how usable your product is. You may also want to ask targeted usability testing questions to further understand their thought process and impressions.
- Once the tests are complete, you’ll want to analyze the timing, success, and processes of the tasks completed to understand where you can improve.
We’ll get into all of this in more detail below in the section on how to do usability testing.
For now, just keep in mind that usability testing measures how easy it is to accomplish certain tasks or goals with your app, so you can improve and iterate on your designs to make your product more intuitive.
What usability testing isn’t
Before we dive deeper into the how and why of usability testing, let’s take a look at what usability testing isn’t.
Usability testing is often confused with user testing, UX testing, or user research. These concepts are all related, but they’re not interchangeable.
User testing vs. usability testing
User testing is a broad term that refers to any type of research that gathers feedback from your users. User testing can include UX testing, general user feedback, or overarching user tests on any stage or aspect of your product. Usability testing can be a type of user testing, but it has a narrower scope. It’s focused specifically on the usability of your product.
For example, user testing might ask participants for feedback on your color scheme and layout. In a usability test, you might observe users to see if the buttons are clear enough within the page layout for users to easily find them.
A/B testing vs. usability testing
A/B testing is a quantitative test that measures user preference for specific design or app components to see how to improve performance.
Usability testing focuses on qualitative testing that shows you how a user interacts with your product overall.
For example, an A/B test might show half of your users a signup screen with a 20% discount offer, while it shows the other half of your users a signup screen with a two-weeks-free discount offer. You could then see if more users signed up after seeing the 20% discount or after the two-weeks-free to determine which types of offers to use in the future.
In a usability test, you might watch the user go through the signup flow, watching to see where they get stuck, what path they use to sign up, and how simple it is for them to complete the task.
Focus groups vs. usability testing
Focus groups are broader than usability testing. In a focus group, your facilitator will ask open-ended questions to get broad feedback on ideas, goals, experiences, and needs related to your product.
In usability testing, individuals are using your product itself for a specific task or purpose to test how functional and easy-to-use it is.
User acceptance testing vs. usability testing
User acceptance testing (UAT) typically happens after all of the other types of testing have been completed. Its goal is to make sure that your app or product meets all of your user’s requirements before it’s launched.
For example, UAT might run several test scenarios to make sure that all of your checkout and signup workflows work as intended. It’s more about the functionality of the product itself, while usability testing is about the user’s experience of navigating the product.
Key elements of usability testing
When you’re designing your usability tests, keep in mind the Four P’s of usability testing. These are:
- The product itself
- The plan for the testing
- The people involved
- The process for the test
The product
Many people think of usability testing as something that happens during the prototyping phase. You’ve started work on a product or app idea. You're building out a prototype, and now you need to do usability testing to make sure users can move through the product as expected.
That’s true, but it’s not the whole story.
Usability testing can and should happen throughout the entire product development process: during prototyping, before you launch, and definitely at regular intervals after the launch. If you’ve recently launched new features within your app, you should do usability testing for these as well.
The plan
A good usability testing plan outlines:
- What features or tasks will be tested
- How you’re going to test them (i.e., which types of testing you’re going to use)
- How you’re going to measure success
For example, let’s say you’re creating a group travel app that aims to help make it easier for people to plan trips with their friends. You might decide that you need to test the following goals:
- Can people easily add friends to their trips?
- Do users know how to add reservations to a shared itinerary?
- Can users quickly book tours?
Then, you’ll decide how you’re going to test each of these (more on this in the next section.)
You’ll also want to decide how you’re going to measure success.
For example, if you’re doing straightforward task-based testing, you might simply ask each participant to try to complete the relevant tasks, and then note down if they could or couldn’t (success/fail). Or you might see how long each task takes, and assign success if they could complete the task within a certain amount of time or a certain number of steps.
The people
All usability testing essentially requires two groups of people: facilitators and participants.
The facilitator guides the participant through the testing process, takes notes, and observes the participant as they go. This can be someone from your team or an independent research team if you’re outsourcing usability testing.
Test participants are the ones performing the tasks and giving feedback to the facilitators. If you have a very specialized product or workflow, it’s best to test with target users of your app to make sure they have the specialized knowledge or context required to complete the workflow. For more general apps, you can run your test on pretty much anyone.
If you can’t find target users to test with, don’t give up on testing altogether! You can look for cognate users: people who aren’t exactly your target user but are similar enough to understand the basics of the product.
The process
Finally, you’ll want to think about the process of how you’re going to run your test. This includes thinking through things like:
- Where you’re going to run your test, if you’re doing in-person testing
- Which type of usability testing will best test the aspects you want to focus on
- Which usability testing method you’ll use
- How you’ll observe, track, and analyze results
For example, if you’re testing an app that’s designed to be used while working out, you may want to test it with users at a local track or gym.
You’ll also want to put careful consideration into how you moderate the test. That is, what usability testing questions you ask, how you observe participants, and what kinds of follow-up questions you ask to better understand their process.
Many teams like to ask their test participants to “think out loud” during the testing process. This allows you to observe what users are looking for, where they expect to find different items, and how they go about solving a problem.
Benefits of usability testing
The more familiar you are with something, the harder it is to remember what was confusing or frustrating as a beginner.
The same is true with your app or product. If you’ve been working on it for months, of course it seems intuitive and easy to use for you. After all, you designed it! That’s why usability testing is so crucial. It helps make sure that your designs “translate” to users, and gives you clarity on where and how to improve ease of use.
Usability testing can also help with:
Reducing development costs
The sooner in the development process you can make changes and fix problems, the cheaper it is to fix. Doing usability testing early on can help validate your prototype and fix tricky features and designs before it gets “hard-coded” into your product and becomes costly to change.
Developing user empathy
It’s easy to lose sight of the customer’s perspective when you’ve spent so much time immersed in your product. Usability testing helps you see things again with fresh eyes, and gain more empathy and understanding for your users’ needs, perspectives, and processes.
For example, you might automatically know where to find things in your product, but usability testing can uncover that your menus aren’t actually intuitive for users. Or, you might have only included an “add to cart” button on your product pages, but find that most users want to “heart” an item or save to a wishlist first.
Combating cognitive biases
Usability testing lets you identify and reduce cognitive biases and false premises. By observing what actual users do when they use your product, you can make sure you’re designing for them, and not based on what you think they’ll do.
Similarly, usability testing can help illuminate other data you’ve gathered from user feedback or testing and put it into context. This helps you avoid cognitive bias in your analysis as well.
Increasing product accessibility
Of course, you need your product to comply with accessibility standards. Usability testing is a great way to make sure your product is as accessible as possible to the widest audience, not just hitting minimums.
Including users with physical, visual, auditory, or cognitive accessibility needs in your usability testing helps make sure your product is easy for everyone to navigate and use. For example, increasing the color contrast in your design makes it easier to use for those with visual impairments, but it also makes it easier for those using a smaller screen, or when using your product outside in harsh sunlight, and so on.
Prioritizing necessary changes
Sometimes getting buy-in to prioritize necessary changes, fixes, or updates can be difficult. It can also be tricky to get your whole team to agree on which changes or updates are the most important.
Usability testing can help you prioritize by giving you clear data on where users are struggling, helping you align your whole team on how to move forward.
Identifying and simplifying complicated workflows
Whenever there’s a multi-step process in your app (i.e., purchasing an item and going through a checkout process, adding a new customer to a CRM, etc.), there’s the possibility of the process either breaking or becoming more complicated than it needs to be.
Usability testing can help make sure that your most complex features and workflows are still intuitive and easy to navigate. Along with the big stuff, usability testing can also help you catch minor errors that can bug up your workflows and irritate users.
Increasing user satisfaction and brand affection
The easier your product is to use, the more satisfied your customers are likely to be — simple as that. So the more you can test your product before you launch it, understand what users find difficult, and adjust accordingly, the better experience you can give your users. And the better experience you can give your users, the stronger your brand affinity and affection will become among your target audience.
The 6 main types of usability testing
When you’re thinking through your testing plan, there are a few main usability testing methods to choose from:
- Qualitative usability testing
- Quantitative testing
- Remote usability tests
- In-person testing
- Moderated usability testing
- Unmoderated usability testing
Moderated or unmoderated usability testing can happen for both remote and in-person tests.
Here’s what each of these methods mean and when to use them:
Quantitative usability testing
Quantitative usability testing gives you numerical data and results to understand usability. It focuses on collecting data that can be easily analyzed to understand results, make predictions, and see large-scale trends.
Quantitative data in usability testing can be things like:
- Success rates
- Completion times for certain tasks
- Satisfaction or ease ratings on a scale
- Percentage of users who used a certain process
- Number of steps taken to complete tasks
Quantitative data is useful for getting high-level insight into where your product is performing and what needs to change.
For example, if you have high success rates with users being able to book a ticket, but low success rates in them being able to change their itineraries, you know you need to improve the process, navigation, or design of the “change itinerary” workflow.
Qualitative usability testing
Qualitative usability testing focuses on thoughts, characteristics, perspectives, and qualities — that is, non-numerical results. Hard data is hard to argue with, but qualitative data can provide more context and be more compelling.
Consider the difference between “60% of our users couldn’t complete the checkout flow in under two minutes” (quantitative) vs. user feedback that says, “I kept trying to find a way to purchase the product I really wanted, but it was so frustrating trying to figure out how enter my shipping and billing details that eventually I just gave up” (qualitative).
In usability testing, qualitative data highlights the “how” and the “why” of usability.
- What makes a feature easy to use?
- Why are users trying to accomplish it in that specific way?
- How do users try to interact with a certain design?
Surveys, interviews, observational notes during a test, and general feedback can all provide qualitative data.
Ideally, you want your usability testing to include both qualitative and quantitative data. Focus on qualitative data when you want to understand the motives or processes behind the numbers or results you’re seeing.
Remote usability testing
Remote usability testing happens remotely, and can be either moderated or unmoderated.
Moderated remote testing means that a facilitator will guide the participant through the tests in real-time.
The moderator can ask questions, give directions, and record observations. When this is happening remotely, you’ll generally want to use software that allows the participants to share their screens, record their screen activity, use a webcam, comment on different aspects of the design, and so on.
An example of a moderated remote test would be a user and facilitator meeting over Zoom to complete tasks via screen share. The facilitator can provide information and direction, and the participant can share their screen to allow the facilitator to observe them completing the tasks.
Unmoderated remote usability testing allows users to complete testing tasks independently, on their own time and in their own space. Usability testing tools can make this possible.
For example, you could recruit potential users for testing and send them a special link to a demo version of your app that'll allow them to complete tests and record their screens and clicks for you to review later.
Remote usability testing is typically a good choice when you:
- Want to run usability testing on a large sample size (consider unmoderated testing)
- Need to test a geographically wide sample (consider moderated testing)
- Don't have in-house resources to moderate tests (consider unmoderated testing)
- Want to observe how users respond without a researcher watching (consider unmoderated testing)
In-person usability testing
As you can probably guess, in-person usability testing is testing that happens in person.
In-person usability testing is often conducted at a lab or research center, but it can happen anywhere your app or product is likely to be used — say, at a fitness center for a workout app, or in a university library for a studying app.
In-person testing can also be moderated (with a facilitator guiding users through the tests) or unmoderated (with users working through tests independently). In general, you should only consider unmoderated in-person usability testing when you’re focusing solely on quantitative data.
For example, if you’ve already worked out the big usability issues and are now just looking to validate with concrete data like percent of tasks completed or task completion time, unmoderated testing can work. Otherwise, moderated testing is best for in-person testing.
Consider in-person usability testing if:
- You want to see how users behave in specific environments or scenarios
- You want to test your app in the situation that it’ll likely be used in (i.e., a workout app in a fitness center)
- You have a physical product (or physical aspect to your product) that has safety considerations or physical testing needed
Which type of usability testing should I use?
As with many things, the hardest part of usability testing is often just getting started. We asked a few of our user researchers what they recommended as a starting place.
Here’s what they said:
“The easiest way to get started with usability testing is often with a qualitative, moderated remote usability test. This allows you to speak directly with a small cohort of users and adapt your tasks and follow up questions based on their live responses. Also, this is often the most cost effective way to run a usability test. All you need is a Zoom link!”
— Chelsea Yip, Senior User Researcher at Bubble
Peter Leykam, User Research Manager at Bubble, also weighed in:
“When getting started with usability testing, it’s important not to let perfect be the enemy of good. When you haven’t even launched, you don’t have your own users to speak with, and might not be able to recruit your ideal user base. The important thing is to get feedback from people who are as close as possible to your actual users. If that’s not possible, getting feedback from friends or family members is better than nothing.”
In short:
- Start with moderated, remote usability tests. They're inexpensive and easy to run.
- Don’t worry about finding the perfect test participants — just get started!
- You don’t have to make your initial usability tests perfect. It’s more important that you do some and ask good questions, then keep iterating from there.
How much usability testing costs
Usability testing costs can vary significantly, depending on the type of testing, what method you’re using, your sample size, and what part of the product development process you’re in.
For example, if you’re building a studying app for students, you might test the prototype on a handful of local college students. This can be a quick, one-day event where you test 10–15 students for the cost of a few pizzas.
However, when you’re further along in the development process, you may want to do more expansive usability testing. This can mean recruiting participants (or paying a user testing group to do so for you), running remote moderated tests (which involves time), and compensating participants with gift cards or discounts to your product.
Conducting usability testing shouldn’t break the bank, but it's an important investment.
Spend too little on testing and you risk incomplete and misleading results from subpar testing methods. But you don’t want to spend too much on testing and delay analysis or waste budgets either.
When determining how much to spend, consider:
- How far along you are in product development (further along can = higher $$)
- What aspect of your product’s usability you’re testing
- How large your sample size needs to be
- What method and testing types you need to use
When to run usability testing during the software development lifecycle
A common misconception about usability testing is that you only need to do it during the prototyping phase.
You should be running usability testing regularly throughout the software development lifecycle, especially when:
- You have a wireframe or prototype built
- You're about to launch your product or commit to a big build
- You’ve recently launched a new product or feature
- You’re about to make updates to your product or a specific feature
Here’s what to think about with usability testing at each phase:
Pre-design
You might be wondering, “How can we do usability testing if we don’t have anything to use yet?”
It’s a good question! But the reality is that the sooner you can start gathering usability data and user feedback, the sooner you can make a great product your audience will love. In the pre-design phase, usability testing can help you validate the needs and expectations of your audience with a product like yours.
You can run usability tests through interviews or surveys that ask targeted usability questions, or even observe potential users doing tasks on competitors' products to understand roadblocks, desires, and common paths to complete a task.
Prototype
During the prototyping phase, your goal should be to validate your ideas and assumptions about how your audience will use or navigate your product.
By doing prototype usability testing, you can make changes and improvements before you spend time and money building your actual product. This is a great time to run tests like card sorting and first-click testing.
Pre-launch
This is one of the most important times to perform usability testing.
By now, you should have a fully-functional product. This means you can run user tests where users perform tasks, moderated or unmoderated. This way, you can observe where they run into errors, inefficiencies, get frustrated, or what causes them to fail to complete the task.
Doing usability testing before you launch allows you to find and fix these elements before you release your product to the public, allowing you to improve user satisfaction and ease once you launch.
Post-launch
No matter how much testing you do pre-launch, you won’t have a perfect product on the first try. Plus, over time, you’ll want to update your product, add new features, and optimize it to be easier and more user-friendly.
The solution: Keep doing usability testing at regular intervals, even after you launch. This is a great time for remote unmoderated tests, session recordings, and other types of usability testing that can be done on an ongoing basis.
How to do usability testing
Now that you’ve got the basics down, it’s time to walk through the nitty-gritty details of how to run a usability test.
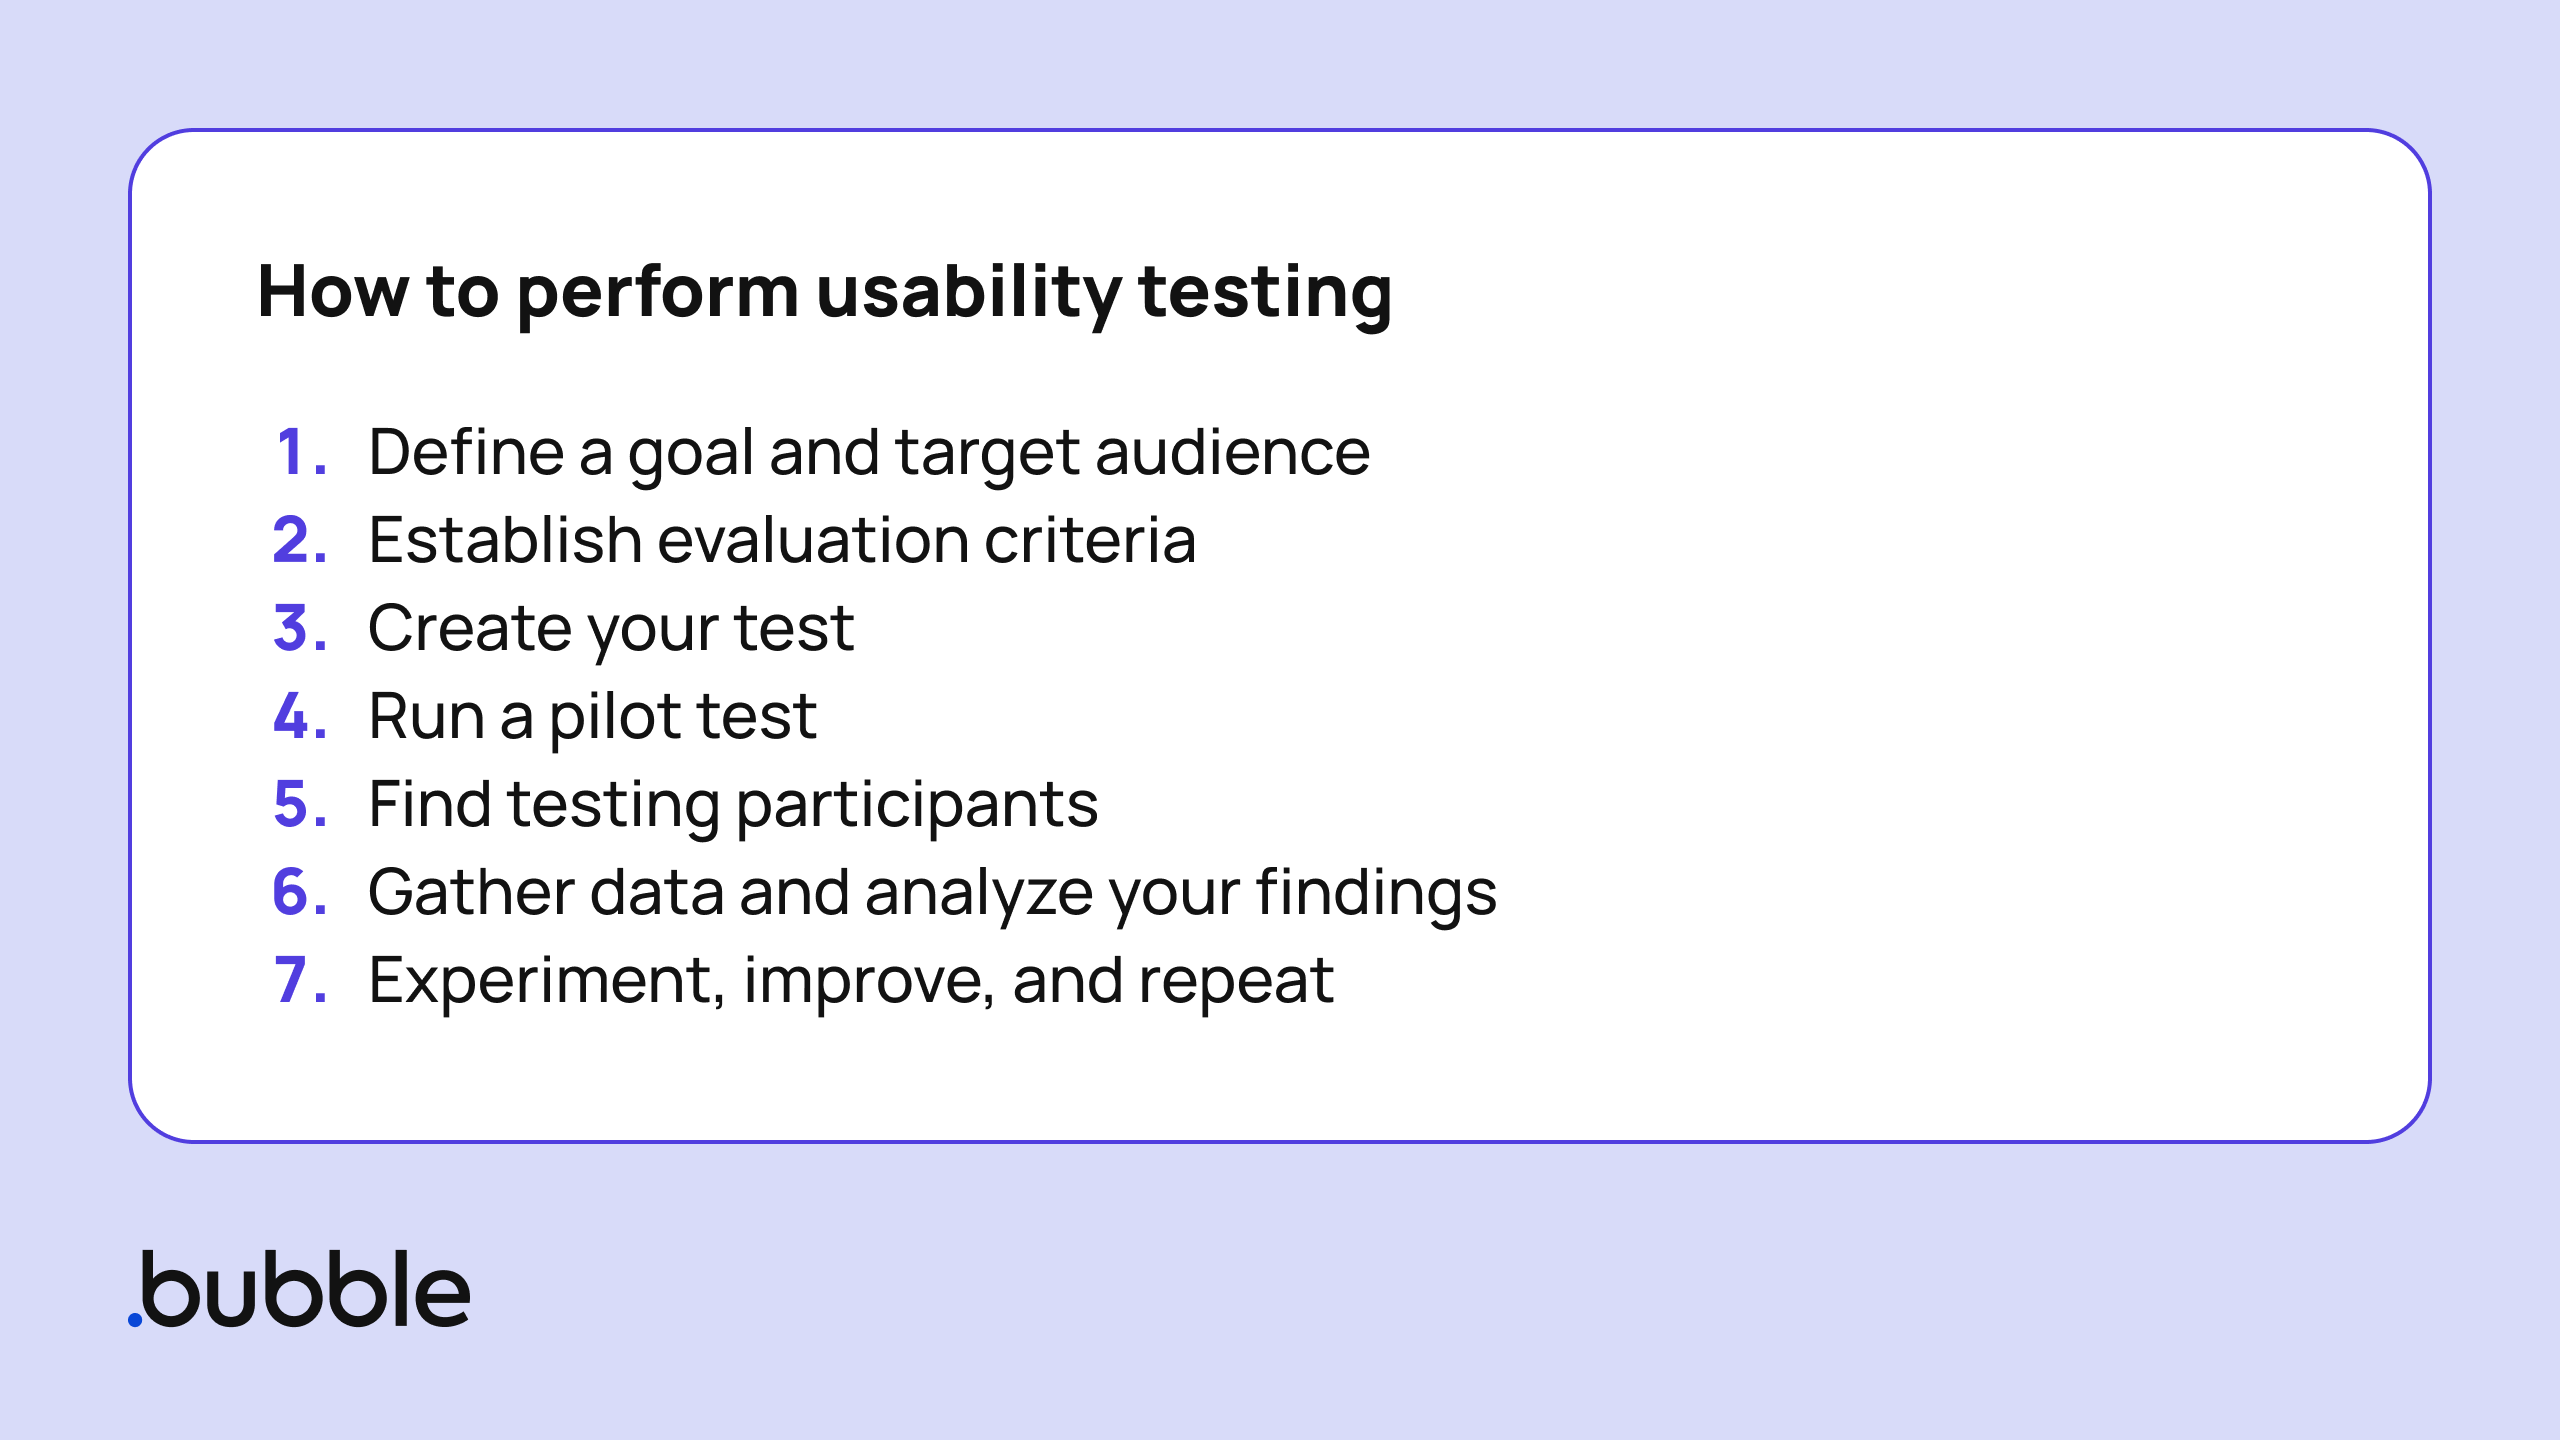
Here’s how we do it:
Define a goal and target audience
Start by defining the goal of this round of usability testing. The more specific and focused the goal, the better results you’ll be able to get.
For example, are you trying to evaluate if users can quickly find the product they need? Or are you wanting to see how easily users can navigate your checkout flow? Even if you already think you know what the results will be, testing it with real users can help you challenge assumptions and cognitive biases to create the best product possible.
You’ll also want to decide on your target audience for this test. In any case, you should pick current users, potential users, or at least people from your target audience.
However, for some features or testing methods, you might need to narrow down your audience. That is, if you’re doing lab testing, you’ll have to find users who are local to your area. If you’re testing a specific feature, you might want to look for current users who are power users of a similar feature in your existing product.
Establish evaluation criteria
With your goal and testing group in place, you’ll want to determine your evaluation criteria. How will you measure success or failure in completing the testing tasks?
Common usability testing metrics include:
- Task completion rate
- Time on task
- Number of errors
- User satisfaction score
- Misclick rate
Your metrics should help clarify your goal. At this point, you may want to come up with a sentence or two that clarifies your goal and metrics for this test. For example:
- “We want to test if people who have never used our product before can complete the checkout process in less than two minutes.”
- “We want to see if travelers who regularly book on desktop can book a flight on our mobile app within five minutes.”
- “We want to see how many of our users can find a specific product using the search on our mobile app.”
Create your test roadmap
Next, you’ll want to create a roadmap for the actual test itself. A good testing plan includes:
- The instructions the moderator will give (or the instructions included for unmoderated testing)
- The tests or tasks the user will perform
- Specific things for the observer to look for and note
- Questions to ask during the test
At this point, you’ll also need to decide what the specific types of testing and testing methods you’ll use. For example, will you use card sorting or task completion tests? Are you going to do in-person or remote testing? Will it be moderated or unmoderated?
These kinds of questions will factor into your testing plan and help your team optimize your results.
One more thing to keep in mind at this stage is the length of your test.
Ideally, you want to keep your tests short and sweet. You don’t want your tests to be too long, or the participants might lose focus or motivation and skew your results. At the same time, if your tests are too short, you may not have time to gather meaningful data and insights.
A good testing length is generally between 10–25 minutes, depending on the product, testing goals and metrics, audience, and product development phase.
Run a pilot test
A pilot test is a great way to make sure your test is clear and effective before you start running it.
Try to find someone for your pilot test who isn’t already familiar with your product. If you run your pilot test on a developer, for example, it’ll be easy to miss unclear areas or ineffective testing strategies because they’re already familiar with how the product is supposed to work.
Someone within your organization who isn’t involved in the product is a good match. Or you might find a few target users to run a pilot test with.
During your pilot test, you want to evaluate all the aspects of your test: the location, the methods, the clarity of the questions, the tasks, and so on. If there’s anything clunky, unclear, or ineffective, now is the time to fix it before you start gathering data for real.
Find testing participants
With your testing methods and plan in place, you’re ready to recruit participants for your test.
You can find participants from:
- Your existing users
- Your website or email list
- A research or user testing panel
- An in-person location, as with guerilla testing
When recruiting participants, try to test as wide a segment of your target audience as possible. Look for a variety of backgrounds, experience levels, and preferences in your participants.
That said, with usability testing, less is often more.
In our experience, 5–10 tests is enough to learn everything you need to know for the current stage or workflow. Ideally, you can recruit 4–6 participants, test, iterate based on their feedback, then run 4–6 more tests.
Testing fewer people more frequently is much more effective than having large sample sizes.
Pre-screening participants can make your testing process easier and more valuable. Make sure your participants have time and motivation to complete the entire test. Use screening questions to make sure they’re a good fit for the testing and metrics you’re hoping to gather.
Finally, you’ll want to obtain explicit consent from all participants to use whatever information you gather to improve your product. If you’ll be sharing any of their responses or recordings with the wider team, be sure to clearly let them know how their data will be used, if it'll be anonymized, and so on.
Gather data and analyze your findings
Once your testing is complete, analyze all of the data — both qualitative and quantitative — to gather insights and report on your findings.
Your analysis can include:
- Summary of usability metrics you were evaluating (i.e., percent of participants who completed a task)
- Optimal path analysis (i.e., looking at the different ways a user completed a task, analyzing which paths are optimal and how to make those the most obvious)
- Common question responses (i.e., a graph or chart showing how participants responded to qualitative questions)
- Recordings and videos (i.e., screen recordings or other recordings showing user actions)
By thoroughly analyzing the data you collected, you can develop clear results from your test, share them with the broader team, and decide how to move forward and what improvements or optimizations to make for your product.
Experiment, improve, and repeat
Just as in product development, there’s no “finish line” for usability testing.
Take what you’ve learned from your usability test to revise, iterate, and experiment on future tests and see what works best. The most effective usability tests are generally created over time, when a team can test and analyze what works best.
As you continue to run usability tests and improve your product, you should also plan regular times to improve and iterate on your testing process itself as well.
User and usability testing methods
We already talked about some of the most common types of usability testing above. As you build and design your test, you’ll want to determine specific testing methods to get the data you need.
Here are eight of the most common usability tests you can try out for yourself:
Lab usability testing
As the name suggests, lab usability testing happens in a controlled laboratory environment.
Typically, it uses a moderated testing type where participants go through the test while a facilitator observes and asks questions in real-time. This is an expensive and time-consuming option, but it allows you to control for multiple variables and gather extensive qualitative data.
Guerilla testing
Guerilla testing is almost the opposite of lab testing.
With guerilla testing, your facilitators will go to a public place, like a park or a mall, and ask people to complete a quick usability test in exchange for a small reward, like a gift card or coffee.
This type of testing is quick and inexpensive, and it’s great for getting quick insights on a small part of your product or early-on in the process.
Interviews
Interviews can happen in-person or remotely, and allow a moderator to gather qualitative data on a user’s behaviors, actions, perspectives, or experiences. Interviews can be a great way to validate ideas and assumptions early in the process.
They can also be used alongside other testing methods to balance out quantitative data with qualitative insights.
Card sorting
Card sorting is a quick usability test for gaining insights on how users think through navigation, page layout, or structure.
In a card sorting test, you’ll label concepts, categories, or potential screens or pages on note cards, and ask participants to sort the cards into groups and categories. After, they’ll explain to your moderator why they sorted them the way they did.
This is a great way to see how users expect things to be arranged or organized within your app, and is particularly helpful during the pre-design or prototyping phase to help design your app in a more intuitive way.
Session recordings
Session recording tests use software to record and anonymize users' sessions to allow you to see exactly how they’re navigating through your app or website.
These can be used for moderated or unmoderated tests, and they’re a great way to gather data at larger scales.
Use them when you need to understand how users interact with or navigate your site or app, to catch where users drop out of your workflows, get confused, or take alternate paths to complete specific tasks.
Five-second tests
In a five-second test, the moderator shows the participant a screenshot of a webpage or app screen and asks a specific question about an element or function of the page. The participant has five seconds to look at the screen before answering the question.
These quick tests are great for getting first impressions and intuitive reactions to your product, and work well as both moderated or unmoderated tests. You can also use them as a type of guerilla testing.
First-click tests
First-click tests are another quick way to gather lots of quantitative data, and can be moderated or unmoderated. In a first-click test, you’ll show a participant a screen or page from your product and ask a specific question about how they’d perform or start a task. The participant will show you what they’d click on first.
For example, you might say, “Where on this page would you try to find a search bar to find a new hair product?” or, “Where would you click if you wanted to add this product to your cart?”
Seeing where users expect certain buttons to be, or where workflows begin, will give you valuable insight into how to design your app so that each workflow step is intuitive.
Eye-tracking
Eye-tracking tests help you see how users visually interact with your app or webpages: where they look first, where they expect to find information, where they spend the longest time, and so on.
Participants will use your product normally while an eye-tracking system set up on the testing monitor tracks their eye movement. The software will then produce a heat map or movement map to show you exactly how they interacted visually with your product.
Although these tests can be very helpful for examining what users do and not just what they say, eye-tracking software can be expensive and difficult to manage logistically.
Tools for usability testing your Bubble app
If you build your app on Bubble, usability testing is even easier.
Bubble has a number of user and usability testing tools that integrate directly with your app, making it easy to run remote moderated and unmoderated testing.
Even better: You can set up ongoing testing to regularly test and gather new insights from your existing audience through unmoderated tests.
Some usability testing tools you can use directly with your Bubble app:
- Hotjar: for heatmaps and behavior analytics
- Mixpanel: for testing product hypotheses, user journeys, and user flow completion rates
- userbrain.com: for finding users and running tests
- Feedbucket: for collecting contextual feedback right within your app
- Usertesting.com: for recordings as users interact with your product
Test your app with real users with Bubble
An easy-to-use app is an app that will improve user satisfaction and adoption.
And the easiest way to make your app easy-to-use? Usability testing.
Now that you know the basics, you’re ready to start usability testing for your own app. And the easiest way to bring your app idea to life? Bubble.
When you build on Bubble, not only do you get easy usability testing options built-in, but you also get a full-stack, no-code development platform that allows you to bring your app idea to life faster than ever.
Build your prototype, test it, launch it, and keep iterating and scaling your idea — and do it all easier and more affordably on Bubble.
Build for as long as you want on the Free plan. Only upgrade when you're ready to launch.
Join Bubble