Netflix and chill? Let’s try Bubble and build.
Bubble is a no-code development tool that is changing the way makers from across the globe build software. Our powerful platform has made it easier than ever to start building software without having to write a single line of code. Our customers are using Bubble to build marketplaces, directories, and even social networks.
This post will uncover the process of using Bubble to replicate a whitelabel version of Netflix (software provided, but popcorn is BYO).
Whether you’re looking to build a dedicated streaming platform, or you’re just interested in utilizing some of the core features from Netflix, this guide will share how to start building the underlying logic for your no-code MVP.
Throughout this guide, we’ll highlight how to build the following key features from Netflix:
- The ability to upload content to the platform from a back-end portal
- A home page that can filter content by categories and content types (movies & TV shows)
- A search bar to navigate specific titles
- A feature for users to add content to their watch list
The steps to building Netflix with no code include:
Get Started
Before you start, you’ll need to first register your free Bubble account. Click the button below to get started, then you can follow along as we build our app together.
Register your account on Bubble
New to Bubble? Follow along on our Crash Course introductory videos to get familiar with the basics of Bubble.
We also recommend completing our introductory lessons, which will guide you through the step-by-step process of the most common Bubble features. This will help you get a running start when building your no-code Netflix clone.
When kickstarting your project, you can choose to begin by wireframing your product design, or building the necessary fields within your database.
In this case, we’ll start by using Bubbles visual design tool to shape the user-interface of our product. If you’re replicating the Netflix platform, some of the core pages you’ll want to include will be:
- A home page for display content by categories
- A dynamic preview page for each movie or TV show
- A portal for admins to upload content to the platform
A major feature of our no code editor is the ability to send data to a page. This means that you only need to create one generic version of a page that can reflect information about specific users or things from your database.
In layman’s terms, you’ll only need to create one page to showcase the preview content for each movie within your database. We can then write the necessary logic to display only the relevant content for each movie when it’s required (we’ll cover this in more detail soon).
Configuring your database
Once you’ve mapped out the display of your product, you can focus on creating the necessary data fields to power your application. We’ll rely on these fields to connect the logic behind your product.
Creating a database in Bubble is a seamless process. Start by listing your top-level data types, then add the necessary fields within each category.
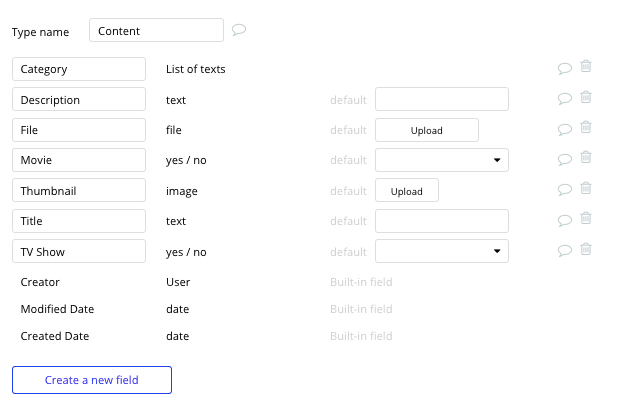
When building your Netflix MVP, we’ll need to create the following data types & fields:
Data Type: Content
Fields:
- Title
- Description
- Thumbnail image
- Content file
- Categories
- TV Show (yes/no)
- Movie (yes/no)
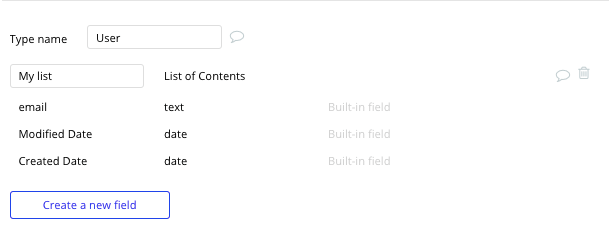
Data Type: User
- My list (list of existing data, type - content). Note: Creating a list based on an overall data type will allow you to seamlessly integrate all of its relevant data fields without having to create additional field values.
Uploading content
Now that you’ve configured your database, we can dive into building the workflows to power your product. The first feature we’ll create isn’t something that users will see directly, but is instead a back-end tool you’ll use to manage the content across the platform.
By building a portal where admins can upload content, it helps streamline the process of structuring the relevant fields across your movie library.
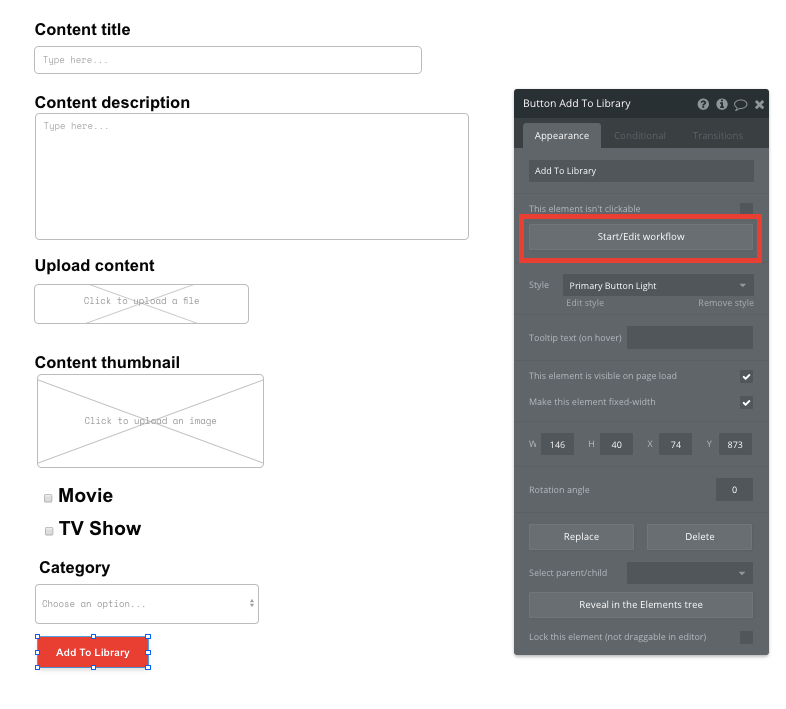
On your upload page, you’ll map the relevant input fields required for each piece of content. Once the upload button has been clicked, this will trigger a workflow that will add this to your database.
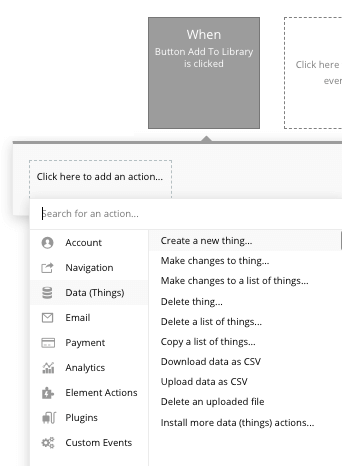
When building your workflow, we’ll need to create a new thing, configuring the data type to ‘content’.
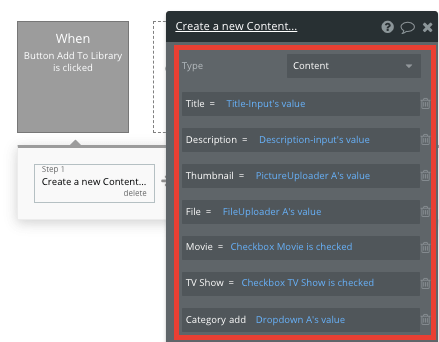
You’ll then match the relevant elements on your page to the data fields under the ‘content’ type in your database. Using a combination of text, image, file, and dropdown elements, it’s possible to add the necessary fields to properly structure each piece of content.
Displaying dynamic content
Once you’ve uploaded a catalogue of content, it’s time to start displaying this on a public-facing page that users can access.
Using Bubble’s repeating group element, you can display a list of dynamic data from your database, based on any configurations you set.
Note: Repeating groups are structured as a vertical format by default, but it’s possible to reconfigure the element to display horizontally.
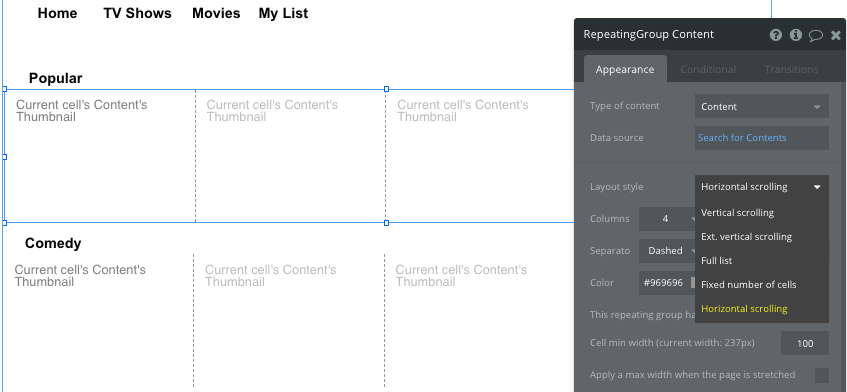
When replicating Netflix, we’ll need to use separate repeating groups for each variation of dynamic content you’d like to display. In this instance, we’ll need to create a new repeating group for each content category on the home page.
To start displaying data in your repeating group, you’ll need to first link the element to a data type within your database. This will help it identify what content it will need to display.
The type of content to display will be the ‘content’ field within your database. At this point, the repeating group will display a list of all the content you’ve uploaded, not just the relevant items for each category.
As a solution, we’ll add an additional constraint within the repeating group to only search for content that contains the category called ‘popular.’
Note: As an MVP, these categories can be manually written on your content upload page as free text fields. You’ll need to ensure that the spelling in your repeating group constraint matches the original input text you added.
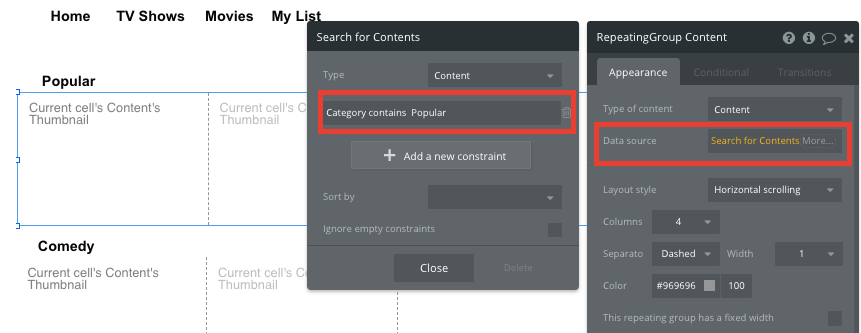
This will now only display the relevant content that has been added to the popular category. You’ll need to repeat this process for each category type you wish to include.
Tip: If you’d like to add additional pages dedicated to TV Shows or Movies, you can add another constraint to match the boolean input (movie or tv show) you classified on the upload page.
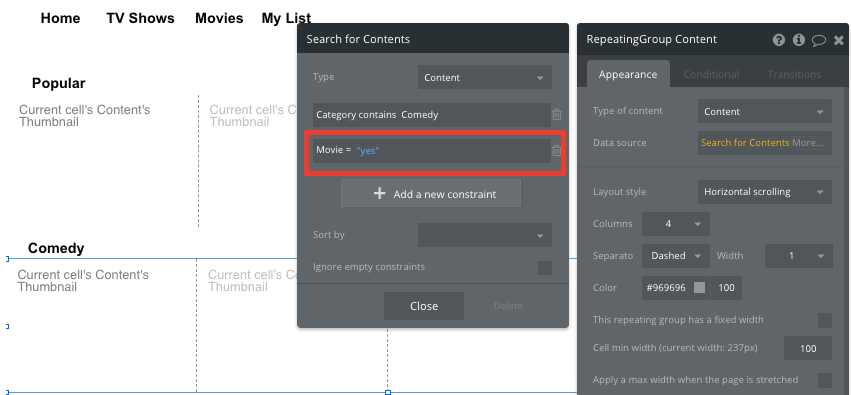
By adding this additional constraint, you can now create dedicated pages to the content style your users are searching for.
Once you’ve properly configured the repeating group, you’ll then need to add any dynamic content fields you wish to display in each column. For our Netflix MVP, we’re only going to display the thumbnail image of each movie.
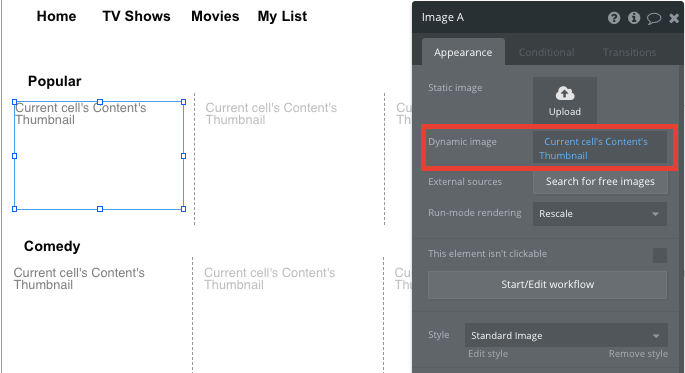
Sending data to dynamic pages
Once a user selects a movie or tv show to preview, we’ll need to display more information about the specific item.
From the repeating group, we can create events based on actions taken within each individual row. This feature will become useful when building navigational features across your platform.
Our Netflix home page only displays a feed of content thumbnails, but not any additional information such as the title or description of the content. This additional information will be hosted on the ‘content preview’ page of your application.
To direct a user to this page, you’ll need to build a navigational workflow that’s triggered when a thumbnail image is clicked.
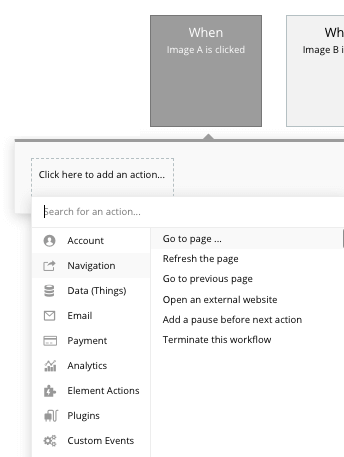
You’ll then need to send additional data to this page, allowing the Bubble editor to identify which specific movie to display. The data you’ll need to display is pulled from the current cells content.
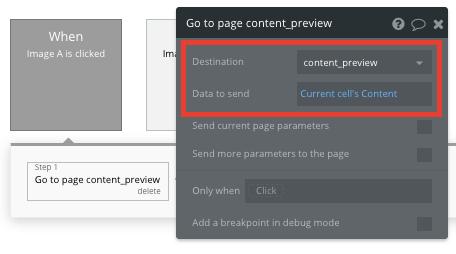
Display dynamic content on the preview page
Once data has been sent to the preview page, you can easily pull the relevant information and display this content for each movie.
You’ll first need to ensure that the destination page type matches the data property that you’re sending within the workflow. In this case, you’ll need to set the ‘preview page’ to a content property.
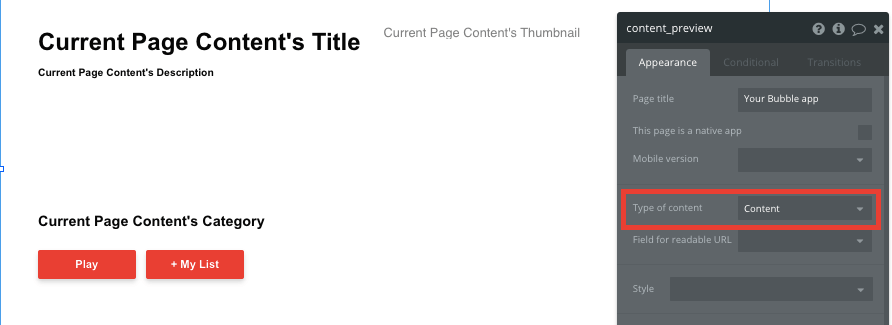
By classifying the type of content of a page, Bubble can easily pull and send relevant data from existing sources.
You can now start adding dynamic content into the fields that display information from a particular movie.
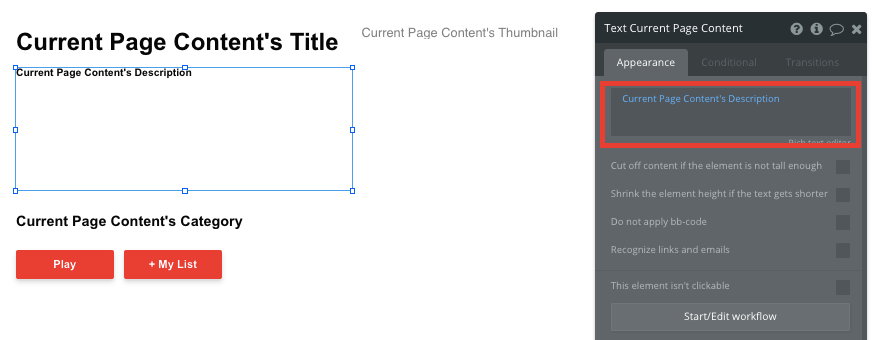
Searching for content
From your homepage, it’s also possible to redirect users to a specific title by integrating a search navigation element. A search bar is a powerful way to streamline the process of discovering particular content by its title.
After adding a search bar element to your home page, configure its parameters to search by the ‘content’ data type and the ‘title’ data field. This will index all entries and even offer search suggestions as they are typed.

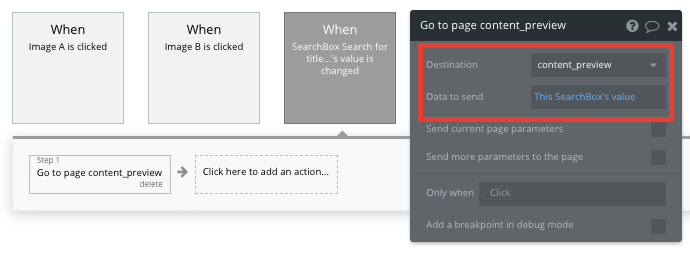
To send a user to the relevant movie preview page, navigate to your workflow editor, then create a new event that is triggered when the value of an element is changed. The element we’ll be working off, is of course, your search bar.
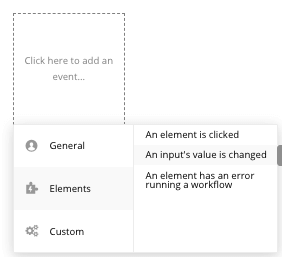
You’ll then create a navigation event, setting the destination page as your preview page - sending the data source from the search box’s current value.
Adding an item to a user's saved list
As with all great Netflix titles, there’s simply too much content to watch and not enough time in the day. By creating a ‘add to watch list’ feature, users can keep track of their favorite titles and watch them at another point in time.
To facilitate this feature, we’ll create a workflow that is triggered when a user clicks the ‘+ My list’ button on the content preview page.
Within this workflow, we’ll make changes to a thing, then add the current pages content to the current users watch list.
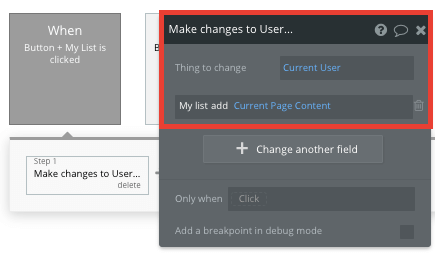
Once a user has started adding titles to their watch list, you can add an additional repeating group on the home page - only this time setting the data source to display content from a users watch list.
Playing content
Popcorn: check. The logic to power your Netflix MVP: check! It’s time to build the final feature - a video player that allows users to start streaming the files you’ve uploaded.
Using Bubble, there’s two options for achieving this process:
- Use our existing video element to embed a video player on your preview page. This player can easily integrate with existing streaming solutions like YouTube and Vimeo, saving you from having to upload a file to your database. You’ll simply need to add a YouTube link as the datasource for the video’s ID.
- A powerful feature within Bubble is the ability to also integrate third-party plugins that our development community have built. The HTML 5 Video Player plugin allows you to natively play any video format that HTML5 supports. This embedded player will integrate with the original video file you uploaded for each movie.
Additional features
Once you’re familiar with creating custom data fields and displaying dynamic content, you can start getting creative with the experiences you build.
Privacy & Security: Now that you have the basics of your app, don't forget to start setting some privacy rules and conditionals to keep your data secure - starting with roles in the 'Privacy' section of your Data tab. You can also check if you're unintentionally exposing any data with an API checker.
Additionally, you can create features to support:
- Upvoting and downvoting content
- Adding user reviews
- Including additional content recommendations on each preview page
Launch
Hiring a developer or dev team to build this app would cost thousands, if not tens-of-thousands of dollars. Well now you can treat yourself to a vacation because you can build and launch your app in Bubble for free.
As you launch and grow in users, paid plans allow you to host the app on your own custom domain, and these start as low as $25 per month. Some templates and plugins may cost more, but you can build all the functionality of a streaming platform without any additional costs.
Templates
If you don’t want to build your Netflix clone from scratch, you can purchase one of the templates made by our community members. Some similar templates to Netflix include:
- Flixly like Netflix by Rapid Dev
- Streaming like Spotify by Rapid Dev
Start Building
Bubble can help you build a Netflix clone or any other product you choose! It’s never been easier to build something incredible without having to code.
To get started for free, sign up here.
You can also connect with other passionate makers building with Bubble on our community forum.
Build your app on Bubble's Free plan. No need to upgrade until you're ready to launch your app.
Join Bubble